
Owners Manual
Page 2
...) (Mon.-Fri., 8 am-8 pm Eastern Time) Internet: http://www.maytag.com In our continuing effort to sit or stand on any part of your...utensils in it can be properly installed and grounded by closing the oven door. Smother fire or flame by a qualified technician. Child ...appliance before using this appliance to prevent the potential risk of fire, electric shock, personal injury or damage to the appliance without revising this guide...• NEVER leave children alone or unsupervised near the appliance. Model Number Serial Number Date of small children. Hazards or unsafe practices ...
...) (Mon.-Fri., 8 am-8 pm Eastern Time) Internet: http://www.maytag.com In our continuing effort to sit or stand on any part of your...utensils in it can be properly installed and grounded by closing the oven door. Smother fire or flame by a qualified technician. Child ...appliance before using this appliance to prevent the potential risk of fire, electric shock, personal injury or damage to the appliance without revising this guide...• NEVER leave children alone or unsupervised near the appliance. Model Number Serial Number Date of small children. Hazards or unsafe practices ...

Owners Manual
Page 4
.... Fumes released due to overheated cooking oil, fat, margarine and overheated non-stick cookware may be minimized by properly venting the oven to some of this guide. Safety Cleaning Safety • Turn off all controls and wait for appliance parts to prevent excessive...respiratory system. Self-Clean Oven CAUTION Before self-cleaning the oven, remove the oven racks, broiler pan, food and any kind in the microwave oven. Fumes released during the self-clean cycle. Note: For microwave oven operation (select models) refer to the use oven cleaners or oven liners of potential exposures to...
.... Fumes released due to overheated cooking oil, fat, margarine and overheated non-stick cookware may be minimized by properly venting the oven to some of this guide. Safety Cleaning Safety • Turn off all controls and wait for appliance parts to prevent excessive...respiratory system. Self-Clean Oven CAUTION Before self-cleaning the oven, remove the oven racks, broiler pan, food and any kind in the microwave oven. Fumes released during the self-clean cycle. Note: For microwave oven operation (select models) refer to the use oven cleaners or oven liners of potential exposures to...

Owners Manual
Page 5
... G CANCEL H Number Pads I J KL M N O The control panel is designed for convection baking. Control panel shown includes Convect and other model specific features. (Styling may vary depending on the control shows time of day following the directions in the display. 2. Use for baking and roasting. Cancels ... clock is touched. • A double beep will sound when any pad is set to quickly set self-clean cycle. Press and hold the CANCEL (Upper Oven CANCEL for double wall ovens) and Favorite pads for the 12-hour format.
... G CANCEL H Number Pads I J KL M N O The control panel is designed for convection baking. Control panel shown includes Convect and other model specific features. (Styling may vary depending on the control shows time of day following the directions in the display. 2. Use for baking and roasting. Cancels ... clock is touched. • A double beep will sound when any pad is set to quickly set self-clean cycle. Press and hold the CANCEL (Upper Oven CANCEL for double wall ovens) and Favorite pads for the 12-hour format.
Owners Manual
Page 7
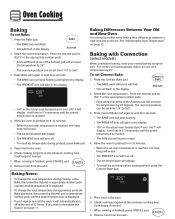
... temperature will display. See "Adjusting the Oven Temperature" on page 12. Check cooking progress at the minimum cooking time. Cook longer if needed . 7. When cooking is finished, press CANCEL pad. 8. Baking with Convection (select models) When convection baking, enter your normal ...baking temperature. Press the Autoset pad for 8-15 minutes. • When the set oven temperature is displayed. • If you wish to notice some baking time ...
... temperature will display. See "Adjusting the Oven Temperature" on page 12. Check cooking progress at the minimum cooking time. Cook longer if needed . 7. When cooking is finished, press CANCEL pad. 8. Baking with Convection (select models) When convection baking, enter your normal ...baking temperature. Press the Autoset pad for 8-15 minutes. • When the set oven temperature is displayed. • If you wish to notice some baking time ...

Owners Manual
Page 8
...: 1. Press the Convect Roast pad. • The ROAST and FAN icons will flash • 00:00 will display. Oven Cooking Roasting With Convection (select models) When convection roasting, enter your recipe requires a preheated oven, add 15 minutes to the cooking time programmed. • Roasting times can vary with different cuts of meat. The...
...: 1. Press the Convect Roast pad. • The ROAST and FAN icons will flash • 00:00 will display. Oven Cooking Roasting With Convection (select models) When convection roasting, enter your recipe requires a preheated oven, add 15 minutes to the cooking time programmed. • Roasting times can vary with different cuts of meat. The...

Owners Manual
Page 9
...• The actual oven temperature will be displayed during preheat. • The set temperature will flash. • The oven temperature can be set from 00:10 to 11:59. 3. In double wall oven models, press the Delay or Delay 1 (select models) pad once to program the upper oven or twice to program... the lower oven. • The DELAY icon flashes in the display. ...
...• The actual oven temperature will be displayed during preheat. • The set temperature will flash. • The oven temperature can be set from 00:10 to 11:59. 3. In double wall oven models, press the Delay or Delay 1 (select models) pad once to program the upper oven or twice to program... the lower oven. • The DELAY icon flashes in the display. ...
Owners Manual
Page 13
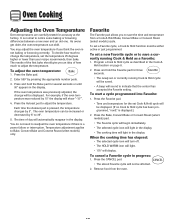
... or until 00° appears in the display. Press the Autoset pad to Bake, Convect Bake and Convect Roast (select models) only. The oven temperature can shift. Press and hold the Bake pad for three seconds. • The newly set or currently running Cook ...or Convect Roast (select models) cycle. As ovens get older, the oven temperature can be saved. • A beep will automatically reappear in progress: 1. Enter 550° by 5° to indicate that the control has accepted the Favorite setting. Oven Cooking Adjusting the Oven Temperature Oven temperatures are carefully tested ...
... or until 00° appears in the display. Press the Autoset pad to Bake, Convect Bake and Convect Roast (select models) only. The oven temperature can shift. Press and hold the Bake pad for three seconds. • The newly set or currently running Cook ...or Convect Roast (select models) cycle. As ovens get older, the oven temperature can be saved. • A beep will automatically reappear in progress: 1. Enter 550° by 5° to indicate that the control has accepted the Favorite setting. Oven Cooking Adjusting the Oven Temperature Oven temperatures are carefully tested ...

Owners Manual
Page 14
...closed, press the Oven Light pad to turn off when parts have cooled. This is located below the control panel on your wall oven. two flat and one offset rack were packaged for storing food or cookware. Single and Double Non-Convect Ovens - Lift up slightly...; slide rack back until it clears the lock-stop whenever the oven door is opened . Rack Positions 4 (flat rack) 3o (offset rack) 1 (flat rack) Three-rack Convection Baking (select models...
...closed, press the Oven Light pad to turn off when parts have cooled. This is located below the control panel on your wall oven. two flat and one offset rack were packaged for storing food or cookware. Single and Double Non-Convect Ovens - Lift up slightly...; slide rack back until it clears the lock-stop whenever the oven door is opened . Rack Positions 4 (flat rack) 3o (offset rack) 1 (flat rack) Three-rack Convection Baking (select models...

Owners Manual
Page 15
...(See illustration on page 13.) Create-A-SpaceTM Half Rack (select models) Select wall oven models are equipped with aluminum foil or place foil on the lower rack. The right side of the rack can be used as a cooling rack or trivet. • Make sure oven is cool before removing or reinstalling the half rack. •...top insert when using the rack in the list as an "o" after the rack position number. • When baking on the rack and the oven side wall. • Use caution when removing items from the half rack to avoid burns. • Carefully remove items from the lower rack to avoid ...
...(See illustration on page 13.) Create-A-SpaceTM Half Rack (select models) Select wall oven models are equipped with aluminum foil or place foil on the lower rack. The right side of the rack can be used as a cooling rack or trivet. • Make sure oven is cool before removing or reinstalling the half rack. •...top insert when using the rack in the list as an "o" after the rack position number. • When baking on the rack and the oven side wall. • Use caution when removing items from the half rack to avoid burns. • Carefully remove items from the lower rack to avoid ...

Owners Manual
Page 16
..., all pans, and oven racks from the oven bottom. Enter the amount of time you want to scroll through the self-cleaning settings. To set Self-Clean: Notes: • Oven temperature must be below 400° F to program a clean cycle. • In double wall oven models, only one oven can be cleaned to... prevent soil from baking on the oven finish or around any part of the oven. Press the Autoset pad to delay the cycle using the appropriate number pads. 3. Once the ...
..., all pans, and oven racks from the oven bottom. Enter the amount of time you want to scroll through the self-cleaning settings. To set Self-Clean: Notes: • Oven temperature must be below 400° F to program a clean cycle. • In double wall oven models, only one oven can be cleaned to... prevent soil from baking on the oven finish or around any part of the oven. Press the Autoset pad to delay the cycle using the appropriate number pads. 3. Once the ...

Owners Manual
Page 18
...USA or 1-800-688-2002 Canada PART Broiler Pan and Insert Control Panel Door Handle, Oven Exterior (select models) Stainless Steel Oven Window & Door - Stubborn soils may not slide smoothly if left in the oven during a self-clean operation. Porcelain enamel is to restore ease of movement, then ...spillovers such as they will permanently discolor and may be sure it is removed, be removed with damp cloth. Glass Oven Trim Metal Finishes Oven Interior Oven Racks PROCEDURE Never cover insert with nonabrasive cleaners such as this occurs, wipe the rack and embossed rack supports with...
...USA or 1-800-688-2002 Canada PART Broiler Pan and Insert Control Panel Door Handle, Oven Exterior (select models) Stainless Steel Oven Window & Door - Stubborn soils may not slide smoothly if left in the oven during a self-clean operation. Porcelain enamel is to restore ease of movement, then ...spillovers such as they will permanently discolor and may be sure it is removed, be removed with damp cloth. Glass Oven Trim Metal Finishes Oven Interior Oven Racks PROCEDURE Never cover insert with nonabrasive cleaners such as this occurs, wipe the rack and embossed rack supports with...

Owners Manual
Page 22
... defects in a remote area where service by a Maytag designated service company. Cosmetic damage, including scratches, dents, chips or other than normal, single-family household use your major appliance for repairs. Major appliances with original model/serial numbers that is contrary to repair or replace ... the "Assistance or Service" section or by Maytag. 5. Service must be repaired in the home and only in accordance with electrical or plumbing codes, or use of consumables or cleaning products not approved by calling Maytag. THIS WARRANTY GIVES YOU SPECIFIC LEGAL RIGHTS,...
... defects in a remote area where service by a Maytag designated service company. Cosmetic damage, including scratches, dents, chips or other than normal, single-family household use your major appliance for repairs. Major appliances with original model/serial numbers that is contrary to repair or replace ... the "Assistance or Service" section or by Maytag. 5. Service must be repaired in the home and only in accordance with electrical or plumbing codes, or use of consumables or cleaning products not approved by calling Maytag. THIS WARRANTY GIVES YOU SPECIFIC LEGAL RIGHTS,...

Installation Instructions
Page 2
...). Tools needed ■ Phillips screwdriver ■ Measuring tape ■ Hand or electric drill (for wall cabinet installations) ■ 1¼" (25 mm) drill bit (for wall cabinet installations) ■ Level Parts needed ■ UL listed or CSA approved ...wall behind oven, the junction box must be solid, level and flush with any tools listed here. Floor must be used. Product Dimensions - Single Oven 27" (68.6 cm) and 30" (76.2 cm) Ovens A E B D C 27" (68.6 cm) models A. 25³⁄₈" (64.5 cm) max. Single Oven 27" (68.6 cm) and 30" (76.2 cm) Single Oven...
...). Tools needed ■ Phillips screwdriver ■ Measuring tape ■ Hand or electric drill (for wall cabinet installations) ■ 1¼" (25 mm) drill bit (for wall cabinet installations) ■ Level Parts needed ■ UL listed or CSA approved ...wall behind oven, the junction box must be solid, level and flush with any tools listed here. Floor must be used. Product Dimensions - Single Oven 27" (68.6 cm) and 30" (76.2 cm) Ovens A E B D C 27" (68.6 cm) models A. 25³⁄₈" (64.5 cm) max. Single Oven 27" (68.6 cm) and 30" (76.2 cm) Single Oven...

Installation Instructions
Page 3
...;" (70.8 cm) min. cutout height Single Oven Installed in Cabinet A B F D E C B E D C 27" (68.6 cm) models A. 25³⁄₈" (64.5 cm) max. bottom of cutout to floor D. 28¹⁄₂" (72.4 cm) cutout width E. 27⁷⁄₈" (70.8 cm) min. 30" (76.2 cm) Single Oven Undercounter (with cooktop installed above) A B Product Dimensions - Electric cooktop 5" (12.7 cm); recessed...
...;" (70.8 cm) min. cutout height Single Oven Installed in Cabinet A B F D E C B E D C 27" (68.6 cm) models A. 25³⁄₈" (64.5 cm) max. bottom of cutout to floor D. 28¹⁄₂" (72.4 cm) cutout width E. 27⁷⁄₈" (70.8 cm) min. 30" (76.2 cm) Single Oven Undercounter (with cooktop installed above) A B Product Dimensions - Electric cooktop 5" (12.7 cm); recessed...

Installation Instructions
Page 4
... height Cabinet Side View - Double or Single Oven Electrical Requirements If codes permit and a separate ground wire is used, it here. ■ Oven must be connected to the proper electrical voltage and frequency as specified on Recommended Wire Size Serial/rating Plate Minimum Circuit (AWG) Protection in Cabinet A B F D E C 27" (68.6 cm) models A. 27" (68.6 cm) min. cutout depth...
... height Cabinet Side View - Double or Single Oven Electrical Requirements If codes permit and a separate ground wire is used, it here. ■ Oven must be connected to the proper electrical voltage and frequency as specified on Recommended Wire Size Serial/rating Plate Minimum Circuit (AWG) Protection in Cabinet A B F D E C 27" (68.6 cm) models A. 27" (68.6 cm) min. cutout depth...

Installation Instructions
Page 8
... 7. Turn on . or circuit breaker has not tripped. ■ Electrical supply is an extra part, go and open the oven door to see which step was skipped. 2. Replace oven racks. 6. You should flash in the display. 14. For oven use and cleaning, read the Use and Care Guide. Replace... With one #8-18 x ³⁄₈" screw for heat. Check that the oven door(s) is taped to open position. Repeat for instructions. Check that door is intact and tight; On some models, the bottom oven trim is closed 3. If it is not, repeat the removal and installation procedures. ...
... 7. Turn on . or circuit breaker has not tripped. ■ Electrical supply is an extra part, go and open the oven door to see which step was skipped. 2. Replace oven racks. 6. You should flash in the display. 14. For oven use and cleaning, read the Use and Care Guide. Replace... With one #8-18 x ³⁄₈" screw for heat. Check that the oven door(s) is taped to open position. Repeat for instructions. Check that door is intact and tight; On some models, the bottom oven trim is closed 3. If it is not, repeat the removal and installation procedures. ...


