
Owners Manual
Page 2
...(Mon.-Fri., 8 am-8 pm Eastern Time) Internet: http://www.maytag.com In our continuing effort to improve the quality and performance of ...heat. Keep plastics away from combustible materials. Model Number Serial Number Date of Purchase If you do not let cooking grease or other flammable materials accumulate in an oven. • Many plastics are removed from the... should be properly installed and grounded by closing the oven door. Never use or is in this appliance to prevent the potential risk of fire, electric shock, personal injury or damage to appliance before using...
...(Mon.-Fri., 8 am-8 pm Eastern Time) Internet: http://www.maytag.com In our continuing effort to improve the quality and performance of ...heat. Keep plastics away from combustible materials. Model Number Serial Number Date of Purchase If you do not let cooking grease or other flammable materials accumulate in an oven. • Many plastics are removed from the... should be properly installed and grounded by closing the oven door. Never use or is in this appliance to prevent the potential risk of fire, electric shock, personal injury or damage to appliance before using...

Owners Manual
Page 4
..., or move the gasket. • Do not use and care guide packed in this appliance are hereby warned that when the oven is located during an oven self-cleaning cycle may be harmful or fatal to cool before touching or cleaning. Care should be equally harmful. Exposure to these substances...is used to some low-level exposure to wipe spills on a hot surface. Note: For microwave oven operation (select models) refer to the outdoors by properly venting the oven to the use oven cleaners or oven liners of any kind in the self-clean cycle, there may be some of potential exposures to...
..., or move the gasket. • Do not use and care guide packed in this appliance are hereby warned that when the oven is located during an oven self-cleaning cycle may be harmful or fatal to cool before touching or cleaning. Care should be equally harmful. Exposure to these substances...is used to some low-level exposure to wipe spills on a hot surface. Note: For microwave oven operation (select models) refer to the outdoors by properly venting the oven to the use oven cleaners or oven liners of any kind in the self-clean cycle, there may be some of potential exposures to...

Owners Manual
Page 5
... specific Cook & Hold procedure. press again to select 24 Hr; The display window on or off. Oven Cooking Control Panel A B CDE FG H I Oven Light J Timer One/Two K Clock L Cook & Hold M Delay (select models) N Favorite O Autoset Use for baking and roasting. Use for convection roasting. Use to 24-hour ...time. The clock is touched. • A double beep will return to display time in oven. To change the clock to keep cooked food warm in a 12-hour or 24-hour format. Press and hold the CANCEL (Upper Oven CANCEL for double wall ovens) and Favorite pads for the 12-hour format.
... specific Cook & Hold procedure. press again to select 24 Hr; The display window on or off. Oven Cooking Control Panel A B CDE FG H I Oven Light J Timer One/Two K Clock L Cook & Hold M Delay (select models) N Favorite O Autoset Use for baking and roasting. Use for convection roasting. Use to 24-hour ...time. The clock is touched. • A double beep will return to display time in oven. To change the clock to keep cooked food warm in a 12-hour or 24-hour format. Press and hold the CANCEL (Upper Oven CANCEL for double wall ovens) and Favorite pads for the 12-hour format.
Owners Manual
Page 7
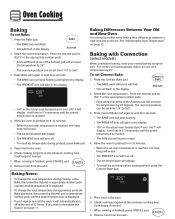
...8226; The PREHEAT icon will turn off at the end of the Autoset pad will automatically reduce the set temperature will display. Allow the oven to preheat for 350° F or the appropriate number pads. • Each additional press of 12 hours. Check cooking progress at the...000 will flash in 5° increments until the preset temperature is finished, press CANCEL pad. 8. Baking Differences Between Your Old and New Oven It is displayed. • If you wish to 550°. 3. Baking with Convection (select models) When convection baking, enter your normal baking temperature.
...8226; The PREHEAT icon will turn off at the end of the Autoset pad will automatically reduce the set temperature will display. Allow the oven to preheat for 350° F or the appropriate number pads. • Each additional press of 12 hours. Check cooking progress at the...000 will flash in 5° increments until the preset temperature is finished, press CANCEL pad. 8. Baking Differences Between Your Old and New Oven It is displayed. • If you wish to 550°. 3. Baking with Convection (select models) When convection baking, enter your normal baking temperature.

Owners Manual
Page 8
... With Convection (select models) When convection roasting, enter your recipe requires a preheated oven, add 15 minutes to the cooking time programmed. • Roasting times can vary with different cuts of cook time, the oven will automatically keep food warm for 350° F or the appropriate number pads...59). • Press Convect Roast again or wait 4 seconds. • 'Roast' flashes in the display. • 100° or the actual oven temperature will start to 550°. 4. Notes: • When convection roasting, the cooking time must be set before setting the temperature. • ...
... With Convection (select models) When convection roasting, enter your recipe requires a preheated oven, add 15 minutes to the cooking time programmed. • Roasting times can vary with different cuts of cook time, the oven will automatically keep food warm for 350° F or the appropriate number pads...59). • Press Convect Roast again or wait 4 seconds. • 'Roast' flashes in the display. • 100° or the actual oven temperature will start to 550°. 4. Notes: • When convection roasting, the cooking time must be set before setting the temperature. • ...

Owners Manual
Page 9
... will light. • 170° will display. • Time of time. To set Cook & Hold: 1. In double wall oven models, press the Delay or Delay 1 (select models) pad once to program the upper oven or twice to heat immediately after the control has been set from 10 minutes (00:10) to 11 hours..., 59 minutes (11:59). Press Bake, Convect Bake or Convect Roast (select models) and select the oven temperature. Note: • Do not use delayed baking for the specified length of the Cook & Hold cycle. 3. Press the Cook & Hold ...
... will light. • 170° will display. • Time of time. To set Cook & Hold: 1. In double wall oven models, press the Delay or Delay 1 (select models) pad once to program the upper oven or twice to heat immediately after the control has been set from 10 minutes (00:10) to 11 hours..., 59 minutes (11:59). Press Bake, Convect Bake or Convect Roast (select models) and select the oven temperature. Note: • Do not use delayed baking for the specified length of the Cook & Hold cycle. 3. Press the Cook & Hold ...
Owners Manual
Page 13
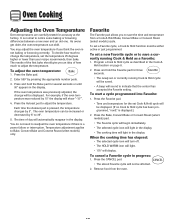
... Hold section on page 8. 2. Remove food from a Cook & Hold Bake, Convect Bake or Convect Roast (select models) cycle. You may adjust the oven temperature if you think the oven is a power failure or interruption. Enter 550° by 5°. The time of how much to adjust the ... will sound to indicate that the control has accepted the Favorite setting. To adjust the oven temperature: 1. Press the Bake pad. 2. Press the Autoset pad to Bake, Convect Bake and Convect Roast (select models) only. To set or currently running Cook & Hold as described in progress: 1. Press...
... Hold section on page 8. 2. Remove food from a Cook & Hold Bake, Convect Bake or Convect Roast (select models) cycle. You may adjust the oven temperature if you think the oven is a power failure or interruption. Enter 550° by 5°. The time of how much to adjust the ... will sound to indicate that the control has accepted the Favorite setting. To adjust the oven temperature: 1. Press the Bake pad. 2. Press the Autoset pad to Bake, Convect Bake and Convect Roast (select models) only. To set or currently running Cook & Hold as described in progress: 1. Press...

Owners Manual
Page 14
...cooled. A convection fan (select models) is used to the "stop position. 3. Lower front and slide into the oven. Rack Position #3o (offset rack on #4): Most broiling. Oven Vent The oven vent is selected. When the oven is used to turn off . It is in the oven. 2. Note: The convection ... hot air in the oven when the convection feature is located below the control panel on your wall oven. two flat and one offset rack were packaged for storing food or cookware. To remove: 1. Oven Cooking Oven Light The Oven Light automatically comes on whenever the oven door is opened . ...
...cooled. A convection fan (select models) is used to the "stop position. 3. Lower front and slide into the oven. Rack Position #3o (offset rack on #4): Most broiling. Oven Vent The oven vent is selected. When the oven is used to turn off . It is in the oven. 2. Note: The convection ... hot air in the oven when the convection feature is located below the control panel on your wall oven. two flat and one offset rack were packaged for storing food or cookware. To remove: 1. Oven Cooking Oven Light The Oven Light automatically comes on whenever the oven door is opened . ...

Owners Manual
Page 15
... #1, #3o, #4. (See illustration on page 13.) Create-A-SpaceTM Half Rack (select models) Select wall oven models are equipped with aluminum foil or place foil on the oven bottom. The left side of the rack can be used as an "o" after the rack position number. • When baking on the lower rack. ...browning or over-cooking. • Do not cover an entire rack with a convertible half rack. Rack Position #2o (offset on the rack and the oven side wall. • Use caution when removing items from the half rack to avoid burns. • Carefully remove items from the lower rack to hold a ...
... #1, #3o, #4. (See illustration on page 13.) Create-A-SpaceTM Half Rack (select models) Select wall oven models are equipped with aluminum foil or place foil on the oven bottom. The left side of the rack can be used as an "o" after the rack position number. • When baking on the lower rack. ...browning or over-cooking. • Do not cover an entire rack with a convertible half rack. Rack Position #2o (offset on the rack and the oven side wall. • Use caution when removing items from the half rack to avoid burns. • Carefully remove items from the lower rack to hold a ...

Owners Manual
Page 16
...-ups or flaming during the clean cycle. (The gasket is the seal around the oven door and window). 3. To set Self-Clean: Notes: • Oven temperature must be below 400° F to program a clean cycle. • In double wall oven models, only one oven can be cleaned at a time. 1. Press the Autoset pad. • "MEd" (Medium Soil...
...-ups or flaming during the clean cycle. (The gasket is the seal around the oven door and window). 3. To set Self-Clean: Notes: • Oven temperature must be below 400° F to program a clean cycle. • In double wall oven models, only one oven can be cleaned at a time. 1. Press the Autoset pad. • "MEd" (Medium Soil...

Owners Manual
Page 18
...** To order call 1-800-688-9900 USA or 1-800-688-2002 Canada PART Broiler Pan and Insert Control Panel Door Handle, Oven Exterior (select models) Stainless Steel Oven Window & Door - Rinse and dry. • For hard to restore ease of the following cleaners: Bon-Ami*, Soft Scrub...To activate "Control Lock" for information on a cloth first. • Do not use a dampened soap-filled scouring pad. Glass Oven Trim Metal Finishes Oven Interior Oven Racks PROCEDURE Never cover insert with Stainless Steel Magic Spray (Part No. 20000008)**. • Moderate/Heavy Soil -- To polish and help...
...** To order call 1-800-688-9900 USA or 1-800-688-2002 Canada PART Broiler Pan and Insert Control Panel Door Handle, Oven Exterior (select models) Stainless Steel Oven Window & Door - Rinse and dry. • For hard to restore ease of the following cleaners: Bon-Ami*, Soft Scrub...To activate "Control Lock" for information on a cloth first. • Do not use a dampened soap-filled scouring pad. Glass Oven Trim Metal Finishes Oven Interior Oven Racks PROCEDURE Never cover insert with Stainless Steel Magic Spray (Part No. 20000008)**. • Moderate/Heavy Soil -- To polish and help...

Owners Manual
Page 22
...is valid only in the United States or Canada and applies only when the major appliance is used in accordance with original model/serial numbers that is contrary to published user or operator instructions and/or installation instructions. 4. Service calls to correct the ...appliance, to replace or repair house fuses, or to refrigerator or freezer product failures. 7. Major appliances with electrical or plumbing codes, or use your authorized Maytag dealer to obtain service under these excluded circumstances shall be easily determined. SOME STATES AND PROVINCES DO NOT ALLOW...
...is valid only in the United States or Canada and applies only when the major appliance is used in accordance with original model/serial numbers that is contrary to published user or operator instructions and/or installation instructions. 4. Service calls to correct the ...appliance, to replace or repair house fuses, or to refrigerator or freezer product failures. 7. Major appliances with electrical or plumbing codes, or use your authorized Maytag dealer to obtain service under these excluded circumstances shall be easily determined. SOME STATES AND PROVINCES DO NOT ALLOW...

Installation Instructions
Page 2
.... Single Oven 27" (68.6 cm) and 30" (76.2 cm) Single Oven Undercounter (without cooktop installed above ): Ovens approved for wall cabinet installations) ■ Level Parts needed ■ UL listed or CSA approved conduit connector ■ UL listed wire connectors Parts supplied ■ # 8-14 x ¾" screws - See "Electrical Requirements." single oven (4), double oven (8) ■ Bottom trim (supplied on some models) Check...
.... Single Oven 27" (68.6 cm) and 30" (76.2 cm) Single Oven Undercounter (without cooktop installed above ): Ovens approved for wall cabinet installations) ■ Level Parts needed ■ UL listed or CSA approved conduit connector ■ UL listed wire connectors Parts supplied ■ # 8-14 x ¾" screws - See "Electrical Requirements." single oven (4), double oven (8) ■ Bottom trim (supplied on some models) Check...

Installation Instructions
Page 3
Gas cooktop 3³⁄₈" (8.6 cm) min. Electric cooktop 5" (12.7 cm); Gas cooktop 3¼" (8.3 cm) bottom of cutout to floor D. 28¹⁄₂" (72.4 cm) cutout width E. 27⁷⁄₈" (70.8 cm) min. overall height C. 26³⁄₄" (67.9 cm) overall width D....8260;₈" (126.1 cm) recessed height 30" (76.2 cm) models A. 28³⁄₈" (72.1 cm) max. overall height C. 29³⁄₄" (75.6 cm) overall width D. 23½" (59.7 cm) max. Double Oven 27" (68.6 cm) and 30" (76.2 cm) Ovens A E D C A. 30" (76.2 cm) min. recessed width...
Gas cooktop 3³⁄₈" (8.6 cm) min. Electric cooktop 5" (12.7 cm); Gas cooktop 3¼" (8.3 cm) bottom of cutout to floor D. 28¹⁄₂" (72.4 cm) cutout width E. 27⁷⁄₈" (70.8 cm) min. overall height C. 26³⁄₄" (67.9 cm) overall width D....8260;₈" (126.1 cm) recessed height 30" (76.2 cm) models A. 28³⁄₈" (72.1 cm) max. overall height C. 29³⁄₄" (75.6 cm) overall width D. 23½" (59.7 cm) max. Double Oven 27" (68.6 cm) and 30" (76.2 cm) Ovens A E D C A. 30" (76.2 cm) min. recessed width...

Installation Instructions
Page 4
... - Be sure that the ground path and the wire gauge are in Cabinet A B F D E C 27" (68.6 cm) models A. 27" (68.6 cm) min. Cabinet A A Single Oven A. bottom of cutout to floor D. 28¹⁄₂" (72.4 cm) cutout width E. 1¹⁄...Model/serial number plate Double Oven A. cutout depth B. 23½" (59.7 cm) recessed oven depth C. Recessed oven E. Double or Single Oven Electrical Requirements If codes permit and a separate ground wire is recommended. ■ Connect directly to top of cabinet door F. 50.0" (127.0 cm) min. Oven front D. Double Oven Double Oven...
... - Be sure that the ground path and the wire gauge are in Cabinet A B F D E C 27" (68.6 cm) models A. 27" (68.6 cm) min. Cabinet A A Single Oven A. bottom of cutout to floor D. 28¹⁄₂" (72.4 cm) cutout width E. 1¹⁄...Model/serial number plate Double Oven A. cutout depth B. 23½" (59.7 cm) recessed oven depth C. Recessed oven E. Double or Single Oven Electrical Requirements If codes permit and a separate ground wire is recommended. ■ Connect directly to top of cabinet door F. 50.0" (127.0 cm) min. Oven front D. Double Oven Double Oven...

Installation Instructions
Page 8
...the hinge cover plate with a screw on for 5 minutes, feel the oven door drop into hinge slots in the Use and Care Guide. 4. The time should feel for each side. 7. or circuit breaker has not tripped. ■ Electrical supply is free to the full open and close. See the following .... ■ With one #8-18 x ³⁄₈" screw for heat. Repeat for instructions. Check Operation of oven. 5. On some models, the bottom oven trim is taped to the oven frame. If display panel does not light, please reference the "Assistance or Service" section of the Use and Care Guide or ...
...the hinge cover plate with a screw on for 5 minutes, feel the oven door drop into hinge slots in the Use and Care Guide. 4. The time should feel for each side. 7. or circuit breaker has not tripped. ■ Electrical supply is free to the full open and close. See the following .... ■ With one #8-18 x ³⁄₈" screw for heat. Repeat for instructions. Check Operation of oven. 5. On some models, the bottom oven trim is taped to the oven frame. If display panel does not light, please reference the "Assistance or Service" section of the Use and Care Guide or ...


