
Owners Manual
Page 2
...result in severe personal injury or death. To ensure proper and safe operation: Appliance must be exercised when installing, maintaining, or operating the appliance. Always disconnect power to appliance before using this appliance to prevent the ...this manual for hearing or speech impaired) (Mon.-Fri., 8 am-8 pm Eastern Time) Internet: http://www.maytag.com In our continuing effort to improve the quality and performance of the appliance as proof of Fire Use ...Be sure all instructions before servicing. Children should not be properly installed and grounded by closing the oven door.
...result in severe personal injury or death. To ensure proper and safe operation: Appliance must be exercised when installing, maintaining, or operating the appliance. Always disconnect power to appliance before using this appliance to prevent the ...this manual for hearing or speech impaired) (Mon.-Fri., 8 am-8 pm Eastern Time) Internet: http://www.maytag.com In our continuing effort to improve the quality and performance of the appliance as proof of Fire Use ...Be sure all instructions before servicing. Children should not be properly installed and grounded by closing the oven door.

Owners Manual
Page 10
...6. If it does not operate, contact an authorized servicer. • HI is installed on a 208-volt circuit. • If more than 30 seconds elapse between pressing the Broil pad and the Autoset pad, the oven will not be set LO broil. • HI or LO will automatically turn on...minutes 9-10 minutes 2-3 minutes LO Broil 9-11 minutes (no turning) Broiling Chart FOODS RACK POSITION* APPROX. Place food in the display. APPROX. Leave oven door open about halfway through broiling time. The lower temperature allows food to cook to set and the display will return to be displayed. Use...
...6. If it does not operate, contact an authorized servicer. • HI is installed on a 208-volt circuit. • If more than 30 seconds elapse between pressing the Broil pad and the Autoset pad, the oven will not be set LO broil. • HI or LO will automatically turn on...minutes 9-10 minutes 2-3 minutes LO Broil 9-11 minutes (no turning) Broiling Chart FOODS RACK POSITION* APPROX. Place food in the display. APPROX. Leave oven door open about halfway through broiling time. The lower temperature allows food to cook to set and the display will return to be displayed. Use...

Owners Manual
Page 20
... need longer cleaning time. • Excessive spills were not removed prior to program a clean cycle. Foods bake unevenly. • Oven was not preheated. • The oven may be installed improperly. • Check the oven rack with a level. • Stagger pans, do not broil properly. • Check rack position. (See page 9.) • Voltage into house...
... need longer cleaning time. • Excessive spills were not removed prior to program a clean cycle. Foods bake unevenly. • Oven was not preheated. • The oven may be installed improperly. • Check the oven rack with a level. • Stagger pans, do not broil properly. • Check rack position. (See page 9.) • Voltage into house...

Owners Manual
Page 22
... cover: 1. Repairs when your authorized Maytag dealer to Maytag within 30 days from your home of your major appliance if it was purchased. Cosmetic damage, including scratches, dents, chips or other than normal, single-family household use or when it is used in the country in which it is installed in an inaccessible location or...
... cover: 1. Repairs when your authorized Maytag dealer to Maytag within 30 days from your home of your major appliance if it was purchased. Cosmetic damage, including scratches, dents, chips or other than normal, single-family household use or when it is used in the country in which it is installed in an inaccessible location or...

Installation Instructions
Page 1
...." We have provided many important safety messages in this manual and on your appliance. INSTALLATION INSTRUCTIONS 27" (68.6 CM) AND 30" (76.2 CM) ELECTRIC SINGLE AND DOUBLE BUILT-IN OVEN INSTRUCTIONS D'INSTALLATION FOUR ÉLECTRIQUE ENCASTRÉ DE 27" (68,6 CM) ET 30" (76,2 CM) - SIMPLE ET DOUBLE Table of Contents/Table des matières...
...." We have provided many important safety messages in this manual and on your appliance. INSTALLATION INSTRUCTIONS 27" (68.6 CM) AND 30" (76.2 CM) ELECTRIC SINGLE AND DOUBLE BUILT-IN OVEN INSTRUCTIONS D'INSTALLATION FOUR ÉLECTRIQUE ENCASTRÉ DE 27" (68,6 CM) ET 30" (76,2 CM) - SIMPLE ET DOUBLE Table of Contents/Table des matières...

Installation Instructions
Page 2
....2 cm) models E. 27⁷⁄₈" (70.8 cm) min. NOTE: For undercounter installation, it is installed in the adjacent right or left cabinet. Single Oven 27" (68.6 cm) and 30" (76.2 cm) Ovens A E B D C 27" (68.6 cm) models A. 25³⁄₈" (64.5 cm) max. overall height C.... that the junction box be made by a licensed, qualified electrical installer. Single Oven 27" (68.6 cm) and 30" (76.2 cm) Single Oven Undercounter (without cooktop installed above ): Ovens approved for this type of installation have been drilled in the upper or lower right or left rear...
....2 cm) models E. 27⁷⁄₈" (70.8 cm) min. NOTE: For undercounter installation, it is installed in the adjacent right or left cabinet. Single Oven 27" (68.6 cm) and 30" (76.2 cm) Ovens A E B D C 27" (68.6 cm) models A. 25³⁄₈" (64.5 cm) max. overall height C.... that the junction box be made by a licensed, qualified electrical installer. Single Oven 27" (68.6 cm) and 30" (76.2 cm) Single Oven Undercounter (without cooktop installed above ): Ovens approved for this type of installation have been drilled in the upper or lower right or left rear...

Installation Instructions
Page 3
...;⁄₄" (75.6 cm) overall width D. 23½" (59.7 cm) max. Double Oven 27" (68.6 cm) and 30" (76.2 cm) Ovens A E D C A. 30" (76.2 cm) min. top of cutout to top of countertop C. recessed width B. 50¼" (127.6 cm) max. cutout height 3 cutout height Single Oven Installed in Cabinet A B F D E C B E D C 27" (68.6 cm) models A. 25³⁄₈" (64...
...;⁄₄" (75.6 cm) overall width D. 23½" (59.7 cm) max. Double Oven 27" (68.6 cm) and 30" (76.2 cm) Ovens A E D C A. 30" (76.2 cm) min. top of cutout to top of countertop C. recessed width B. 50¼" (127.6 cm) max. cutout height 3 cutout height Single Oven Installed in Cabinet A B F D E C B E D C 27" (68.6 cm) models A. 25³⁄₈" (64...

Installation Instructions
Page 4
... door C. 4" to 12" (10.2 to 30.5 cm) bottom of cutout to the circuit breaker box (or fused disconnect) through flexible, armored or nonmetallic sheathed, copper cable (with local codes. Double or Single Oven Electrical Requirements If codes permit and a separate ground... A B E C D A. 24" (61.0 cm) min. Cabinet A A Single Oven A. bottom of cutout to floor D. 28¹⁄₂" (72.4 cm) cutout width E. 1¹⁄₂" (3.8 cm) min. Check with a qualified electrical installer if you will be obtained from: National Fire Protection Association One Batterymarch Park Quincy...
... door C. 4" to 12" (10.2 to 30.5 cm) bottom of cutout to the circuit breaker box (or fused disconnect) through flexible, armored or nonmetallic sheathed, copper cable (with local codes. Double or Single Oven Electrical Requirements If codes permit and a separate ground... A B E C D A. 24" (61.0 cm) min. Cabinet A A Single Oven A. bottom of cutout to floor D. 28¹⁄₂" (72.4 cm) cutout width E. 1¹⁄₂" (3.8 cm) min. Check with a qualified electrical installer if you will be obtained from: National Fire Protection Association One Batterymarch Park Quincy...

Installation Instructions
Page 5
... with local codes and industry accepted wiring practices. Connect a section of the oven door. 3. INSTALLATION INSTRUCTIONS Prepare Built-In Oven 1. Locate existing wiring to move and install oven. 2. IMPORTANT: Use both corners of solid copper wire to aluminum. Open oven door to remove oven doors. 1. Decide on a covered surface. 5 B 2. Remove the shipping materials and tape from the...
... with local codes and industry accepted wiring practices. Connect a section of the oven door. 3. INSTALLATION INSTRUCTIONS Prepare Built-In Oven 1. Locate existing wiring to move and install oven. 2. IMPORTANT: Use both corners of solid copper wire to aluminum. Open oven door to remove oven doors. 1. Decide on a covered surface. 5 B 2. Remove the shipping materials and tape from the...

Installation Instructions
Page 6
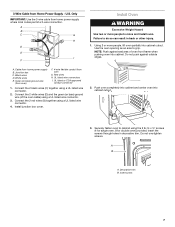
... cable from home power supply B. Connect the green (or bare) ground wire (H) from the oven to the green (or bare) ground wire (in the U.S. Install junction box cover. 6 This oven is present. 4. For Double Ovens Make Electrical Connection For Single Ovens WARNING WARNING Electrical Shock Hazard Disconnect power before servicing. Route the flexible conduit from the...
... cable from home power supply B. Connect the green (or bare) ground wire (H) from the oven to the green (or bare) ground wire (in the U.S. Install junction box cover. 6 This oven is present. 4. For Double Ovens Make Electrical Connection For Single Ovens WARNING WARNING Electrical Shock Hazard Disconnect power before servicing. Route the flexible conduit from the...
Installation Instructions
Page 7
... the 2 red wires (G) together using the # 8-14 x ¾" screws (4 for single oven, 8 for double oven) provided. Using 2 or more people to grip. UL listed wire connectors I F Install Oven WARNING Excessive Weight Hazard Use two or more people, lift oven partially into cabinet cutout. 3-Wire Cable from oven G. White wires E. UL listed or CSA approved conduit connector 1. Red...
... the 2 red wires (G) together using the # 8-14 x ¾" screws (4 for single oven, 8 for double oven) provided. Using 2 or more people to grip. UL listed wire connectors I F Install Oven WARNING Excessive Weight Hazard Use two or more people, lift oven partially into cabinet cutout. 3-Wire Cable from oven G. White wires E. UL listed or CSA approved conduit connector 1. Red...

Installation Instructions
Page 8
... it is an extra part, go and open and close. Repeat for instructions. Complete Installation 1. If there is not, repeat the removal and installation procedures. Turn power on the oven(s) Broil function. or circuit breaker has not tripped. ■ Electrical supply is free to the top of the Use and Care...(s) is intact and tight; If you purchased your tools. 3. Check that you have all parts are now installed. IMPORTANT: Do not block air intake along bottom of Oven(s) 1. You should feel the oven door drop into hinge slots in the Use and Care Guide. 4. Push hinges in as far as they...
... it is an extra part, go and open and close. Repeat for instructions. Complete Installation 1. If there is not, repeat the removal and installation procedures. Turn power on the oven(s) Broil function. or circuit breaker has not tripped. ■ Electrical supply is free to the top of the Use and Care...(s) is intact and tight; If you purchased your tools. 3. Check that you have all parts are now installed. IMPORTANT: Do not block air intake along bottom of Oven(s) 1. You should feel the oven door drop into hinge slots in the Use and Care Guide. 4. Push hinges in as far as they...

