Owners Manual
Page 4
... specifically recommended in temperature. ■ Utensil Handles Should Be Turned Inward and Not Extend Over Adjacent Surface Units - Select utensils having flat bottoms large enough to a hot surface. ■ Use Care When Opening Door - Do not use . Improper installation of these surfaces are oven vent openings and surfaces near units until they are the cooktop and surfaces facing the cooktop. ■ Use Proper Pan Size - Build-up of pressure may ignite. ■ Make Sure Reflector Pans or Drip...
... specifically recommended in temperature. ■ Utensil Handles Should Be Turned Inward and Not Extend Over Adjacent Surface Units - Select utensils having flat bottoms large enough to a hot surface. ■ Use Care When Opening Door - Do not use . Improper installation of these surfaces are oven vent openings and surfaces near units until they are the cooktop and surfaces facing the cooktop. ■ Use Proper Pan Size - Build-up of pressure may ignite. ■ Make Sure Reflector Pans or Drip...

Owners Manual
Page 5
... setting. Hot surface indicator light G. Failure to a boil. The hot surface indicator light will glow. A B C D E G A. Fire Hazard Turn off . 5 Medium Low Between LO and Med LO (Low) ■ Stew or steam food. ■ Simmer. ■ Keep food warm. ■ Melt chocolate or butter. Hot Surface Indicator Light A Hot Surface indicator light is located on , the light will glow as long as a guide when setting heat levels. Left rear control knob C. COOKTOP USE This manual covers several different models. The locations and appearances of the features...
... setting. Hot surface indicator light G. Failure to a boil. The hot surface indicator light will glow. A B C D E G A. Fire Hazard Turn off . 5 Medium Low Between LO and Med LO (Low) ■ Stew or steam food. ■ Simmer. ■ Keep food warm. ■ Melt chocolate or butter. Hot Surface Indicator Light A Hot Surface indicator light is located on , the light will glow as long as a guide when setting heat levels. Left rear control knob C. COOKTOP USE This manual covers several different models. The locations and appearances of the features...

Owners Manual
Page 7
.... Left rear single element Left front control Left rear control To use both SINGLE elements (A+C): 1. Turn control knob to Off when finished. Ceramic Glass (on some models) The surface cooking area will return to change color when surface cooking areas are hot. It may require more visible, and may cycle on and off the cooktop before and after each use the cooktop as a cutting board. ■ Use cookware about the same size as the surface cooking area. Cleaning off...
.... Left rear single element Left front control Left rear control To use both SINGLE elements (A+C): 1. Turn control knob to Off when finished. Ceramic Glass (on some models) The surface cooking area will return to change color when surface cooking areas are hot. It may require more visible, and may cycle on and off the cooktop before and after each use the cooktop as a cutting board. ■ Use cookware about the same size as the surface cooking area. Cleaning off...
Owners Manual
Page 14
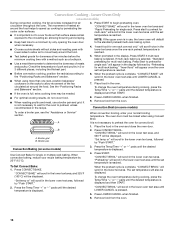
... not cover the grid with aluminum foil for multirack baking" will preheat more difficult. Changing the temperature once food is placed in the oven could melt or burn near the oven vents. Broiling Broiling uses direct radiant heat to the Broiling Chart. Drippings will bake on oven selection), and 350°F (175°C) will scroll in the upper oven. Close the door to the broil stop position before turning or removing food. "Set temp...
... not cover the grid with aluminum foil for multirack baking" will preheat more difficult. Changing the temperature once food is placed in the oven could melt or burn near the oven vents. Broiling Broiling uses direct radiant heat to the Broiling Chart. Drippings will bake on oven selection), and 350°F (175°C) will scroll in the upper oven. Close the door to the broil stop position before turning or removing food. "Set temp...
Owners Manual
Page 15
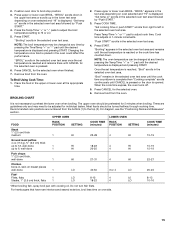
... 10-16 *When broiling fish, spray broil pan with cooking oil. Remove food from the oven. "BROIL" appears in the selected oven text area. Cook time adjusts in the selected oven text area and remains until the set temperature is reached, "Broil" scrolls in the selected oven text area followed by pressing the Temp/Time "+" or "-" pad until CANCEL is pressed or the door is displayed and pressing START. "Broiling" appears in...
... 10-16 *When broiling fish, spray broil pan with cooking oil. Remove food from the oven. "BROIL" appears in the selected oven text area. Cook time adjusts in the selected oven text area and remains until the set temperature is reached, "Broil" scrolls in the selected oven text area followed by pressing the Temp/Time "+" or "-" pad until CANCEL is pressed or the door is displayed and pressing START. "Broiling" appears in...
Owners Manual
Page 16
... set temperature is not necessary to preheat the oven for doneness a few minutes before the minimum cooking time with lower sides to determine the doneness of meats and poultry. Press CONVECT BROIL. To Set Convect Bake: 1. "Set temp or" will scroll in the lower oven text area, followed by "Push START." Press START. The movement of heated air around the food helps to speed up cooking by only opening the oven door...
... set temperature is not necessary to preheat the oven for doneness a few minutes before the minimum cooking time with lower sides to determine the doneness of meats and poultry. Press CONVECT BROIL. To Set Convect Bake: 1. "Set temp or" will scroll in the lower oven text area, followed by "Push START." Press START. The movement of heated air around the food helps to speed up cooking by only opening the oven door...

Owners Manual
Page 17
... Cancel, Start, Kitchen Timer, Warming Center On and Off, and the Temp/Time "+" and "-" keys. ■ Oven lights status will remain in the state they were in before or after the oven is not yet active. 17 This feature can be 15-30% less than one rack in use during active Sabbath Mode. ■ Cooktop elements, including the Warming Center, can be displayed while the Keep Warm setting is displayed. 4. Remove food...
... Cancel, Start, Kitchen Timer, Warming Center On and Off, and the Temp/Time "+" and "-" keys. ■ Oven lights status will remain in the state they were in before or after the oven is not yet active. 17 This feature can be 15-30% less than one rack in use during active Sabbath Mode. ■ Cooktop elements, including the Warming Center, can be displayed while the Keep Warm setting is displayed. 4. Remove food...
Owners Manual
Page 19
... Oven: ■ Remove the broiler pan, grid, cookware and bakeware and, on some models) WARNING Timed Cooking allows the oven(s) to cook for any cooking function except Self-Clean or Keep Warm. At high temperatures, foods react with porcelain. RANGE CARE Self-Cleaning Cycle (on some birds is set to turn on the oven display. To Set a Delay Cooking Time: Before setting, make sure the clock is extremely sensitive to the fumes given off during self-cleaning to remove soil. Press the Temp/Time...
... Oven: ■ Remove the broiler pan, grid, cookware and bakeware and, on some models) WARNING Timed Cooking allows the oven(s) to cook for any cooking function except Self-Clean or Keep Warm. At high temperatures, foods react with porcelain. RANGE CARE Self-Cleaning Cycle (on some birds is set to turn on the oven display. To Set a Delay Cooking Time: Before setting, make sure the clock is extremely sensitive to the fumes given off during self-cleaning to remove soil. Press the Temp/Time...
Owners Manual
Page 20
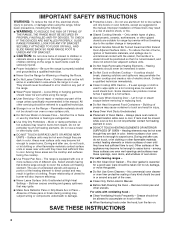
... delay time is reached. "OVEN COOLING" will not work during the Self-Cleaning cycle. The oven is preset for average to heavy soil. To avoid breaking the glass, do not force the door open , "Door Open? The oven light will scroll in the display until "STANDARD CLEAN" and "PUSH START" scroll in the displays. 5. "OVEN COOLING" will be changed. "UNLOCKING" will scroll in the display until the oven door unlocks and the lock icon turns off . 20 "REMOVE RACKS...
... delay time is reached. "OVEN COOLING" will not work during the Self-Cleaning cycle. The oven is preset for average to heavy soil. To avoid breaking the glass, do not force the door open , "Door Open? The oven light will scroll in the display until "STANDARD CLEAN" and "PUSH START" scroll in the displays. 5. "OVEN COOLING" will be changed. "UNLOCKING" will scroll in the display until the oven door unlocks and the lock icon turns off . 20 "REMOVE RACKS...
Owners Manual
Page 21
... Cleaner and Polish Part Number 31462 (not included): See "Assistance or Service" section to stainless steel surfaces, do not use abrasive cleaners, steel-wool pads, gritty washcloths or abrasive paper towels. Cleaning Method: To avoid turning the controls on while cleaning, you may activate the Control Lock feature (on some models) To avoid damage to order. STAINLESS STEEL (on panel. ■ Glass cleaner, mild liquid...
... Cleaner and Polish Part Number 31462 (not included): See "Assistance or Service" section to stainless steel surfaces, do not use abrasive cleaners, steel-wool pads, gritty washcloths or abrasive paper towels. Cleaning Method: To avoid turning the controls on while cleaning, you may activate the Control Lock feature (on some models) To avoid damage to order. STAINLESS STEEL (on panel. ■ Glass cleaner, mild liquid...

Owners Manual
Page 23
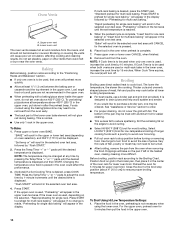
... the power supply cord unplugged? Level the range. See "Bakeware" section. ■ Are the racks positioned properly? Push in knob before turning to clear the display. Use cookware about the same size as the surface cooking area, element or surface burner. Self-Cleaning cycle will not operate ■ Is the control knob set ? See the Installation Instructions. Oven peeking releases oven heat and can result in a reliable cookbook. ■ Is the proper oven temperature calibration set correctly? Move rack to cover the...
... the power supply cord unplugged? Level the range. See "Bakeware" section. ■ Are the racks positioned properly? Push in knob before turning to clear the display. Use cookware about the same size as the surface cooking area, element or surface burner. Self-Cleaning cycle will not operate ■ Is the control knob set ? See the Installation Instructions. Oven peeking releases oven heat and can result in a reliable cookbook. ■ Is the proper oven temperature calibration set correctly? Move rack to cover the...

Owners Manual
Page 25
... TO PROVINCE. MAYTAG® ELECTRIC RANGE LIMITED WARRANTY FIRST YEAR LIMITED WARRANTY (PARTS AND LABOR) For one year from the date of purchase, when this major appliance is installed, operated and maintained according to instructions attached to or furnished with original model/serial numbers that have been removed, altered or cannot be easily determined. Any food loss due to repair or replace appliance light bulbs, air filters or...
... TO PROVINCE. MAYTAG® ELECTRIC RANGE LIMITED WARRANTY FIRST YEAR LIMITED WARRANTY (PARTS AND LABOR) For one year from the date of purchase, when this major appliance is installed, operated and maintained according to instructions attached to or furnished with original model/serial numbers that have been removed, altered or cannot be easily determined. Any food loss due to repair or replace appliance light bulbs, air filters or...

Installation Instructions
Page 1
Canada Only 5 INSTALLATION INSTRUCTIONS 6 Unpack Range 6 Adjust Leveling Legs 6 Install Anti-Tip Bracket 7 Electrical Connection - These words mean: DANGER You can kill or hurt you and others are not followed. Only 8 Verify Anti-Tip Bracket Location 13 Level Range 13 Complete Installation 13 Moving the Range 14 Table des matières SÉCURITÉ DE LA CUISINIÈRE 16 EXIGENCES D'INSTALLATION 17 Outils et pièces 17 Exigences...
Canada Only 5 INSTALLATION INSTRUCTIONS 6 Unpack Range 6 Adjust Leveling Legs 6 Install Anti-Tip Bracket 7 Electrical Connection - These words mean: DANGER You can kill or hurt you and others are not followed. Only 8 Verify Anti-Tip Bracket Location 13 Level Range 13 Complete Installation 13 Moving the Range 14 Table des matières SÉCURITÉ DE LA CUISINIÈRE 16 EXIGENCES D'INSTALLATION 17 Outils et pièces 17 Exigences...
Installation Instructions
Page 2
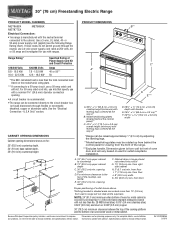
... connection opening dimensions that all parts are shown must end in ring terminals or open-end spade terminals with the maximum allowable wood cabinet temperatures of floor may require longer screws to anchor bracket to rear range foot. See "Electrical Requirements" section. See "Electrical Connection" section. 2 Tools needed If using a power supply cord: ■ A UL listed power supply cord kit marked for mounting anti-tip bracket) ■ Anti-tip bracket (taped inside upper oven with installation clearances specified on the model/serial rating plate...
... connection opening dimensions that all parts are shown must end in ring terminals or open-end spade terminals with the maximum allowable wood cabinet temperatures of floor may require longer screws to anchor bracket to rear range foot. See "Electrical Requirements" section. See "Electrical Connection" section. 2 Tools needed If using a power supply cord: ■ A UL listed power supply cord kit marked for mounting anti-tip bracket) ■ Anti-tip bracket (taped inside upper oven with installation clearances specified on the model/serial rating plate...
Installation Instructions
Page 3
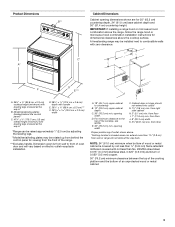
Dimension given is covered by adjusting the leveling legs. **Model/serial/rating plates may be rotated up from behind the control panel for viewing from the front of an unprotected wood or metal cabinet. 3 Cabinet door or hinge should not extend into cutout* G. 1½" (3.8 cm) min. from floor I F H A. 35 90.8 cm ± 0.3 cm) cooktop height (minimum) with not less than No. 28 MSG sheet steel...
Dimension given is covered by adjusting the leveling legs. **Model/serial/rating plates may be rotated up from behind the control panel for viewing from the front of an unprotected wood or metal cabinet. 3 Cabinet door or hinge should not extend into cutout* G. 1½" (3.8 cm) min. from floor I F H A. 35 90.8 cm ± 0.3 cm) cooktop height (minimum) with not less than No. 28 MSG sheet steel...

Installation Instructions
Page 4
... 4-wire power cord are adequate and in the line so that the electrical connection and wire size are : 40-amp circuit 2 No.-8 conductors 1 No.-10 white neutral 1 No.-8 green grounding If connecting to the proper electrical voltage and frequency as to the circuit breaker box (or fused disconnect) through the neutral, use a 4-wire power supply cord rated at the junction box). ■ Wire sizes and connections must determine the type of Power Supply Cord Kit...
... 4-wire power cord are adequate and in the line so that the electrical connection and wire size are : 40-amp circuit 2 No.-8 conductors 1 No.-10 white neutral 1 No.-8 green grounding If connecting to the proper electrical voltage and frequency as to the circuit breaker box (or fused disconnect) through the neutral, use a 4-wire power supply cord rated at the junction box). ■ Wire sizes and connections must determine the type of Power Supply Cord Kit...

Installation Instructions
Page 13
... to adjust leveling legs up or down until rear leveling leg is engaged in oven. 2. Replace terminal block access cover. Check that you have all of the 10-32 hex nuts. Plug power cord into position. 5. Slide range into an outlet. ■ Electrical supply is level. Turn power on for 5 minutes, check for satisfactory baking performance. Turn on surface elements and oven. Ground-link screw D. Complete Installation 1. Check that rear leveling leg is removed from the anti-tip bracket...
... to adjust leveling legs up or down until rear leveling leg is engaged in oven. 2. Replace terminal block access cover. Check that you have all of the 10-32 hex nuts. Plug power cord into position. 5. Slide range into an outlet. ■ Electrical supply is level. Turn power on for 5 minutes, check for satisfactory baking performance. Turn on surface elements and oven. Ground-link screw D. Complete Installation 1. Check that rear leveling leg is removed from the anti-tip bracket...

Installation Instructions
Page 14
... the anti-tip bracket securely attached to follow these instructions can result in power supply cord. 5. Failure to floor or wall. ■ Slide range back so rear range foot is under anti-tip bracket. 5. Slide range forward. 2. Complete cleaning or maintenance. 4. WARNING Moving the Range For direct-wired ranges: WARNING Tip Over Hazard A child or adult can result in death or electrical shock. 1. Reconnect the anti-tip bracket, if the range is level. 14 Replace all parts and panels before servicing. Failure...
... the anti-tip bracket securely attached to follow these instructions can result in power supply cord. 5. Failure to floor or wall. ■ Slide range back so rear range foot is under anti-tip bracket. 5. Slide range forward. 2. Complete cleaning or maintenance. 4. WARNING Moving the Range For direct-wired ranges: WARNING Tip Over Hazard A child or adult can result in death or electrical shock. 1. Reconnect the anti-tip bracket, if the range is level. 14 Replace all parts and panels before servicing. Failure...
Dimension Guide
Page 1
... the range. ***Excludes handle. U.S.A Only" section. CABINET OPENING DIMENSIONS Cabinet opening . from floor J. 8" (20.3 cm) width K. 3 " (8.91 cm) min. NOTE: 24" (61.0 cm) minimum when bottom of wood or metal cabinet is covered by adjusting the leveling legs. **Model/serial/rating plates may be connected directly to the cabinet. or 50-amp power supply cord (pigtail) (see NOTE. q The range can be rotated up from behind the control panel...
... the range. ***Excludes handle. U.S.A Only" section. CABINET OPENING DIMENSIONS Cabinet opening . from floor J. 8" (20.3 cm) width K. 3 " (8.91 cm) min. NOTE: 24" (61.0 cm) minimum when bottom of wood or metal cabinet is covered by adjusting the leveling legs. **Model/serial/rating plates may be connected directly to the cabinet. or 50-amp power supply cord (pigtail) (see NOTE. q The range can be rotated up from behind the control panel...
Warranty Information
Page 1
... transportation for product service if your major appliance, to replace or repair house fuses, or to correct house wiring or plumbing. 2. In Canada, call 1-800-688-9900. Repairs when your major appliance, to instruct you on the below named parts only and does not include labor. ■ Glass-ceramic cooktop, if due to thermal breakage ■ Electric surface elements ■ Electric bake/broil oven elements (excludes convection element) YOUR SOLE AND...
... transportation for product service if your major appliance, to replace or repair house fuses, or to correct house wiring or plumbing. 2. In Canada, call 1-800-688-9900. Repairs when your major appliance, to instruct you on the below named parts only and does not include labor. ■ Glass-ceramic cooktop, if due to thermal breakage ■ Electric surface elements ■ Electric bake/broil oven elements (excludes convection element) YOUR SOLE AND...


