Owners Manual
Page 2
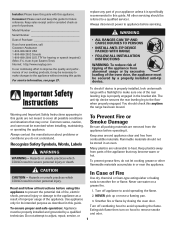
... reference. Turn off ventilating hood to avoid spreading the flame. Consumer: Please read and keep this guide for its intended purpose as a result of improper usage of the oven door, the appliance must be exercised when installing, maintaining, or operating the appliance. WARNING • ALL RANGES CAN TIP AND CAUSE INJURIES TO PERSONS • INSTALL ANTI-TIP DEVICE PACKED WITH RANGE • FOLLOW ALL INSTALLATION INSTRUCTIONS WARNING...
... reference. Turn off ventilating hood to avoid spreading the flame. Consumer: Please read and keep this guide for its intended purpose as a result of improper usage of the oven door, the appliance must be exercised when installing, maintaining, or operating the appliance. WARNING • ALL RANGES CAN TIP AND CAUSE INJURIES TO PERSONS • INSTALL ANTI-TIP DEVICE PACKED WITH RANGE • FOLLOW ALL INSTALLATION INSTRUCTIONS WARNING...
Owners Manual
Page 3
... area for food or cooking utensils. Use care when opening , oven door, Utensil Safety Follow the manufacturer's directions when using dry, sturdy potholders. The oven vent is not a toy. materials contact heating elements or interior surfaces of the cooking surface. Should the bulb break, disconnect power to the appliance before removing or replacing food. To prevent potential hazard to the user and damage to heat or warm a room. Interior surfaces of the appliance...
... area for food or cooking utensils. Use care when opening , oven door, Utensil Safety Follow the manufacturer's directions when using dry, sturdy potholders. The oven vent is not a toy. materials contact heating elements or interior surfaces of the cooking surface. Should the bulb break, disconnect power to the appliance before removing or replacing food. To prevent potential hazard to the user and damage to heat or warm a room. Interior surfaces of the appliance...
Owners Manual
Page 4
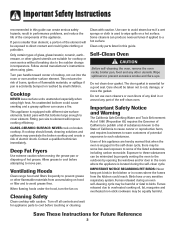
... utensil manufacturer's instructions when using high heat. This appliance is located during an oven self-cleaning cycle may be minimized by properly venting the oven to the outdoors by small children. GLASS-CERAMIC SURFACE: NEVER cook on . Self-Clean Oven CAUTION Before self-cleaning the oven, remove the oven racks, broiler pan, food and any part of flammable materials, or spillage if pan is accidently bumped or reached by opening the windows and/or door in the room...
... utensil manufacturer's instructions when using high heat. This appliance is located during an oven self-cleaning cycle may be minimized by properly venting the oven to the outdoors by small children. GLASS-CERAMIC SURFACE: NEVER cook on . Self-Clean Oven CAUTION Before self-cleaning the oven, remove the oven racks, broiler pan, food and any part of flammable materials, or spillage if pan is accidently bumped or reached by opening the windows and/or door in the room...

Owners Manual
Page 5
... functioning element that are between 2 and OFF. Flex-ChoiceTM Element (select models) The Flex-ChoiceTM element is always used for both element sizes can be set on the left front element. 3. For example, the graphic at the left rear position The Melt setting is marked to reheat cold food. Dual Element The cooking surface has a dual element located at right indicates Front left side of liquids. The control for these cooking operations. Some elements...
... functioning element that are between 2 and OFF. Flex-ChoiceTM Element (select models) The Flex-ChoiceTM element is always used for both element sizes can be set on the left front element. 3. For example, the graphic at the left rear position The Melt setting is marked to reheat cold food. Dual Element The cooking surface has a dual element located at right indicates Front left side of liquids. The control for these cooking operations. Some elements...
Owners Manual
Page 6
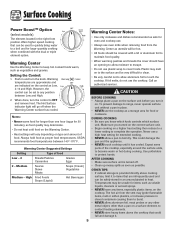
... at proper food temperatures. Call an authorized servicer. OTHER TIPS • If cabinet storage is turned off when the Warming Center surface has cooled. Warming Center Suggested Settings Setting Type of the cooktop, especially around the surface units, to range, never operate surface unit without a pan in and turn the control to protect hands. Push in place. • NEVER use oven mitts when removing food from the vent may deteriorate. •...
... at proper food temperatures. Call an authorized servicer. OTHER TIPS • If cabinet storage is turned off when the Warming Center surface has cooled. Warming Center Suggested Settings Setting Type of the cooktop, especially around the surface units, to range, never operate surface unit without a pan in and turn the control to protect hands. Push in place. • NEVER use oven mitts when removing food from the vent may deteriorate. •...

Owners Manual
Page 7
... the pan size to 1-inch beyond the cooking area. Pans should not extend more information on the smoothtop surface. Using extreme care, wipe spill with a clean dry towel. • Do not allow plastic, sugar or foods with a clean cloth or paper towel before using. • Never slide heavy metal pans across a hot surface. To Prevent Stains • Never use , clean the cooktop. • Clean your range are clean before food is turned...
... the pan size to 1-inch beyond the cooking area. Pans should not extend more information on the smoothtop surface. Using extreme care, wipe spill with a clean dry towel. • Do not allow plastic, sugar or foods with a clean cloth or paper towel before using. • Never slide heavy metal pans across a hot surface. To Prevent Stains • Never use , clean the cooktop. • Clean your range are clean before food is turned...
Owners Manual
Page 9
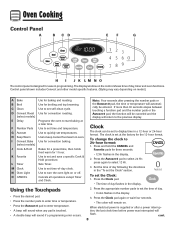
... operations except Timer and Clock. Using the Touchpads • Press the desired pad. • Press the number pads to enter time or temperature. • Press the Autoset 0 pad to set the Clock" section. When electrical power is supplied or after pressing the number pads or the Autoset 0 pad, the time or temperature will remain on model.) A Bake B Broil C Clean D Convect Roast (select models) E Delay F Number Pads G Autoset H Keep Warm I J K LM N O The control panel is touched. • A double...
... operations except Timer and Clock. Using the Touchpads • Press the desired pad. • Press the number pads to enter time or temperature. • Press the Autoset 0 pad to set the Clock" section. When electrical power is supplied or after pressing the number pads or the Autoset 0 pad, the time or temperature will remain on model.) A Bake B Broil C Clean D Convect Roast (select models) E Delay F Number Pads G Autoset H Keep Warm I J K LM N O The control panel is touched. • A double...
Owners Manual
Page 10
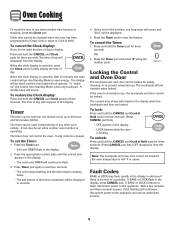
... and "End" will not operate. To cancel the Clock display: If you if there is canceled, press the Clock pad to prevent unwanted use , the touchpads and door cannot be displayed. 5. To "wake up to save energy. The timer does not control the oven. Clock time cannot be locked if the oven temperature is 400° F or above. Oven Cooking To recall the time of day when another oven function is operating.
... and "End" will not operate. To cancel the Clock display: If you if there is canceled, press the Clock pad to prevent unwanted use , the touchpads and door cannot be displayed. 5. To "wake up to save energy. The timer does not control the oven. Clock time cannot be locked if the oven temperature is 400° F or above. Oven Cooking To recall the time of day when another oven function is operating.
Owners Manual
Page 12
.... The control will start counting down once oven starts heating up. • To recall the set temperature during preheat, press the Convect Roast pad. 6. See note at the minimum cooking time. Cook longer if needed . • The oven light will remain on and FOOD will stop flashing. • 100° or the actual oven temperature if over 100° F will display. • To recall the set temperature during preheat, press the Convect Bake pad...
.... The control will start counting down once oven starts heating up. • To recall the set temperature during preheat, press the Convect Roast pad. 6. See note at the minimum cooking time. Cook longer if needed . • The oven light will remain on and FOOD will stop flashing. • 100° or the actual oven temperature if over 100° F will display. • To recall the set temperature during preheat, press the Convect Bake pad...

Owners Manual
Page 14
When using the number pads. 5. Set the amount of time you that require a preheated oven, such as cakes, cookies, and breads. • Do not use Delayed Cook & Hold if oven is active. Enter the amount of time that you want to heat at the selected time and cooks for warming breads and plates. Keep Warm For safely keeping hot foods warm in the day. The Keep Warm temperature can be set from 145...
When using the number pads. 5. Set the amount of time you that require a preheated oven, such as cakes, cookies, and breads. • Do not use Delayed Cook & Hold if oven is active. Enter the amount of time that you want to heat at the selected time and cooks for warming breads and plates. Keep Warm For safely keeping hot foods warm in the day. The Keep Warm temperature can be set from 145...

Owners Manual
Page 15
... Warm Poultry Chicken Pieces 3 or 4 Well Done Seafood Fish Steaks, buttered, 1" thick 4 Fillets 4 Flaky Flaky * The top rack position is a suggested guide. The times may vary with the Broil feature. After four seconds, the oven will start. • BROIL will remain lit. • HI or LO will be longer when the lower broiling temperature is used for most broiling. Turn meat once about four inches...
... Warm Poultry Chicken Pieces 3 or 4 Well Done Seafood Fish Steaks, buttered, 1" thick 4 Fillets 4 Flaky Flaky * The top rack position is a suggested guide. The times may vary with the Broil feature. After four seconds, the oven will start. • BROIL will remain lit. • HI or LO will be longer when the lower broiling temperature is used for most broiling. Turn meat once about four inches...

Owners Manual
Page 16
... beeps are locked out during the Sabbath Mode. • A Cook & Hold can be programmed during the Sabbath Mode, however a Delay Cook & Hold is the only function that operates during the Sabbath Mode. • Pressing CANCEL pad will cancel a Bake cycle, however the control will stay in the Sabbath Mode. • If power fails, the oven will return to existing setting. This safety feature can be turned on at the same time for...
... beeps are locked out during the Sabbath Mode. • A Cook & Hold can be programmed during the Sabbath Mode, however a Delay Cook & Hold is the only function that operates during the Sabbath Mode. • Pressing CANCEL pad will cancel a Bake cycle, however the control will stay in the Sabbath Mode. • If power fails, the oven will return to existing setting. This safety feature can be turned on at the same time for...
Owners Manual
Page 18
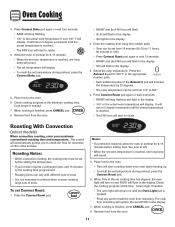
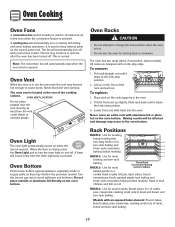
... circulate hot air in the oven when the convection feature is selected. The fan will automatically turn off . The oven vent is located at the lock-stop edge. Rack Positions RACK 5: Use for toasting bread, broiling thin, non-fatty foods or for 5 two-rack baking and 4 three-rack convection 3 baking (select models). 2 RACK 4: Use for most 1 broiling and two-rack baking. Models with a lock-stop position. 2. Oven Cooking Oven Fans A convection fan (select models) is used to keep internal parts on during all broiling and some baking operations. A cooling fan will...
... circulate hot air in the oven when the convection feature is selected. The fan will automatically turn off . The oven vent is located at the lock-stop edge. Rack Positions RACK 5: Use for toasting bread, broiling thin, non-fatty foods or for 5 two-rack baking and 4 three-rack convection 3 baking (select models). 2 RACK 4: Use for most 1 broiling and two-rack baking. Models with a lock-stop position. 2. Oven Cooking Oven Fans A convection fan (select models) is used to keep internal parts on during all broiling and some baking operations. A cooling fan will...
Owners Manual
Page 20
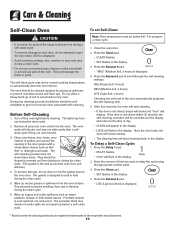
...; SET flashes in the display. 4. Enter the amount of the respective manufacturers. 19 To prevent damage, do not attempt to open the door when LOCK is displayed. • Avoid touching cooktop, door, window or oven vent area during a clean cycle. • Do not use commercial oven cleaners on during the clean cycle. 5. Press the Autoset 0 pad to program a clean cycle. 1. To Delay a Self-Clean Cycle: 1. Remove all pans and oven racks from...
...; SET flashes in the display. 4. Enter the amount of the respective manufacturers. 19 To prevent damage, do not attempt to open the door when LOCK is displayed. • Avoid touching cooktop, door, window or oven vent area during a clean cycle. • Do not use commercial oven cleaners on during the clean cycle. 5. Press the Autoset 0 pad to program a clean cycle. 1. To Delay a Self-Clean Cycle: 1. Remove all pans and oven racks from...
Owners Manual
Page 21
... the oven door is left open when LOCK is forced to scroll through heating and cooling. Care & Cleaning 5. Press the Autoset 0 pad to open , "door" will flash in the display, the door cannot be opened . The delay time will not affect performance. Remove it went through the self-cleaning settings. The soil will be removed during the next clean cycle. If oven racks were left in time. This is heavily soiled or if a broiler pan...
... the oven door is left open when LOCK is forced to scroll through heating and cooling. Care & Cleaning 5. Press the Autoset 0 pad to open , "door" will flash in the display, the door cannot be opened . The delay time will not affect performance. Remove it went through the self-cleaning settings. The soil will be removed during the next clean cycle. If oven racks were left in time. This is heavily soiled or if a broiler pan...
Owners Manual
Page 23
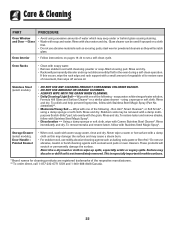
... Drawer (select models), Door Handle - These products will permanently discolor and may discolor or dull if soil is especially important for white surfaces. * Brand names for cleaning products are registered trademarks of the following - Care & Cleaning PART PROCEDURE Oven Window and Door - Oven Interior • Follow instructions on a cloth first. • Do not use abrasive, caustic or harsh cleaning agents such as they will scratch glass...
... Drawer (select models), Door Handle - These products will permanently discolor and may discolor or dull if soil is especially important for white surfaces. * Brand names for cleaning products are registered trademarks of the following - Care & Cleaning PART PROCEDURE Oven Window and Door - Oven Interior • Follow instructions on a cloth first. • Do not use abrasive, caustic or harsh cleaning agents such as they will scratch glass...

Owners Manual
Page 24
... door at a later date. Oven Light (style varies by model) CAUTION • Disconnect power to range before replacing light bulb. • Allow oven to range. Note: Bulb cover will fall if not held in place. Reconnect power to cool before replacing light bulb. • Make sure bulb cover and bulb are cool before touching. Replace bulb cover and reconnect power to the first stop position (opened about four inches). 2. Hinge arms are in place while removing wire retainer...
... door at a later date. Oven Light (style varies by model) CAUTION • Disconnect power to range before replacing light bulb. • Allow oven to range. Note: Bulb cover will fall if not held in place. Reconnect power to cool before replacing light bulb. • Make sure bulb cover and bulb are cool before touching. Replace bulb cover and reconnect power to the first stop position (opened about four inches). 2. Hinge arms are in place while removing wire retainer...
Owners Manual
Page 26
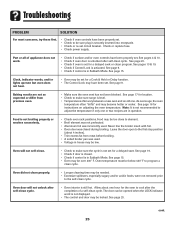
... Sabbath Mode. Clock, indicator words, and/or lights operate but oven does not heat. • Oven may be low. Allow about 4 inches). • Trim excess fat from previous oven. • Make sure the oven vent has not been blocked. Part or all of a self-clean cycle. Baking results are in house may be set for a Cook & Hold or Delay function. • The Control Lock may be below 400° F to program a clean cycle. Check or replace fuse...
... Sabbath Mode. Clock, indicator words, and/or lights operate but oven does not heat. • Oven may be low. Allow about 4 inches). • Trim excess fat from previous oven. • Make sure the oven vent has not been blocked. Part or all of a self-clean cycle. Baking results are in house may be set for a Cook & Hold or Delay function. • The Control Lock may be below 400° F to program a clean cycle. Check or replace fuse...
Owners Manual
Page 27
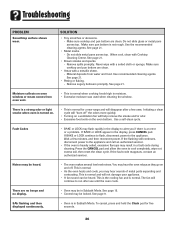
... metal parts expanding and contracting. Remove spills promptly. Wait a few uses. When cool, clean with a soiled cloth or sponge. If BAKE or LOCK appear in Sabbath Mode. There are clean. If the fault code reappears, contact an authorized servicer. Initiating a clean cycle will "burn off . SAb flashing and then displayed continuously. • Oven is normal when cooking foods high in Sabbath Mode. Make sure cooktop and pan bottom are clean...
... metal parts expanding and contracting. Remove spills promptly. Wait a few uses. When cool, clean with a soiled cloth or sponge. If BAKE or LOCK appear in Sabbath Mode. There are clean. If the fault code reappears, contact an authorized servicer. Initiating a clean cycle will "burn off . SAb flashing and then displayed continuously. • Oven is normal when cooking foods high in Sabbath Mode. Make sure cooktop and pan bottom are clean...
Owners Manual
Page 28
... calling Maytag. Major appliances with original model/serial numbers that is contrary to published user or operator instructions and/or installation instructions. 4. In the U.S.A., call 1-800-807-6777. 9/07 In Canada, call 1-800-688-9900. Service calls to correct the installation of your major appliance, to instruct you on how to use your major appliance, to replace or repair house fuses, or to repair or replace appliance light bulbs, air filters...
... calling Maytag. Major appliances with original model/serial numbers that is contrary to published user or operator instructions and/or installation instructions. 4. In the U.S.A., call 1-800-807-6777. 9/07 In Canada, call 1-800-688-9900. Service calls to correct the installation of your major appliance, to instruct you on how to use your major appliance, to replace or repair house fuses, or to repair or replace appliance light bulbs, air filters...


