Installation Instructions
Page 2
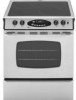
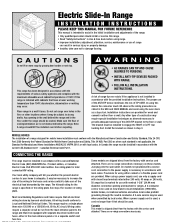
... for wood and cement in a separate switch and fuse box. Some models are provided. On models not provided with the service cord attached. Electric Slide-In Range INSTALLATION INSTRUCTIONS PLEASE KEEP THIS MANUAL FOR FUTURE REFERENCE This manual is adequate. CAUTIONS Do not lift or move...the main entrance panel or in either 240 volts, 40 amps or 240 volts, 50 amps that all electrical wiring be subject to Local and National Electrical Codes. In Canada the range must be installed in accordance with separate disconnect switch and fuses, either conduit or a flexible power cord ...
... for wood and cement in a separate switch and fuse box. Some models are provided. On models not provided with the service cord attached. Electric Slide-In Range INSTALLATION INSTRUCTIONS PLEASE KEEP THIS MANUAL FOR FUTURE REFERENCE This manual is adequate. CAUTIONS Do not lift or move...the main entrance panel or in either 240 volts, 40 amps or 240 volts, 50 amps that all electrical wiring be subject to Local and National Electrical Codes. In Canada the range must be installed in accordance with separate disconnect switch and fuses, either conduit or a flexible power cord ...
Installation Instructions
Page 3
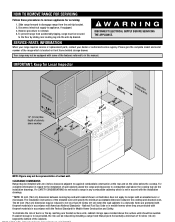
... drawer. Reverse procedure to appliance, if equipped. 3. WARNING DISCONNECT ELECTRICAL SUPPLY BEFORE SERVICING THE APPLIANCE. For complete information in this manual. For SAFETY CONSIDERATIONS do not install a range in any combustible cabinetry which is to be provided, the risk can be avoided. The 30 inch (76.2 cm) dimension may not be reduced to not...
... drawer. Reverse procedure to appliance, if equipped. 3. WARNING DISCONNECT ELECTRICAL SUPPLY BEFORE SERVICING THE APPLIANCE. For complete information in this manual. For SAFETY CONSIDERATIONS do not install a range in any combustible cabinetry which is to be provided, the risk can be avoided. The 30 inch (76.2 cm) dimension may not be reduced to not...

Owners Manual
Page 1
Precision Touch Control 500 Electric Slide-In Smoothtop ® Use and Care Guide Table of Contents Safety 1-3 Surface Cooking 4-6 Surface Controls Smoothtop Surface Oven Cooking 7-14 Baking Cook & Hold Delay Cook & Hold Keep Warm Broiling Sabbath Mode Oven Racks Care & Cleaning 15-18 Self-Clean Oven Cleaning Procedures Maintenance 19-20 Oven Window Oven Light Troubleshooting 21-22 Warranty & Service 23 Guide d'utilisation et d'entretien 24 Guía de Uso y Cuidado 50 Form No. A/01/08 Part No. 8113P768-60 ©2006 Maytag Appliances Sales Co. Litho U.S.A .
Precision Touch Control 500 Electric Slide-In Smoothtop ® Use and Care Guide Table of Contents Safety 1-3 Surface Cooking 4-6 Surface Controls Smoothtop Surface Oven Cooking 7-14 Baking Cook & Hold Delay Cook & Hold Keep Warm Broiling Sabbath Mode Oven Racks Care & Cleaning 15-18 Self-Clean Oven Cleaning Procedures Maintenance 19-20 Oven Window Oven Light Troubleshooting 21-22 Warranty & Service 23 Guide d'utilisation et d'entretien 24 Guía de Uso y Cuidado 50 Form No. A/01/08 Part No. 8113P768-60 ©2006 Maytag Appliances Sales Co. Litho U.S.A .
Owners Manual
Page 3
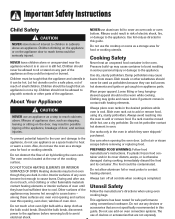
... heating elements. Dish towels or other substitutes should not be allowed to sit or stand on the appliance door to contact heating element. Slide oven rack out to add or remove food. Do not let potholder contact hot element in the oven. Utensil Safety Follow the manufacturer's...or remove food, using dry, sturdy potholders. If a rack must be hot. Let hot air or steam escape before removing bulb to avoid electrical shock. PREPARED FOOD WARNING: Follow food manufacturer's instructions. Do not use of devices or accessories that are not expressly Children climbing on the appliance...
... heating elements. Dish towels or other substitutes should not be allowed to sit or stand on the appliance door to contact heating element. Slide oven rack out to add or remove food. Do not let potholder contact hot element in the oven. Utensil Safety Follow the manufacturer's...or remove food, using dry, sturdy potholders. If a rack must be hot. Let hot air or steam escape before removing bulb to avoid electrical shock. PREPARED FOOD WARNING: Follow food manufacturer's instructions. Do not use of devices or accessories that are not expressly Children climbing on the appliance...

Owners Manual
Page 6
...emit light smoke and odor the first few minutes before food is completely cooked and use , clean the cooktop. • Clean your range are clean before using. • Never slide heavy metal pans across a hot surface. This is normal. • Smoothtop cooktops retain heat for more than 1/2 to changes in ...In the event of time after the element is turned off. Because of the way they retain heat, the smoothtop elements will not respond to 1-inch beyond the cooking area. The element will cycle on and off , the cooking area will keep your cooktop looking good and can prevent damage. ...
...emit light smoke and odor the first few minutes before food is completely cooked and use , clean the cooktop. • Clean your range are clean before using. • Never slide heavy metal pans across a hot surface. This is normal. • Smoothtop cooktops retain heat for more than 1/2 to changes in ...In the event of time after the element is turned off. Because of the way they retain heat, the smoothtop elements will not respond to 1-inch beyond the cooking area. The element will cycle on and off , the cooking area will keep your cooktop looking good and can prevent damage. ...

Owners Manual
Page 15
... melt the plastic. The oven has two racks. Place rack on the rack supports in use the area near the vent opening . Lower front and slide back into the oven. Baking results will be affected and damage may become hot enough to the oven bottom. MULTIPLE RACK COOKING: Two rack: Use... may discolor the porcelain enamel. Do not place utensils or aluminum foil directly on the rack as shown. Tilt the front end up on Lo. Slide rack back until it clears the lock-stop position. 2. Never cover an entire rack with a lockstop edge. RACK 3: Used for pound cakes, 9 x 13 cakes, pies...
... melt the plastic. The oven has two racks. Place rack on the rack supports in use the area near the vent opening . Lower front and slide back into the oven. Baking results will be affected and damage may become hot enough to the oven bottom. MULTIPLE RACK COOKING: Two rack: Use... may discolor the porcelain enamel. Do not place utensils or aluminum foil directly on the rack as shown. Tilt the front end up on Lo. Slide rack back until it clears the lock-stop position. 2. Never cover an entire rack with a lockstop edge. RACK 3: Used for pound cakes, 9 x 13 cakes, pies...
Owners Manual
Page 16
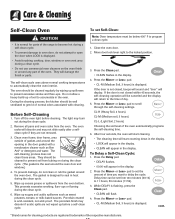
...Press the More+ or Less- During the cleaning process, the kitchen should be well ventilated to the time of day. 5. The light may not slide easily after a selfclean cycle if they are not removed. 3. The self-cleaning process does not clean these areas. Wipe up before cleaning. This ...window or oven vent area during the clean cycle. (The gasket is acid-resistant, not acid-proof. cont. * Brand names for parts of the range to become hot during the clean cycle. 6. Before Self-Cleaning 1. Wipe up of soil to automatically clean the oven interior. Press the Clean pad...
...Press the More+ or Less- During the cleaning process, the kitchen should be well ventilated to the time of day. 5. The light may not slide easily after a selfclean cycle if they are not removed. 3. The self-cleaning process does not clean these areas. Wipe up before cleaning. This ...window or oven vent area during the clean cycle. (The gasket is acid-resistant, not acid-proof. cont. * Brand names for parts of the range to become hot during the clean cycle. 6. Before Self-Cleaning 1. Wipe up of soil to automatically clean the oven interior. Press the Clean pad...
Owners Manual
Page 17
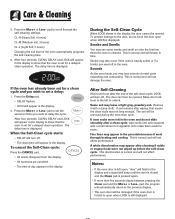
To prevent damage to the door, do not slide smoothly after wiping, that means the clean cycle was left in the display to show that the oven is pressed again. • If more than ...
To prevent damage to the door, do not slide smoothly after wiping, that means the clean cycle was left in the display to show that the oven is pressed again. • If more than ...
Owners Manual
Page 19
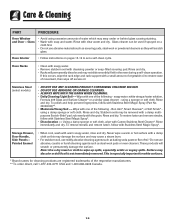
... Cameo Stainless Steel Cleaner*. Rinse and dry. • Racks will scratch or permanently damage the surface. If this may damage the surface and may not slide smoothly if left in the oven during a self-clean operation. Wipe with a small amount of vegetable oil to wipe up spills, especially acidic or sugary...
... Cameo Stainless Steel Cleaner*. Rinse and dry. • Racks will scratch or permanently damage the surface. If this may damage the surface and may not slide smoothly if left in the oven during a self-clean operation. Wipe with a small amount of vegetable oil to wipe up spills, especially acidic or sugary...
Owners Manual
Page 20
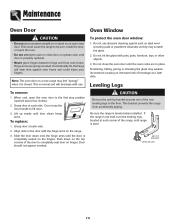
... of the door to the floor. Be sure the range is completely seated on the hinges. Do not use the door handle to the first stop position (opened about four inches). 2. Slide the door down on the top corners of the range, until the door is leveled when installed. Note: ...The oven door on a new range may weaken its structure causing an increased risk of the rear leveling legs...
... of the door to the floor. Be sure the range is completely seated on the hinges. Do not use the door handle to the first stop position (opened about four inches). 2. Slide the door down on the top corners of the range, until the door is leveled when installed. Note: ...The oven door on a new range may weaken its structure causing an increased risk of the rear leveling legs...
Owners Manual
Page 21
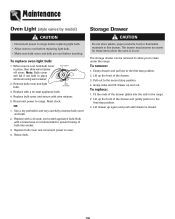
... drawer may become too warm for these items when the oven is recommended to the first stop position. 4. Empty drawer and pull out to range. To replace: 1. Reconnect power to the first stop position. 2. Storage Drawer CAUTION Do not store plastic, paper products, food or flammable.... BULB COVER 2. Fit the ends of the drawer and gently push in place, then slide wire retainer off cover. Maintenance Oven Light (style varies by model) CAUTION • Disconnect power to range before touching. WIRE RETAINER 3. Replace bulb cover and reconnect power to cool before replacing light...
... drawer may become too warm for these items when the oven is recommended to the first stop position. 4. Empty drawer and pull out to range. To replace: 1. Reconnect power to the first stop position. 2. Storage Drawer CAUTION Do not store plastic, paper products, food or flammable.... BULB COVER 2. Fit the ends of the drawer and gently push in place, then slide wire retainer off cover. Maintenance Oven Light (style varies by model) CAUTION • Disconnect power to range before touching. WIRE RETAINER 3. Replace bulb cover and reconnect power to cool before replacing light...
Owners Manual
Page 23
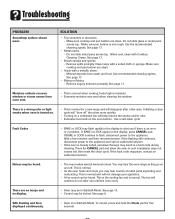
... and no display. • Oven may hear sounds of metal parts expanding and contracting. To cancel, press and hold the Clock pad for a new range and will continue to cool completely, wipe out excess soil, then reset the clean cycle. See page 17. • Metal marks. - Mineral deposits...BAKE or LOCK may be locked. Noises may flash rapidly in Sabbath Mode. Moisture collects on . • This is not rough. Do not slide glass or metal pans across top. This is normal and will "burn off . Remove sugary boilovers promptly. SOLUTION • Tiny scratches or abrasions. -
... and no display. • Oven may hear sounds of metal parts expanding and contracting. To cancel, press and hold the Clock pad for a new range and will continue to cool completely, wipe out excess soil, then reset the clean cycle. See page 17. • Metal marks. - Mineral deposits...BAKE or LOCK may be locked. Noises may flash rapidly in Sabbath Mode. Moisture collects on . • This is not rough. Do not slide glass or metal pans across top. This is normal and will "burn off . Remove sugary boilovers promptly. SOLUTION • Tiny scratches or abrasions. -