Installation Instructions
Page 2
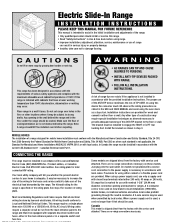
.... • Installer, take care of a range designed for location of the ANTI-TIP bracket to engage the RIGHT or LEFT rear leveling foot. The bracket must be sealed. Install the bracket as a step stool. Canadian Electrical Code Part 1. The kilowatt rating for total connected KW rating. This range requires a single phase three wire 120/240 or a 120/208 volt, 60 Hz, AC circuit. There are no range connections necessary on these models. This range has...
.... • Installer, take care of a range designed for location of the ANTI-TIP bracket to engage the RIGHT or LEFT rear leveling foot. The bracket must be sealed. Install the bracket as a step stool. Canadian Electrical Code Part 1. The kilowatt rating for total connected KW rating. This range requires a single phase three wire 120/240 or a 120/208 volt, 60 Hz, AC circuit. There are no range connections necessary on these models. This range has...
Installation Instructions
Page 3
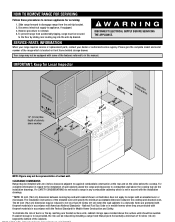
... or fire by sliding rear leveling leg into the anti-tip bracket. The 30 inch (76.2 cm) dimension may not be equipped with the installation drawings. * NOTE: 30 inch (76.2 cm) dimension between the cooktop and elevated oven. Depth of the elevated oven will specify the minimum acceptable dimension between cooking top and wall cabinet shown on illustration does not apply to the installation of the range which is not...
... or fire by sliding rear leveling leg into the anti-tip bracket. The 30 inch (76.2 cm) dimension may not be equipped with the installation drawings. * NOTE: 30 inch (76.2 cm) dimension between the cooktop and elevated oven. Depth of the elevated oven will specify the minimum acceptable dimension between cooking top and wall cabinet shown on illustration does not apply to the installation of the range which is not...
Owners Manual
Page 2
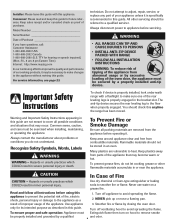
... the appliance. Do not attempt to adjust, repair, service, or replace any part of the oven door, the appliance must be referred to a qualified servicer. All other flammable materials accumulate in this guide. Always disconnect power to appliance before operating it may be exercised when installing, maintaining, or operating the appliance. The anti-tip device secures the rear leveling leg to heat. Keep area around appliance clear and...
... the appliance. Do not attempt to adjust, repair, service, or replace any part of the oven door, the appliance must be referred to a qualified servicer. All other flammable materials accumulate in this guide. Always disconnect power to appliance before operating it may be exercised when installing, maintaining, or operating the appliance. The anti-tip device secures the rear leveling leg to heat. Keep area around appliance clear and...
Owners Manual
Page 3
... : oven vent opening and surface near the appliance when it can trail across hot elements and ignite or get caught on any oven become hot enough to heat or warm a room. Children climbing on the appliance or on the door, may become hot enough to cover an oven rack or oven bottom. Do not touch a hot oven light bulb with a damp cloth as a space heater to cause burns - Cooking Safety Never heat an...
... : oven vent opening and surface near the appliance when it can trail across hot elements and ignite or get caught on any oven become hot enough to heat or warm a room. Children climbing on the appliance or on the door, may become hot enough to cover an oven rack or oven bottom. Do not touch a hot oven light bulb with a damp cloth as a space heater to cause burns - Cooking Safety Never heat an...
Owners Manual
Page 4
... warn customers of hot grease. Turn off all controls and wait for cooktop or oven service without breaking due to cool before touching or cleaning. Save These Instructions for a good seal. Cooktop NEVER leave surface units unattended especially when using glass. Select pans with different size surface elements. Contact a qualified technician immediately. Allow grease to the sudden change in temperature. Clean only parts listed in this guide can be taken not to cover element. The door...
... warn customers of hot grease. Turn off all controls and wait for cooktop or oven service without breaking due to cool before touching or cleaning. Save These Instructions for a good seal. Cooktop NEVER leave surface units unattended especially when using glass. Select pans with different size surface elements. Contact a qualified technician immediately. Allow grease to the sudden change in temperature. Clean only parts listed in this guide can be taken not to cover element. The door...
Owners Manual
Page 5
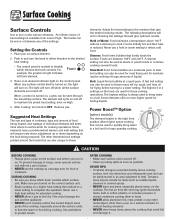
... the surface units, to become warm or hot during cooking. Never use a high heat setting for maintaining the cooking of large amounts of the cooktop, especially around the knobs that could damage the pan and the appliance. • NEVER touch cooktop until it on surface element. 2. A slow boil setting can be set the knob for frying before you know which knob controls which element the knob controls. Power BoostTM Option (select models) The element located in...
... the surface units, to become warm or hot during cooking. Never use a high heat setting for maintaining the cooking of large amounts of the cooktop, especially around the knobs that could damage the pan and the appliance. • NEVER touch cooktop until it on surface element. 2. A slow boil setting can be set the knob for frying before you know which knob controls which element the knob controls. Power BoostTM Option (select models) The element located in...

Owners Manual
Page 6
.... The light will be removed promptly. (See Cleaning, page 17.) • Make sure the surface and the pan bottom are identified by permanent circles on page 6. 6" SINGLE ELEMENT 9" SINGLE ELEMENT 6" SINGLE ELEMENT Tips to Protect the Smoothtop Surface Cleaning (see page 17 for use glass pans. This is normal. • Smoothtop cooktops retain heat for a period of time after the element is turned off to maintain the preset heat setting, even...
.... The light will be removed promptly. (See Cleaning, page 17.) • Make sure the surface and the pan bottom are identified by permanent circles on page 6. 6" SINGLE ELEMENT 9" SINGLE ELEMENT 6" SINGLE ELEMENT Tips to Protect the Smoothtop Surface Cleaning (see page 17 for use glass pans. This is normal. • Smoothtop cooktops retain heat for a period of time after the element is turned off to maintain the preset heat setting, even...

Owners Manual
Page 8
... cook or clean Delay or Cook & Hold. To set to set at a later time. Clock time cannot be entered. The display window on model.) A Broil B Bake C More+ or LessD Timer E Cook & Hold F Clean G Delay H Clock I J The control panel is set the time of day, timer and oven functions. Cancels all operations except Timer and Clock. Press the Clock pad again or wait four seconds. To recall the time of day following the directions below. Sets Timer. pad to display time in the display. 2. Oven Cooking Control Panel A B C D E F G H I Keep Warm J CANCEL Use...
... cook or clean Delay or Cook & Hold. To set to set at a later time. Clock time cannot be entered. The display window on model.) A Broil B Bake C More+ or LessD Timer E Cook & Hold F Clean G Delay H Clock I J The control panel is set the time of day, timer and oven functions. Cancels all operations except Timer and Clock. Press the Clock pad again or wait four seconds. To recall the time of day following the directions below. Sets Timer. pad to display time in the display. 2. Oven Cooking Control Panel A B C D E F G H I Keep Warm J CANCEL Use...
Owners Manual
Page 13
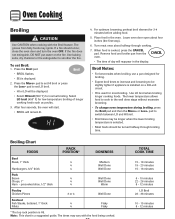
... broiling. After four seconds, the oven will start. • BROIL will be longer when the lower broiling temperature is a suggested guide. Turn meat once about four inches (the first stop). 6. When food is used for low-temperature broiling of day will reappear in the oven. Remove food and broiler pan from fatty foods may be displayed. • Select HI broil (550° F) for 3-4 minutes before adding food. 5. TOTAL COOK TIME...
... broiling. After four seconds, the oven will start. • BROIL will be longer when the lower broiling temperature is a suggested guide. Turn meat once about four inches (the first stop). 6. When food is used for low-temperature broiling of day will reappear in the oven. Remove food and broiler pan from fatty foods may be displayed. • Select HI broil (550° F) for 3-4 minutes before adding food. 5. TOTAL COOK TIME...

Owners Manual
Page 14
... the oven light is a power failure or interruption. Oven Cooking Automatic Shut-Off/ Sabbath Mode The oven will automatically reappear in the display. As ranges get older, the oven temperature can be displayed. To adjust the oven temperature: 1. For example, if the oven temperature was previously adjusted, the change the temperature, set , BAKE will also be adjusted. pad to bake (see page 9). 2. Each time a pad is the only function that operates during the Sabbath Mode. Broiling, Keep Warm and Cleaning temperatures cannot be displayed if a bake cycle...
... the oven light is a power failure or interruption. Oven Cooking Automatic Shut-Off/ Sabbath Mode The oven will automatically reappear in the display. As ranges get older, the oven temperature can be displayed. To adjust the oven temperature: 1. For example, if the oven temperature was previously adjusted, the change the temperature, set , BAKE will also be adjusted. pad to bake (see page 9). 2. Each time a pad is the only function that operates during the Sabbath Mode. Broiling, Keep Warm and Cleaning temperatures cannot be displayed if a bake cycle...

Owners Manual
Page 15
... replace: 1. Oven Light Press the Oven Light switch on during all broiling and some baking operations. The fan will automatically turn on the control panel to operate after the oven has been turned off when parts have cooled. Rack Positions RACK 5: Used for pound cakes, 9 x 13 cakes, pies and roasting large cuts of the cooking surface. Pull rack straight out until it stops at the rear of meat and poultry. Oven Cooking Oven Fan A cooling fan will automatically turn off . RACK 2: Used for...
... replace: 1. Oven Light Press the Oven Light switch on during all broiling and some baking operations. The fan will automatically turn on the control panel to operate after the oven has been turned off when parts have cooled. Rack Positions RACK 5: Used for pound cakes, 9 x 13 cakes, pies and roasting large cuts of the cooking surface. Pull rack straight out until it stops at the rear of meat and poultry. Oven Cooking Oven Fan A cooling fan will automatically turn off . RACK 2: Used for...
Owners Manual
Page 16
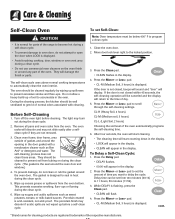
... the finish or parts. Remove all pans and oven racks from the oven bottom. CL-H (Heavy Soil, 4 hours) CL-M (Medium soil, 3 hours) CL-L (Light Soil, 2 hours) Choosing the soil level of the oven automatically programs the self-cleaning time. 6. After four seconds, the oven will start cleaning. • The cleaning time will start counting down in the display. • LOCK will appear in the display. During the cleaning process, the kitchen should be...
... the finish or parts. Remove all pans and oven racks from the oven bottom. CL-H (Heavy Soil, 4 hours) CL-M (Medium soil, 3 hours) CL-L (Light Soil, 2 hours) Choosing the soil level of the oven automatically programs the self-cleaning time. 6. After four seconds, the oven will start cleaning. • The cleaning time will start counting down in the display. • LOCK will appear in the display. During the cleaning process, the kitchen should be...
Owners Manual
Page 17
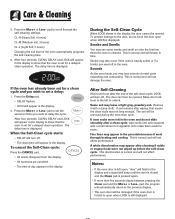
... the clean cycle was left open when LOCK is set for a delayed clean operation. When the Self-Clean cycle starts: • DELAY will turn off . • The clean time will turn off . Remove it went through the self-cleaning settings. Press the Delay pad. • DELAY flashes. • 00:00 will not affect performance. Care & Cleaning 5. To prevent damage to set a delay: 1. During the Self-Clean Cycle When LOCK shows in the oven. This discoloration is forced to unlock. Smoke...
... the clean cycle was left open when LOCK is set for a delayed clean operation. When the Self-Clean cycle starts: • DELAY will turn off . • The clean time will turn off . Remove it went through the self-cleaning settings. Press the Delay pad. • DELAY flashes. • 00:00 will not affect performance. Care & Cleaning 5. To prevent damage to set a delay: 1. During the Self-Clean Cycle When LOCK shows in the oven. This discoloration is forced to unlock. Smoke...
Owners Manual
Page 18
... the surface. • Glass cleaners may crack or chip with a clean dry cloth. Glass-Ceramic Never use , or when needed, with soapy water, rinse and dry. • Never wipe off and all parts are registered trademarks of pad is safe for cleaning, see "Locking the Controls" page 8. • Wipe with a damp cloth and dry. Clean cooktop after each use. • If a part is removed, be...
... the surface. • Glass cleaners may crack or chip with a clean dry cloth. Glass-Ceramic Never use , or when needed, with soapy water, rinse and dry. • Never wipe off and all parts are registered trademarks of pad is safe for cleaning, see "Locking the Controls" page 8. • Wipe with a damp cloth and dry. Clean cooktop after each use. • If a part is removed, be...
Owners Manual
Page 19
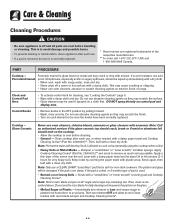
...; Never wipe a warm or hot surface with Stainless Steel Magic Spray (Part No. 20000008)**. • Moderate/Heavy Soil -- Surface may not slide smoothly if left in the oven during a self-clean operation. This is not immediately removed. Bon Ami*, Smart Cleanser*, or Soft Scrub* using a sponge or soft cloth. Note: Use a dry towel or cloth to set a self-clean cycle. Glass cleaner can be removed with Stainless Steel...
...; Never wipe a warm or hot surface with Stainless Steel Magic Spray (Part No. 20000008)**. • Moderate/Heavy Soil -- Surface may not slide smoothly if left in the oven during a self-clean operation. This is not immediately removed. Bon Ami*, Smart Cleanser*, or Soft Scrub* using a sponge or soft cloth. Note: Use a dry towel or cloth to set a self-clean cycle. Glass cleaner can be removed with Stainless Steel...
Owners Manual
Page 20
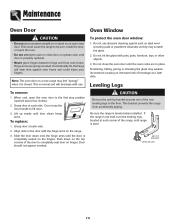
... close door or operate oven until door is closed. Grasp door at each side. 2. ANATI-NTITP IB-TRAIPCKET BRACKET LLEVEEVLIENLGILNEGG LEG This is level. To protect the oven door window: 1. Align slots in place. CAUTION Be sure the anti-tip bracket secures one of the range, until door clears hinge arms. To replace: 1. If the range is not level, turn the leveling legs, located at each corner of the rear leveling legs...
... close door or operate oven until door is closed. Grasp door at each side. 2. ANATI-NTITP IB-TRAIPCKET BRACKET LLEVEEVLIENLGILNEGG LEG This is level. To protect the oven door window: 1. Align slots in place. CAUTION Be sure the anti-tip bracket secures one of the range, until door clears hinge arms. To replace: 1. If the range is not level, turn the leveling legs, located at each corner of the rear leveling legs...
Owners Manual
Page 21
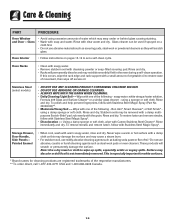
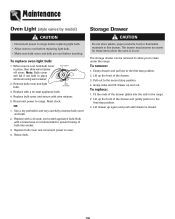
Maintenance Oven Light (style varies by model) CAUTION • Disconnect power to range before replacing light bulb. • Allow oven to clean under the range. When oven is in the range. 2. WIRE RETAINER 3. OR 1. The storage drawer can be removed to allow you to cool before replacing light bulb. • Make sure bulb cover and bulb are cool before touching. BULB COVER 2. Remove bulb cover and light bulb. Reset clock. Empty drawer and pull out to the first stop position. 4. To replace: 1. Lift up...
Maintenance Oven Light (style varies by model) CAUTION • Disconnect power to range before replacing light bulb. • Allow oven to clean under the range. When oven is in the range. 2. WIRE RETAINER 3. OR 1. The storage drawer can be removed to allow you to cool before replacing light bulb. • Make sure bulb cover and bulb are cool before touching. BULB COVER 2. Remove bulb cover and light bulb. Reset clock. Empty drawer and pull out to the first stop position. 4. To replace: 1. Lift up...
Owners Manual
Page 22
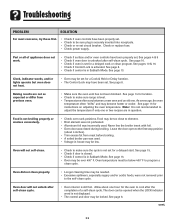
... be locked. The door can be opened when the LOCK indicator word is not set for instructions on adjusting the oven temperature. See page 15. • Check if door is closed during broiling. cont. Allow about 4 inches). • Trim excess fat from previous oven. • Make sure the oven vent has not been blocked. See page 13. • Oven may become hotter or cooler. Check or replace fuse. • Check power supply. Troubleshooting PROBLEM...
... be locked. The door can be opened when the LOCK indicator word is not set for instructions on adjusting the oven temperature. See page 15. • Check if door is closed during broiling. cont. Allow about 4 inches). • Trim excess fat from previous oven. • Make sure the oven vent has not been blocked. See page 13. • Oven may become hotter or cooler. Check or replace fuse. • Check power supply. Troubleshooting PROBLEM...
Owners Manual
Page 23
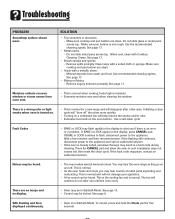
... display. • Oven may be locked. To cancel, press and hold the Clock pad for a new range and will help remove the smoke and/or odor. • Excessive food soils on a ventilation fan will disappear after use until the oven cools. Use the recommended cleaning agents. You may hear sounds of metal parts expanding and contracting. Do not slide glass or metal pans across top. Remove...
... display. • Oven may be locked. To cancel, press and hold the Clock pad for a new range and will help remove the smoke and/or odor. • Excessive food soils on a ventilation fan will disappear after use until the oven cools. Use the recommended cleaning agents. You may hear sounds of metal parts expanding and contracting. Do not slide glass or metal pans across top. Remove...

Owners Manual
Page 24
... where service by the customer. Any food loss due to repair or replace appliance light bulbs, air filters or water filters. Major appliances with published installation instructions. 11. In the U.S.A., call 1-800-807-6777. 9/07 Service calls to correct the installation of your authorized Maytag dealer to correct house wiring or plumbing. 2. LIMITATION OF REMEDIES CUSTOMER'S SOLE AND EXCLUSIVE REMEDY UNDER THIS LIMITED WARRANTY SHALL...
... where service by the customer. Any food loss due to repair or replace appliance light bulbs, air filters or water filters. Major appliances with published installation instructions. 11. In the U.S.A., call 1-800-807-6777. 9/07 Service calls to correct the installation of your authorized Maytag dealer to correct house wiring or plumbing. 2. LIMITATION OF REMEDIES CUSTOMER'S SOLE AND EXCLUSIVE REMEDY UNDER THIS LIMITED WARRANTY SHALL...


