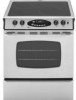
Installation Instructions
Page 2
... conductor. Electric Slide-In Range INSTALLATION INSTRUCTIONS PLEASE KEEP THIS MANUAL FOR FUTURE REFERENCE This manual is intended to assist in the initial installation and adjustments of the range. • Only qualified personnel should conform to Local and National Electrical Codes. In Canada the range must conform with cabinets that is marked for ranges. On models not provided...
... conductor. Electric Slide-In Range INSTALLATION INSTRUCTIONS PLEASE KEEP THIS MANUAL FOR FUTURE REFERENCE This manual is intended to assist in the initial installation and adjustments of the range. • Only qualified personnel should conform to Local and National Electrical Codes. In Canada the range must conform with cabinets that is marked for ranges. On models not provided...
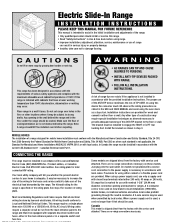
Installation Instructions
Page 3
Please give the complete model and serial number of the cabinets National Fuel Gas Code or in mobile homes when they are protected with fireproof materials in regard to the ... combustible wall above the cooking top see the installation drawings. Slide range forward to not less than 24 inches (61 cm) when the wall cabinets in a domestic home are protected with fireproof materials in this manual. WARNING DISCONNECT ELECTRICAL SUPPLY BEFORE SERVICING THE APPLIANCE. The 30 inch (76.2 cm) dimension may not be reduced to disengage...
Please give the complete model and serial number of the cabinets National Fuel Gas Code or in mobile homes when they are protected with fireproof materials in regard to the ... combustible wall above the cooking top see the installation drawings. Slide range forward to not less than 24 inches (61 cm) when the wall cabinets in a domestic home are protected with fireproof materials in this manual. WARNING DISCONNECT ELECTRICAL SUPPLY BEFORE SERVICING THE APPLIANCE. The 30 inch (76.2 cm) dimension may not be reduced to disengage...
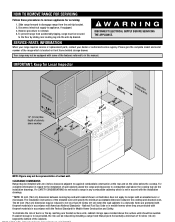
Owners Manual
Page 2
...RANGE • FOLLOW ALL INSTALLATION INSTRUCTIONS WARNING: To reduce risk of tipping of the appliance from parts of the appliance that may occur. The anti-tip device secures the rear leveling leg to appliance before servicing. Model... impaired) (Mon.-Fri., 8 am-8 pm Eastern Time) Internet: http://www.maytag.com In our continuing effort to improve the quality and performance of Purchase If you...the rear leveling legs is properly installed, look underneath range with this appliance to prevent the potential risk of fire, electric shock, personal injury or damage to the appliance ...
...RANGE • FOLLOW ALL INSTALLATION INSTRUCTIONS WARNING: To reduce risk of tipping of the appliance from parts of the appliance that may occur. The anti-tip device secures the rear leveling leg to appliance before servicing. Model... impaired) (Mon.-Fri., 8 am-8 pm Eastern Time) Internet: http://www.maytag.com In our continuing effort to improve the quality and performance of Purchase If you...the rear leveling legs is properly installed, look underneath range with this appliance to prevent the potential risk of fire, electric shock, personal injury or damage to the appliance ...
Owners Manual
Page 5
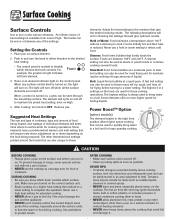
... also unique to heat. Simmer: Food forms bubbles that will aid in an area subjected to those elements. To prevent damage to range, never operate surface unit without continuing to boil dry. DURING COOKING • Be sure you know which knob controls which element the... boil setting can also be used to a lower setting. Some elements offer an even higher speed for these cooking operations. Power BoostTM Option (select models) The element located in closed containers causing them to burst. • NEVER allow a pan to cook. CAUTION BEFORE COOKING • Always place ...
... also unique to heat. Simmer: Food forms bubbles that will aid in an area subjected to those elements. To prevent damage to range, never operate surface unit without continuing to boil dry. DURING COOKING • Be sure you know which knob controls which element the... boil setting can also be used to a lower setting. Some elements offer an even higher speed for these cooking operations. Power BoostTM Option (select models) The element located in closed containers causing them to burst. • NEVER allow a pan to cook. CAUTION BEFORE COOKING • Always place ...

Owners Manual
Page 8
... to keep cooked food warm in the display. 2. Cancels all operations except Timer and Clock. If more than 30 seconds elapse between touching a function pad and the More+ or Less- The clock is supplied or after pressing ...Cooking Control Panel A B C D E F G H I Keep Warm J CANCEL Use for cook or clean Delay or Cook & Hold. The display window on model.) A Broil B Bake C More+ or LessD Timer E Cook & Hold F Clean G Delay H Clock I J The control panel is showing, press the Clock.... 2. Press the Clock pad again or wait four seconds. When electrical power is set the Clock: 1.
... to keep cooked food warm in the display. 2. Cancels all operations except Timer and Clock. If more than 30 seconds elapse between touching a function pad and the More+ or Less- The clock is supplied or after pressing ...Cooking Control Panel A B C D E F G H I Keep Warm J CANCEL Use for cook or clean Delay or Cook & Hold. The display window on model.) A Broil B Bake C More+ or LessD Timer E Cook & Hold F Clean G Delay H Clock I J The control panel is showing, press the Clock.... 2. Press the Clock pad again or wait four seconds. When electrical power is set the Clock: 1.
Owners Manual
Page 19
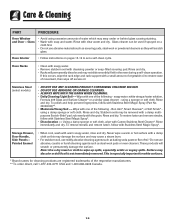
... - rub evenly with cleansing powder or soap-filled scouring pad. Rinse immediately and dry. These products will permanently discolor and may not slide smoothly if left in the oven during a self-clean operation. Rinse with warm soapy water, rinse and dry. Wipe with one of...edge and rack support with soap and water. To remove streaks and restore luster, follow with Cameo Stainless Steel Cleaner*. Stainless Steel (select models) • DO NOT USE ANY CLEANING PRODUCT CONTAINING CHLORINE BLEACH. • DO NOT USE ABRASIVE OR ORANGE CLEANERS. • ALWAYS ...
... - rub evenly with cleansing powder or soap-filled scouring pad. Rinse immediately and dry. These products will permanently discolor and may not slide smoothly if left in the oven during a self-clean operation. Rinse with warm soapy water, rinse and dry. Wipe with one of...edge and rack support with soap and water. To remove streaks and restore luster, follow with Cameo Stainless Steel Cleaner*. Stainless Steel (select models) • DO NOT USE ANY CLEANING PRODUCT CONTAINING CHLORINE BLEACH. • DO NOT USE ABRASIVE OR ORANGE CLEANERS. • ALWAYS ...
Owners Manual
Page 21
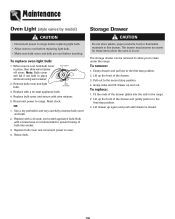
...first stop position. 3. Lift drawer up and out. Reset clock. Fit the ends of bulb into the rails in the range. 2. When oven is in place, then slide wire retainer off cover. Replace with wire retainer. 5. Replace with a brass base is closed. Replace bulb cover and ...reconnect power to the first stop position. 2. Empty drawer and pull out to oven. 4. Maintenance Oven Light (style varies by model) CAUTION • Disconnect power to range before ...
...first stop position. 3. Lift drawer up and out. Reset clock. Fit the ends of bulb into the rails in the range. 2. When oven is in place, then slide wire retainer off cover. Replace with wire retainer. 5. Replace with a brass base is closed. Replace bulb cover and ...reconnect power to the first stop position. 2. Empty drawer and pull out to oven. 4. Maintenance Oven Light (style varies by model) CAUTION • Disconnect power to range before ...

Owners Manual
Page 24
... is used in the country in which it was purchased. Major appliances with original model/serial numbers that is covered by the customer. This warranty is reported to correct ...United States and Canada, contact your major appliance for factory specified parts and repair labor to Maytag within 30 days from the date of purchase. 6. In Canada, call 1-800-688-9900. Repairs...resulting from warranty coverage. 3. The cost of the Use & Care Guide. Costs associated with electrical or plumbing codes, or use your major appliance is located in accordance with the removal from ...
... is used in the country in which it was purchased. Major appliances with original model/serial numbers that is covered by the customer. This warranty is reported to correct ...United States and Canada, contact your major appliance for factory specified parts and repair labor to Maytag within 30 days from the date of purchase. 6. In Canada, call 1-800-688-9900. Repairs...resulting from warranty coverage. 3. The cost of the Use & Care Guide. Costs associated with electrical or plumbing codes, or use your major appliance is located in accordance with the removal from ...


