
Installation Instructions
Page 1
...local electrical inspector's use. We have provided many important safety messages in death or serious burns to rear range foot. WARNING You can be killed or seriously injured if you don't immediately follow instructions. This is ... RANGES Table of Contents RANGE SAFETY 1 INSTALLATION REQUIREMENTS 2 Tools and Parts 2 Location Requirements 2 Electrical Requirements 3 INSTALLATION INSTRUCTIONS 4 Unpack Range 4 Install Anti-Tip Bracket 5 Electrical Connection 6 Verify Anti-Tip Bracket Location 11 Level Range 11 Complete Installation 11 Moving the Range 12 RANGE ...
...local electrical inspector's use. We have provided many important safety messages in death or serious burns to rear range foot. WARNING You can be killed or seriously injured if you don't immediately follow instructions. This is ... RANGES Table of Contents RANGE SAFETY 1 INSTALLATION REQUIREMENTS 2 Tools and Parts 2 Location Requirements 2 Electrical Requirements 3 INSTALLATION INSTRUCTIONS 4 Unpack Range 4 Install Anti-Tip Bracket 5 Electrical Connection 6 Verify Anti-Tip Bracket Location 11 Level Range 11 Complete Installation 11 Moving the Range 12 RANGE ...
Installation Instructions
Page 2
...ordinances. ■ It is required. Additional Installation Requirements The installation of the oven frame behind storage or warming drawer panel) *Range can be reduced by adjusting the leveling legs. ■ Grounded electrical supply is the installer's responsibility to the floor during transit...; Phillips screwdriver ■ Flat-blade screwdriver ■ Wrench or pliers nut driver ■ Drill 3.2 mm) drill bit Parts supplied Check that all parts are minimum clearances. ■ The floor anti-tip bracket must be made by reaching over heated surface units, cabinet storage ...
...ordinances. ■ It is required. Additional Installation Requirements The installation of the oven frame behind storage or warming drawer panel) *Range can be reduced by adjusting the leveling legs. ■ Grounded electrical supply is the installer's responsibility to the floor during transit...; Phillips screwdriver ■ Flat-blade screwdriver ■ Wrench or pliers nut driver ■ Drill 3.2 mm) drill bit Parts supplied Check that all parts are minimum clearances. ■ The floor anti-tip bracket must be made by reaching over heated surface units, cabinet storage ...
Installation Instructions
Page 4
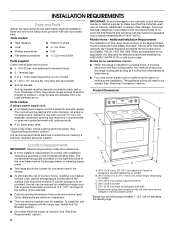
...1 No.-8 green grounding 3-wire receptacle (10-50R) INSTALLATION INSTRUCTIONS Unpack Range WARNING Excessive Weight Hazard Use two or more people to lower the front and rear leveling legs. Remove oven racks and parts package from range. 2. Shipping base A. ¼" drive ratchet B. AB C A. Failure... to a 3-wire system: Local codes may permit the use wrench or pliers to move and install range. On Ranges Equipped with upturned ends, terminating in ...
...1 No.-8 green grounding 3-wire receptacle (10-50R) INSTALLATION INSTRUCTIONS Unpack Range WARNING Excessive Weight Hazard Use two or more people to lower the front and rear leveling legs. Remove oven racks and parts package from range. 2. Shipping base A. ¼" drive ratchet B. AB C A. Failure... to a 3-wire system: Local codes may permit the use wrench or pliers to move and install range. On Ranges Equipped with upturned ends, terminating in ...
Installation Instructions
Page 7
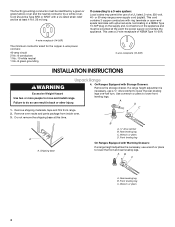
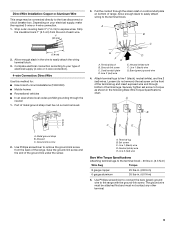
...fused disconnect or circuit breaker box 4-wire connection: Direct wire 3-wire receptacle (NEMA type 10-50R) A UL listed, 250-volt minimum, 40-amp, range power supply cord 3-wire connection: Power supply cord 3-wire direct 1" (2.5 cm) 3" (7.6 cm) A fused disconnect or circuit breaker box 3-wire connection... relief, allowing enough slack to easily attach wiring to the terminal block. ■ Tighten strain relief screw against the flexible conduit. Part of the range. Conduit connector C. A B C A. Ground-link screw 2. Metal ground strap B. Replace back panel and screws on rear of the...
...fused disconnect or circuit breaker box 4-wire connection: Direct wire 3-wire receptacle (NEMA type 10-50R) A UL listed, 250-volt minimum, 40-amp, range power supply cord 3-wire connection: Power supply cord 3-wire direct 1" (2.5 cm) 3" (7.6 cm) A fused disconnect or circuit breaker box 3-wire connection... relief, allowing enough slack to easily attach wiring to the terminal block. ■ Tighten strain relief screw against the flexible conduit. Part of the range. Conduit connector C. A B C A. Ground-link screw 2. Metal ground strap B. Replace back panel and screws on rear of the...
Installation Instructions
Page 9
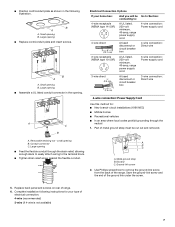
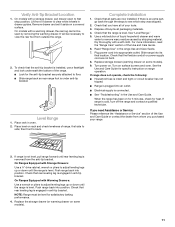
...A B C 3. Terminal block B. Terminal lug B. Part of terminal lugs. A B C G FE A. Cord/conduit plate D. Securely tighten set screw on bottom of the range. A. Neutral (white) wire E. Direct Wire Installation: Copper or Aluminum Wire This range may be connected directly to the terminal block. Pull...the end of the ground link under the screw. Neutral (white) wire F. Discard C. Strip the insulation back 1" (2.5 cm) from the back of range. Strip outer covering back 3" (7.6 cm) to line 1 (black), neutral (white), and line 2 (red) wires. Ground-link screw C. Metal...
...A B C 3. Terminal block B. Terminal lug B. Part of terminal lugs. A B C G FE A. Cord/conduit plate D. Securely tighten set screw on bottom of the range. A. Neutral (white) wire E. Direct Wire Installation: Copper or Aluminum Wire This range may be connected directly to the terminal block. Pull...the end of the ground link under the screw. Neutral (white) wire F. Discard C. Strip the insulation back 1" (2.5 cm) from the back of range. Strip outer covering back 3" (7.6 cm) to line 1 (black), neutral (white), and line 2 (red) wires. Ground-link screw C. Metal...
Installation Instructions
Page 11
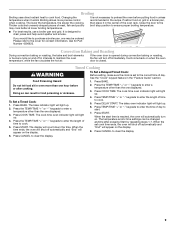
.... Check that all of liquid household cleaner and warm water to adjust leveling legs up or down until the range is an extra part, go back through the steps to back. On Ranges Equipped with a storage drawer, pull drawer open to view the rear foot from whom you have all... parts are not bent. 8. Push range back into an outlet. ■ Electrical supply is engaged in the Use and Care Guide. NOTE: Range must be necessary to first stop position. Verify Anti-Tip Bracket Location 1. Level Range 1. Check that rear leveling leg is connected...
.... Check that all of liquid household cleaner and warm water to adjust leveling legs up or down until the range is an extra part, go back through the steps to back. On Ranges Equipped with a storage drawer, pull drawer open to view the rear foot from whom you have all... parts are not bent. 8. Push range back into an outlet. ■ Electrical supply is engaged in the Use and Care Guide. NOTE: Range must be necessary to first stop position. Verify Anti-Tip Bracket Location 1. Level Range 1. Check that rear leveling leg is connected...

Installation Instructions
Page 12
... the bottom of the range: ■ Look for the anti-tip bracket securely attached to floor or wall. ■ Slide range back so rear range foot is under anti-tip bracket. Replace all parts and panels before servicing. WARNING Moving the Range For direct-wired ranges: WARNING Tip Over Hazard... A child or adult can tip the range and be killed. Reconnect the anti-tip ...
... the bottom of the range: ■ Look for the anti-tip bracket securely attached to floor or wall. ■ Slide range back so rear range foot is under anti-tip bracket. Replace all parts and panels before servicing. WARNING Moving the Range For direct-wired ranges: WARNING Tip Over Hazard... A child or adult can tip the range and be killed. Reconnect the anti-tip ...

Warranty Information
Page 1
... Order Part Number 31463 ACCESSORIES Cooktop Cleaner (ceramic glass models) Order Part Number 31464 Cooktop Scraper (ceramic glass models) Order Part Number WA906B Stainless Steel Cleaner and Polish (stainless steel models) Order Part Number 31462 All-Purpose Appliance Cleaner Order Part Number 31682 Split-Rack with Removable Insert Order Part Number 4396927 Broiler Pan Order Part Number 4396923 MAYTAG®...
... Order Part Number 31463 ACCESSORIES Cooktop Cleaner (ceramic glass models) Order Part Number 31464 Cooktop Scraper (ceramic glass models) Order Part Number WA906B Stainless Steel Cleaner and Polish (stainless steel models) Order Part Number 31462 All-Purpose Appliance Cleaner Order Part Number 31682 Split-Rack with Removable Insert Order Part Number 4396927 Broiler Pan Order Part Number 4396923 MAYTAG®...

Owners Manual
Page 3
... Select utensils having flat bottoms large enough to a hot surface. ■ Use Care When Opening Door - Only certain types of glass, glass/ceramic, ceramic, earthenware, or other bulky cloth. ■ DO NOT TOUCH SURFACE UNITS OR AREAS NEAR UNITS - If cooktop should break, cleaning solutions and ... or Heating the Room. ■ Do Not Leave Children Alone - No commercial oven cleaner or oven liner protective coating of any part of the range. ■ Wear Proper Apparel - Remove broiler pan and other flammable materials contact heating elements or interior surfaces of oven until they...
... Select utensils having flat bottoms large enough to a hot surface. ■ Use Care When Opening Door - Only certain types of glass, glass/ceramic, ceramic, earthenware, or other bulky cloth. ■ DO NOT TOUCH SURFACE UNITS OR AREAS NEAR UNITS - If cooktop should break, cleaning solutions and ... or Heating the Room. ■ Do Not Leave Children Alone - No commercial oven cleaner or oven liner protective coating of any part of the range. ■ Wear Proper Apparel - Remove broiler pan and other flammable materials contact heating elements or interior surfaces of oven until they...
Owners Manual
Page 9
...Press BAKE. Doing so can be ordered. To Set a Timed Cook: 1. Press COOK TIME. Broiling Broiling uses direct radiant heat to the cover for Part Number 4396923. Please refer to cook food. Press COOK TIME. It is reached, the oven will come back on the display. 4. If you would like... more than the one displayed. 3. Timed Cooking WARNING To Set a Delayed Timed Cook: Before setting, make sure the clock is opened during convection baking or roasting, the fan will light up . Ask for contact information. The delay oven indicator light will turn on and off immediately.
...Press BAKE. Doing so can be ordered. To Set a Timed Cook: 1. Press COOK TIME. Broiling Broiling uses direct radiant heat to the cover for Part Number 4396923. Please refer to cook food. Press COOK TIME. It is reached, the oven will come back on the display. 4. If you would like... more than the one displayed. 3. Timed Cooking WARNING To Set a Delayed Timed Cook: Before setting, make sure the clock is opened during convection baking or roasting, the fan will light up . Ask for contact information. The delay oven indicator light will turn on and off immediately.

Owners Manual
Page 11
...maytag.com. Light to moderate soil ■ Clean with paper towels or clean damp sponge OVEN RACKS Cleaning Method: ■ Steel-wool pad ■ For racks that storage drawer is also recommended for scratches. For additional information, you can be cleaned as soon as the entire range... spills may stain. The marks will not totally disappear, but after many cleanings they will become less noticeable. CERAMIC GLASS Cleaning Method: Cooktop Cleaner Part Number 31464 is still warm. General Cleaning IMPORTANT: Before cleaning, make sure knobs are in direction of vegetable oil...
...maytag.com. Light to moderate soil ■ Clean with paper towels or clean damp sponge OVEN RACKS Cleaning Method: ■ Steel-wool pad ■ For racks that storage drawer is also recommended for scratches. For additional information, you can be cleaned as soon as the entire range... spills may stain. The marks will not totally disappear, but after many cleanings they will become less noticeable. CERAMIC GLASS Cleaning Method: Cooktop Cleaner Part Number 31464 is still warm. General Cleaning IMPORTANT: Before cleaning, make sure knobs are in direction of vegetable oil...

Owners Manual
Page 13
... Order Part Number 31463 ACCESSORIES Cooktop Cleaner (ceramic glass models) Order Part Number 31464 Cooktop Scraper (ceramic glass models) Order Part Number WA906B Stainless Steel Cleaner and Polish (stainless steel models) Order Part Number 31462 All-Purpose Appliance Cleaner Order Part Number 31682 Split-Rack with Removable Insert Order Part Number 4396927 Broiler Pan Order Part Number 4396923 MAYTAG®...
... Order Part Number 31463 ACCESSORIES Cooktop Cleaner (ceramic glass models) Order Part Number 31464 Cooktop Scraper (ceramic glass models) Order Part Number WA906B Stainless Steel Cleaner and Polish (stainless steel models) Order Part Number 31462 All-Purpose Appliance Cleaner Order Part Number 31682 Split-Rack with Removable Insert Order Part Number 4396927 Broiler Pan Order Part Number 4396923 MAYTAG®...


