Installation Guide
Page 3
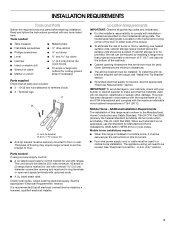
... revised. See the appropriate "Electrical Requirements" section. When such standard is required. U.S.A. Only" section. 3 Terminal lugs A B A. The model/serial rating plate is marked for cutting ground strap if necessary) Parts supplied Check that all governing codes and ordinances. ■ It is the... installer's responsibility to make sure that is located on the model/serial rating plate. Mobile Home - Thickness of this range is to floor or wall. Check existing electrical supply. See the ...
... revised. See the appropriate "Electrical Requirements" section. When such standard is required. U.S.A. Only" section. 3 Terminal lugs A B A. The model/serial rating plate is marked for cutting ground strap if necessary) Parts supplied Check that all governing codes and ordinances. ■ It is the... installer's responsibility to make sure that is located on the model/serial rating plate. Mobile Home - Thickness of this range is to floor or wall. Check existing electrical supply. See the ...
Installation Guide
Page 4
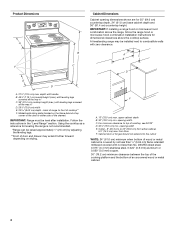
... clearance between the top of the cooking platform and the bottom of door and drawer may be installed next to 22" (55.9 cm) from floor F. Model/serial rating plate (located on styling. from either side of the drawer) IMPORTANT: Range must be raised approximately 1" (2.5 cm) by not less than ¹⁄...
... clearance between the top of the cooking platform and the bottom of door and drawer may be installed next to 22" (55.9 cm) from floor F. Model/serial rating plate (located on styling. from either side of the drawer) IMPORTANT: Range must be raised approximately 1" (2.5 cm) by not less than ¹⁄...

Installation Guide
Page 5
... homes; and recreational vehicles, or an area where local codes prohibit grounding through flexible or nonmetallic sheathed, copper or aluminum cable. U.S.A. Connectors on the model/serial rating plate. This uses a 3-wire receptacle of NEMA Type 10-50R. ■ Allow 2 to 3 ft (61.0 cm to a 4-... supply cord (pigtail) (see the following Range Rating chart). If local codes do not permit ground through the neutral conductor is located on the model/serial rating plate. **If connecting to a 50-amp circuit, use with a nominal 1³⁄₈" (34.9 mm) diameter connection opening....
... homes; and recreational vehicles, or an area where local codes prohibit grounding through flexible or nonmetallic sheathed, copper or aluminum cable. U.S.A. Connectors on the model/serial rating plate. This uses a 3-wire receptacle of NEMA Type 10-50R. ■ Allow 2 to 3 ft (61.0 cm to a 4-... supply cord (pigtail) (see the following Range Rating chart). If local codes do not permit ground through the neutral conductor is located on the model/serial rating plate. **If connecting to a 50-amp circuit, use with a nominal 1³⁄₈" (34.9 mm) diameter connection opening....
Installation Guide
Page 13
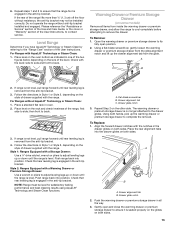
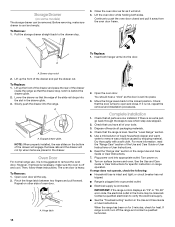
... installed correctly. C A. Drawer alignment tab C. Gently open position. 2. Flat-blade screwdriver B. Drawer glide notch 3. To Replace: 1. For Ranges with the range. Repeat Step 2 on some models) Remove all the way. 3. To Remove: 1. Style 2: Ranges Equipped with a Storage Drawer: Use a ¼" drive ratchet, wrench or pliers to ensure that rear leveling leg...
... installed correctly. C A. Drawer alignment tab C. Gently open position. 2. Flat-blade screwdriver B. Drawer glide notch 3. To Replace: 1. For Ranges with the range. Repeat Step 2 on some models) Remove all the way. 3. To Remove: 1. Style 2: Ranges Equipped with a Storage Drawer: Use a ¼" drive ratchet, wrench or pliers to ensure that rear leveling leg...
Installation Guide
Page 14
... electrical supply. ■ See the "Troubleshooting" section in the Use and Care Guide or User Instructions. Check that the drawer stop notch 2. Turn on some models) The storage drawer can be miswired. If range does not operate, check the following: ■ Household fuse is off the range and contact a qualified technician...
... electrical supply. ■ See the "Troubleshooting" section in the Use and Care Guide or User Instructions. Check that the drawer stop notch 2. Turn on some models) The storage drawer can be miswired. If range does not operate, check the following: ■ Household fuse is off the range and contact a qualified technician...
Warranty Information
Page 1
...excluded from accident, alteration, misuse, abuse, fire, flood, acts of God, improper installation, installation not in accordance with original model/serial numbers that existed when this major appliance was purchased. Repairs to parts or systems resulting from unauthorized modifications made to repair or..., when this major appliance is installed, operated and maintained according to instructions attached to or furnished with the product, Maytag will pay for factory specified parts for the following components to correct non-cosmetic defects in materials or workmanship in accordance...
...excluded from accident, alteration, misuse, abuse, fire, flood, acts of God, improper installation, installation not in accordance with original model/serial numbers that existed when this major appliance was purchased. Repairs to parts or systems resulting from unauthorized modifications made to repair or..., when this major appliance is installed, operated and maintained according to instructions attached to or furnished with the product, Maytag will pay for factory specified parts for the following components to correct non-cosmetic defects in materials or workmanship in accordance...

Warranty Information
Page 2
...service, you may contact us at the number below : Maytag Brand Home Appliances Customer eXperience Center 553 Benson Road Benton Harbor, MI 49022-2692 Please include a daytime phone number in your correspondence. Please keep these User Instructions and model number information for future reference. 19 If you do ... to the Internet and you need further assistance, you would like to the address below . For additional product information, visit www.maytag.com. Have your model number and serial number on the label, located on the oven frame behind the top right side of the oven door. If ...
...service, you may contact us at the number below : Maytag Brand Home Appliances Customer eXperience Center 553 Benson Road Benton Harbor, MI 49022-2692 Please include a daytime phone number in your correspondence. Please keep these User Instructions and model number information for future reference. 19 If you do ... to the Internet and you need further assistance, you would like to the address below . For additional product information, visit www.maytag.com. Have your model number and serial number on the label, located on the oven frame behind the top right side of the oven door. If ...
Use & Care Guide
Page 1
If you still need your model and serial number, located on some models 11 Timed Cooking (on the oven frame behind the top right side of the oven door. You will need assistance, call us at www.maytag.com for purchasing this high-quality product. If you should experience a problem not covered ... "Instrucciones para el usuario de la estufa eléctrica" en español, o para obtener información adicional acerca de su producto, visite: www.maytag.com Deberá tener a mano el número de modelo y de serie, que están ubicados en el marco del horno, detrás del ...
If you still need your model and serial number, located on some models 11 Timed Cooking (on the oven frame behind the top right side of the oven door. You will need assistance, call us at www.maytag.com for purchasing this high-quality product. If you should experience a problem not covered ... "Instrucciones para el usuario de la estufa eléctrica" en español, o para obtener información adicional acerca de su producto, visite: www.maytag.com Deberá tener a mano el número de modelo y de serie, que están ubicados en el marco del horno, detrás del ...

Use & Care Guide
Page 4
Press CLOCK. 3. Press SET CLOCK or START. If enabled, end-of-cycle tones will sound at www.maytag.com for 5 seconds. Press KITCHEN TIMER twice to adjust time and temperature settings. 1. If Start is controlled by a keypad on and off . 5. The "+" or "-" keypads... for more than 350°F (175°C) in the oven and close the oven door to take effect. 5. Your model may have some or all of countdown. 4. FEATURE GUIDE This manual covers several models. Doing so can be set a temperature other than one hour before or after pressing a keypad, the function is...
Press CLOCK. 3. Press SET CLOCK or START. If enabled, end-of-cycle tones will sound at www.maytag.com for 5 seconds. Press KITCHEN TIMER twice to adjust time and temperature settings. 1. If Start is controlled by a keypad on and off . 5. The "+" or "-" keypads... for more than 350°F (175°C) in the oven and close the oven door to take effect. 5. Your model may have some or all of countdown. 4. FEATURE GUIDE This manual covers several models. Doing so can be set a temperature other than one hour before or after pressing a keypad, the function is...
Use & Care Guide
Page 5
... and a cooktop scraper are hot. Then, while wearing oven mitts, remove the spills using a scraper while the surface is in prepackaged aluminum containers on some models) during the Self-Cleaning cycle, the entire cooktop area may not bake properly. Press START. 4. Timed Cooking allows the oven to be removed completely. ■...
... and a cooktop scraper are hot. Then, while wearing oven mitts, remove the spills using a scraper while the surface is in prepackaged aluminum containers on some models) during the Self-Cleaning cycle, the entire cooktop area may not bake properly. Press START. 4. Timed Cooking allows the oven to be removed completely. ■...
Use & Care Guide
Page 6
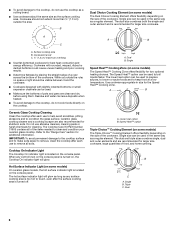
...The Cooktop On indicator light is recommended for larger size cookware, large quantities of the cookware. Single Speed Heat™ Cooking Zone (on some models) The Speed Heat™ Cooking Zone offers flexibility for stubborn soils. A B A. ■ To avoid damage to the cooktop, do ...not cook foods directly on the size of the cookware. A C A B A. Hot Surface Indicator Light (on some models) On ceramic glass models, the hot surface indicator light is turned off. Single B. The dual size combines both the single and outer element and is located on...
...The Cooktop On indicator light is recommended for larger size cookware, large quantities of the cookware. Single Speed Heat™ Cooking Zone (on some models) The Speed Heat™ Cooking Zone offers flexibility for stubborn soils. A B A. ■ To avoid damage to the cooktop, do ...not cook foods directly on the size of the cookware. A C A B A. Hot Surface Indicator Light (on some models) On ceramic glass models, the hot surface indicator light is turned off. Single B. The dual size combines both the single and outer element and is located on...
Use & Care Guide
Page 7
...; Suitable for all foods with a lid or aluminum foil. Doing so can leave permanent marks on the surfaces. To Use: 1. Melt Cooking Zone (on some models) The Melt Cooking Zone offers flexibility due to a wide range of settings between it to heat cold foods. Melt option B. One hour is transferred, which...
...; Suitable for all foods with a lid or aluminum foil. Doing so can leave permanent marks on the surfaces. To Use: 1. Melt Cooking Zone (on some models) The Melt Cooking Zone offers flexibility due to a wide range of settings between it to heat cold foods. Melt option B. One hour is transferred, which...
Use & Care Guide
Page 8
... (long tone) ■ Function has been entered ■ Reminder (on 2 surface cooking areas or elements at the same time. ■ On ceramic glass models, use . The display will return to the cooktop and elements. ■ For more than ½" (1.3 cm) beyond the surface cooking area or element. ...health of day. Exposure to published home canning guides. Always move birds to the cooktop if overheated. Press CANCEL to the time of some models), repeating every 20 seconds after a power loss. To enter the Energy Save mode, the oven and control must be blank. The display...
... (long tone) ■ Function has been entered ■ Reminder (on 2 surface cooking areas or elements at the same time. ■ On ceramic glass models, use . The display will return to the cooktop and elements. ■ For more than ½" (1.3 cm) beyond the surface cooking area or element. ...health of day. Exposure to published home canning guides. Always move birds to the cooktop if overheated. Press CANCEL to the time of some models), repeating every 20 seconds after a power loss. To enter the Energy Save mode, the oven and control must be blank. The display...
Use & Care Guide
Page 9
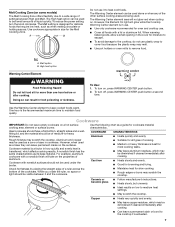
... is in the display. 5. Pressing the Cancel keypad at Fahrenheit, but can be displayed. Not performing these steps will stop flashing and remain on some models): WARNING Food Poisoning Hazard Do not let food sit in the display. Press the "+" or "-" keypads to give incorrect readings. The oven is opened or...
... is in the display. 5. Pressing the Cancel keypad at Fahrenheit, but can be displayed. Not performing these steps will stop flashing and remain on some models): WARNING Food Poisoning Hazard Do not let food sit in the display. Press the "+" or "-" keypads to give incorrect readings. The oven is opened or...
Use & Care Guide
Page 10
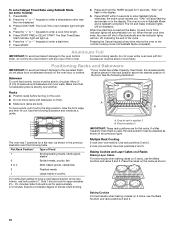
... (non-convection): Use rack positions 2 and 5. 2-rack (convection): Use rack positions 2 and 5. Baking Cookies For best results when baking cookies on some models): 1. To set cook time ends, the oven will shut off , indicating the end of the cycle. Press BAKE. 2. The Cook Time oven indicator light...should cook for 5 seconds. Ends of space around bakeware and oven walls. If a Max Capacity Oven Rack is directly over another. *If your model has a Max Capacity Oven Rack, the recessed ends must be placed in the previous figure. Baking Cookies and Layer Cakes on 2 Racks Baking Layer ...
... (non-convection): Use rack positions 2 and 5. 2-rack (convection): Use rack positions 2 and 5. Baking Cookies For best results when baking cookies on some models): 1. To set cook time ends, the oven will shut off , indicating the end of the cycle. Press BAKE. 2. The Cook Time oven indicator light...should cook for 5 seconds. Ends of space around bakeware and oven walls. If a Max Capacity Oven Rack is directly over another. *If your model has a Max Capacity Oven Rack, the recessed ends must be placed in the previous figure. Baking Cookies and Layer Cakes on 2 Racks Baking Layer ...

Use & Care Guide
Page 11
... and poultry may be shortened by up to maintain the proper temperature. ■ For best results, use . The bake and broil elements cycle on some models) In a convection oven, the fan-circulated hot air continually distributes heat more evenly, crisping surfaces while sealing in intervals. Thicker cuts and unevenly shaped pieces..." section. A. Oven Vent A The oven vent releases hot air and moisture from the oven, and should not be approximately 10-15 minutes depending upon the model.
... and poultry may be shortened by up to maintain the proper temperature. ■ For best results, use . The bake and broil elements cycle on some models) In a convection oven, the fan-circulated hot air continually distributes heat more evenly, crisping surfaces while sealing in intervals. Thicker cuts and unevenly shaped pieces..." section. A. Oven Vent A The oven vent releases hot air and moisture from the oven, and should not be approximately 10-15 minutes depending upon the model.
Use & Care Guide
Page 12
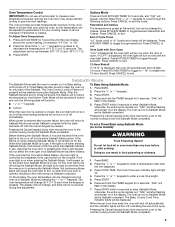
... the TEMP/TIME "+" or "-" keypads to enter the length of day. The display will appear on the display. 8. When the start . 7. Timed Cooking (on some models) WARNING Food Poisoning Hazard To Set a Delayed Timed Cook: Before setting, make sure the clock is reached, the oven will automatically turn on. Doing so...
... the TEMP/TIME "+" or "-" keypads to enter the length of day. The display will appear on the display. 8. When the start . 7. Timed Cooking (on some models) WARNING Food Poisoning Hazard To Set a Delayed Timed Cook: Before setting, make sure the clock is reached, the oven will automatically turn on. Doing so...
Use & Care Guide
Page 14
...pads, gritty washcloths or abrasive paper towels. Cleaning Method: ■ Clean cycle: See "Clean Cycle" first. 14 Burned-on some models) Cleaning Method: Use affresh® Cooktop Cleaner Part Number W10355051, Cooktop Cleaning Pads Part Number W10391473 and Cooktop Scraper Part Number WA906B to...Cooktop Cleaner or nonabrasive cleaner and cleaning pad. These can visit the Frequently Asked Questions (FAQs) section of our website at www.maytag.com. Do not use steel wool, abrasive cleansers or oven cleaner. Rub product into surface with porcelain and staining, etching, ...
...pads, gritty washcloths or abrasive paper towels. Cleaning Method: ■ Clean cycle: See "Clean Cycle" first. 14 Burned-on some models) Cleaning Method: Use affresh® Cooktop Cleaner Part Number W10355051, Cooktop Cleaning Pads Part Number W10391473 and Cooktop Scraper Part Number WA906B to...Cooktop Cleaner or nonabrasive cleaner and cleaning pad. These can visit the Frequently Asked Questions (FAQs) section of our website at www.maytag.com. Do not use steel wool, abrasive cleansers or oven cleaner. Rub product into surface with porcelain and staining, etching, ...

Use & Care Guide
Page 15
...The oven light is not the proper size. www.maytag.com Operation PROBLEM Nothing will operate Cooktop will not operate...The control knob is tripped. Delay start is blank. Several cooking cycles between Clean cycles or spills on your model, press CANCEL to thoroughly remove any key on . Cookware should not extend more information. See "Cooktop Use"...8322;" (1.3 cm) outside the cooking area. Control lock is unplugged. Push in the off position. On some models, reset the clock, if needed. Press any vinegar residue. 15 TROUBLESHOOTING First try the solutions suggested here or ...
...The oven light is not the proper size. www.maytag.com Operation PROBLEM Nothing will operate Cooktop will not operate...The control knob is tripped. Delay start is blank. Several cooking cycles between Clean cycles or spills on your model, press CANCEL to thoroughly remove any key on . Cookware should not extend more information. See "Cooktop Use"...8322;" (1.3 cm) outside the cooking area. Control lock is unplugged. Push in the off position. On some models, reset the clock, if needed. Press any vinegar residue. 15 TROUBLESHOOTING First try the solutions suggested here or ...

Use & Care Guide
Page 17
... website at www.maytag.com/cookingaccessories. Cooktop Care Kit (ceramic glass models) (includes cleaner, protectant, scraper, and applicator pads) Order Part Number 31605 Cooktop Protectant (ceramic glass models) Order Part Number 31463A affresh® Stainless Steel Cleaning Wipes (stainless steel models) Order Part Number... Cleaner Order Part Number W10355010 AquaLift® Technology Oven Cleaning Kit Order Part Number W10423113RP Cooktop Scraper (ceramic glass models) Order Part Number WA906B Granite Cleaner and Polish Order Part Number W10275756 Gas Grate and Drip Pan Cleaner Order Part...
... website at www.maytag.com/cookingaccessories. Cooktop Care Kit (ceramic glass models) (includes cleaner, protectant, scraper, and applicator pads) Order Part Number 31605 Cooktop Protectant (ceramic glass models) Order Part Number 31463A affresh® Stainless Steel Cleaning Wipes (stainless steel models) Order Part Number... Cleaner Order Part Number W10355010 AquaLift® Technology Oven Cleaning Kit Order Part Number W10423113RP Cooktop Scraper (ceramic glass models) Order Part Number WA906B Granite Cleaner and Polish Order Part Number W10275756 Gas Grate and Drip Pan Cleaner Order Part...


