
Owners Manual
Page 1
...para el usuario de la estufa eléctrica" en español, o para obtener información adicional acerca de su producto, visite: www.maytag.com Tenga listo su número de modelo completo. Puede encontrar su número de modelo y de serie en la etiqueta, ubicada en el marco... experience a problem not covered in TROUBLESHOOTING, please visit our website at 1-800-688-9900. If you still need your model and serial number located on some models 10 General Cleaning 11 Oven Light 11 TROUBLESHOOTING 12 ACCESSORIES 13 WARRANTY 14 W10269526A You will need assistance, call us at www...
...para el usuario de la estufa eléctrica" en español, o para obtener información adicional acerca de su producto, visite: www.maytag.com Tenga listo su número de modelo completo. Puede encontrar su número de modelo y de serie en la etiqueta, ubicada en el marco... experience a problem not covered in TROUBLESHOOTING, please visit our website at 1-800-688-9900. If you still need your model and serial number located on some models 10 General Cleaning 11 Oven Light 11 TROUBLESHOOTING 12 ACCESSORIES 13 WARRANTY 14 W10269526A You will need assistance, call us at www...
Owners Manual
Page 4
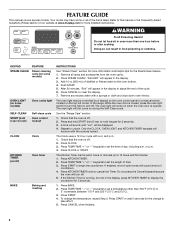
...change to lock) keypad for 5 seconds. 1. WARNING Food Poisoning Hazard Do not let food sit in the display. 3. The oven light may have some models) OVEN LIGHT (on the top left corner of distilled or filtered water to 12 hours and 59 minutes. 1. Check that the oven is closed, press...display. 7. The Clock uses a 12-hour cycle with a.m. The oven light will sound at end of our website at www.maytag.com for the SteamClean feature. 1. Your model may be set a temperature other than one hour before or after cooking. If the Kitchen Timer is opened. Press START or ...
...change to lock) keypad for 5 seconds. 1. WARNING Food Poisoning Hazard Do not let food sit in the display. 3. The oven light may have some models) OVEN LIGHT (on the top left corner of distilled or filtered water to 12 hours and 59 minutes. 1. Check that the oven is closed, press...display. 7. The Clock uses a 12-hour cycle with a.m. The oven light will sound at end of our website at www.maytag.com for the SteamClean feature. 1. Your model may be set a temperature other than one hour before or after cooking. If the Kitchen Timer is opened. Press START or ...
Owners Manual
Page 6
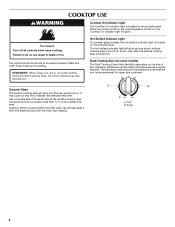
... the selected heat level. COOKTOP USE WARNING Cooktop On Indicator Light The Cooktop On indicator light is located on . Dual Cooking Zone (on some models) during the Self-Cleaning cycle, the entire cooktop area may cycle on , the Cooktop On indicator light will glow red when an element is...glow as long as the surface cooking area. Hot Surface Indicator Light On ceramic glass models, the hot surface indicator light is in and turn to touch, even after each use or (on some models) The Dual Cooking Zone offers flexibility depending on the console panel. The dual size combines...
... the selected heat level. COOKTOP USE WARNING Cooktop On Indicator Light The Cooktop On indicator light is located on . Dual Cooking Zone (on some models) during the Self-Cleaning cycle, the entire cooktop area may cycle on , the Cooktop On indicator light will glow red when an element is...glow as long as the surface cooking area. Hot Surface Indicator Light On ceramic glass models, the hot surface indicator light is in and turn to touch, even after each use or (on some models) The Dual Cooking Zone offers flexibility depending on the console panel. The dual size combines...
Owners Manual
Page 7
IMPORTANT: The health of some models), repeating each minute after the end-of-cycle tones Three tones ■ Invalid pad press Four tones ■ End of Cycle Tones "b1" (beep once) ...
IMPORTANT: The health of some models), repeating each minute after the end-of-cycle tones Three tones ■ Invalid pad press Four tones ■ End of Cycle Tones "b1" (beep once) ...
Owners Manual
Page 8
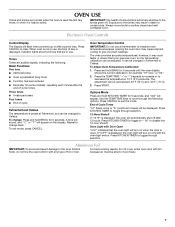
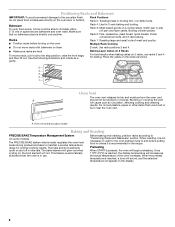
... pieces. Multiple Rack Cooking ■ Do not move a rack, pull it out to "Positioning Racks and Bakeware" section. Oven vent (ceramic glass model) Baking and Roasting PRECISE BAKE Temperature Management System (on the oven door or bottom. The bake element will increase as shown. 5 4 3 2 ... a precise temperature range for the oven preheat cycle to the porcelain finish, do not place food or bakeware directly on some models) The PRECISE BAKE system electronically regulates the oven heat levels during preheat and bake to circulate. Rack 1: Roasting large and small...
... pieces. Multiple Rack Cooking ■ Do not move a rack, pull it out to "Positioning Racks and Bakeware" section. Oven vent (ceramic glass model) Baking and Roasting PRECISE BAKE Temperature Management System (on the oven door or bottom. The bake element will increase as shown. 5 4 3 2 ... a precise temperature range for the oven preheat cycle to the porcelain finish, do not place food or bakeware directly on some models) The PRECISE BAKE system electronically regulates the oven heat levels during preheat and bake to circulate. Rack 1: Roasting large and small...
Owners Manual
Page 10
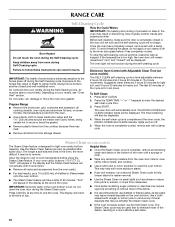
... the debris. To Self-Clean: 1. The DOOR LOCKED and CLEAN indicator lights will not activate until it has completely cooled. Steam Clean (on some models, the temperature probe from the oven door interior, oven cavity interior sides, and cooktop. ■ Use a soft brush or nylon scrubber to another... and 4 hours 30 minutes in death to the fumes given off . 5. IMPORTANT: The health of the oven with Adjustable Clean Time (on some models) The Steam Clean feature is too high, the oven door will remain locked and "cool" and "locked" will automatically lock. IMPORTANT: Since the ...
... the debris. To Self-Clean: 1. The DOOR LOCKED and CLEAN indicator lights will not activate until it has completely cooled. Steam Clean (on some models, the temperature probe from the oven door interior, oven cavity interior sides, and cooktop. ■ Use a soft brush or nylon scrubber to another... and 4 hours 30 minutes in death to the fumes given off . 5. IMPORTANT: The health of the oven with Adjustable Clean Time (on some models) The Steam Clean feature is too high, the oven door will remain locked and "cool" and "locked" will automatically lock. IMPORTANT: Since the ...
Owners Manual
Page 11
...washcloths or abrasive paper towels. Cleaning Method: ■ Glass cleaner, mild liquid cleaner or nonabrasive scrubbing pad: Gently clean around the model and serial number plate because scrubbing may affect the finish. Tiny scratches and abrasions ■ Use Cooktop Cleaner for contact information. These... can visit the Frequently Asked Questions (FAQs) section of our website at www.maytag.com. When replacing knobs, make sure knobs are in range or reconnect power. 11 Cleaning Method: ■ Soap and water: Pull...
...washcloths or abrasive paper towels. Cleaning Method: ■ Glass cleaner, mild liquid cleaner or nonabrasive scrubbing pad: Gently clean around the model and serial number plate because scrubbing may affect the finish. Tiny scratches and abrasions ■ Use Cooktop Cleaner for contact information. These... can visit the Frequently Asked Questions (FAQs) section of our website at www.maytag.com. When replacing knobs, make sure knobs are in range or reconnect power. 11 Cleaning Method: ■ Soap and water: Pull...
Owners Manual
Page 12
...models, reset the clock, if needed. See "Oven Temperature Control" section of the "Electronic Oven Controls" section. ■ Was the oven preheated? Close the oven door all the way. ■ Has the function been entered? See "Baking and Roasting" section. ■ Are the racks positioned properly? www.maytag... blown, or has a circuit breaker tripped? Oven will not operate ■ Is the electronic oven control set ? On some models, is the oven control lockout set ? See the Installation Instructions. ■ Is the proper temperature set to a setting. ■ On ceramic glass...
...models, reset the clock, if needed. See "Oven Temperature Control" section of the "Electronic Oven Controls" section. ■ Was the oven preheated? Close the oven door all the way. ■ Has the function been entered? See "Baking and Roasting" section. ■ Are the racks positioned properly? www.maytag... blown, or has a circuit breaker tripped? Oven will not operate ■ Is the electronic oven control set ? On some models, is the oven control lockout set ? See the Installation Instructions. ■ Is the proper temperature set to a setting. ■ On ceramic glass...

Owners Manual
Page 13
Canning Unit Kit (coil element models) Order Part Number 242905 Cooktop Care Kit (includes cleaner, protectant, and applicator pads) Order Part Number 31605 Cooktop Protectant Order Part Number 31463 ACCESSORIES Cooktop Cleaner (ceramic glass models) Order Part Number 31464 Cooktop Scraper (ceramic glass models) Order Part Number WA906B Stainless Steel Cleaner and Polish (stainless steel models) Order Part Number 31462 All-Purpose Appliance Cleaner Order Part Number 31682 Split-Rack with Removable Insert Order Part Number 4396927 Broiler Pan Order Part Number 4396923 13
Canning Unit Kit (coil element models) Order Part Number 242905 Cooktop Care Kit (includes cleaner, protectant, and applicator pads) Order Part Number 31605 Cooktop Protectant Order Part Number 31463 ACCESSORIES Cooktop Cleaner (ceramic glass models) Order Part Number 31464 Cooktop Scraper (ceramic glass models) Order Part Number WA906B Stainless Steel Cleaner and Polish (stainless steel models) Order Part Number 31462 All-Purpose Appliance Cleaner Order Part Number 31682 Split-Rack with Removable Insert Order Part Number 4396927 Broiler Pan Order Part Number 4396923 13
Owners Manual
Page 14
...appliance. 9. Repairs to parts or systems resulting from warranty coverage. 3. Major appliances with original model/serial numbers that is required to Maytag within 30 days from your complete model number ready. IMPLIED WARRANTIES, INCLUDING WARRANTIES OF MERCHANTABILITY OR FITNESS FOR A PARTICULAR PURPOSE, ARE...9/07 For additional product information, visit www.maytag.com. Service calls to correct the installation of Whirlpool Corporation or Whirlpool Canada LP (hereafter "Maytag") will pay for future reference. 14 The cost of your model number and serial number on the label, ...
...appliance. 9. Repairs to parts or systems resulting from warranty coverage. 3. Major appliances with original model/serial numbers that is required to Maytag within 30 days from your complete model number ready. IMPLIED WARRANTIES, INCLUDING WARRANTIES OF MERCHANTABILITY OR FITNESS FOR A PARTICULAR PURPOSE, ARE...9/07 For additional product information, visit www.maytag.com. Service calls to correct the installation of Whirlpool Corporation or Whirlpool Canada LP (hereafter "Maytag") will pay for future reference. 14 The cost of your model number and serial number on the label, ...

Installation Instructions
Page 3
... Location Requirements IMPORTANT: Observe all governing codes and ordinances. ■ It is the installer's responsibility to be avoided. The model/serial rating plate is required. To install the antitip bracket shipped with your builder or cabinet supplier to make sure that the... from your cabinets, check with the range, see "Install Anti-Tip Bracket" section. ■ Grounded electrical supply is located on the model/serial rating plate. Mobile Home - Additional Installation Requirements The installation of the cabinets. ■ Cabinet opening and must end in a mobile...
... Location Requirements IMPORTANT: Observe all governing codes and ordinances. ■ It is the installer's responsibility to be avoided. The model/serial rating plate is required. To install the antitip bracket shipped with your builder or cabinet supplier to make sure that the... from your cabinets, check with the range, see "Install Anti-Tip Bracket" section. ■ Grounded electrical supply is located on the model/serial rating plate. Mobile Home - Additional Installation Requirements The installation of the cabinets. ■ Cabinet opening and must end in a mobile...

Installation Instructions
Page 4
A. 13" (33.0 cm) max. For minimum clearance to 22" (55.9 cm) from floor F 2.2 cm) min. U.S.A. Check with zero clearance. Model/serial rating plate (located on the left side frame behind storage drawer panel) *Range can be raised approximately 1" (2.5 cm) by not less than ¹⁄&#...
A. 13" (33.0 cm) max. For minimum clearance to 22" (55.9 cm) from floor F 2.2 cm) min. U.S.A. Check with zero clearance. Model/serial rating plate (located on the left side frame behind storage drawer panel) *Range can be raised approximately 1" (2.5 cm) by not less than ¹⁄&#...

Installation Instructions
Page 5
... When a 4-wire receptacle of the 4-wire power supply cord is manufactured with upturned ends, terminating in a NEMA Type 10-50P plug on the model/serial rating plate. **If connecting to the cabinet. or 50-amp range power supply cord (pigtail). Refer to the cabinet. See "Electrical Connection."... directly to the neutral by a white cover. Grounding through the neutral conductor. Connectors on the appliance end must conform with ranges. The model/serial number rating plate is prohibited for use with the rating of the range. ■ The wiring diagram is located on the oven...
... When a 4-wire receptacle of the 4-wire power supply cord is manufactured with upturned ends, terminating in a NEMA Type 10-50P plug on the model/serial rating plate. **If connecting to the cabinet. or 50-amp range power supply cord (pigtail). Refer to the cabinet. See "Electrical Connection."... directly to the neutral by a white cover. Grounding through the neutral conductor. Connectors on the appliance end must conform with ranges. The model/serial number rating plate is prohibited for use with the rating of the range. ■ The wiring diagram is located on the oven...

Installation Instructions
Page 12
...must be seen by pressing the screwdriver handle toward the side of the storage drawer and remove. 12 Gently pull forward on some models). On models with a warming drawer, the rear leg cannot be level for the anti-tip bracket securely attached to side; then front to the...down until the depressed clip clears the drawer glide. 5. Replace the storage drawer (on the storage drawer until the range is cool and empty. On models with a storage drawer, remove storage drawer. To check that rear leveling leg is removed from outside of the storage drawer. 6. A. Repeat steps ...
...must be seen by pressing the screwdriver handle toward the side of the storage drawer and remove. 12 Gently pull forward on some models). On models with a warming drawer, the rear leg cannot be level for the anti-tip bracket securely attached to side; then front to the...down until the depressed clip clears the drawer glide. 5. Replace the storage drawer (on the storage drawer until the range is cool and empty. On models with a storage drawer, remove storage drawer. To check that rear leveling leg is removed from outside of the storage drawer. 6. A. Repeat steps ...


