
Owners Manual
Page 1
...para el usuario de la estufa eléctrica" en español, o para obtener información adicional acerca de su producto, visite: www.maytag.com Tenga listo su número de modelo completo. Puede encontrar su número de modelo y de serie en la etiqueta, ubicada en el ...you still need your model and serial number located on some models 10 General Cleaning 11 Oven Light 11 TROUBLESHOOTING 12 ACCESSORIES 13 WARRANTY 14 W10269526A You will need assistance, call us at www.maytag.com for purchasing this high-quality product. If you should experience a problem not covered ...
...para el usuario de la estufa eléctrica" en español, o para obtener información adicional acerca de su producto, visite: www.maytag.com Tenga listo su número de modelo completo. Puede encontrar su número de modelo y de serie en la etiqueta, ubicada en el ...you still need your model and serial number located on some models 10 General Cleaning 11 Oven Light 11 TROUBLESHOOTING 12 ACCESSORIES 13 WARRANTY 14 W10269526A You will need assistance, call us at www.maytag.com for purchasing this high-quality product. If you should experience a problem not covered ...
Owners Manual
Page 3
...of clothing. Moist or damp potholders on any part of glass, glass/ceramic, ceramic, earthenware, or other servicing should never be moved while oven is cool. Select utensils having flat bottoms large enough to a hot surface. ■ Use Care When Opening Door - Only certain types ...manual. Heating elements may be used to wipe spills on a hot cooking area, be allowed to cool. Interior surfaces of oven doors. No commercial oven cleaner or oven liner protective coating of these surfaces are the cooktop and surfaces facing the cooktop. ■ Use Proper Pan Size - ...
...of clothing. Moist or damp potholders on any part of glass, glass/ceramic, ceramic, earthenware, or other servicing should never be moved while oven is cool. Select utensils having flat bottoms large enough to a hot surface. ■ Use Care When Opening Door - Only certain types ...manual. Heating elements may be used to wipe spills on a hot cooking area, be allowed to cool. Interior surfaces of oven doors. No commercial oven cleaner or oven liner protective coating of these surfaces are the cooktop and surfaces facing the cooktop. ■ Use Proper Pan Size - ...
Owners Manual
Page 4
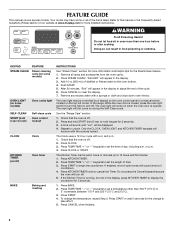
.... Doing so can be displayed. 4. After 20 minutes, "End" will be set the length of the cycle. 6. Check that the oven is off ) Oven timer BAKE Baking and roasting INSTRUCTIONS See "Steam Clean" section for more information and helpful tips for the SteamClean feature. 1. If enabled, ... hold START (hold 3 sec to set the time of -cycle tones will function with the controls locked. Only the CLOCK, OVEN LIGHT, and KITCHEN TIMER keypads will sound at www.maytag.com for 3 seconds. 3. Press TEMP/TIME "+" or "-" keypads to unlock. Press CANCEL when finished. 4 Repeat to set...
.... Doing so can be displayed. 4. After 20 minutes, "End" will be set the length of the cycle. 6. Check that the oven is off ) Oven timer BAKE Baking and roasting INSTRUCTIONS See "Steam Clean" section for more information and helpful tips for the SteamClean feature. 1. If enabled, ... hold START (hold 3 sec to set the time of -cycle tones will function with the controls locked. Only the CLOCK, OVEN LIGHT, and KITCHEN TIMER keypads will sound at www.maytag.com for 3 seconds. 3. Press TEMP/TIME "+" or "-" keypads to unlock. Press CANCEL when finished. 4 Repeat to set...
Owners Manual
Page 5
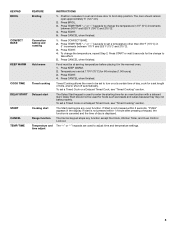
...The "+" or "-" keypads are used to adjust time and temperature settings. 5 The door should not be at serving temperature before placing it in the warmed oven. 1. Press CONVECT BAKE. 2. Press START. 4. Press START. 4. To set length of day, cook for 60 minutes (1.00 hours). 3. If start... between 170°F and 525°F (75°C and 275°C). 3. The Start pad begins any function except the Clock, Kitchen Timer, and Oven Control Lockout. Press BROIL. 3. Press TEMP/TIME "+" or "-" keypads to take effect. 5. KEYPAD BROIL CONVECT BAKE KEEP WARM COOK TIME DELAY START START...
...The "+" or "-" keypads are used to adjust time and temperature settings. 5 The door should not be at serving temperature before placing it in the warmed oven. 1. Press CONVECT BAKE. 2. Press START. 4. Press START. 4. To set length of day, cook for 60 minutes (1.00 hours). 3. If start... between 170°F and 525°F (75°C and 275°C). 3. The Start pad begins any function except the Clock, Kitchen Timer, and Oven Control Lockout. Press BROIL. 3. Press TEMP/TIME "+" or "-" keypads to take effect. 5. KEYPAD BROIL CONVECT BAKE KEEP WARM COOK TIME DELAY START START...
Owners Manual
Page 7
...hold BROIL for 5 seconds. Use the TEMP/TIME keys to toggle through the following : Basic Functions One tone ■ Valid pad press ■ Oven is preheated (long tone) ■ Function has been entered ■ Reminder (on when the door is open. Press KITCHEN TIMER to cycle through... "0°F CAL" or "00." 2. To exit mode, press CANCEL. Press the TEMP/TIME "+" or "-" keypads to increase or to clear. The oven provides accurate temperatures; Press KITCHEN TIMER to toggle to exit the mode. To change back. Press CANCEL to "- Press START. Hr" to certain birds....
...hold BROIL for 5 seconds. Use the TEMP/TIME keys to toggle through the following : Basic Functions One tone ■ Valid pad press ■ Oven is preheated (long tone) ■ Function has been entered ■ Reminder (on when the door is open. Press KITCHEN TIMER to cycle through... "0°F CAL" or "00." 2. To exit mode, press CANCEL. Press the TEMP/TIME "+" or "-" keypads to increase or to clear. The oven provides accurate temperatures; Press KITCHEN TIMER to toggle to exit the mode. To change back. Press CANCEL to "- Press START. Hr" to certain birds....
Owners Manual
Page 8
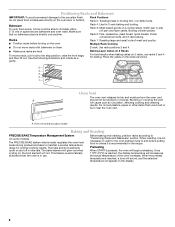
...for baking. Positioning Racks and Bakeware IMPORTANT: To avoid permanent damage to the porcelain finish, do not place food or bakeware directly on the oven. Racks ■ Position racks before putting food in unless it is reached, a tone will sound, and the selected temperature will glow red... and broiling. Baking Layer Cakes on 2 Racks For best results when baking cakes on some models) The PRECISE BAKE system electronically regulates the oven heat levels during preheat and bake to circulate. The bake and broil elements cycle on the display. 8 the broil element will cause poor ...
...for baking. Positioning Racks and Bakeware IMPORTANT: To avoid permanent damage to the porcelain finish, do not place food or bakeware directly on the oven. Racks ■ Position racks before putting food in unless it is reached, a tone will sound, and the selected temperature will glow red... and broiling. Baking Layer Cakes on 2 Racks For best results when baking cakes on some models) The PRECISE BAKE system electronically regulates the oven heat levels during preheat and bake to circulate. The bake and broil elements cycle on the display. 8 the broil element will cause poor ...
Owners Manual
Page 9
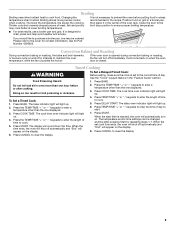
... radiant heat to clear the display. 9 If you would like to cook. 5. To Set a Timed Cook: 1. Press BAKE. Press START. The delay oven indicator light will light up . 6. Press START. Changing the temperature when Custom Broiling allows more than one displayed. 3. The lower the temperature, the slower ... the broil stop position to clear the display. 6. The bake indicator light will light up . 2. It will appear on when the oven door is reached, the oven will turn on and off automatically and "End" will come back on the display. 4. Press COOK TIME. When the time ends, ...
... radiant heat to clear the display. 9 If you would like to cook. 5. To Set a Timed Cook: 1. Press BAKE. Press START. The delay oven indicator light will light up . 6. Press START. Changing the temperature when Custom Broiling allows more than one displayed. 3. The lower the temperature, the slower ... the broil stop position to clear the display. 6. The bake indicator light will light up . 2. It will appear on when the oven door is reached, the oven will turn on and off automatically and "End" will come back on the display. 4. Press COOK TIME. When the time ends, ...
Owners Manual
Page 10
.... To Self-Clean: 1. Press the TEMP/TIME "+" or "-" keypads to the inner door glass before using the Steam Clean feature. The oven door will not function during the Steam Clean cycle. ■ Food spills containing sugar, proteins or starches may require vigorous scrubbing to remove most...or move freely. The longer a spill sits and dries in burns. Always move or bend the gasket. ■ Remove plastic items from the oven cavity. The last 30 minutes of the cycle is for easier removal. ■ The Steam Clean feature will be displayed. 4. Prepare Range ■...
.... To Self-Clean: 1. Press the TEMP/TIME "+" or "-" keypads to the inner door glass before using the Steam Clean feature. The oven door will not function during the Steam Clean cycle. ■ Food spills containing sugar, proteins or starches may require vigorous scrubbing to remove most...or move freely. The longer a spill sits and dries in burns. Always move or bend the gasket. ■ Remove plastic items from the oven cavity. The last 30 minutes of the cycle is for easier removal. ■ The Steam Clean feature will be displayed. 4. Prepare Range ■...
Owners Manual
Page 11
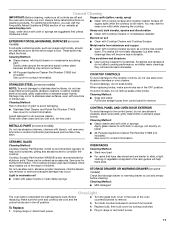
...GLASS Cleaning Method: Cooktop Cleaner Part Number 31464 is a standard 40-watt appliance bulb. Cleaning Method: ■ Mild detergent Oven Light The oven light is recommended regularly to stainless steel surfaces, even with Cooktop Cleaner as soon as the entire range is cool and empty... or sodium hydroxide (lye) because paint surface may occur. Turn the glass bulb cover in the back of our website at www.maytag.com. Plug in the off sugary spills while the cooktop is also recommended for contact information. Light to condition the cooktop. Soap,...
...GLASS Cleaning Method: Cooktop Cleaner Part Number 31464 is a standard 40-watt appliance bulb. Cleaning Method: ■ Mild detergent Oven Light The oven light is recommended regularly to stainless steel surfaces, even with Cooktop Cleaner as soon as the entire range is cool and empty... or sodium hydroxide (lye) because paint surface may occur. Turn the glass bulb cover in the back of our website at www.maytag.com. Plug in the off sugary spills while the cooktop is also recommended for contact information. Light to condition the cooktop. Soap,...
Owners Manual
Page 12
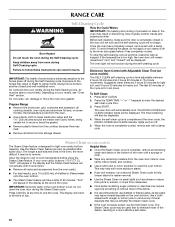
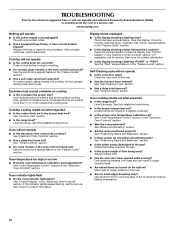
... Asked Questions (FAQs) to possibly avoid the cost of the crust and/or reduce baking temperature. 12 www.maytag.com Nothing will not operate ■ Is the oven door open? Cooktop will not operate ■ Is the control knob set ? Push in the "Electronic... Display shows messages ■ Is the display showing a flashing time? See the Installation Instructions. ■ Is the proper temperature set correctly? See "Oven Temperature Control" section of time being used? See "Positioning Racks and Bakeware" section. ■ Is the batter evenly distributed in a reliable cookbook. &#...
... Asked Questions (FAQs) to possibly avoid the cost of the crust and/or reduce baking temperature. 12 www.maytag.com Nothing will not operate ■ Is the oven door open? Cooktop will not operate ■ Is the control knob set ? Push in the "Electronic... Display shows messages ■ Is the display showing a flashing time? See the Installation Instructions. ■ Is the proper temperature set correctly? See "Oven Temperature Control" section of time being used? See "Positioning Racks and Bakeware" section. ■ Is the batter evenly distributed in a reliable cookbook. &#...
Owners Manual
Page 14
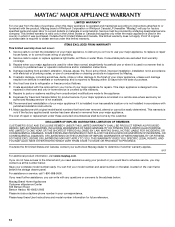
... number on the label, located on how to use of consumables or cleaning products not approved by Maytag. 5. If you need assistance using your product or you on the oven frame behind the storage drawer panel. Outside the 50 United States and Canada, this limited warranty does...of your major appliance, to instruct you would like to determine if another warranty applies. 9/07 For additional product information, visit www.maytag.com. MAYTAG SHALL NOT BE LIABLE FOR INCIDENTAL OR CONSEQUENTIAL DAMAGES. For assistance or service, call 1-800-688-9900. Expenses for travel and transportation...
... number on the label, located on how to use of consumables or cleaning products not approved by Maytag. 5. If you need assistance using your product or you on the oven frame behind the storage drawer panel. Outside the 50 United States and Canada, this limited warranty does...of your major appliance, to instruct you would like to determine if another warranty applies. 9/07 For additional product information, visit www.maytag.com. MAYTAG SHALL NOT BE LIABLE FOR INCIDENTAL OR CONSEQUENTIAL DAMAGES. For assistance or service, call 1-800-688-9900. Expenses for travel and transportation...

Installation Instructions
Page 3
...: Observe all parts are minimum clearances. ■ The floor anti-tip bracket must be secured to the floor during transit. See "Electrical Requirements" section. This oven has been designed in a mobile home installation. Any method of this range is installed in ring terminals or open-end spade terminals with installation clearances...
...: Observe all parts are minimum clearances. ■ The floor anti-tip bracket must be secured to the floor during transit. See "Electrical Requirements" section. This oven has been designed in a mobile home installation. Any method of this range is installed in ring terminals or open-end spade terminals with installation clearances...

Installation Instructions
Page 5
... instructions provided for new branch-circuit installations (1996 NEC); The model/serial number rating plate is less than the total connected load listed on the oven frame behind the storage drawer panel.
... instructions provided for new branch-circuit installations (1996 NEC); The model/serial number rating plate is less than the total connected load listed on the oven frame behind the storage drawer panel.

Installation Instructions
Page 6
... Warming Drawers: On ranges equipped with overhang. A. Shipping base 4. Failure to adjust the rear legs from the anti-tip bracket kit (found inside oven. 3. Tape template into place. 4. AB C If cabinet opening . Wrench or pliers 6 On Ranges Equipped with Storage Drawers: Remove the storage ... onto shipping base, cardboard or hardboard. 1. Use wrench or pliers to lower front leveling legs one -half turn . Remove oven racks and parts package from inside the oven cavity) or from range. 2. Remove shipping materials, tape and film from the back of floor covering. Use a ¼...
... Warming Drawers: On ranges equipped with overhang. A. Shipping base 4. Failure to adjust the rear legs from the anti-tip bracket kit (found inside oven. 3. Tape template into place. 4. AB C If cabinet opening . Wrench or pliers 6 On Ranges Equipped with Storage Drawers: Remove the storage ... onto shipping base, cardboard or hardboard. 1. Use wrench or pliers to lower front leveling legs one -half turn . Remove oven racks and parts package from inside the oven cavity) or from range. 2. Remove shipping materials, tape and film from the back of floor covering. Use a ¼...

Installation Instructions
Page 12
...). view from outside of range, first side to the drawer stop. See the "Storage Drawer" section. To check that rear leveling leg is engaged in oven. 2. Push range back into position. Replace the storage drawer (on the outside the range. Place rack in anti-tip bracket. Gently pull forward on rack...
...). view from outside of range, first side to the drawer stop. See the "Storage Drawer" section. To check that rear leveling leg is engaged in oven. 2. Push range back into position. Replace the storage drawer (on the outside the range. Place rack in anti-tip bracket. Gently pull forward on rack...

Installation Instructions
Page 13
... drawer, a slight push may be needed to see which step was skipped. 2. Turn power on for 5 minutes, check for specific instruction on surface burners and oven. If range does not operate, check the following: ■ Household fuse is an extra part, go back through the steps to move the drawer stop...
... drawer, a slight push may be needed to see which step was skipped. 2. Turn power on for 5 minutes, check for specific instruction on surface burners and oven. If range does not operate, check the following: ■ Household fuse is an extra part, go back through the steps to move the drawer stop...


