
Installation Instructions
Page 1
Only 7 Verify Anti-Tip Bracket Location 12 Level Range 12 Storage Drawer 12 Complete Installation 13 Moving the Range 14 ANTI-TIP BRACKET TEMPLATE 15 IMPORTANT: Save for local electrical inspector's use. U.S.A. Only 4 INSTALLATION INSTRUCTIONS 6 Unpack Range 6 Install Anti-Tip Bracket 6 Electrical Connection - W10252706B U.S.A. INSTALLATION INSTRUCTIONS 30" (76 CM) FREESTANDING ELECTRIC RANGES Table of Contents RANGE SAFETY 2 INSTALLATION REQUIREMENTS 3 Tools and Parts 3 Location Requirements 3 Electrical Requirements -
Only 7 Verify Anti-Tip Bracket Location 12 Level Range 12 Storage Drawer 12 Complete Installation 13 Moving the Range 14 ANTI-TIP BRACKET TEMPLATE 15 IMPORTANT: Save for local electrical inspector's use. U.S.A. Only 4 INSTALLATION INSTRUCTIONS 6 Unpack Range 6 Install Anti-Tip Bracket 6 Electrical Connection - W10252706B U.S.A. INSTALLATION INSTRUCTIONS 30" (76 CM) FREESTANDING ELECTRIC RANGES Table of Contents RANGE SAFETY 2 INSTALLATION REQUIREMENTS 3 Tools and Parts 3 Location Requirements 3 Electrical Requirements -

Installation Instructions
Page 3
...¼" nut driver and nut driver 3.2 mm) drill bit (for wood floors) 4.8 mm) carbide-tipped masonry drill bit (for concrete/ceramic floors) ■ Tin snips or large wire cutters (for convenient use with upturned ends. ■ A UL listed strain relief. Check existing...used in ring terminals or open-end spade terminals with ranges. See "Electrical Connection" section. 3 See "Electrical Requirements" section. Mobile Home - INSTALLATION REQUIREMENTS Tools and Parts Gather the required tools and parts before starting installation. It is installed in accordance with ...
...¼" nut driver and nut driver 3.2 mm) drill bit (for wood floors) 4.8 mm) carbide-tipped masonry drill bit (for concrete/ceramic floors) ■ Tin snips or large wire cutters (for convenient use with upturned ends. ■ A UL listed strain relief. Check existing...used in ring terminals or open-end spade terminals with ranges. See "Electrical Connection" section. 3 See "Electrical Requirements" section. Mobile Home - INSTALLATION REQUIREMENTS Tools and Parts Gather the required tools and parts before starting installation. It is installed in accordance with ...

Installation Instructions
Page 6
Remove oven racks and parts package from outside the range. Shipping base 4. Reconnect the anti-tip bracket, if the range is not flush with overhang. Before moving range, slide range onto shipping base, cardboard or hardboard. 1. B A. ¼" drive ratchet B. AB C If cabinet opening is wider than ...template into place. 4. It will be accessed by removing the warming drawer. Failure to children and adults. Rear leveling leg C. On Ranges Equipped with a warming drawer, the rear legs cannot be centered in death or serious burns to do so can result in the ...
Remove oven racks and parts package from outside the range. Shipping base 4. Reconnect the anti-tip bracket, if the range is not flush with overhang. Before moving range, slide range onto shipping base, cardboard or hardboard. 1. B A. ¼" drive ratchet B. AB C If cabinet opening is wider than ...template into place. 4. It will be accessed by removing the warming drawer. Failure to children and adults. Rear leveling leg C. On Ranges Equipped with a warming drawer, the rear legs cannot be centered in death or serious burns to do so can result in the ...

Installation Instructions
Page 8
...) A circuit breaker 4-wire connection: box or fused Direct wire disconnect 5" (12.7 cm) 3-wire receptacle (NEMA type 10-50R) A UL listed, 250-volt minimum, 40-amp, range power supply cord 3-wire connection: Power supply cord Style 2: Direct wire strain relief ■ Remove the knockout as needed for your home has: And you... Supply Cord Use this method for the power supply cord. ■ Assemble a UL listed strain relief in the opening . Add strain relief. Removable retaining nut B. Part of the ground-link under the screw. 8 Discard C.
...) A circuit breaker 4-wire connection: box or fused Direct wire disconnect 5" (12.7 cm) 3-wire receptacle (NEMA type 10-50R) A UL listed, 250-volt minimum, 40-amp, range power supply cord 3-wire connection: Power supply cord Style 2: Direct wire strain relief ■ Remove the knockout as needed for your home has: And you... Supply Cord Use this method for the power supply cord. ■ Assemble a UL listed strain relief in the opening . Add strain relief. Removable retaining nut B. Part of the ground-link under the screw. 8 Discard C.

Installation Instructions
Page 10
...9632; In an area where local codes prohibit grounding through the neutral 1. Discard C. C D E A. Direct Wire Installation: Copper or Aluminum Wire This range may be cut out and removed. Strip outer covering back 3" (7.6 cm) to line 1 (black), neutral (white), and line 2 (red) wires...;₈" (1.0 cm) 3. A B 3" (7.6 cm) 2. Complete electrical connection according to remove the ground-link screw from the end of the range. Part of the ground-link under the screw. Cord/conduit plate D. Bare (green) ground wire E. Neutral (white) wire G. Attach terminal lugs to expose...
...9632; In an area where local codes prohibit grounding through the neutral 1. Discard C. C D E A. Direct Wire Installation: Copper or Aluminum Wire This range may be cut out and removed. Strip outer covering back 3" (7.6 cm) to line 1 (black), neutral (white), and line 2 (red) wires...;₈" (1.0 cm) 3. A B 3" (7.6 cm) 2. Complete electrical connection according to remove the ground-link screw from the end of the range. Part of the ground-link under the screw. Cord/conduit plate D. Bare (green) ground wire E. Neutral (white) wire G. Attach terminal lugs to expose...

Installation Instructions
Page 13
.... 3. Use a mild solution of /recycle all parts are removing and replacing the storage drawer, a slight push may be needed to see which step was skipped. 2. Read "Range Use" in the drawer glides. Turn on range operation. or circuit breaker has not tripped. ■ Range is plugged into an outlet. ■ Electrical supply... residue caused by shipping material. Engage drawer glide. 4. NOTE: When you have all of the Use and Care Guide. 6. Check that the range is an extra part, go back through the steps to move the drawer stop notch past the drawer glides. For more information, read the...
.... 3. Use a mild solution of /recycle all parts are removing and replacing the storage drawer, a slight push may be needed to see which step was skipped. 2. Read "Range Use" in the drawer glides. Turn on range operation. or circuit breaker has not tripped. ■ Range is plugged into an outlet. ■ Electrical supply... residue caused by shipping material. Engage drawer glide. 4. NOTE: When you have all of the Use and Care Guide. 6. Check that the range is an extra part, go back through the steps to move the drawer stop notch past the drawer glides. For more information, read the...

Installation Instructions
Page 14
...or maintenance: For power supply cord-connected ranges: 1. Slide range forward. 2. Electrical Shock Hazard Disconnect power before operating. Reconnect the anti-tip bracket, if the range is level. 14 Plug in death or electrical shock. 1. Replace all parts and panels before servicing. Failure to do... so can result in power supply cord. 5. Disconnect power. 2. If removing the range is level. 6. Complete cleaning or ...
...or maintenance: For power supply cord-connected ranges: 1. Slide range forward. 2. Electrical Shock Hazard Disconnect power before operating. Reconnect the anti-tip bracket, if the range is level. 14 Plug in death or electrical shock. 1. Replace all parts and panels before servicing. Failure to do... so can result in power supply cord. 5. Disconnect power. 2. If removing the range is level. 6. Complete cleaning or ...

Owners Manual
Page 3
...to cover the surface unit heating element. Other surfaces of the appliance may result in or around any part of the range. ■ Wear Proper Apparel - Moist or damp potholders on the Range - Select utensils having flat bottoms large enough to a hot surface. ■ Use Care When ...Do not repair or replace any part of an oven become hot enough to cause burns. Let hot air or steam escape before removing or replacing food. ■ Do Not Heat Unopened Food Containers - Only certain types of glass, glass/ceramic, ceramic, earthenware, or other servicing should...
...to cover the surface unit heating element. Other surfaces of the appliance may result in or around any part of the range. ■ Wear Proper Apparel - Moist or damp potholders on the Range - Select utensils having flat bottoms large enough to a hot surface. ■ Use Care When ...Do not repair or replace any part of an oven become hot enough to cause burns. Let hot air or steam escape before removing or replacing food. ■ Do Not Heat Unopened Food Containers - Only certain types of glass, glass/ceramic, ceramic, earthenware, or other servicing should...
Owners Manual
Page 7
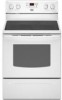
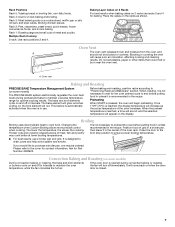
...Changing the temperature when Custom Broiling allows more precise control when cooking. Close the door to the broil stop position to maintain a precise temperature range for 2-rack baking and broiling. Rack 1: Roasting large and small cuts of meat, fish and poultry may be blocked or covered. Broiling ...Broiling uses direct radiant heat to the cover for Part Number 4396923. It is recommended in intervals to preheat the oven before putting food in unless it in intervals. Convection Baking and Roasting...
...Changing the temperature when Custom Broiling allows more precise control when cooking. Close the door to the broil stop position to maintain a precise temperature range for 2-rack baking and broiling. Rack 1: Roasting large and small cuts of meat, fish and poultry may be blocked or covered. Broiling ...Broiling uses direct radiant heat to the cover for Part Number 4396923. It is recommended in intervals to preheat the oven before putting food in unless it in intervals. Convection Baking and Roasting...

Owners Manual
Page 9
... cool and the control knobs are in range or reconnect power. 9 Metal marks from aluminum and copper ■ Clean with cooktop scraper and cooktop cleaner. CERAMIC GLASS (on some models) Food spills...performance, and after many cleanings they will become less noticeable. ■ All-Purpose Appliance Cleaner Part Number 31682 (not included): See cover for contact information. General Cleaning IMPORTANT: Before cleaning, ... water and a soft cloth or sponge are in the back of our website at www.maytag.com. Plug in the off and the oven and cooktop are harder to slide, a ...
... cool and the control knobs are in range or reconnect power. 9 Metal marks from aluminum and copper ■ Clean with cooktop scraper and cooktop cleaner. CERAMIC GLASS (on some models) Food spills...performance, and after many cleanings they will become less noticeable. ■ All-Purpose Appliance Cleaner Part Number 31682 (not included): See cover for contact information. General Cleaning IMPORTANT: Before cleaning, ... water and a soft cloth or sponge are in the back of our website at www.maytag.com. Plug in the off and the oven and cooktop are harder to slide, a ...

Owners Manual
Page 11
... Order Part Number 31463 ACCESSORIES Cooktop Cleaner (ceramic glass models) Order Part Number 31464 Cooktop Scraper (ceramic glass models) Order Part Number WA906B Stainless Steel Cleaner and Polish (stainless steel models) Order Part Number 31462 All-Purpose Appliance Cleaner Order Part Number 31682 Split-Rack with Removable Insert Order Part Number 4396927 Broiler Pan Order Part Number 4396923 MAYTAG®...
... Order Part Number 31463 ACCESSORIES Cooktop Cleaner (ceramic glass models) Order Part Number 31464 Cooktop Scraper (ceramic glass models) Order Part Number WA906B Stainless Steel Cleaner and Polish (stainless steel models) Order Part Number 31462 All-Purpose Appliance Cleaner Order Part Number 31682 Split-Rack with Removable Insert Order Part Number 4396927 Broiler Pan Order Part Number 4396923 MAYTAG®...

Warranty Information
Page 1
... Order Part Number 31463 ACCESSORIES Cooktop Cleaner (ceramic glass models) Order Part Number 31464 Cooktop Scraper (ceramic glass models) Order Part Number WA906B Stainless Steel Cleaner and Polish (stainless steel models) Order Part Number 31462 All-Purpose Appliance Cleaner Order Part Number 31682 Split-Rack with Removable Insert Order Part Number 4396927 Broiler Pan Order Part Number 4396923 MAYTAG®...
... Order Part Number 31463 ACCESSORIES Cooktop Cleaner (ceramic glass models) Order Part Number 31464 Cooktop Scraper (ceramic glass models) Order Part Number WA906B Stainless Steel Cleaner and Polish (stainless steel models) Order Part Number 31462 All-Purpose Appliance Cleaner Order Part Number 31682 Split-Rack with Removable Insert Order Part Number 4396927 Broiler Pan Order Part Number 4396923 MAYTAG®...


