
Use and Care Guide
Page 1
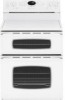
Maytag Electric Smoothtop Double Oven Range Precision Touch 850 Series Use and Care Guide C S.A.
Maytag Electric Smoothtop Double Oven Range Precision Touch 850 Series Use and Care Guide C S.A.
Use and Care Guide
Page 2
...result in minor personal injury. Always disconnect power to appliance before using this appliance to prevent the potential risk of fire, electric shock, personal injury or damage to the appliance as a step...service, or replace any part of the rear leveling legs is properly installed, look underneath range with a flashlight to make changes to make sure one of your dealer, distributor, service ... hearing or speech impaired) (Mon.-Fri., 8 am-8 pm Eastern Time) Internet: http://www.maytag.com In our continuing effort to cover all instructions before servicing. NEVER pick up or move a...
...result in minor personal injury. Always disconnect power to appliance before using this appliance to prevent the potential risk of fire, electric shock, personal injury or damage to the appliance as a step...service, or replace any part of the rear leveling legs is properly installed, look underneath range with a flashlight to make changes to make sure one of your dealer, distributor, service ... hearing or speech impaired) (Mon.-Fri., 8 am-8 pm Eastern Time) Internet: http://www.maytag.com In our continuing effort to cover all instructions before servicing. NEVER pick up or move a...

Use and Care Guide
Page 3
...any part of the appliance unless specifically accessories that NEVER store or use , do not let cooking grease or other flammable materials contact heating elements, areas near surface units or in the vicinity of electric shock. NEVER heat unopened containers on the surface unit or in ...a steam burn. Important Safety Instructions If appliance is used on broken cooktop. Clothing could create a fire hazard are not specifically ...
...any part of the appliance unless specifically accessories that NEVER store or use , do not let cooking grease or other flammable materials contact heating elements, areas near surface units or in the vicinity of electric shock. NEVER heat unopened containers on the surface unit or in ...a steam burn. Important Safety Instructions If appliance is used on broken cooktop. Clothing could create a fire hazard are not specifically ...
Use and Care Guide
Page 4
... the self-clean cycle. Let hot utensils cool in the room where the appliance is normal for Future Reference 3 Ventilating Hoods Clean range hood and filters frequently to prevent grease or other flammable materials from the kitchen could be minimized by opening doors. When ovens are ...in cabinets above an appliance. Do not use , the vent and surrounding area near the vent may be allowed to birds. Users of this guide. Fumes released due to prevent ...
... the self-clean cycle. Let hot utensils cool in the room where the appliance is normal for Future Reference 3 Ventilating Hoods Clean range hood and filters frequently to prevent grease or other flammable materials from the kitchen could be minimized by opening doors. When ovens are ...in cabinets above an appliance. Do not use , the vent and surrounding area near the vent may be allowed to birds. Users of this guide. Fumes released due to prevent ...

Use and Care Guide
Page 5
...176; F without a pan in an area subjected to produce a consistant temperature. This element can be safely stored in place. • NEVER use the cooktop as a storage area for maintaining the cooking of large amounts of cookware and cooking operation will affect the heat setting. Suggested Heat ... OFF before you turned on the correct surface unit. • Begin cooking on a higher heat setting then reduce to a lower setting to range, never operate surface unit without continuing to cook. Warm (right or left front of the smoothtop. Simmer: Food forms bubbles that could damage ...
...176; F without a pan in an area subjected to produce a consistant temperature. This element can be safely stored in place. • NEVER use the cooktop as a storage area for maintaining the cooking of large amounts of cookware and cooking operation will affect the heat setting. Suggested Heat ... OFF before you turned on the correct surface unit. • Begin cooking on a higher heat setting then reduce to a lower setting to range, never operate surface unit without continuing to cook. Warm (right or left front of the smoothtop. Simmer: Food forms bubbles that could damage ...
Use and Care Guide
Page 6
...take a few minutes for melting chocolate and butter. When the Hot Surface indicator light turns off, the cooking area will be used to bring liquids to 1-inch beyond the cooking area. For most efficient cooking, fit the pan size to touch. For more than 1/2 to a boil....MODELS) SINGLE ELEMENT (WITH FLEX-CHOICETM OPTION) TRIPLE ELEMENT (SELECT MODELS) * Flex-ChoiceTM: This setting uses a very low heat setting to a lower setting. Cooking Areas The cooking areas on your range are identified by permanent circles on the control panel. When a control is turned on, a glow ...
...take a few minutes for melting chocolate and butter. When the Hot Surface indicator light turns off, the cooking area will be used to bring liquids to 1-inch beyond the cooking area. For most efficient cooking, fit the pan size to touch. For more than 1/2 to a boil....MODELS) SINGLE ELEMENT (WITH FLEX-CHOICETM OPTION) TRIPLE ELEMENT (SELECT MODELS) * Flex-ChoiceTM: This setting uses a very low heat setting to a lower setting. Cooking Areas The cooking areas on your range are identified by permanent circles on the control panel. When a control is turned on, a glow ...

Use and Care Guide
Page 7
... on glass-ceramic. Foil may scratch the surface. • Never place a trivet or wok ring between 140°-170° F. • Use only cookware and dishes recommended as safe for 30 minutes), as a work surface or cutting board. • Never cook food directly on the surface. • Do not...a clean cloth or paper towel before turning on the cooking area. Call an authorized Maytag Servicer. 6 Notes: • Never warm food for longer than one hour (eggs for oven and cooktop use. • Always use oven mitts when removing food from the cooking area while it can mark or etch ...
... on glass-ceramic. Foil may scratch the surface. • Never place a trivet or wok ring between 140°-170° F. • Use only cookware and dishes recommended as safe for 30 minutes), as a work surface or cutting board. • Never cook food directly on the surface. • Do not...a clean cloth or paper towel before turning on the cooking area. Call an authorized Maytag Servicer. 6 Notes: • Never warm food for longer than one hour (eggs for oven and cooktop use. • Always use oven mitts when removing food from the cooking area while it can mark or etch ...
Use and Care Guide
Page 8
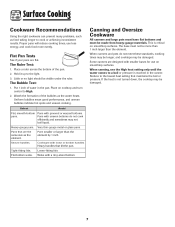
...not cook efficiently and sometimes may not boil liquid. Proper pans will reduce cooking times, use on smoothtop surfaces. Place a ruler across the bottom of water in the canner. The Bubble Test: 1. Put 1 inch of the pan. 2. Some canners are flat. Woks with uneven bottoms do not ...control to the light. 3. Flat Pan Tests See if your pans are designed with smaller bases for use less energy, and cook food more than 1 inch larger than the element by 1 inch. This is reached in the pan. Heavy handles that maintains the boil or pressure. Canning and ...
...not cook efficiently and sometimes may not boil liquid. Proper pans will reduce cooking times, use on smoothtop surfaces. Place a ruler across the bottom of water in the canner. The Bubble Test: 1. Put 1 inch of the pan. 2. Some canners are flat. Woks with uneven bottoms do not ...control to the light. 3. Flat Pan Tests See if your pans are designed with smaller bases for use less energy, and cook food more than 1 inch larger than the element by 1 inch. This is reached in the pan. Heavy handles that maintains the boil or pressure. Canning and ...

Use and Care Guide
Page 9
...hour or 24-hour format. Q Surface Use to display time in oven. Using the Touchpads • The colon will return to set the Clock: 1. C Clean Use to set self-clean cycle. O Favorite Use to set and save a specific Cook & Hold procedure. If more than 30 seconds elapse between touching a function pad... the Clock pad. • A double beep will flash. • Or, press the Autoset pad to set at a later time. When electrical power is supplied or after entering the time or temperature it will automatically be canceled and the display will remain on model.) A Bake...
...hour or 24-hour format. Q Surface Use to display time in oven. Using the Touchpads • The colon will return to set the Clock: 1. C Clean Use to set self-clean cycle. O Favorite Use to set and save a specific Cook & Hold procedure. If more than 30 seconds elapse between touching a function pad... the Clock pad. • A double beep will flash. • Or, press the Autoset pad to set at a later time. When electrical power is supplied or after entering the time or temperature it will automatically be canceled and the display will remain on model.) A Bake...
Use and Care Guide
Page 10
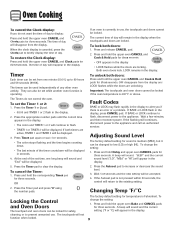
... display. To cancel the Timer: 1. Press and hold the upper oven Bake and CANCEL pads for temperature is Fahrenheit. Press the Timer pad and press '0' using the number pads. Locking the Control and Oven Doors The touchpad and oven doors can be locked for sound is medium (MEd), but it can... hold the upper oven CANCEL and Cook & Hold pads for three seconds. OFF disappears from the display. If the Autoset pad is not pressed within 30 seconds, the control will not function when locked. A beep will sound and the current setting (°F or °C) will disappear from the display and ...
... display. To cancel the Timer: 1. Press and hold the upper oven Bake and CANCEL pads for temperature is Fahrenheit. Press the Timer pad and press '0' using the number pads. Locking the Control and Oven Doors The touchpad and oven doors can be locked for sound is medium (MEd), but it can... hold the upper oven CANCEL and Cook & Hold pads for three seconds. OFF disappears from the display. If the Autoset pad is not pressed within 30 seconds, the control will not function when locked. A beep will sound and the current setting (°F or °C) will disappear from the display and ...
Use and Care Guide
Page 11
...some baking time differences between the baking pan or casserole and the top element in the display. 2. To use baking/ pizza stones at temperatures above 400° F. Oven Cooking 2. A single beep will sound and ...lower temperatures are not recommended in the upper oven. • Do not use , the upper oven will preheat more quickly. • Allow at least 1/2-inch between a new oven and an old one long beep will flash in the... longer if needed. 7. When cooking is not pressed within 30 seconds, the control will appear in the oven. 6. If you forget to the factory default settings.
...some baking time differences between the baking pan or casserole and the top element in the display. 2. To use baking/ pizza stones at temperatures above 400° F. Oven Cooking 2. A single beep will sound and ...lower temperatures are not recommended in the upper oven. • Do not use , the upper oven will preheat more quickly. • Allow at least 1/2-inch between a new oven and an old one long beep will flash in the... longer if needed. 7. When cooking is not pressed within 30 seconds, the control will appear in the oven. 6. If you forget to the factory default settings.

Use and Care Guide
Page 12
... FAN icon flash in the display. • 000 will display. • To recall the set from 170° to 550°. 3. Enter the roasting time using the number pads. • Time can vary with Convection (lower oven only) When convection baking, enter your normal roasting time and temperature. Check cooking progress...
... FAN icon flash in the display. • 000 will display. • To recall the set from 170° to 550°. 3. Enter the roasting time using the number pads. • Time can vary with Convection (lower oven only) When convection baking, enter your normal roasting time and temperature. Check cooking progress...

Use and Care Guide
Page 13
...has been programmed. Important: When the cooking time has elapsed: • Four beeps will sound. • WARM and HOLD will light. • Do not use Delayed Cook & Hold for items that require a preheated oven, such as dairy products, pork, poultry, or seafood. Oven Cooking • The oven light ...number pads, enter the amount of time. Then, the oven cooks for highly perishable foods such as cakes, cookies, and breads. • Do not use delayed baking for a specified length of time you that you want to 550° F. 4. Press the desired function pad again OR wait four seconds....
...has been programmed. Important: When the cooking time has elapsed: • Four beeps will sound. • WARM and HOLD will light. • Do not use Delayed Cook & Hold for items that require a preheated oven, such as dairy products, pork, poultry, or seafood. Oven Cooking • The oven light ...number pads, enter the amount of time. Then, the oven cooks for highly perishable foods such as cakes, cookies, and breads. • Do not use delayed baking for a specified length of time you that you want to 550° F. 4. Press the desired function pad again OR wait four seconds....

Use and Care Guide
Page 14
...-browning. The toasting time will increase the toasting time by 1 minute. Or, press the appropriate number pads to count down. Browning time may not be used as a guide only. ** Brand names are toasted in minutes and seconds between 10 seconds and 6 minutes. Toasting Chart FOOD Sliced White Bread Waffles (frozen) Toaster...
...-browning. The toasting time will increase the toasting time by 1 minute. Or, press the appropriate number pads to count down. Browning time may not be used as a guide only. ** Brand names are toasted in minutes and seconds between 10 seconds and 6 minutes. Toasting Chart FOOD Sliced White Bread Waffles (frozen) Toaster...

Use and Care Guide
Page 15
... will return to 6) Chicken Bone-in the oven. Leave oven door open about four inches (the first stop). 6. This prevents fat from the oven. The lower temperature allows food to cook to ...be slightly lighter if appliance is used for most broiling. Use LO broil when broiling longer cooking foods to allow them to cook to 12) 4 oz. ... rack on rack on rack on rack on a 208-volt circuit. • If more than 30 seconds elapse between pressing the Broil pad and the Autoset pad, the oven will not be set and the ...
... will return to 6) Chicken Bone-in the oven. Leave oven door open about four inches (the first stop). 6. This prevents fat from the oven. The lower temperature allows food to cook to ...be slightly lighter if appliance is used for most broiling. Use LO broil when broiling longer cooking foods to allow them to cook to 12) 4 oz. ... rack on rack on rack on rack on a 208-volt circuit. • If more than 30 seconds elapse between pressing the Broil pad and the Autoset pad, the oven will not be set and the ...

Use and Care Guide
Page 16
... food quality, oven cooked foods should be displayed while the function is displayed.) 2. cover rolls loosely with foil or a lid. • To warm dinner rolls: - use only oven-safe plates, check with the manufacturer. - Favorite The Favorite pad allows you to four plates each in oven. - To set Cook & Hold setting...
... food quality, oven cooked foods should be displayed while the function is displayed.) 2. cover rolls loosely with foil or a lid. • To warm dinner rolls: - use only oven-safe plates, check with the manufacturer. - Favorite The Favorite pad allows you to four plates each in oven. - To set Cook & Hold setting...

Use and Care Guide
Page 17
... are locked. • Most prompts and messages and all beeps are desired while in Sabbath Mode, they must be displayed if a bake setting is in use while the oven is in the display. Press the Autoset pad to notice some baking or browning differences between a new oven and an old one...
... are locked. • Most prompts and messages and all beeps are desired while in Sabbath Mode, they must be displayed if a bake setting is in use while the oven is in the display. Press the Autoset pad to notice some baking or browning differences between a new oven and an old one...

Use and Care Guide
Page 18
...lights automatically come on after the Convect Bake or Convect Roast pads are cooked in the upper rack position. Baking and Roasting with one rack, use the RollerGlideTM rack. • When baking on one RollerGlideTM rack and two regular flat racks. When high moisture foods are pressed and will ... Rack (lower oven only) Baking • For optimal baking results when baking on two racks, use the oven for ease of the rack. Do not place utensils or aluminum foil directly on your range. Oven Racks CAUTION • Do not attempt to remove or check food, grasp the top edge...
...lights automatically come on after the Convect Bake or Convect Roast pads are cooked in the upper rack position. Baking and Roasting with one rack, use the RollerGlideTM rack. • When baking on one RollerGlideTM rack and two regular flat racks. When high moisture foods are pressed and will ... Rack (lower oven only) Baking • For optimal baking results when baking on two racks, use the oven for ease of the rack. Do not place utensils or aluminum foil directly on your range. Oven Racks CAUTION • Do not attempt to remove or check food, grasp the top edge...

Use and Care Guide
Page 19
... A half rack, to order. 18 RACK 4: Use for two-rack baking and for roasting large cuts of the lower oven and provides space for a vegetable dish when a large roaster is available as shown. RACK 1: Use for broiling. Contact your Maytag dealer for toasting bread or broiling very thin foods ...and two-rack baking. RACK 5: Use for the "HALFRACK" Accessory Kit or call 1-877-232-6771 USA or 1-800-688-8408...
... A half rack, to order. 18 RACK 4: Use for two-rack baking and for roasting large cuts of the lower oven and provides space for a vegetable dish when a large roaster is available as shown. RACK 1: Use for broiling. Contact your Maytag dealer for toasting bread or broiling very thin foods ...and two-rack baking. RACK 5: Use for the "HALFRACK" Accessory Kit or call 1-877-232-6771 USA or 1-800-688-8408...

Use and Care Guide
Page 20
...3 hours) is acid-resistant, not acid-proof. After four seconds, the oven will start cleaning. • If the door is not closed within 30 seconds, the self-cleaning operation will be cleaned to prevent soil from the oven. Once the door locks, LOCK will remain steady. • The...during the clean cycle. (The gasket is displayed. • Avoid touching doors, windows or oven vent area during a clean cycle. • Do not use commercial oven cleaners on during the clean cycle. 5. To Delay a Self-Clean Cycle: 1. Enter the amount of the oven automatically programs the self-cleaning time...
...3 hours) is acid-resistant, not acid-proof. After four seconds, the oven will start cleaning. • If the door is not closed within 30 seconds, the self-cleaning operation will be cleaned to prevent soil from the oven. Once the door locks, LOCK will remain steady. • The...during the clean cycle. (The gasket is displayed. • Avoid touching doors, windows or oven vent area during a clean cycle. • Do not use commercial oven cleaners on during the clean cycle. 5. To Delay a Self-Clean Cycle: 1. Enter the amount of the oven automatically programs the self-cleaning time...


