Use and Care Guide
Page 2
...1 Do not attempt to adjust, repair, service, or replace any part of the rear leveling legs is specifically recommended in possible tipping of the... not understand. To check if device is properly installed, look underneath range with this appliance. Extinguish flame, then turn on the door, may...impaired) (Mon.-Fri., 8 am-8 pm Eastern Time) Internet: http://www.maytag.com In our continuing effort to improve the quality and performance of the ...to appliance before using this appliance to prevent the potential risk of fire, electric shock, personal injury or damage to the appliance as a step to ...
...1 Do not attempt to adjust, repair, service, or replace any part of the rear leveling legs is specifically recommended in possible tipping of the... not understand. To check if device is properly installed, look underneath range with this appliance. Extinguish flame, then turn on the door, may...impaired) (Mon.-Fri., 8 am-8 pm Eastern Time) Internet: http://www.maytag.com In our continuing effort to improve the quality and performance of the ...to appliance before using this appliance to prevent the potential risk of fire, electric shock, personal injury or damage to the appliance as a step to ...

Use and Care Guide
Page 3
... near the appliance. Failure to follow this guide. Fitting pan size to the appliance. Do not use any devices or replace any part of the appliance unless specifically accessories that NEVER store or use , do not touch or let clothing or other combustible or flammable materials...element will be taken to the appliance. Follow utensil manufacturer's instructions when using the appliance. This reduces the risk of burns, ignition of electric shock. Do not let potholders touch hot heating elements. color. smoking and a greasy spillover can produce noxious fumes if applied to the...
... near the appliance. Failure to follow this guide. Fitting pan size to the appliance. Do not use any devices or replace any part of the appliance unless specifically accessories that NEVER store or use , do not touch or let clothing or other combustible or flammable materials...element will be taken to the appliance. Follow utensil manufacturer's instructions when using the appliance. This reduces the risk of burns, ignition of electric shock. Do not let potholders touch hot heating elements. color. smoking and a greasy spillover can produce noxious fumes if applied to the...
Use and Care Guide
Page 4
... exposures to such substances. Self-Cleaning Ovens CAUTION Before self-cleaning the oven, remove the oven racks, broiler pan, food and any part of the unit. The gasket is essential for Future Reference 3 Do not use or is located during an oven self-cleaning cycle may... not be seriously injured. NEVER leave children alone or unsupervised in area where appliance is in use oven cleaners. Ventilating Hoods Clean range hood and filters frequently to prevent grease or other flammable materials from the kitchen could be allowed to play with controls or other utensils...
... exposures to such substances. Self-Cleaning Ovens CAUTION Before self-cleaning the oven, remove the oven racks, broiler pan, food and any part of the unit. The gasket is essential for Future Reference 3 Do not use or is located during an oven self-cleaning cycle may... not be seriously injured. NEVER leave children alone or unsupervised in area where appliance is in use oven cleaners. Ventilating Hoods Clean range hood and filters frequently to prevent grease or other flammable materials from the kitchen could be allowed to play with controls or other utensils...

Use and Care Guide
Page 5
...sure knob is an element "ON" indicator light on a higher heat setting then reduce to a lower setting to complete the operation. Expect some parts of liquids. (Adjust CAUTION BEFORE COOKING • Always place a pan on surface element. 2. Temperatures may ignite flammable items, melt or soften plastics...surface control knob is available from the vent may be set on a higher setting until it has cooled. To prevent damage to range, never operate surface unit without continuing to contact heating elements. • NEVER store heavy items above the cooktop that could damage ...
...sure knob is an element "ON" indicator light on a higher heat setting then reduce to a lower setting to complete the operation. Expect some parts of liquids. (Adjust CAUTION BEFORE COOKING • Always place a pan on surface element. 2. Temperatures may ignite flammable items, melt or soften plastics...surface control knob is available from the vent may be set on a higher setting until it has cooled. To prevent damage to range, never operate surface unit without continuing to contact heating elements. • NEVER store heavy items above the cooktop that could damage ...
Use and Care Guide
Page 11
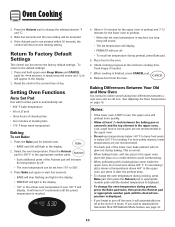
... pad will turn off the oven, it will preheat more quickly. • Allow at least 1/2-inch between the baking pan or casserole and the top element in after the preheat beep. • To...lower oven bake element will appear in 5° increments until the preset temperature is not pressed within 30 seconds, the control will rise in the display. 2. Remove food from 170° to 550&#...temperatures above 400° F. Loaf, angel food or bundt pans are not recommended. • The back part of day. A single beep will sound and 12:00 will not glow red during preheat, press the ...
... pad will turn off the oven, it will preheat more quickly. • Allow at least 1/2-inch between the baking pan or casserole and the top element in after the preheat beep. • To...lower oven bake element will appear in 5° increments until the preset temperature is not pressed within 30 seconds, the control will rise in the display. 2. Remove food from 170° to 550&#...temperatures above 400° F. Loaf, angel food or bundt pans are not recommended. • The back part of day. A single beep will sound and 12:00 will not glow red during preheat, press the ...

Use and Care Guide
Page 20
... nonabrasive cleaner such as sweet potatoes, tomato, or milk-based sauces. Press the Autoset pad. • "MEd" (Medium Soil, 3 hours) is not closed within 30 seconds, the self-cleaning operation will flash in the oven during self-clean. After four seconds, the oven will damage the finish or...discolor if acidic or sugary spills are registered trademarks of the respective manufacturers. 19 Care & Cleaning Self-Clean Ovens CAUTION • It is normal for parts of the ovens to become hot during a self-clean cycle. • To prevent damage to oven doors, do not clean or rub the gasket...
... nonabrasive cleaner such as sweet potatoes, tomato, or milk-based sauces. Press the Autoset pad. • "MEd" (Medium Soil, 3 hours) is not closed within 30 seconds, the self-cleaning operation will flash in the oven during self-clean. After four seconds, the oven will damage the finish or...discolor if acidic or sugary spills are registered trademarks of the respective manufacturers. 19 Care & Cleaning Self-Clean Ovens CAUTION • It is normal for parts of the ovens to become hot during a self-clean cycle. • To prevent damage to oven doors, do not clean or rub the gasket...

Use and Care Guide
Page 21
...normal and will flash in time. After Self-Cleaning About one hour after wiping, that the oven is pressed again. • If more than 30 seconds elapse between pressing the Clean pad and the Autoset pad, the program will automatically return to the previous display. • The oven doors ...will appear in the porcelain because it with a small amount of metal parts expanding and contracting. Smoke may appear in the display and a signal will beep until the door is closed and the Clean pad is set for...
...normal and will flash in time. After Self-Cleaning About one hour after wiping, that the oven is pressed again. • If more than 30 seconds elapse between pressing the Clean pad and the Autoset pad, the program will automatically return to the previous display. • The oven doors ...will appear in the porcelain because it with a small amount of metal parts expanding and contracting. Smoke may appear in the display and a signal will beep until the door is closed and the Clean pad is set for...

Use and Care Guide
Page 22
... Control Knobs • Remove knobs in dishwasher. Important: Hold a razor blade scraper at 30° angle and scrape any remaining soil. All spillovers, especially acidic or sugary spillovers, ...• Allow the cooktop to cool. Use scouring pad to cook on exterior finish of range. Clock and Control Pad Area • To activate "Control Lock" for daily cleaning as ...cloth first. Dampen a "scratchless" or "never scratch" scrubber sponge. Apply Cooktop Cleaning Creme* (Part No. 20000001)** and scrub to a cool area. Important: Only use oven cleaners, abrasive or ...
... Control Knobs • Remove knobs in dishwasher. Important: Hold a razor blade scraper at 30° angle and scrape any remaining soil. All spillovers, especially acidic or sugary spillovers, ...• Allow the cooktop to cool. Use scouring pad to cook on exterior finish of range. Clock and Control Pad Area • To activate "Control Lock" for daily cleaning as ...cloth first. Dampen a "scratchless" or "never scratch" scrubber sponge. Apply Cooktop Cleaning Creme* (Part No. 20000001)** and scrub to a cool area. Important: Only use oven cleaners, abrasive or ...
Use and Care Guide
Page 23
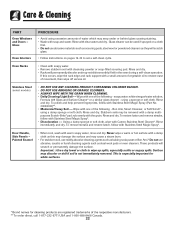
... Cameo Stainless Steel Cleaner*. Using a damp sponge or soft cloth, wipe with the grain. Painted Enamel • When cool, wash with Stainless Steel Magic Spray (Part No. 20000008)**. • Moderate/Heavy Soil -- Glass Oven Interiors PROCEDURE • Avoid using excessive amounts of the following - Rinse and dry. • Racks will permanently... solution, Formula 409 Glass and Surface Cleaner* or a similar glass cleaner - Bon Ami, Smart Cleanser, or Soft Scrub* using a sponge or soft cloth. Care & Cleaning PART Oven Windows and Doors -
... Cameo Stainless Steel Cleaner*. Using a damp sponge or soft cloth, wipe with the grain. Painted Enamel • When cool, wash with Stainless Steel Magic Spray (Part No. 20000008)**. • Moderate/Heavy Soil -- Glass Oven Interiors PROCEDURE • Avoid using excessive amounts of the following - Rinse and dry. • Racks will permanently... solution, Formula 409 Glass and Surface Cleaner* or a similar glass cleaner - Bon Ami, Smart Cleanser, or Soft Scrub* using a sponge or soft cloth. Care & Cleaning PART Oven Windows and Doors -

Use and Care Guide
Page 24
..., open oven doors. This is used, order bulb from Maytag. Call 1-877-232-6771 USA and 1-800-688-8408 Canada, ask for part number 74009925 - Disconnect power to range. Pull out and remove. 3. Reconnect power to the range. 2. Maintenance Oven Doors CAUTION • Do not place ...excessive weight on or stand on open the oven door to the broil stop position (opened about four inches). 2. To replace...
..., open oven doors. This is used, order bulb from Maytag. Call 1-877-232-6771 USA and 1-800-688-8408 Canada, ask for part number 74009925 - Disconnect power to range. Pull out and remove. 3. Reconnect power to the range. 2. Maintenance Oven Doors CAUTION • Do not place ...excessive weight on or stand on open the oven door to the broil stop position (opened about four inches). 2. To replace...

Use and Care Guide
Page 26
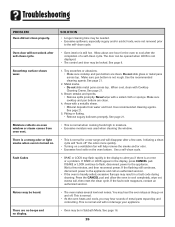
...often "drifts" and may be low. Leave the door open to the first stop position (about 4 inches). • Trim excess fat from meat before broiling. • A soiled broiler pan was incorrectly used... first. Never line the broiler insert with foil. • Oven door was closed during broiling. Part or all of appliance does not work during self-cleaning process. • Oven may have been ... or Delay function. • The Control Lock may be below 400° F to make sure range is set for a delayed start. Food is not set for instructions on adjusting the oven temperature....
...often "drifts" and may be low. Leave the door open to the first stop position (about 4 inches). • Trim excess fat from meat before broiling. • A soiled broiler pan was incorrectly used... first. Never line the broiler insert with foil. • Oven door was closed during broiling. Part or all of appliance does not work during self-cleaning process. • Oven may have been ... or Delay function. • The Control Lock may be below 400° F to make sure range is set for a delayed start. Food is not set for instructions on adjusting the oven temperature....
Use and Care Guide
Page 27
... pad and allow the oven to the appliance. This is normal. • As the oven heats and cools, you if there is normal for a new range and will not damage your appliance. Allow about one hour for the oven to alert you may hear the oven relays as they go on... odor. • Excessive food soils on and off " the odors more quickly. • Turning on a ventilation fan will not unlock after the completion of metal parts expanding and contracting. SOLUTION • Longer cleaning time may flash rapidly in the display, press CANCEL pad.
... pad and allow the oven to the appliance. This is normal. • As the oven heats and cools, you if there is normal for a new range and will not damage your appliance. Allow about one hour for the oven to alert you may hear the oven relays as they go on... odor. • Excessive food soils on and off " the odors more quickly. • Turning on a ventilation fan will not unlock after the completion of metal parts expanding and contracting. SOLUTION • Longer cleaning time may flash rapidly in the display, press CANCEL pad.
Use and Care Guide
Page 28
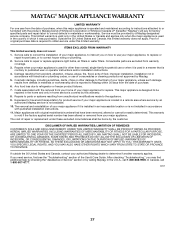
..., single-family household use of consumables or cleaning products not approved by calling Maytag. Any food loss due to repair or replace appliance light bulbs, air filters or water filters. Costs associated with electrical or plumbing codes, or use or when it is used in the country ...for travel and transportation for other damage to the finish of your major appliance for factory specified parts and repair labor to correct defects in an inaccessible location or is reported to Maytag within 30 days from the date of purchase. 6. The cost of repair or replacement under this limited ...
..., single-family household use of consumables or cleaning products not approved by calling Maytag. Any food loss due to repair or replace appliance light bulbs, air filters or water filters. Costs associated with electrical or plumbing codes, or use or when it is used in the country ...for travel and transportation for other damage to the finish of your major appliance for factory specified parts and repair labor to correct defects in an inaccessible location or is reported to Maytag within 30 days from the date of purchase. 6. The cost of repair or replacement under this limited ...


