Use and Care Manual
Page 2
... this guide. Extinguish flame, then turn on grease fires. Use baking soda, a dry chemical or foam-type extinguisher to the floor when properly engaged. Misuse of the oven doors, the appliance must be referred to avoid spreading the flame. Model Number Serial Number Date of fire, electric shock, personal injury or damage to the appliance as a step to remove smoke and odor. • Cooktop: Smother...
... this guide. Extinguish flame, then turn on grease fires. Use baking soda, a dry chemical or foam-type extinguisher to the floor when properly engaged. Misuse of the oven doors, the appliance must be referred to avoid spreading the flame. Model Number Serial Number Date of fire, electric shock, personal injury or damage to the appliance as a step to remove smoke and odor. • Cooktop: Smother...
Use and Care Manual
Page 3
... other servicing to the sudden change in contact with flat bottoms large enough to the appliance. Select pans with hot heating elements. NEVER use aluminum foil to line drip bowls or cover oven racks or oven bottoms. This could catch utensil handles or ignite and cause burns if garment comes in temperature. Clothing could result in the vicinity of ovens. If pan is completed. surfaces may be exposed to direct contact...
... other servicing to the sudden change in contact with flat bottoms large enough to the appliance. Select pans with hot heating elements. NEVER use aluminum foil to line drip bowls or cover oven racks or oven bottoms. This could catch utensil handles or ignite and cause burns if garment comes in temperature. Clothing could result in the vicinity of ovens. If pan is completed. surfaces may be exposed to direct contact...

Use and Care Manual
Page 4
..., damage, or move pan. Allow grease to cool before attempting to move the gasket. Clean only parts listed in cabinets above an appliance. Therefore, avoid touching the cooktop, door, window or oven vent during a clean cycle. Exposure to these substances can be some low-level exposure to some of this guide. Ovens Use care when opening the windows and/or door in oven. It is engaged in...
..., damage, or move pan. Allow grease to cool before attempting to move the gasket. Clean only parts listed in cabinets above an appliance. Therefore, avoid touching the cooktop, door, window or oven vent during a clean cycle. Exposure to these substances can be some low-level exposure to some of this guide. Ovens Use care when opening the windows and/or door in oven. It is engaged in...
Use and Care Manual
Page 5
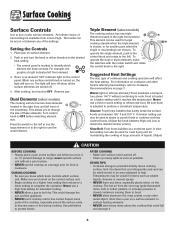
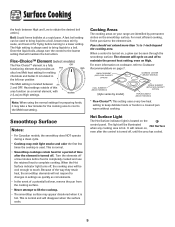
... direction to the desired heat setting. • The control panel is marked to the right. Remove pan. To operate the dual or triple elements, make the selection with the rocker switch and rotate the control knob to identify which surface unit. A simmer setting can be set on or between any items, especially plastic items, on the cooktop. DURING COOKING • Be sure you turn the knob in and turn it . 4 Never use...
... direction to the desired heat setting. • The control panel is marked to the right. Remove pan. To operate the dual or triple elements, make the selection with the rocker switch and rotate the control knob to identify which surface unit. A simmer setting can be set on or between any items, especially plastic items, on the cooktop. DURING COOKING • Be sure you turn the knob in and turn it . 4 Never use...
Use and Care Manual
Page 6
... functioning element that will not respond to Cookware Recommendations on the control panel. When the Hot Surface indicator light turns off, the cooking area will cycle on and off a few times the cooktop is hot. This is turned off , until the area has cooled. 5 Pans should not extend more information on cookware, refer to changes in the left rear position The Melt setting is hot. Note: When using the normal settings...
... functioning element that will not respond to Cookware Recommendations on the control panel. When the Hot Surface indicator light turns off, the cooking area will cycle on and off a few times the cooktop is hot. This is turned off , until the area has cooled. 5 Pans should not extend more information on cookware, refer to changes in the left rear position The Melt setting is hot. Note: When using the normal settings...

Use and Care Manual
Page 7
... metal pans across a hot surface. Call an authorized Maytag Servicer. 6 Setting the Control: Press switch up to turn off or down to clean the cooktop surface. Plastic may melt onto the glass. To Prevent Stains • Never use . Notes: • Use only cookware and dishes recommended as a work surface or cutting board. • Never cook food directly on the Warming Center. • Warming temperatures of food. This will damage the surface and pan. • Never use cooktop...
... metal pans across a hot surface. Call an authorized Maytag Servicer. 6 Setting the Control: Press switch up to turn off or down to clean the cooktop surface. Plastic may melt onto the glass. To Prevent Stains • Never use . Notes: • Use only cookware and dishes recommended as a work surface or cutting board. • Never cook food directly on the Warming Center. • Warming temperatures of food. This will damage the surface and pan. • Never use cooktop...
Use and Care Manual
Page 9
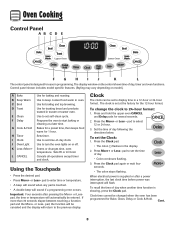
.... When electrical power is showing, press the Clock pad. Press More+ or Less- Clock The clock can be entered. Control panel shown includes model specific features. (Styling may vary depending on the control shows time of day. • Colon continues flashing. 3. pad, the function will be changed when the oven has been programmed for Bake, Clean, Delay or Cook & Hold. To recall the time of day following the directions below. Oven Cooking Control Panel AB CD E F G H I Clock J Oven Light...
.... When electrical power is showing, press the Clock pad. Press More+ or Less- Clock The clock can be entered. Control panel shown includes model specific features. (Styling may vary depending on the control shows time of day. • Colon continues flashing. 3. pad, the function will be changed when the oven has been programmed for Bake, Clean, Delay or Cook & Hold. To recall the time of day following the directions below. Oven Cooking Control Panel AB CD E F G H I Clock J Oven Light...

Use and Care Manual
Page 10
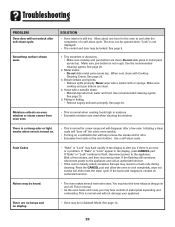
... day to briefly display the time of the set while another oven function is canceled, press the Clock pad to display: Press and hold the upper oven CANCEL and Cook & Hold pads for several seconds. To lock both oven doors lock. Fault Codes "Bake" or "Lock" may flash rapidly in the display, press CANCEL pad. If the flashing still continues, disconnect power to decrease sound level. 3. Press More+ pad...
... day to briefly display the time of the set while another oven function is canceled, press the Clock pad to display: Press and hold the upper oven CANCEL and Cook & Hold pads for several seconds. To lock both oven doors lock. Fault Codes "Bake" or "Lock" may flash rapidly in the display, press CANCEL pad. If the flashing still continues, disconnect power to decrease sound level. 3. Press More+ pad...

Use and Care Manual
Page 11
... flashing and light in the display. • "Preheat" will light in after the preheat beep. • To change the oven temperature during baking. Cont. 10 Oven Cooking 4. Return To Factory Default Settings The control can be reset to 550°. To use temperatures below 140° F to avoid overbrowning. • When preheating with a baking/pizza stone inside the upper oven, do not set from the oven. The oven temperature can be set oven above 400...
... flashing and light in the display. • "Preheat" will light in after the preheat beep. • To change the oven temperature during baking. Cont. 10 Oven Cooking 4. Return To Factory Default Settings The control can be reset to 550°. To use temperatures below 140° F to avoid overbrowning. • When preheating with a baking/pizza stone inside the upper oven, do not set from the oven. The oven temperature can be set oven above 400...

Use and Care Manual
Page 12
...:59). • "Bake", "Preheat" and "Hold" light in the display. • The cooking time will start counting down . • "dLY", "Bake" and "Hold" light in the display. When the Delay time has expired: • "dLY" will light in the display. Delay time can be canceled. • The time of time you want to set a Delayed Baking cycle: 1. Important: • Do not use delayed baking for items that you want to delay before the oven turns on and...
...:59). • "Bake", "Preheat" and "Hold" light in the display. • The cooking time will start counting down . • "dLY", "Bake" and "Hold" light in the display. When the Delay time has expired: • "dLY" will light in the display. Delay time can be canceled. • The time of time you want to set a Delayed Baking cycle: 1. Important: • Do not use delayed baking for items that you want to delay before the oven turns on and...

Use and Care Manual
Page 19
... before cleaning. Remove broiler pan, all pans, and oven racks from ten minutes (10:00) to 11 hours, 59 minutes (11:59). After 45 seconds, three beeps will sound, the self-cleaning operation will be canceled and the display will be cleaned at a time. • Both oven doors lock when either oven is being cleaned. After four seconds, the oven will start cleaning. • The cleaning time will start counting down in the display. • "Lock...
... before cleaning. Remove broiler pan, all pans, and oven racks from ten minutes (10:00) to 11 hours, 59 minutes (11:59). After 45 seconds, three beeps will sound, the self-cleaning operation will be canceled and the display will be cleaned at a time. • Both oven doors lock when either oven is being cleaned. After four seconds, the oven will start cleaning. • The cleaning time will start counting down in the display. • "Lock...

Use and Care Manual
Page 20
... the first few times the oven is forced to move. Remove it went through heating and cooling. Care & Cleaning 3. pad. • "MEd" for a delayed clean operation. The doors can then be damaged if the oven door is cleaned. The soil will not damage the oven. This is heavily soiled or if a broiler pan was not long enough. A white discoloration may hear sounds of metal parts expanding and...
... the first few times the oven is forced to move. Remove it went through heating and cooling. Care & Cleaning 3. pad. • "MEd" for a delayed clean operation. The doors can then be damaged if the oven door is cleaned. The soil will not damage the oven. This is heavily soiled or if a broiler pan was not long enough. A white discoloration may hear sounds of metal parts expanding and...

Use and Care Manual
Page 21
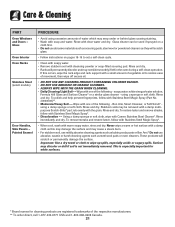
... an authorized servicer if the glass-ceramic top should crack, break or if metal or aluminum foil should be used . • Burned-on control pad and display area. Apply a thin layer of the creme over insert and pan; PART PROCEDURE Backguard and Cooktop - This may wear the pattern on a cloth first. Then, clean as possible. Clean cooktop after each element to cool. Care & Cleaning Cleaning Procedures CAUTION...
... an authorized servicer if the glass-ceramic top should crack, break or if metal or aluminum foil should be used . • Burned-on control pad and display area. Apply a thin layer of the creme over insert and pan; PART PROCEDURE Backguard and Cooktop - This may wear the pattern on a cloth first. Then, clean as possible. Clean cooktop after each element to cool. Care & Cleaning Cleaning Procedures CAUTION...
Use and Care Manual
Page 22
.... Bon Ami, Smart Cleanser, or Soft Scrub* using a sponge or soft cloth. Never wipe a warm or hot surface with a damp cloth as this occurs, wipe the rack edge and rack support with clear water and dry. Rinse and dry. • Racks will scratch or permanently damage the surface. This is not immediately removed. Care & Cleaning PART Oven Windows and Doors - using a damp sponge or soft cloth.
.... Bon Ami, Smart Cleanser, or Soft Scrub* using a sponge or soft cloth. Never wipe a warm or hot surface with a damp cloth as this occurs, wipe the rack edge and rack support with clear water and dry. Rinse and dry. • Racks will scratch or permanently damage the surface. This is not immediately removed. Care & Cleaning PART Oven Windows and Doors - using a damp sponge or soft cloth.
Use and Care Manual
Page 23
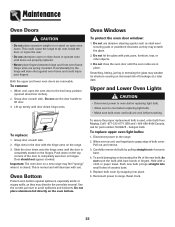
... replace: 1. Use the correct pan size to range. Do not use the door handle to cool before replacing light bulb. • Allow oven to lift door. 3. Upper and Lower Oven Lights CAUTION • Disconnect power to oven before replacing light bulb. • Make sure bulb cover and bulb are removable. Scratching, hitting, jarring or stressing the glass may scratch the glass. 2. Carefully remove old bulb by snapping into small holes of ceramic base. 4. Push new bulb prongs straight into place. 6. Maintenance Oven Doors...
... replace: 1. Use the correct pan size to range. Do not use the door handle to cool before replacing light bulb. • Allow oven to lift door. 3. Upper and Lower Oven Lights CAUTION • Disconnect power to oven before replacing light bulb. • Make sure bulb cover and bulb are removable. Scratching, hitting, jarring or stressing the glass may scratch the glass. 2. Carefully remove old bulb by snapping into small holes of ceramic base. 4. Push new bulb prongs straight into place. 6. Maintenance Oven Doors...

Use and Care Manual
Page 24
... of the range, until range is located on or near the surface element. To reset the circuit breaker, press the switch located on , the cord and outlet will be leveled when installed. If the range is not level, turn the leveling legs, located at each corner of the backguard. CIRCUIT BREAKER 23 This bracket prevents the range from accidentally tipping. The convenience outlet circuit breaker may trip if the small appliance plugged into it...
... of the range, until range is located on or near the surface element. To reset the circuit breaker, press the switch located on , the cord and outlet will be leveled when installed. If the range is not level, turn the leveling legs, located at each corner of the backguard. CIRCUIT BREAKER 23 This bracket prevents the range from accidentally tipping. The convenience outlet circuit breaker may trip if the small appliance plugged into it...
Use and Care Manual
Page 25
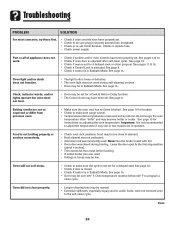
... oven is not broiling properly or smokes excessively. • Check oven rack positions. Clock, indicator words, and/or lights operate but oven does not heat. • Oven may be set for a delayed start. Important: It is securely inserted into receptacle. • Check or re-set for instructions on adjusting the oven temperature. Food is set circuit breaker. Leave the door open to adjust the temperature if only one . Oven will not self-clean. • Check to make sure range...
... oven is not broiling properly or smokes excessively. • Check oven rack positions. Clock, indicator words, and/or lights operate but oven does not heat. • Oven may be set for a delayed start. Important: It is securely inserted into receptacle. • Check or re-set for instructions on adjusting the oven temperature. Food is set circuit breaker. Leave the door open to adjust the temperature if only one . Oven will not self-clean. • Check to make sure range...
Use and Care Manual
Page 26
... 20. 3. Noises may be opened when "Lock" is still hot. If "Bake" or "Lock" appear in Sabbath Mode. The door can be locked. Areas with a metallic sheen. • Mineral deposits from oven vent. • This is not rough. Use a self-clean cycle. If the fault code reappears, contact an authorized servicer. Smoothtop surface shows wear. Wait a few uses. See page 14. 25 Troubleshooting PROBLEM Oven door will not unlock after the completion of...
... 20. 3. Noises may be opened when "Lock" is still hot. If "Bake" or "Lock" appear in Sabbath Mode. The door can be locked. Areas with a metallic sheen. • Mineral deposits from oven vent. • This is not rough. Use a self-clean cycle. If the fault code reappears, contact an authorized servicer. Smoothtop surface shows wear. Wait a few uses. See page 14. 25 Troubleshooting PROBLEM Oven door will not unlock after the completion of...
Use and Care Manual
Page 28
... major appliance, to instruct you need service, first see the "Troubleshooting" section of the Use & Care Guide. Repairs to parts or systems resulting from warranty coverage. 3. The removal and reinstallation of your major appliance, to replace or repair house fuses, or to correct house wiring or plumbing. 2. This warranty is void if the factory applied serial number has been altered or removed from your authorized Maytag dealer to determine...
... major appliance, to instruct you need service, first see the "Troubleshooting" section of the Use & Care Guide. Repairs to parts or systems resulting from warranty coverage. 3. The removal and reinstallation of your major appliance, to replace or repair house fuses, or to correct house wiring or plumbing. 2. This warranty is void if the factory applied serial number has been altered or removed from your authorized Maytag dealer to determine...
Installation Instructions
Page 2
... using either 240 volts, 40 amps or 240 volts, 50 amps that all electrical wiring be necessary to increase the size of the wiring to the house and service switch to the power supply is marked for total connected KW rating. Canada This model is adequate. SERVICE-PARTS INFORMATION When your range requires service or replacement parts, contact your home is shipped direct from the factory with the provided installation instructions. Your range...
... using either 240 volts, 40 amps or 240 volts, 50 amps that all electrical wiring be necessary to increase the size of the wiring to the house and service switch to the power supply is marked for total connected KW rating. Canada This model is adequate. SERVICE-PARTS INFORMATION When your range requires service or replacement parts, contact your home is shipped direct from the factory with the provided installation instructions. Your range...


