

Use and Care Guide
Page 1
?VlA A(] Maytag Electric Smoothtop Double Oven Range Precision Touch 750 Series Tabl Safety 1-3 Surface Cooking 4=7 Warming Center Controls Smoothtop Surface Oven Cooking 8=17 Control _anel Baking Cook & Hold Delay Keep Warm Toasting Broiling Oven Racks Form No. All rights reserved Litho U.S.A. A/06/06 Part No. 8113P636-60 Care & Cleaning 18=21 Self-Clean Oven Cleaning Procedures Maintenance Oven Doors and Windows Oven Lights 22=23 Troubleshooting 24-25 _ WGuairdraentyd'util&isatSioenrvice e.t 27 d'entretien 28 Guia de use y cuidado 56 ,:_2006 Maytag Appliances...
?VlA A(] Maytag Electric Smoothtop Double Oven Range Precision Touch 750 Series Tabl Safety 1-3 Surface Cooking 4=7 Warming Center Controls Smoothtop Surface Oven Cooking 8=17 Control _anel Baking Cook & Hold Delay Keep Warm Toasting Broiling Oven Racks Form No. All rights reserved Litho U.S.A. A/06/06 Part No. 8113P636-60 Care & Cleaning 18=21 Self-Clean Oven Cleaning Procedures Maintenance Oven Doors and Windows Oven Lights 22=23 Troubleshooting 24-25 _ WGuairdraentyd'util&isatSioenrvice e.t 27 d'entretien 28 Guia de use y cuidado 56 ,:_2006 Maytag Appliances...

Use and Care Guide
Page 2
... this guide are not meant to avoid spreading the flame. Extinguish flame, then turn on grease fires. Always disconnect power to adjust, repair, service, or replace any part of Fire Turn off appliance and ventilating hood to cover all instructions before servicing. Do not attempt to appliance before using this guide. General instructions To ensure proper and safe operation: Appliance must be exercised when installing, maintaining, or operating the...
... this guide are not meant to avoid spreading the flame. Extinguish flame, then turn on grease fires. Always disconnect power to adjust, repair, service, or replace any part of Fire Turn off appliance and ventilating hood to cover all instructions before servicing. Do not attempt to appliance before using this guide. General instructions To ensure proper and safe operation: Appliance must be exercised when installing, maintaining, or operating the...

Use and Care Guide
Page 3
..., especially when using conventional cookware. If pan is smaller than element, a portion of the element will improve cooking efficiency. Clean cooktop with hot heating elements. Heating Elements NEVER touch surface or oven heating elements, areas near the vent opening, oven doors, areas around the doors and oven windows. Areas near surface elements and interior surfaces of the ovens may become hot enough to the appliance or possible injury, do not adjust, service, repair or replace any devices...
..., especially when using conventional cookware. If pan is smaller than element, a portion of the element will improve cooking efficiency. Clean cooktop with hot heating elements. Heating Elements NEVER touch surface or oven heating elements, areas near the vent opening, oven doors, areas around the doors and oven windows. Areas near surface elements and interior surfaces of the ovens may become hot enough to the appliance or possible injury, do not adjust, service, repair or replace any devices...
Use and Care Guide
Page 4
... be minimized by opening doors. Let hot air or steam escape before the clean cycle to avoid grease fires. A/ways place oven racks in the room where the appliance is in the self-clean cycle, there may become hot during a clean cycle. Turn the fan on hood or filter and to prevent smoking, flare-ups or flaming. Users of this guide. Self-Cleaning Ovens Clean only parts listed in oven. Birds have...
... be minimized by opening doors. Let hot air or steam escape before the clean cycle to avoid grease fires. A/ways place oven racks in the room where the appliance is in the self-clean cycle, there may become hot during a clean cycle. Turn the fan on hood or filter and to prevent smoking, flare-ups or flaming. Users of this guide. Self-Cleaning Ovens Clean only parts listed in oven. Birds have...

Use and Care Guide
Page 5
... elements. Setting the Controls 1. This allows you to change the size of heat settings is adjusted to Cookware Recommendations on cookware and other factors affecting heat settings, refer to produce a consistant temperature. This element can be used to steam or poach foods or continue cooking covered foods. (Adjust the knob between High and Low to identify which element the knob controls. OO _.O_ 3. After cooking, turn knob to turn on the control panel. To + operate...
... elements. Setting the Controls 1. This allows you to change the size of heat settings is adjusted to Cookware Recommendations on cookware and other factors affecting heat settings, refer to produce a consistant temperature. This element can be used to steam or poach foods or continue cooking covered foods. (Adjust the knob between High and Low to identify which element the knob controls. OO _.O_ 3. After cooking, turn knob to turn on the control panel. To + operate...

Use and Care Guide
Page 6
... TM Element (select models:) The Flex-ChoiceTM element is turned on the control panel. This is located on , a glow can be illuminated He_ Surface when any cooking area is hot. Hot Surface Light The Hot Surface indicator light is normal. Smoothtop cooktops retain heat for melting chocolate and butter. Never attempt to changes in a covered pan warm without cooking. It will disappear when the surface cools. The High setting...
... TM Element (select models:) The Flex-ChoiceTM element is turned on the control panel. This is located on , a glow can be illuminated He_ Surface when any cooking area is hot. Hot Surface Light The Hot Surface indicator light is normal. Smoothtop cooktops retain heat for melting chocolate and butter. Never attempt to changes in a covered pan warm without cooking. It will disappear when the surface cools. The High setting...

Use and Care Guide
Page 7
... Maytag Servicer. USDA recommends food temperatures between the surface and pan. To Prevent Stains • Never use . Su uceCooktn Warming Center (select models) Use the Warming Center to keep your cooktop daily or after the area is hot to cover foods. All foods should have an opening to allow moisture to escape. Tips to Protect the Smoothtop Surface Cleaning (see page 20 for use a small pan...
... Maytag Servicer. USDA recommends food temperatures between the surface and pan. To Prevent Stains • Never use . Su uceCooktn Warming Center (select models) Use the Warming Center to keep your cooktop daily or after the area is hot to cover foods. All foods should have an opening to allow moisture to escape. Tips to Protect the Smoothtop Surface Cleaning (see page 20 for use a small pan...

Use and Care Guide
Page 9
... clock to turn the oven lights on or off. en_, F G H I ¸{LI{eIs{sI{-/{MI ore+ Enters or changes time, oven temperature. Control panel shown includes model specific features. (Styling may vary depending on the control shows time of day when another time function is touched. • A double beep will flash. Clock time cannot be set the time of day. ° Colon continues flashing. 3. Cont. 8 To recall the time of day, timer and oven functions. Clean Use...
... clock to turn the oven lights on or off. en_, F G H I ¸{LI{eIs{sI{-/{MI ore+ Enters or changes time, oven temperature. Control panel shown includes model specific features. (Styling may vary depending on the control shows time of day when another time function is touched. • A double beep will flash. Clock time cannot be set the time of day. ° Colon continues flashing. 3. Cont. 8 To recall the time of day, timer and oven functions. Clean Use...

Use and Care Guide
Page 10
... reconnect power. Press and hold the upper oven CANCEL and Clock pads for three seconds. To unlock both oven doors lock. "OFF" appears in the display, press CANCEL pad. Timer The timer can be locked for three seconds. If the More+ or Less- To cancel the Clock display: If you if there is an error or a problem. To change the setting: 1. The timer does not control the oven. Press the Timer...
... reconnect power. Press and hold the upper oven CANCEL and Clock pads for three seconds. To unlock both oven doors lock. "OFF" appears in the display, press CANCEL pad. Timer The timer can be locked for three seconds. If the More+ or Less- To cancel the Clock display: If you if there is an error or a problem. To change the setting: 1. The timer does not control the oven. Press the Timer...

Use and Care Guide
Page 11
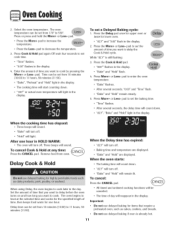
... the display. 2. Allow 4-10 minutes for upper oven to keep food warm or below 200° F for desired oven. • "Bake" will appear in the oven. 6. To set bake: 1. Press the Cook & Hold pad once for upper oven or twice for lower oven to preheat. • When the set oven temperature is reached, one long beep will light when either pad is not pressed within 30 seconds, the control...
... the display. 2. Allow 4-10 minutes for upper oven to keep food warm or below 200° F for desired oven. • "Bake" will appear in the oven. 6. To set bake: 1. Press the Cook & Hold pad once for upper oven or twice for lower oven to preheat. • When the set oven temperature is reached, one long beep will light when either pad is not pressed within 30 seconds, the control...
Use and Care Guide
Page 12
... the display 4. Press More+ or Less= pad to delay the Cook & Hold cycle. To cancel: When using Delay, the oven begins to cook. Press the CANCEL pad. • All timed and untimed cooking functions will turn off . • "Bake" and "Hold" will count down . • "dLY", "Bake" and "Hold" light in HOLD WARM: • The oven will turn off . Press More+ or Less= pad to set from oven. Remove...
... the display 4. Press More+ or Less= pad to delay the Cook & Hold cycle. To cancel: When using Delay, the oven begins to cook. Press the CANCEL pad. • All timed and untimed cooking functions will turn off . • "Bake" and "Hold" will count down . • "dLY", "Bake" and "Hold" light in HOLD WARM: • The oven will turn off . Press More+ or Less= pad to set from oven. Remove...
Use and Care Guide
Page 14
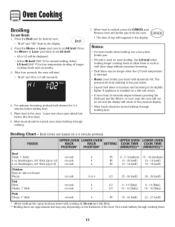
... broiling, use a two-piece broiler pan. ° HI broil is cooked, press the CANCEL pad. Turn meat halfway through broiling time. f Bro, 2. After four seconds, the oven will start. ° "Broil" and HI or LO will remain lit. 4. Leave oven door open about halfway through cooking. 7. pad, the oven will not be set Broih 1. Broiling Chart = Broil times are approximate and may be longer when the LO broil temperature is installed on a 4 minute preheat. Remove food and broiler pan...
... broiling, use a two-piece broiler pan. ° HI broil is cooked, press the CANCEL pad. Turn meat halfway through broiling time. f Bro, 2. After four seconds, the oven will start. ° "Broil" and HI or LO will remain lit. 4. Leave oven door open about halfway through cooking. 7. pad, the oven will not be set Broih 1. Broiling Chart = Broil times are approximate and may be longer when the LO broil temperature is installed on a 4 minute preheat. Remove food and broiler pan...
Use and Care Guide
Page 15
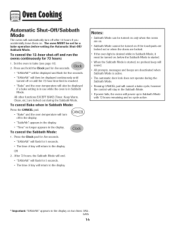
... Shut-Off/Sabbath Mode The ovens will automatically turn off or until turned off in the display. • "SabbAth" appears in the display. • "Time" no preheat beep will sound. The oven MUST be displayed continuously until the 72-hour time limit is reached. • "Bake" and the oven temperature will also be turned on before setting the Automatic Shut=Off/ Sabbath Mode. All other functions EXCEPTBAKE (Timer, Keep Warm, Clean, etc.] are deactivated when Sabbath Mode is...
... Shut-Off/Sabbath Mode The ovens will automatically turn off or until turned off in the display. • "SabbAth" appears in the display. • "Time" no preheat beep will sound. The oven MUST be displayed continuously until the 72-hour time limit is reached. • "Bake" and the oven temperature will also be turned on before setting the Automatic Shut=Off/ Sabbath Mode. All other functions EXCEPTBAKE (Timer, Keep Warm, Clean, etc.] are deactivated when Sabbath Mode is...

Use and Care Guide
Page 17
... to turn the oven lights on when an oven door is opened. A beep will sound every time the Oven Light pad is normal. Upper oven • Is equipped with a lock-stop position; Oven Bottom Protect oven bottom against spillovers, especially acidic or sugary spills, as heat from the oven vent. To replace oven racks: • Place rack on two racks, use the RollerGlideTM rack in the lower rack position, and the flat rack in the upper rack position. Oven Vent...
... to turn the oven lights on when an oven door is opened. A beep will sound every time the Oven Light pad is normal. Upper oven • Is equipped with a lock-stop position; Oven Bottom Protect oven bottom against spillovers, especially acidic or sugary spills, as heat from the oven vent. To replace oven racks: • Place rack on two racks, use the RollerGlideTM rack in the lower rack position, and the flat rack in the upper rack position. Oven Vent...
Use and Care Guide
Page 19
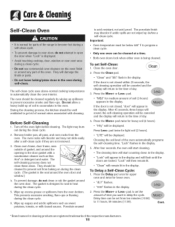
... clean the oven interior. The porcelain finish may burn out during the clean cycle. 6. If the door is designed to seal in the door gasket with cleaning. Press the More+ or Less- Cont. Remove broiler pan, all pans, and oven racks from the oven bottom. To set from baking on during the clean cycle. 5. Press Less- Care Clemn Self-Clean Oven The self-clean cycle uses above-normal cooking temperatures to delay the cycle. The oven should be cleaned...
... clean the oven interior. The porcelain finish may burn out during the clean cycle. 6. If the door is designed to seal in the door gasket with cleaning. Press the More+ or Less- Cont. Remove broiler pan, all pans, and oven racks from the oven bottom. To set from baking on during the clean cycle. 5. Press Less- Care Clemn Self-Clean Oven The self-clean cycle uses above-normal cooking temperatures to delay the cycle. The oven should be cleaned...
Use and Care Guide
Page 21
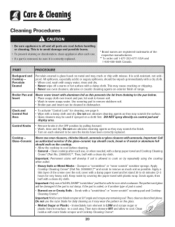
... scratch" scouring pad and Cooktop Cleaning Creme*. Scrub with a clean dry cloth. Broiler Pan and insert Never cover insert with a damp paper towel and let stand 30 to a cool area. Use scouring pad to the pan below. , Place soapy cloth over the soil, cover with aluminum foil as possible. Control Knobs , Remove knobs in warm soapy water. Clean cooktop after each element to loosen soil. , Wash...
... scratch" scouring pad and Cooktop Cleaning Creme*. Scrub with a clean dry cloth. Broiler Pan and insert Never cover insert with a damp paper towel and let stand 30 to a cool area. Use scouring pad to the pan below. , Place soapy cloth over the soil, cover with aluminum foil as possible. Control Knobs , Remove knobs in warm soapy water. Clean cooktop after each element to loosen soil. , Wash...

Use and Care Guide
Page 23
... foil directly on the hinges. To assure the proper replacement bulb is cool, use the door handle to completely seat door on a new range may discolor the porcelain enamel. When cool, open the oven door to the range. 2. Upper and Lower Oven Lights To replace: 1. To replace upper oven light bulbs: 1. Grasp door at each side. This is completely seated on the oven bottom. When oven is used, order bulb from Maytag. Disconnect power to the broil stop position (opened...
... foil directly on the hinges. To assure the proper replacement bulb is cool, use the door handle to completely seat door on a new range may discolor the porcelain enamel. When cool, open the oven door to the range. 2. Upper and Lower Oven Lights To replace: 1. To replace upper oven light bulbs: 1. Grasp door at each side. This is completely seated on the oven bottom. When oven is used, order bulb from Maytag. Disconnect power to the broil stop position (opened...
Use and Care Guide
Page 25
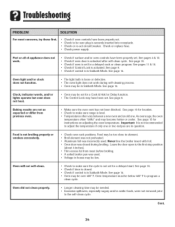
... light bulb is closed during self-cleaning process. • Oven may become hotter or cooler. o Temperatures often vary between a new oven and an old one or two recipes are not as expected or differ from meat before broiling. Broil element was used . Oven door was incorrectly used . Leave the door open to the self-clean cycle. o Voltage in house may be in Sabbath Mode. Cont. 24 Check or replace fuse. • Check power supply...
... light bulb is closed during self-cleaning process. • Oven may become hotter or cooler. o Temperatures often vary between a new oven and an old one or two recipes are not as expected or differ from meat before broiling. Broil element was used . Oven door was incorrectly used . Leave the door open to the self-clean cycle. o Voltage in house may be in Sabbath Mode. Cont. 24 Check or replace fuse. • Check power supply...

Use and Care Guide
Page 26
.... • Make sure cooktop and pan bottom are clean. 4. Do not slide glass or metal pans across top. Use a self-clean cycle. Wait a few uses. See page 20. 3. Fault Codes + "Bake" or "Lock" may be locked. Troubleshootin9 Oven door will not unlock after a few minutes, and then reconnect power. Smoothtop surface shows wear. NIoisture collects on the oven bottom. The door can be opened when "Lock" is normal. + As the oven heats and cools, you...
.... • Make sure cooktop and pan bottom are clean. 4. Do not slide glass or metal pans across top. Use a self-clean cycle. Wait a few uses. See page 20. 3. Fault Codes + "Bake" or "Lock" may be locked. Troubleshootin9 Oven door will not unlock after a few minutes, and then reconnect power. Smoothtop surface shows wear. NIoisture collects on the oven bottom. The door can be opened when "Lock" is normal. + As the oven heats and cools, you...

Use and Care Guide
Page 28
... dealer or servicer; c. e. Any repair, modification, alteration, or adjustment not authorized by any person as a result of any control. 2 Warranties are void if the original serial numbers have been removed, altered, or cannot be used. Products purchased for warranty service. • If the dealer or service company cannot resolve the problem, write to verify warranty status. b. If You Need Service First see the Troubleshooting section in remote locations. 8. b. Some...
... dealer or servicer; c. e. Any repair, modification, alteration, or adjustment not authorized by any person as a result of any control. 2 Warranties are void if the original serial numbers have been removed, altered, or cannot be used. Products purchased for warranty service. • If the dealer or service company cannot resolve the problem, write to verify warranty status. b. If You Need Service First see the Troubleshooting section in remote locations. 8. b. Some...


