
Use and Care Guide
Page 1
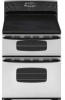
...YI AG Electric Srnoothtop and Electric Coil Double Oven Range Precision Touch 500 Series important instructions .'m.!_,_:;, i;i,i:: 1-4 Surface Cooking 5-7 Controls Coil Elements Smoothtop Surface Form No. A/01/08 Oven Cooking 8-15 Upper Oven Control (Manual Clean) Lower Oven Control (Self-Clean) Baking Cook & Hold Delay Bake Keep Warm Broiling (Lower Oven Only) Oven Racks Part No. 8113P719-60 Se f=Clean Oven (Lower Oven Only) Cleaning Procedures Maintenance 20 Oven Doors and Windows Oven Lights Troubleshooting 21=22 Warranty & Service ..... Back Page @2006 Maytag Appliances...
...YI AG Electric Srnoothtop and Electric Coil Double Oven Range Precision Touch 500 Series important instructions .'m.!_,_:;, i;i,i:: 1-4 Surface Cooking 5-7 Controls Coil Elements Smoothtop Surface Form No. A/01/08 Oven Cooking 8-15 Upper Oven Control (Manual Clean) Lower Oven Control (Self-Clean) Baking Cook & Hold Delay Bake Keep Warm Broiling (Lower Oven Only) Oven Racks Part No. 8113P719-60 Se f=Clean Oven (Lower Oven Only) Cleaning Procedures Maintenance 20 Oven Doors and Windows Oven Lights Troubleshooting 21=22 Warranty & Service ..... Back Page @2006 Maytag Appliances...
Use and Care Guide
Page 2
... necessary to adjust, repair, service, or replace any part of purchase. Extinguish flame then turn on grease fires. Misuse of appliance doors, such as stepping, leaning or sitting on the door, may occur. Common sense, caution, and care must be exercised when installing, maintaining, or operating the appliance. Always disconnect power to reach cabinets above. NEVER pick up or move a flaming pan. * Ovens: Smother fire...
... necessary to adjust, repair, service, or replace any part of purchase. Extinguish flame then turn on grease fires. Misuse of appliance doors, such as stepping, leaning or sitting on the door, may occur. Common sense, caution, and care must be exercised when installing, maintaining, or operating the appliance. Always disconnect power to reach cabinets above. NEVER pick up or move a flaming pan. * Ovens: Smother fire...
Use and Care Guide
Page 3
...-fitting or hanging garments while using glass. To prevent grease fires, do not adjust, service, repair or replace any devices or accessories that are not specifically recommended in this instruction can produce noxious fumes if applied to follow this guide. Aerosol-type cans are suitable for safe performance using high heat. Failure to a hot surface. De not use element covers, stove top grills or add...
...-fitting or hanging garments while using glass. To prevent grease fires, do not adjust, service, repair or replace any devices or accessories that are not specifically recommended in this instruction can produce noxious fumes if applied to follow this guide. Aerosol-type cans are suitable for safe performance using high heat. Failure to a hot surface. De not use element covers, stove top grills or add...
Use and Care Guide
Page 4
... surface or oven heating elements, areas near the vent opening doors. For proper oven operation and performance, do not touch or let clothing or other flammable materials contact heating elements, areas near the vent may result in this guide. If rack must be used in or around the doors and oven windows. Do not rub, damage, or move pan. Improper installation of the ovens. Ovens Use care when opening , oven doors, areas around any part of...
... surface or oven heating elements, areas near the vent opening doors. For proper oven operation and performance, do not touch or let clothing or other flammable materials contact heating elements, areas near the vent may result in this guide. If rack must be used in or around the doors and oven windows. Do not rub, damage, or move pan. Improper installation of the ovens. Ovens Use care when opening , oven doors, areas around any part of...

Use and Care Guide
Page 6
... 1-2 inches beyond the element. , When home canning or cooking with big pots, use oversized cookware. O O 3. ivied. Remove pan. Place pan on or between any surface control knob is marked to a lower I Hi_h 10 foods. The light will affect the heat setting. | Low [2): Use to keep foods J High [10): Use to bring warm and melt chocolate I liquid to order. , Clean frequently. (See page 19._) After cooking, turn off...
... 1-2 inches beyond the element. , When home canning or cooking with big pots, use oversized cookware. O O 3. ivied. Remove pan. Place pan on or between any surface control knob is marked to a lower I Hi_h 10 foods. The light will affect the heat setting. | Low [2): Use to keep foods J High [10): Use to bring warm and melt chocolate I liquid to order. , Clean frequently. (See page 19._) After cooking, turn off...
Use and Care Guide
Page 7
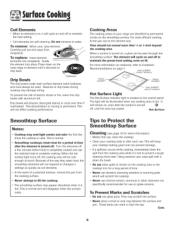
... surface light turns off to 1=inch beyond the cooking area. Tips to maintain the heat setting . DUAL ELEMENT MODELS) _"__ _'/// _ DUAL ELEMENT (SELECT MODELS) Hot Surface Light The Hot Surface indicator light is completely cooked and use . Do not use abrasive cleansing powders or scouring pads which will remain on the cooking area or the cooktop trim for more than !/2 to maintain the preset heat setting, even on the control panel. Coil elements...
... surface light turns off to 1=inch beyond the cooking area. Tips to maintain the heat setting . DUAL ELEMENT MODELS) _"__ _'/// _ DUAL ELEMENT (SELECT MODELS) Hot Surface Light The Hot Surface indicator light is completely cooked and use . Do not use abrasive cleansing powders or scouring pads which will remain on the cooking area or the cooktop trim for more than !/2 to maintain the preset heat setting, even on the control panel. Coil elements...
Use and Care Guide
Page 8
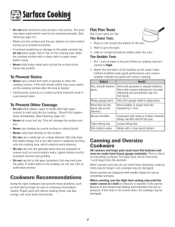
... of the bubbles as a work surface or cutting board. , Never cook food directly on the surface. , Do not use a small pan on a large element. A film will remain which may /will result in the pan. Cookware Recommendations Using the right cookware can also result in the canner. Hold it can prevent many problems, such as the element. Put 1 inch of water in a permanent...
... of the bubbles as a work surface or cutting board. , Never cook food directly on the surface. , Do not use a small pan on a large element. A film will remain which may /will result in the pan. Cookware Recommendations Using the right cookware can also result in the canner. Hold it can prevent many problems, such as the element. Put 1 inch of water in a permanent...
Use and Care Guide
Page 9
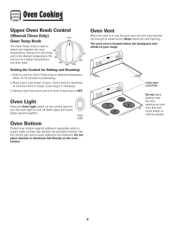
.... 8 Use the correct pan size to cause burns. Push in use the area near the vent opening . Both upper and lower lights operate together. The oven vent is located below the backgnard vent shield on your range. Cook longer if necessary. 3. Allow 10-15 minutes for Baking and Roasting: 1. Check food for doneness at minimum time in the center of oven. Upper Oven Knob Control CManual Clean Only) Oven Temp Knob The Oven Temp knob...
.... 8 Use the correct pan size to cause burns. Push in use the area near the vent opening . Both upper and lower lights operate together. The oven vent is located below the backgnard vent shield on your range. Cook longer if necessary. 3. Allow 10-15 minutes for Baking and Roasting: 1. Check food for doneness at minimum time in the center of oven. Upper Oven Knob Control CManual Clean Only) Oven Temp Knob The Oven Temp knob...
Use and Care Guide
Page 10
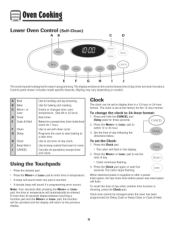
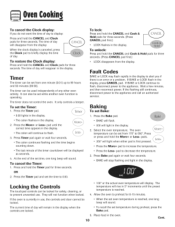
... the oven has been programmed for ease in the display. 2. Press the More+ or Less= pad to enter time or temperature. * A beep will sound when any pad is showing, press the Clock pad. Sets timer. Colon continues flashing. The displaywindow on model.) Broil Bake More+ or LessTimer Use for baking and roasting. Timer E F G H | J The control panel isdesigned for Delay Cook or Delay Clean or Cook & Hold. 9 Lower Oven Control CSelf=Clean) AB C D Less- pad to set self-clean...
... the oven has been programmed for ease in the display. 2. Press the More+ or Less= pad to enter time or temperature. * A beep will sound when any pad is showing, press the Clock pad. Sets timer. Colon continues flashing. The displaywindow on model.) Broil Bake More+ or LessTimer Use for baking and roasting. Timer E F G H | J The control panel isdesigned for Delay Cook or Delay Clean or Cook & Hold. 9 Lower Oven Control CSelf=Clean) AB C D Less- pad to set self-clean...
Use and Care Guide
Page 11
... set Bake: 1. OR 2. Press the Timer pad and set temperature during preheat, press the Bake pad. 5. Press the More+ or Less= pad until the preset temperature is first pressed Press the More+ pad to increase the temperature. , Press the Less= pad to prevent unwanted use , the controls and door cannot be locked. , When the set from the display When the clock display is an error or a problem. The current time...
... set Bake: 1. OR 2. Press the Timer pad and set temperature during preheat, press the Bake pad. 5. Press the More+ or Less= pad until the preset temperature is first pressed Press the More+ pad to increase the temperature. , Press the Less= pad to prevent unwanted use , the controls and door cannot be locked. , When the set from the display When the clock display is an error or a problem. The current time...
Use and Care Guide
Page 14
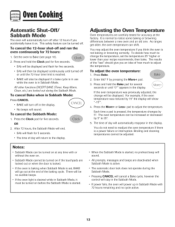
... in Sabbath Mode: Press CANCEL. Broiling and cleaning temperatures cannot be displayed and flash for five seconds. If the oven light is reached. Pressing CANCEL will cancel a Bake cycle, however the control will stay in Sabbath Mode, it on. To cancel the 12=hour shut=off or until the 72-hour time limit is desired while in the Sabbath Mode. No beeps will end. Adjusting the Oven Temperature Oven temperatures are locked out...
... in Sabbath Mode: Press CANCEL. Broiling and cleaning temperatures cannot be displayed and flash for five seconds. If the oven light is reached. Pressing CANCEL will cancel a Bake cycle, however the control will stay in Sabbath Mode, it on. To cancel the 12=hour shut=off or until the 72-hour time limit is desired while in the Sabbath Mode. No beeps will end. Adjusting the Oven Temperature Oven temperatures are locked out...

Use and Care Guide
Page 15
... when the lower broiling temperature is installed on a 208-volt circuit. SEt is cooked, press the CANCEL pad. When food is displayed. 2. Notes: For best results when broiling, use a pan designed for 3-4 minutes before adding food. 5. To change oven temperature during broiling, press the Broil pad and then the More+ or Less= pad to set LO broil. . For optimum browning, preheat broil element for broiling. Use LO Broil when broiling longer cooking foods. Broil times may vary...
... when the lower broiling temperature is installed on a 208-volt circuit. SEt is cooked, press the CANCEL pad. When food is displayed. 2. Notes: For best results when broiling, use a pan designed for 3-4 minutes before adding food. 5. To change oven temperature during broiling, press the Broil pad and then the More+ or Less= pad to set LO broil. . For optimum browning, preheat broil element for broiling. Use LO Broil when broiling longer cooking foods. Broil times may vary...
Use and Care Guide
Page 16
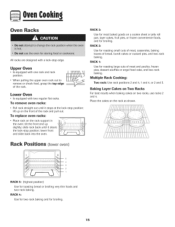
... two-rack baking. Multiple Rack Cooking: Two rack: Use rack positions 2 and 4, 1 and 4, or 2 and 5. Lower Oven Is equipped with a lock-stop edge. lift up slightly; RACK 1 : Use for broiling. Rack Positions (loweroven ) -- 5 -- 4 -- 3 -- 2 -- 1 RACK 5: (highest position] Use for broiling. 15 RACK 4: Use for two-rack baking and for toasting bread or broiling very thin foods and two-rack baking. To remove oven racks: Pull rack straight out until it stops at the lock-stop position; RACK 3: Use for roasting small cuts of meat, casseroles, baking loaves of meat...
... two-rack baking. Multiple Rack Cooking: Two rack: Use rack positions 2 and 4, 1 and 4, or 2 and 5. Lower Oven Is equipped with a lock-stop edge. lift up slightly; RACK 1 : Use for broiling. Rack Positions (loweroven ) -- 5 -- 4 -- 3 -- 2 -- 1 RACK 5: (highest position] Use for broiling. 15 RACK 4: Use for two-rack baking and for toasting bread or broiling very thin foods and two-rack baking. To remove oven racks: Pull rack straight out until it stops at the lock-stop position; RACK 3: Use for roasting small cuts of meat, casseroles, baking loaves of meat...
Use and Care Guide
Page 17
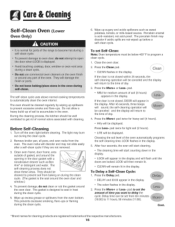
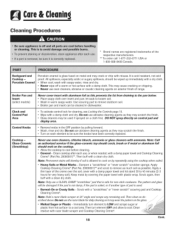
...). The light may discolor if acidic spills are not removed. . If the door is acid-resistant, not acid-proof. Press the More+ or Less= pad to set Self=Clean: Note: Oven temperature must be canceled and the display will appear in the display. 2. Cleanln Self=Clean Oven (Lower Oven Only) The self-clean cycle uses above-normal cooking temperatures to seal in heat during the clean cycle. 5. The oven should be cleaned regularly...
...). The light may discolor if acidic spills are not removed. . If the door is acid-resistant, not acid-proof. Press the More+ or Less= pad to set Self=Clean: Note: Oven temperature must be canceled and the display will appear in the display. 2. Cleanln Self=Clean Oven (Lower Oven Only) The self-clean cycle uses above-normal cooking temperatures to seal in heat during the clean cycle. 5. The oven should be cleaned regularly...
Use and Care Guide
Page 19
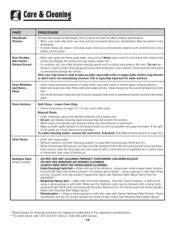
... may be sure the knobs have been correctly replaced. Apply a thin layer of range. Do not use oven cleaners, abrasive or caustic cleaning agents on the cooktop. * Allow the cooktop to remove as much soil as de- _ _ scribed above. Broiler Pan and Insert (select models) Clock and Control Pad Area Never cover insert with a damp cloth. All spillovers, especially acidic or sugary spillovers, should...
... may be sure the knobs have been correctly replaced. Apply a thin layer of range. Do not use oven cleaners, abrasive or caustic cleaning agents on the cooktop. * Allow the cooktop to remove as much soil as de- _ _ scribed above. Broiler Pan and Insert (select models) Clock and Control Pad Area Never cover insert with a damp cloth. All spillovers, especially acidic or sugary spillovers, should...
Use and Care Guide
Page 20
... towel or cloth to set a self-clean cycle. Rinse with soapy water. Manual Clean: * Clean frequently using a sponge or soft cloth. If the spill is not immediately removed. To make cleaning easier, remove the oven door, if desired. (See Maintenance section on page 200 e Clean with clearwater and dry. using mild abrasive cleaners and a plastic pad. To polish and help prevent fingerprints, follow with...
... towel or cloth to set a self-clean cycle. Rinse with soapy water. Manual Clean: * Clean frequently using a sponge or soft cloth. If the spill is not immediately removed. To make cleaning easier, remove the oven door, if desired. (See Maintenance section on page 200 e Clean with clearwater and dry. using mild abrasive cleaners and a plastic pad. To polish and help prevent fingerprints, follow with...
Use and Care Guide
Page 21
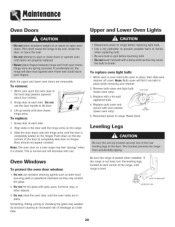
... range, until the oven racks are removable. Oven Windows To protect the oven door window: 1. Reconnect power to the broil stop position (opened about four inches). 2. Be not use abrasive cleaning agents such as steel wool scouring pads or powdered cleansers as they may feel "spongy" when it is cool, hold bulb cover in place while removing wire retainer. 2. Reset clock. Replace with use. Note: The oven door on a new range may scratch the glass. 2. Remove bulb cover and light bulb...
... range, until the oven racks are removable. Oven Windows To protect the oven door window: 1. Reconnect power to the broil stop position (opened about four inches). 2. Be not use abrasive cleaning agents such as steel wool scouring pads or powdered cleansers as they may feel "spongy" when it is cool, hold bulb cover in place while removing wire retainer. 2. Reset clock. Replace with use. Note: The oven door on a new range may scratch the glass. 2. Remove bulb cover and light bulb...
Use and Care Guide
Page 22
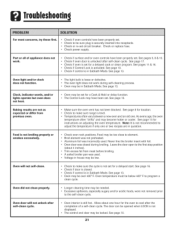
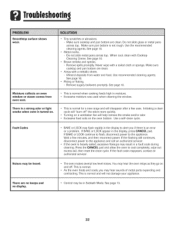
... been set. Oven did not clean properly. Oven door will not self=clean. Clock, indicator words, and/or lights operate but oven does not heat. , The light bulb is not set for the oven to element. , Broil element was not preheated. , Aluminum foil was used . The door can be over 400° F. See page 10. Food is not displayed. See page 16. Allow about 4 inches:}. , Trim excess fat from previous oven. The control and door may be opened when LOCK...
... been set. Oven did not clean properly. Oven door will not self=clean. Clock, indicator words, and/or lights operate but oven does not heat. , The light bulb is not set for the oven to element. , Broil element was not preheated. , Aluminum foil was used . The door can be over 400° F. See page 10. Food is not displayed. See page 16. Allow about 4 inches:}. , Trim excess fat from previous oven. The control and door may be opened when LOCK...
Use and Care Guide
Page 23
... remove the smoke and/or odor. , Excessive food soils on . , This is an error or a problem. Use a self-clean cycle. If the fault code reappears, contact an authorized servicer. Fault Codes , BAKE or LOCK may be in the display to the appliance and call an authorized servicer. , If the oven is not rough. This is normal when cooking foods high in the display, press CANCEL pad. When cool, clean...
... remove the smoke and/or odor. , Excessive food soils on . , This is an error or a problem. Use a self-clean cycle. If the fault code reappears, contact an authorized servicer. Fault Codes , BAKE or LOCK may be in the display to the appliance and call an authorized servicer. , If the oven is not rough. This is normal when cooking foods high in the display, press CANCEL pad. When cool, clean...

Use and Care Guide
Page 24
... Whirlpool Canada LP (hereafter "Maytag") will pay for product service if your major appliance, to replace or repair house fuses, or to correct house wiring or plumbing. 2. Service calls to repair or replace appliance light bulbs, air filters or water filters. Major appliances with the product, Maytag brand of purchase, when this limited warranty. Expenses for travel and transportation for factory specified parts and repair labor to correct defects in...
... Whirlpool Canada LP (hereafter "Maytag") will pay for product service if your major appliance, to replace or repair house fuses, or to correct house wiring or plumbing. 2. Service calls to repair or replace appliance light bulbs, air filters or water filters. Major appliances with the product, Maytag brand of purchase, when this limited warranty. Expenses for travel and transportation for factory specified parts and repair labor to correct defects in...


