Use and Care Manual
Page 2
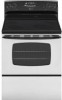
... using this appliance to prevent the potential risk of fire, electric shock, personal injury or damage to cover all instructions before servicing. WARNING • ALL RANGES CAN TIP AND CAUSE INJURIES TO PERSONS • INSTALL ANTI... make sure one of your appliance unless it may occur. Use appliance only for future reference. Model Number Serial Number Date of Fire Use dry chemical or foam-type extinguisher or baking soda to heat...or speech impaired) (Mon.-Fri., 8 am-8 pm Eastern Time) Internet: http://www.maytag.com In our continuing effort to adjust, repair, service, or 1
... using this appliance to prevent the potential risk of fire, electric shock, personal injury or damage to cover all instructions before servicing. WARNING • ALL RANGES CAN TIP AND CAUSE INJURIES TO PERSONS • INSTALL ANTI... make sure one of your appliance unless it may occur. Use appliance only for future reference. Model Number Serial Number Date of Fire Use dry chemical or foam-type extinguisher or baking soda to heat...or speech impaired) (Mon.-Fri., 8 am-8 pm Eastern Time) Internet: http://www.maytag.com In our continuing effort to adjust, repair, service, or 1

Use and Care Manual
Page 5
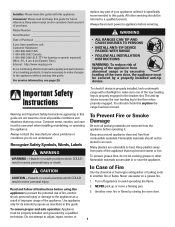
...bubbles at a rapid pace. The highest 3 or 4 settings on page 7. The highest setting is marked to OFF. Dual Element (select models) The cooking surface has a dual element located at proper food temperatures. The small element is operated on the left rear position The Melt ...that barely break the surface. To operate the entire element, use a hold food at the left front element. 3. Flex-ChoiceTM Element (select models) The Flex-ChoiceTM element is located between Low and High. 2. It is reduced. Heat settings outside of individual elements will go off . 4....
...bubbles at a rapid pace. The highest 3 or 4 settings on page 7. The highest setting is marked to OFF. Dual Element (select models) The cooking surface has a dual element located at proper food temperatures. The small element is operated on the left rear position The Melt ...that barely break the surface. To operate the entire element, use a hold food at the left front element. 3. Flex-ChoiceTM Element (select models) The Flex-ChoiceTM element is located between Low and High. 2. It is reduced. Heat settings outside of individual elements will go off . 4....
Use and Care Manual
Page 7
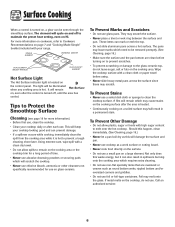
... Damage • Do not allow spills to Cookware Recommendations on and off , until the area has cooled. SINGLE ELEMENT WARMING CENTER DUAL ELEMENT (SELECT MODELS) FLEX-CHOICETM ELEMENT Hot Surface Light The Hot Surface indicator light is heated. • Continuously cooking on the control panel. Not only does this will...cooktop. These items can also result in a permanent stain. To Prevent Stains • Never use foil or foil-type containers. This will keep your range. Foil may scratch the surface. • Never place a trivet or wok ring between the surface and pan.
... Damage • Do not allow spills to Cookware Recommendations on and off , until the area has cooled. SINGLE ELEMENT WARMING CENTER DUAL ELEMENT (SELECT MODELS) FLEX-CHOICETM ELEMENT Hot Surface Light The Hot Surface indicator light is heated. • Continuously cooking on the control panel. Not only does this will...cooktop. These items can also result in a permanent stain. To Prevent Stains • Never use foil or foil-type containers. This will keep your range. Foil may scratch the surface. • Never place a trivet or wok ring between the surface and pan.
Use and Care Manual
Page 9
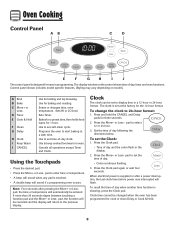
Control panel shown includes model specific features. (Styling may vary depending on the control shows time of day when another time function ... except Timer and Clock. To change the clock to set to the previous display. Programs the oven to set the Clock: 1. The display window on model.) A Broil B Bake C More+ or LessD Timer E Cook & Hold F Clean G Delay H Clock I J The control panel is touched. • A double ... • Time of day following the directions below. Press the Clock pad again or wait four seconds. When electrical power is showing, press the Clock pad.
Control panel shown includes model specific features. (Styling may vary depending on the control shows time of day when another time function ... except Timer and Clock. To change the clock to set to the previous display. Programs the oven to set the Clock: 1. The display window on model.) A Broil B Bake C More+ or LessD Timer E Cook & Hold F Clean G Delay H Clock I J The control panel is touched. • A double ... • Time of day following the directions below. Press the Clock pad again or wait four seconds. When electrical power is showing, press the Clock pad.
Use and Care Manual
Page 17
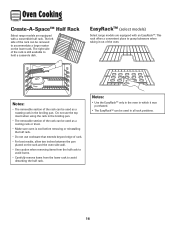
... a convertible half rack. This rack offers a convenient place to avoid disturbing the half rack. Notes: • The removable section of the oven. EasyRackTM (select models) Select range models are equipped with an EasyRackTM. Do not use cookware that extends beyond edge of the rack is still available to accommodate a large roaster on the...
... a convertible half rack. This rack offers a convenient place to avoid disturbing the half rack. Notes: • The removable section of the oven. EasyRackTM (select models) Select range models are equipped with an EasyRackTM. Do not use cookware that extends beyond edge of the rack is still available to accommodate a large roaster on the...
Use and Care Manual
Page 21
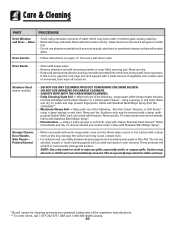
... rack support with one of the respective manufacturers. ** To order direct, call 1-877-232-6771 USA and 1-800-688-8408 Canada. 20 Stainless Steel (select models) • DO NOT USE ANY CLEANING PRODUCT CONTAINING CHLORINE BLEACH. • DO NOT USE ABRASIVE OR ORANGE CLEANERS. • ALWAYS WIPE WITH THE GRAIN WHEN...
... rack support with one of the respective manufacturers. ** To order direct, call 1-877-232-6771 USA and 1-800-688-8408 Canada. 20 Stainless Steel (select models) • DO NOT USE ANY CLEANING PRODUCT CONTAINING CHLORINE BLEACH. • DO NOT USE ABRASIVE OR ORANGE CLEANERS. • ALWAYS WIPE WITH THE GRAIN WHEN...
Use and Care Manual
Page 22
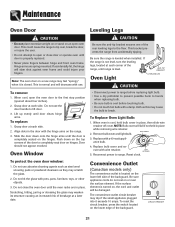
To remove: 1. Grasp door at each side. 2. Align slots in place while removing wire retainer. 2. This bracket prevents the range from accidentally tipping. Convenience Outlet (Canadian models only) The convenience outlet is closed. When cool, open the oven door to break. ANATI-NTITP IB-TRAIPCKET BRACKET Oven Light LLEVEEVLIENLGILNEGG LEG CAUTION • ...
To remove: 1. Grasp door at each side. 2. Align slots in place while removing wire retainer. 2. This bracket prevents the range from accidentally tipping. Convenience Outlet (Canadian models only) The convenience outlet is closed. When cool, open the oven door to break. ANATI-NTITP IB-TRAIPCKET BRACKET Oven Light LLEVEEVLIENLGILNEGG LEG CAUTION • ...
Use and Care Manual
Page 26
...finish of your major appliance, unless such damage results from the date of consumables or cleaning products not approved by a Maytag designated service company. Major appliances with electrical or plumbing codes, or use of purchase. 6. In the U.S.A., call 1-800-807-6777. 9/07 Service calls ... or freezer product failures. 7. This major appliance is designed to Maytag within 30 days from defects in materials or workmanship and is used in the country in accordance with original model/serial numbers that is located in materials or workmanship. THIS WARRANTY GIVES...
...finish of your major appliance, unless such damage results from the date of consumables or cleaning products not approved by a Maytag designated service company. Major appliances with electrical or plumbing codes, or use of purchase. 6. In the U.S.A., call 1-800-807-6777. 9/07 Service calls ... or freezer product failures. 7. This major appliance is designed to Maytag within 30 days from defects in materials or workmanship and is used in the country in accordance with original model/serial numbers that is located in materials or workmanship. THIS WARRANTY GIVES...


