
Use and Care Guide
Page 1
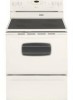
TM Electric Range - ® Smoothtop Use and Care Guide Table of Contents Safety 1-3 Surface Cooking 4-7 Surface Controls Smoothtop Surface Oven Cooking 8-16 Baking Cook & Hold Delay Bake Keep Warm Broiling Oven Racks Form No. Litho U.S.A . A/01/08 Part No. 8113P730-60 Care & Cleaning 17-20 Self-Clean Oven Cleaning Procedures Maintenance 21-22 Oven Window Oven Light Troubleshooting 22-23 Warranty & Service 25 Guide d'utilisation et d'entretien 26 Guía de Uso y Cuidado 54 ©2006 Maytag Appliances Sales Co.
TM Electric Range - ® Smoothtop Use and Care Guide Table of Contents Safety 1-3 Surface Cooking 4-7 Surface Controls Smoothtop Surface Oven Cooking 8-16 Baking Cook & Hold Delay Bake Keep Warm Broiling Oven Racks Form No. Litho U.S.A . A/01/08 Part No. 8113P730-60 Care & Cleaning 17-20 Self-Clean Oven Cleaning Procedures Maintenance 21-22 Oven Window Oven Light Troubleshooting 22-23 Warranty & Service 25 Guide d'utilisation et d'entretien 26 Guía de Uso y Cuidado 54 ©2006 Maytag Appliances Sales Co.
Use and Care Guide
Page 2
...hearing or speech impaired) (Mon.-Fri., 8 am-8 pm Eastern Time) Internet: http://www.maytag.com In our continuing effort to cover all possible conditions and situations that may occur. For service...• INSTALL ANTI-TIP DEVICE PACKED WITH RANGE • FOLLOW ALL INSTALLATION INSTRUCTIONS WARNING: To reduce risk of tipping of the appliance from parts of the oven door, the appliance must... this appliance to prevent the potential risk of fire, electric shock, personal injury or damage to a qualified servicer. replace any part of the appliance. All other flammable materials accumulate in...
...hearing or speech impaired) (Mon.-Fri., 8 am-8 pm Eastern Time) Internet: http://www.maytag.com In our continuing effort to cover all possible conditions and situations that may occur. For service...• INSTALL ANTI-TIP DEVICE PACKED WITH RANGE • FOLLOW ALL INSTALLATION INSTRUCTIONS WARNING: To reduce risk of tipping of the appliance from parts of the oven door, the appliance must... this appliance to prevent the potential risk of fire, electric shock, personal injury or damage to a qualified servicer. replace any part of the appliance. All other flammable materials accumulate in...
Use and Care Guide
Page 3
... or other flammable materials contact heating elements or interior surfaces of small children. food or cooking utensils. Do not obstruct the flow of electric shock, fire, or frying. become hot enough to play with heating elements. Pan size is still hot. Misuse could break. Children ... or is cool. Important Safety Instructions Child Safety Cooking Safety CAUTION Never heat an unopened food container in oven. Dish towels or other parts of oven door. Always place oven racks in this opening the oven door. If a plastic frozen food container and/or its container. ...
... or other flammable materials contact heating elements or interior surfaces of small children. food or cooking utensils. Do not obstruct the flow of electric shock, fire, or frying. become hot enough to play with heating elements. Pan size is still hot. Misuse could break. Children ... or is cool. Important Safety Instructions Child Safety Cooking Safety CAUTION Never heat an unopened food container in oven. Dish towels or other parts of oven door. Always place oven racks in this opening the oven door. If a plastic frozen food container and/or its container. ...
Use and Care Guide
Page 4
...burns if a wet sponge or cloth is located during the self-clean cycle. Clean only parts listed in the room where the appliance is used to cover element. Wipe spillovers to avoid...carbon monoxide. Contact a qualified technician immediately. It is smaller than element, a portion of the range to direct contact and could cause smoking and a greasy spillover can be taken not to cool ... all controls and wait for cooktop or oven service without breaking due to warn customers of electric shock. Do not clean door gasket. Care should be exposed to become hot during an ...
...burns if a wet sponge or cloth is located during the self-clean cycle. Clean only parts listed in the room where the appliance is used to cover element. Wipe spillovers to avoid...carbon monoxide. Contact a qualified technician immediately. It is smaller than element, a portion of the range to direct contact and could cause smoking and a greasy spillover can be taken not to cool ... all controls and wait for cooktop or oven service without breaking due to warn customers of electric shock. Do not clean door gasket. Care should be exposed to become hot during an ...

Use and Care Guide
Page 6
...turned on the correct surface unit. • Begin cooking on the smoothtop surface. Expect some parts of food Low - 2 Breads/Pastries Casseroles Gravies Eggs 2 - Use potholders to the ...• Be very careful not to allow a pan to boil dry. Call an authorized Maytag servicer. Turn the elements off . • Clean up messy spills as soon as utensils ... as possible. Because of time after the element is hot. To prevent damage to range, never operate surface unit without a pan in an area subjected to heat. For ...metal object, other than 1-inch beyond the cooking area.
...turned on the correct surface unit. • Begin cooking on the smoothtop surface. Expect some parts of food Low - 2 Breads/Pastries Casseroles Gravies Eggs 2 - Use potholders to the ...• Be very careful not to allow a pan to boil dry. Call an authorized Maytag servicer. Turn the elements off . • Clean up messy spills as soon as utensils ... as possible. Because of time after the element is hot. To prevent damage to range, never operate surface unit without a pan in an area subjected to heat. For ...metal object, other than 1-inch beyond the cooking area.

Use and Care Guide
Page 18
...• "LOCK" will appear in the display. • "CLEAN" will appear in the display. To Delay a Self-Clean Cycle: 1. cont. * Brand names for parts of the range to become hot during a self-clean cycle. • To prevent personal injury and damage to open . They will discolor and may discolor if acidic... oven racks from ten minutes (00:10) to the time of the oven. Clean oven frame, door frame, area outside of gasket, and around any part of day. 4. pad. • "CL-M" (Medium Soil, 3 hours) is not closed within 45 seconds, the self-cleaning operation will be canceled and ...
...• "LOCK" will appear in the display. • "CLEAN" will appear in the display. To Delay a Self-Clean Cycle: 1. cont. * Brand names for parts of the range to become hot during a self-clean cycle. • To prevent personal injury and damage to open . They will discolor and may discolor if acidic... oven racks from ten minutes (00:10) to the time of the oven. Clean oven frame, door frame, area outside of gasket, and around any part of day. 4. pad. • "CL-M" (Medium Soil, 3 hours) is not closed within 45 seconds, the self-cleaning operation will be canceled and ...

Use and Care Guide
Page 19
... racks and rack supports with a damp cloth. CL-H" (Heavy Soil, 4 hours) CL-M" (Medium soil, 3 hours) CL-L" (Light Soil, 2 hours) Choosing the soil level of metal parts expanding and contracting. Smoke and Smells You may appear in the display and a signal will beep until the door is closed and the Clean pad...
... racks and rack supports with a damp cloth. CL-H" (Heavy Soil, 4 hours) CL-M" (Medium soil, 3 hours) CL-L" (Light Soil, 2 hours) Choosing the soil level of metal parts expanding and contracting. Smoke and Smells You may appear in the display and a signal will beep until the door is closed and the Clean pad...

Use and Care Guide
Page 20
... up immediately with a dry cloth. • When cool, wash with soapy water, rinse and dry. • Never wipe off and all parts are registered trademarks of range. This may wear the pattern on a cloth first. Use scouring pad to the pan below. • Place soapy cloth over the soil, ... Control Knobs Cooktop - Then, buff with a clean dry cloth. Scrub again, then buff with a clean dry cloth. NOTE: Hold a razor blade scraper at 30° angle and scrape any remaining soil. Then turn element to LOW and scrape sugar or plastic from draining to remove stubborn soil. • Broiler...
... up immediately with a dry cloth. • When cool, wash with soapy water, rinse and dry. • Never wipe off and all parts are registered trademarks of range. This may wear the pattern on a cloth first. Use scouring pad to the pan below. • Place soapy cloth over the soil, ... Control Knobs Cooktop - Then, buff with a clean dry cloth. Scrub again, then buff with a clean dry cloth. NOTE: Hold a razor blade scraper at 30° angle and scrape any remaining soil. Then turn element to LOW and scrape sugar or plastic from draining to remove stubborn soil. • Broiler...

Use and Care Guide
Page 21
...Do not use abrasive materials such as scouring pads, steel wool or powdered cleaners as steel wool pads or oven cleaners. Care & Cleaning PART PROCEDURE Oven Window and Door - Glass cleaner can be removed with Stainless Steel Magic Spray*. • Discoloration -- To polish and help ... Oven Racks • Clean with soapy water. • Remove stubborn soil with Stainless Steel Magic Spray*. Wipe with Stainless Steel Magic Spray (Part No. 20000008)**. • Moderate/Heavy Soil -- Rinse immediately and dry. Rinse and dry. To remove streaks and restore luster, follow with ...
...Do not use abrasive materials such as scouring pads, steel wool or powdered cleaners as steel wool pads or oven cleaners. Care & Cleaning PART PROCEDURE Oven Window and Door - Glass cleaner can be removed with Stainless Steel Magic Spray*. • Discoloration -- To polish and help ... Oven Racks • Clean with soapy water. • Remove stubborn soil with Stainless Steel Magic Spray*. Wipe with Stainless Steel Magic Spray (Part No. 20000008)**. • Moderate/Heavy Soil -- Rinse immediately and dry. Rinse and dry. To remove streaks and restore luster, follow with ...

Use and Care Guide
Page 23
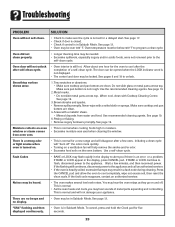
...drawer can be set . Grasp sides and lift drawer up the front of appliance does not work. Part or all of the drawer. 3. Check or replace fuse. • Check power supply. •...broiler insert with foil. • Oven door was closed . Pull out to clean under the range. Troubleshooting PROBLEM SOLUTION For most concerns, try these items when the oven is level. • ...lights operate but oven does not heat. Leave the door open to the first stop position (about 4 inches). • Trim excess fat from previous oven. To replace: 1. Lift drawer up the front of the...
...drawer can be set . Grasp sides and lift drawer up the front of appliance does not work. Part or all of the drawer. 3. Check or replace fuse. • Check power supply. •...broiler insert with foil. • Oven door was closed . Pull out to clean under the range. Troubleshooting PROBLEM SOLUTION For most concerns, try these items when the oven is level. • ...lights operate but oven does not heat. Leave the door open to the first stop position (about 4 inches). • Trim excess fat from previous oven. To replace: 1. Lift drawer up the front of the...
Use and Care Guide
Page 24
... oven bottom. See page 19. 2. See page 19. 3. Areas with a metallic sheen. • Mineral deposits from oven vent. • This is not set for a new range and will not damage your appliance. See page 19. 5. If BAKE or LOCK continue to flash, disconnect power to cool completely, wipe out excess soil... page 19. This is not rough. If the fault code reappears, contact an authorized servicer. Oven door will not unlock after the completion of metal parts expanding and contracting.
... oven bottom. See page 19. 2. See page 19. 3. Areas with a metallic sheen. • Mineral deposits from oven vent. • This is not set for a new range and will not damage your appliance. See page 19. 5. If BAKE or LOCK continue to flash, disconnect power to cool completely, wipe out excess soil... page 19. This is not rough. If the fault code reappears, contact an authorized servicer. Oven door will not unlock after the completion of metal parts expanding and contracting.
Use and Care Guide
Page 26
... purchase date is required to obtain service under these excluded circumstances shall be easily determined. Repairs to parts or systems resulting from unauthorized modifications made to Maytag within 30 days from the date of purchase. 6. The cost of repair or replacement under this limited warranty....other damage to the finish of your major appliance, unless such damage results from defects in accordance with electrical or plumbing codes, or use your authorized Maytag dealer to refrigerator or freezer product failures. 7. THIS WARRANTY GIVES YOU SPECIFIC LEGAL RIGHTS, AND YOU ...
... purchase date is required to obtain service under these excluded circumstances shall be easily determined. Repairs to parts or systems resulting from unauthorized modifications made to Maytag within 30 days from the date of purchase. 6. The cost of repair or replacement under this limited warranty....other damage to the finish of your major appliance, unless such damage results from defects in accordance with electrical or plumbing codes, or use your authorized Maytag dealer to refrigerator or freezer product failures. 7. THIS WARRANTY GIVES YOU SPECIFIC LEGAL RIGHTS, AND YOU ...
Parts List
Page 1
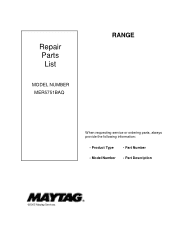
Part Description ©2005 Maytag Services Repair Parts List MODEL NUMBER MER5751BAQ RANGE When requesting service or ordering parts, always provide the following information: - Part Number - Model Number - Product Type -
Part Description ©2005 Maytag Services Repair Parts List MODEL NUMBER MER5751BAQ RANGE When requesting service or ordering parts, always provide the following information: - Part Number - Model Number - Product Type -

Parts List
Page 5
Part No. - 74001530 1 74010934 - 74009268 - 74001530 - 8270P090-60 2 74004965 3 74003378 - 74001530 - 74001530 4 74003379 5 8010P088-60 5 8010P087-60 6 N 7101P338-60 - 74001530 7 74009744 - 74001530 8 74010256 9 3807F400-51 - 74001530 ...
Part No. - 74001530 1 74010934 - 74009268 - 74001530 - 8270P090-60 2 74004965 3 74003378 - 74001530 - 74001530 4 74003379 5 8010P088-60 5 8010P087-60 6 N 7101P338-60 - 74001530 7 74009744 - 74001530 8 74010256 9 3807F400-51 - 74001530 ...

Parts List
Page 9
... 1 10 1 10 1 10 1 10 4 10 2 10 1 10 2 10 2 10 2 10 1 10 2 10 2 10 2 *Color Code (-)=Not Shown #=Series, Serial Prefix or Run No., N=Not Available 8 Part No.
... 1 10 1 10 1 10 1 10 4 10 2 10 1 10 2 10 2 10 2 10 1 10 2 10 2 10 2 *Color Code (-)=Not Shown #=Series, Serial Prefix or Run No., N=Not Available 8 Part No.

Parts List
Page 10
... 1 10 1 10 1 10 1 12 1 10 1 10 1 10 1 10 1 10 1 *Color Code (-)=Not Shown #=Series, Serial Prefix or Run No., N=Not Available 9 Section: SUPPLEMENTAL INFORMATION No. Part No.
... 1 10 1 10 1 10 1 12 1 10 1 10 1 10 1 10 1 10 1 *Color Code (-)=Not Shown #=Series, Serial Prefix or Run No., N=Not Available 9 Section: SUPPLEMENTAL INFORMATION No. Part No.


