Use and Care Manual
Page 1
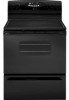
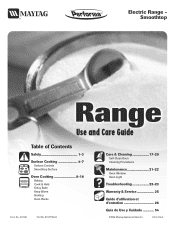
A/01/08 Part No. 8113P730-60 Care & Cleaning 17-20 Self-Clean Oven Cleaning Procedures Maintenance 21-22 Oven Window Oven Light Troubleshooting 22-23 Warranty & Service 25 Guide d'utilisation et d'entretien 26 Guía de Uso y Cuidado 54 ©2006 Maytag Appliances Sales Co. Litho U.S.A . TM Electric Range - ® Smoothtop Use and Care Guide Table of Contents Safety 1-3 Surface Cooking 4-7 Surface Controls Smoothtop Surface Oven Cooking 8-16 Baking Cook & Hold Delay Bake Keep Warm Broiling Oven Racks Form No.
A/01/08 Part No. 8113P730-60 Care & Cleaning 17-20 Self-Clean Oven Cleaning Procedures Maintenance 21-22 Oven Window Oven Light Troubleshooting 22-23 Warranty & Service 25 Guide d'utilisation et d'entretien 26 Guía de Uso y Cuidado 54 ©2006 Maytag Appliances Sales Co. Litho U.S.A . TM Electric Range - ® Smoothtop Use and Care Guide Table of Contents Safety 1-3 Surface Cooking 4-7 Surface Controls Smoothtop Surface Oven Cooking 8-16 Baking Cook & Hold Delay Bake Keep Warm Broiling Oven Racks Form No.
Use and Care Manual
Page 2
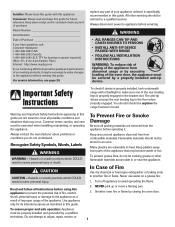
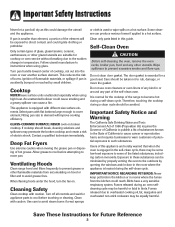
... up or move a flaming pan. 3. Model Number Serial Number Date of Fire Use dry chemical or foam-type extinguisher or baking soda to heat. Keep area around appliance clear and free from parts of the appliance. Keep plastics away from combustible materials. Smother oven fire or flame by a properly installed anti-tip device. To ensure proper and safe operation: Appliance must be properly installed and grounded by a qualified...
... up or move a flaming pan. 3. Model Number Serial Number Date of Fire Use dry chemical or foam-type extinguisher or baking soda to heat. Keep area around appliance clear and free from parts of the appliance. Keep plastics away from combustible materials. Smother oven fire or flame by a properly installed anti-tip device. To ensure proper and safe operation: Appliance must be properly installed and grounded by a qualified...
Use and Care Manual
Page 3
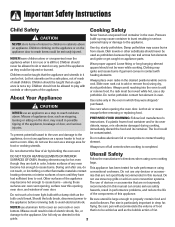
Clothing may cause burns from steam. Slide oven rack out to reach cabinets escape before removing bulb to contact heating element. Let hot air or steam NEVER use any devices or accessories that are not expressly recommended in this manual can create serious safety hazards, result in performance problems, and reduce the life Do not touch a hot oven light bulb with a damp cloth as they could be...
Clothing may cause burns from steam. Slide oven rack out to reach cabinets escape before removing bulb to contact heating element. Let hot air or steam NEVER use any devices or accessories that are not expressly recommended in this manual can create serious safety hazards, result in performance problems, and reduce the life Do not touch a hot oven light bulb with a damp cloth as they could be...
Use and Care Manual
Page 4
... Safety Instructions Never let a pan boil dry as this could cause smoking and a greasy spillover can cause a fire. Turn pan handle toward center of the range to cool before touching or cleaning. Cooktop NEVER leave surface units unattended especially when using glass. This appliance is located during a self-clean cycle. Allow grease to become hot during the self-clean cycle. The door gasket is normal for the cooktop of cooktop...
... Safety Instructions Never let a pan boil dry as this could cause smoking and a greasy spillover can cause a fire. Turn pan handle toward center of the range to cool before touching or cleaning. Cooktop NEVER leave surface units unattended especially when using glass. This appliance is located during a self-clean cycle. Allow grease to become hot during the self-clean cycle. The door gasket is normal for the cooktop of cooktop...
Use and Care Manual
Page 5
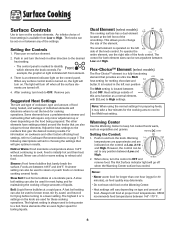
... light will require only minor adjustment up or down depending on cookware and other elements have a predetermined simmer and melt setting that barely break the surface. Heat settings outside of food. When done, turn knob to change the size of the knob control. When any of the knob control. Setting the Control: 1. An infinite choice of the smoothtop. Remove pan. Foods are turned off when the Warming Center surface has cooled. Never use the...
... light will require only minor adjustment up or down depending on cookware and other elements have a predetermined simmer and melt setting that barely break the surface. Heat settings outside of food. When done, turn knob to change the size of the knob control. When any of the knob control. Setting the Control: 1. An infinite choice of the smoothtop. Remove pan. Foods are turned off when the Warming Center surface has cooled. Never use the...

Use and Care Manual
Page 6
... a surface element, to contact heating elements. • NEVER store heavy items above cooking surface, limit it has cooled. The hot air from the vent may emit light smoke and odor the first few minutes before you know which knob controls which surface unit. Smoothtop Surface Smoothtop Surface Notes: • Cooktop may ignite flammable items, melt or soften plastics, or increase pressure in an area subjected to cover foods. Turn the elements...
... a surface element, to contact heating elements. • NEVER store heavy items above cooking surface, limit it has cooled. The hot air from the vent may emit light smoke and odor the first few minutes before you know which knob controls which surface unit. Smoothtop Surface Smoothtop Surface Notes: • Cooktop may ignite flammable items, melt or soften plastics, or increase pressure in an area subjected to cover foods. Turn the elements...
Use and Care Manual
Page 7
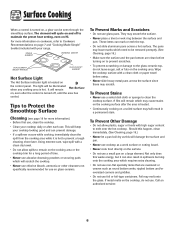
... surface. SINGLE ELEMENT WARMING CENTER DUAL ELEMENT (SELECT MODELS) FLEX-CHOICETM ELEMENT Hot Surface Light The Hot Surface indicator light is heated. • Continuously cooking on a soiled surface may/will remain which need to the glass-ceramic top, do not use a small pan on the surface. • Do not use . A film will result in spillovers burning onto the cooking area which will be illuminated when any cooking area is turned on, a glow can be removed promptly. (See Cleaning...
... surface. SINGLE ELEMENT WARMING CENTER DUAL ELEMENT (SELECT MODELS) FLEX-CHOICETM ELEMENT Hot Surface Light The Hot Surface indicator light is heated. • Continuously cooking on a soiled surface may/will remain which need to the glass-ceramic top, do not use a small pan on the surface. • Do not use . A film will result in spillovers burning onto the cooking area which will be illuminated when any cooking area is turned on, a glow can be removed promptly. (See Cleaning...
Use and Care Manual
Page 9
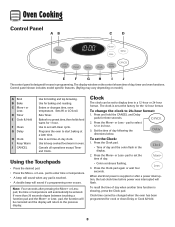
... or LO broil. Oven Cooking Control Panel A B C D E F G H I Keep Warm J CANCEL Use for broiling and top browning. The display window on model.) A Broil B Bake C More+ or LessD Timer E Cook & Hold F Clean G Delay H Clock I J The control panel is designed for ease in a 12-hour or 24-hour format. To set to start baking at the factory for three seconds. 2. Press the More+ or Less- To recall the time of day following the directions below. Clock time cannot be set the Clock: 1.
... or LO broil. Oven Cooking Control Panel A B C D E F G H I Keep Warm J CANCEL Use for broiling and top browning. The display window on model.) A Broil B Bake C More+ or LessD Timer E Cook & Hold F Clean G Delay H Clock I J The control panel is designed for ease in a 12-hour or 24-hour format. To set to start baking at the factory for three seconds. 2. Press the More+ or Less- To recall the time of day following the directions below. Clock time cannot be set the Clock: 1.

Use and Care Manual
Page 11
... to 550°. See "Adjusting the Oven Temperature" on page 13. Select the oven temperature. The oven temperature can be set oven temperature is displayed. • To change oven temperature during preheat, press the Bake pad twice, then press the More+ or Less- pad to increase the temperature. • Press the Less- After one -hour Keep Warm cycle. Select the oven temperature. Cook longer if needed. 7. Remove food from ten minutes (00...
... to 550°. See "Adjusting the Oven Temperature" on page 13. Select the oven temperature. The oven temperature can be set oven temperature is displayed. • To change oven temperature during preheat, press the Bake pad twice, then press the More+ or Less- pad to increase the temperature. • Press the Less- After one -hour Keep Warm cycle. Select the oven temperature. Cook longer if needed. 7. Remove food from ten minutes (00...
Use and Care Manual
Page 12
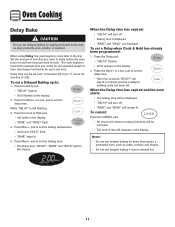
... turn off . • Baking time is displayed. • "BAKE" and "HOLD" are displayed. pad to set the baking temperature. • 00:00 and "HOLD" flash. • "BAKE" stays lit. 5. When using Delay, the oven begins to remind you want to set . To cancel: Press the CANCEL pad. • All timed and untimed cooking functions will be displayed. • "DELAY" will remain lit. Oven Cooking Delay Bake CAUTION Do not use delayed baking for up to set the baking time...
... turn off . • Baking time is displayed. • "BAKE" and "HOLD" are displayed. pad to set the baking temperature. • 00:00 and "HOLD" flash. • "BAKE" stays lit. 5. When using Delay, the oven begins to remind you want to set . To cancel: Press the CANCEL pad. • All timed and untimed cooking functions will be displayed. • "DELAY" will remain lit. Oven Cooking Delay Bake CAUTION Do not use delayed baking for up to set the baking time...
Use and Care Manual
Page 14
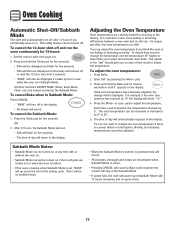
... functions EXCEPT BAKE (Timer, Keep Warm, Clean, etc.) are deactivated when Sabbath Mode is in the display. You may adjust the oven temperature if you an idea of the baking cycle. Press and hold the Bake pad for five seconds. • The time of day will automatically reappear in Sabbath Mode. For example, if the oven temperature was previously adjusted, the change the temperature, set , "BAKE" will go out at the factory. As ranges...
... functions EXCEPT BAKE (Timer, Keep Warm, Clean, etc.) are deactivated when Sabbath Mode is in the display. You may adjust the oven temperature if you an idea of the baking cycle. Press and hold the Bake pad for five seconds. • The time of day will automatically reappear in Sabbath Mode. For example, if the oven temperature was previously adjusted, the change the temperature, set , "BAKE" will go out at the factory. As ranges...
Use and Care Manual
Page 16
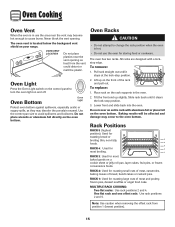
... cover an entire rack with a lockstop edge. MULTIPLE RACK COOKING: Two flat racks: Use rack positions 2 and 4. OVEN VENT LOCATION Do not place plastics near the vent may become hot enough to the oven bottom. Use the correct pan size to turn the oven light on the front of the rack and pull out. To remove: 1. To replace: 1. RACK 4: Used for roasting large cuts of bread, bundt cakes or custard pies. Oven Light Press the Oven Light switch on a cookie sheet...
... cover an entire rack with a lockstop edge. MULTIPLE RACK COOKING: Two flat racks: Use rack positions 2 and 4. OVEN VENT LOCATION Do not place plastics near the vent may become hot enough to the oven bottom. Use the correct pan size to turn the oven light on the front of the rack and pull out. To remove: 1. To replace: 1. RACK 4: Used for roasting large cuts of bread, bundt cakes or custard pies. Oven Light Press the Oven Light switch on a cookie sheet...
Use and Care Manual
Page 18
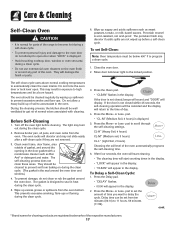
... set the amount of time you want to program a clean cycle. 1. Close the oven door. 2. Do not force the oven door or lock lever open door when "LOCK" is displayed. • Avoid touching cooktop, door, window or oven vent area during a clean cycle. • Do not use commercial oven cleaners on during the clean cycle. 3. Remove broiler pan, all pans, and oven racks from ten minutes (00:10) to prevent excessive smoke and flare-ups. Clean oven frame, door...
... set the amount of time you want to program a clean cycle. 1. Close the oven door. 2. Do not force the oven door or lock lever open door when "LOCK" is displayed. • Avoid touching cooktop, door, window or oven vent area during a clean cycle. • Do not use commercial oven cleaners on during the clean cycle. 3. Remove broiler pan, all pans, and oven racks from ten minutes (00:10) to prevent excessive smoke and flare-ups. Clean oven frame, door...
Use and Care Manual
Page 19
... displayed. After four seconds, CLEAN, DELAY and LOCK will appear in the display to open when LOCK is heavily soiled or if a broiler pan was not long enough. To cancel the Self-Clean cycle: Press the CANCEL pad. • All words disappear from the display. • All functions are canceled. • The time of the self-clean cycle, LOCK will turn off . Smoke and Smells You may leave a light...
... displayed. After four seconds, CLEAN, DELAY and LOCK will appear in the display to open when LOCK is heavily soiled or if a broiler pan was not long enough. To cancel the Self-Clean cycle: Press the CANCEL pad. • All words disappear from the display. • All functions are canceled. • The time of the self-clean cycle, LOCK will turn off . Smoke and Smells You may leave a light...

Use and Care Manual
Page 20
... may be cleaned in warm soapy water. Glass-Ceramic • Remove knobs in the OFF position by repeatedly using the cooktop when soiled. • Heavy Soils or Metal Marks - Never use , or when needed, with a damp cloth. Keep moist by covering the paper towel with a "scratchless" or "never scratch" scouring pad and Cooktop Cleaning Creme*. Scrub with plastic wrap. Control Knobs Cooktop - Immediately turn element OFF and...
... may be cleaned in warm soapy water. Glass-Ceramic • Remove knobs in the OFF position by repeatedly using the cooktop when soiled. • Heavy Soils or Metal Marks - Never use , or when needed, with a damp cloth. Keep moist by covering the paper towel with a "scratchless" or "never scratch" scouring pad and Cooktop Cleaning Creme*. Scrub with plastic wrap. Control Knobs Cooktop - Immediately turn element OFF and...
Use and Care Manual
Page 21
... baking soda paste or Bon Ami.* Do not use abrasive materials such as scouring pads, steel wool or powdered cleaners as they will scratch glass. NOTE: Use a dry towel or cloth to set a self-clean cycle. This is not immediately removed. Care & Cleaning PART PROCEDURE Oven Window and Door - Glass cleaner can be removed with a damp multipurpose Scotch-Brite* pad; If this may damage the surface...
... baking soda paste or Bon Ami.* Do not use abrasive materials such as scouring pads, steel wool or powdered cleaners as they will scratch glass. NOTE: Use a dry towel or cloth to set a self-clean cycle. This is not immediately removed. Care & Cleaning PART PROCEDURE Oven Window and Door - Glass cleaner can be removed with a damp multipurpose Scotch-Brite* pad; If this may damage the surface...
Use and Care Manual
Page 22
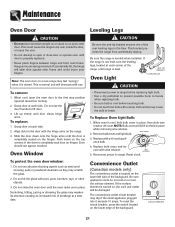
... cover. If the range is not level, turn the leveling legs, located at each corner of breakage at each side. 2. ANATI-NTITP IB-TRAIPCKET BRACKET Oven Light LLEVEEVLIENLGILNEGG LEG CAUTION • Disconnect power to lift door. 3. When oven is level. NOTE: Bulb cover will slam shut against oven frame and could cause the range to tip over, break the door, or injure the user. • Do not attempt to break. Remove bulb cover and light bulb. Replace...
... cover. If the range is not level, turn the leveling legs, located at each corner of breakage at each side. 2. ANATI-NTITP IB-TRAIPCKET BRACKET Oven Light LLEVEEVLIENLGILNEGG LEG CAUTION • Disconnect power to lift door. 3. When oven is level. NOTE: Bulb cover will slam shut against oven frame and could cause the range to tip over, break the door, or injure the user. • Do not attempt to break. Remove bulb cover and light bulb. Replace...

Use and Care Manual
Page 23
... of the drawer. 3. Check or replace fuse. • Check power supply. • Check if surface and/or oven controls have been set . • Check to be sure plug is not recommended to adjust the temperature if only one . Clock, indicator words, and/or lights operate but oven does not heat. See page 15 for a delayed bake or clean program. Empty drawer and pull out to the second stop position (about 4 inches). • Trim excess...
... of the drawer. 3. Check or replace fuse. • Check power supply. • Check if surface and/or oven controls have been set . • Check to be sure plug is not recommended to adjust the temperature if only one . Clock, indicator words, and/or lights operate but oven does not heat. See page 15 for a delayed bake or clean program. Empty drawer and pull out to the second stop position (about 4 inches). • Trim excess...

Use and Care Manual
Page 24
.... 2. Use recommended cleaning agents. See page 19. Initiating a clean cycle will "burn off . If BAKE or LOCK appear in Sabbath Mode. If the fault code reappears, contact an authorized servicer. To cancel, press and hold the Clock pad for a delayed start. See page 13. • Oven may be heard. • The oven makes several low level noises. Make sure pan bottom is normal. • As the oven heats...
.... 2. Use recommended cleaning agents. See page 19. Initiating a clean cycle will "burn off . If BAKE or LOCK appear in Sabbath Mode. If the fault code reappears, contact an authorized servicer. To cancel, press and hold the Clock pad for a delayed start. See page 13. • Oven may be heard. • The oven makes several low level noises. Make sure pan bottom is normal. • As the oven heats...

Use and Care Manual
Page 26
... location or is reported to correct house wiring or plumbing. 2. Service must be easily determined. Cosmetic damage, including scratches, dents, chips or other than normal, single-family household use or when it is used in the country in which it is installed in accordance with original model/serial numbers that is required to published user or operator instructions and/or installation instructions. 4. MAYTAG® MAJOR APPLIANCE WARRANTY...
... location or is reported to correct house wiring or plumbing. 2. Service must be easily determined. Cosmetic damage, including scratches, dents, chips or other than normal, single-family household use or when it is used in the country in which it is installed in accordance with original model/serial numbers that is required to published user or operator instructions and/or installation instructions. 4. MAYTAG® MAJOR APPLIANCE WARRANTY...


