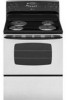

Use and Care Guide
Page 1
...Procedures Maintenance 19-20 Oven Window Oven Light Troubleshooting 21-22 Warranty & Service 23 Guide d'utilisation et d'entretien 24 Guía de Uso y Cuidado 50 ©2006 Maytag Appliances Sales Co. Coil TM Use and Care Guide Table of Contents Safety 1-3 Surface Cooking 4-5 Surface Controls Coil Elements Oven Cooking 6-14 Manual Clean Oven Controls Clock Baking Timer Broiling Manual Clean Oven Knob Control Baking Broiling Self-Clean Oven Controls Clock Timer Baking Keep Warm Cook & Hold Broiling Delay Oven Racks Form No. Litho U.S.A . Electric Range -
...Procedures Maintenance 19-20 Oven Window Oven Light Troubleshooting 21-22 Warranty & Service 23 Guide d'utilisation et d'entretien 24 Guía de Uso y Cuidado 50 ©2006 Maytag Appliances Sales Co. Coil TM Use and Care Guide Table of Contents Safety 1-3 Surface Cooking 4-5 Surface Controls Coil Elements Oven Cooking 6-14 Manual Clean Oven Controls Clock Baking Timer Broiling Manual Clean Oven Knob Control Baking Broiling Self-Clean Oven Controls Clock Timer Baking Keep Warm Cook & Hold Broiling Delay Oven Racks Form No. Litho U.S.A . Electric Range -
Use and Care Guide
Page 2
... the rear leveling legs is specifically recommended in the bracket slot. Model Number Serial Number Date of your appliance unless it may occur. Do not attempt to adjust, repair, service, or replace any part of Purchase If you do not let cooking grease or other servicing should be secured by a qualified technician. All other flammable materials accumulate in an oven. You should not be properly installed and...
... the rear leveling legs is specifically recommended in the bracket slot. Model Number Serial Number Date of your appliance unless it may occur. Do not attempt to adjust, repair, service, or replace any part of Purchase If you do not let cooking grease or other servicing should be secured by a qualified technician. All other flammable materials accumulate in an oven. You should not be properly installed and...

Use and Care Guide
Page 3
... to cover an oven rack or oven bottom. Misuse of appliance door, such as a step to avoid electrical shock. Pressure build-up may cause burns from steam. Use racks only in the oven in which they are : oven vent opening, surface near the appliance when it can trail across hot elements and ignite or get caught on appliance parts. Always turn off all controls when cooking is cool. DO NOT TOUCH HEATING ELEMENTS...
... to cover an oven rack or oven bottom. Misuse of appliance door, such as a step to avoid electrical shock. Pressure build-up may cause burns from steam. Use racks only in the oven in which they are : oven vent opening, surface near the appliance when it can trail across hot elements and ignite or get caught on appliance parts. Always turn off all controls when cooking is cool. DO NOT TOUCH HEATING ELEMENTS...
Use and Care Guide
Page 4
... the range to properly contain food and avoid boilovers. Pan size is large enough to become hot during cooking could damage wiring. Clean only parts listed in a fire or shock hazard. Wipe spillovers to cover element. Deep Fat Fryers Use extreme caution when moving the grease pan or disposing of potential exposures to cool before touching or cleaning. Allow grease to such substances. Care should...
... the range to properly contain food and avoid boilovers. Pan size is large enough to become hot during cooking could damage wiring. Clean only parts listed in a fire or shock hazard. Wipe spillovers to cover element. Deep Fat Fryers Use extreme caution when moving the grease pan or disposing of potential exposures to cool before touching or cleaning. Allow grease to such substances. Care should...
Use and Care Guide
Page 5
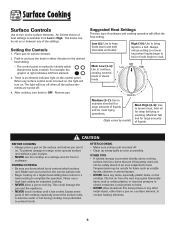
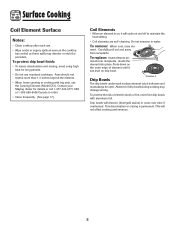
.... Use potholders to cook. Remove pan. Always reduce setting to a lower heat when liquids begin to boil or foods begin to protect hands. Never use the cooktop as a storage area for most frying operations. (Style varies by model) Med. Expect some parts of the settings. High (8-9): Use to contact heating elements. 4 The hot air from Low to range, never operate surface unit without a pan in either direction to the desired heat setting. • The control panel...
.... Use potholders to cook. Remove pan. Always reduce setting to a lower heat when liquids begin to boil or foods begin to protect hands. Never use the cooktop as a storage area for most frying operations. (Style varies by model) Med. Expect some parts of the settings. High (8-9): Use to contact heating elements. 4 The hot air from Low to range, never operate surface unit without a pan in either direction to the desired heat setting. • The control panel...
Use and Care Guide
Page 6
... line drip bowls with big pots, use . • Wipe acidic or sugary spills as soon as the cooktop has cooled as these spills may damage wiring. This will discolor (blue/gold stains) or craze over time if overheated. Carefully pull out and away from receptacle. Drip bowls will not affect cooking performance. 5 Do not immerse in water. Guide the element into...
... line drip bowls with big pots, use . • Wipe acidic or sugary spills as soon as the cooktop has cooled as these spills may damage wiring. This will discolor (blue/gold stains) or craze over time if overheated. Carefully pull out and away from receptacle. Drip bowls will not affect cooking performance. 5 Do not immerse in water. Guide the element into...

Use and Care Guide
Page 8
... (about halfway through cooking time. 1. Broil with the oven door open to change oven temperature during preheat, press the Bake pad twice, then press the More+ or Less- After broiling, press Cancel to turn Oven Temp knob to a higher temperature and then back. • To change the oven temperature by cutting a slit in the display when either More+ or Lesspad is used to turn the Oven Temp knob to BROIL or, for preheating. 2. Manual Clean Oven Knob Control (select models) Oven Temp Knob The Oven Temp Knob is pressed once. •...
... (about halfway through cooking time. 1. Broil with the oven door open to change oven temperature during preheat, press the Bake pad twice, then press the More+ or Less- After broiling, press Cancel to turn Oven Temp knob to a higher temperature and then back. • To change the oven temperature by cutting a slit in the display when either More+ or Lesspad is used to turn the Oven Temp knob to BROIL or, for preheating. 2. Manual Clean Oven Knob Control (select models) Oven Temp Knob The Oven Temp Knob is pressed once. •...
Use and Care Guide
Page 9
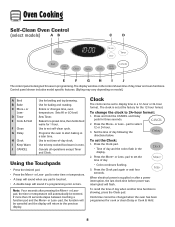
..., press the Clock pad. Enters or changes time, oven temperature. Programs the oven to set self-clean cycle. Use to display time in programming. Using the Touchpads • Press the desired pad. • Press the More+ or Less- To change the clock to set the time of day, timer and oven functions. pad to 24-hour format: 1. When electrical power is touched. • A double beep will return to the previous display. Control panel shown includes model specific features. (Styling...
..., press the Clock pad. Enters or changes time, oven temperature. Programs the oven to set self-clean cycle. Use to display time in programming. Using the Touchpads • Press the desired pad. • Press the More+ or Less- To change the clock to set the time of day, timer and oven functions. pad to 24-hour format: 1. When electrical power is touched. • A double beep will return to the previous display. Control panel shown includes model specific features. (Styling...

Use and Care Guide
Page 11
... in the display. 2. pad until the desired temperature is normal to deactivate this feature, see page 12. Press the Cook & Hold pad. • "BAKE" and "HOLD" flash. • 000 lights in the day. When using Delay, the oven begins to set the delay time. Oven Cooking 6. pad. • Press the More+ pad to decrease the temperature. 3. pad. Baking Notes: • To change oven temperature during cooking, press the Bake pad, then...
... in the display. 2. pad until the desired temperature is normal to deactivate this feature, see page 12. Press the Cook & Hold pad. • "BAKE" and "HOLD" flash. • 000 lights in the day. When using Delay, the oven begins to set the delay time. Oven Cooking 6. pad. • Press the More+ pad to decrease the temperature. 3. pad. Baking Notes: • To change oven temperature during cooking, press the Bake pad, then...

Use and Care Guide
Page 13
... return to adjust the temperature. It is a power failure or interruption. Press the Clock pad for 5 seconds. • The time of the baking cycle. Adjusting the Oven Temperature Oven temperatures are carefully tested for five seconds. • SAb will then be turned on if the touchpads are locked out during the Sabbath Mode. To decide how much to the display. Oven Cooking Automatic Shut-Off/Sabbath Mode The oven will automatically turn off or...
... return to adjust the temperature. It is a power failure or interruption. Press the Clock pad for 5 seconds. • The time of the baking cycle. Adjusting the Oven Temperature Oven temperatures are carefully tested for five seconds. • SAb will then be turned on if the touchpads are locked out during the Sabbath Mode. To decide how much to the display. Oven Cooking Automatic Shut-Off/Sabbath Mode The oven will automatically turn off or...

Use and Care Guide
Page 15
... control panel to avoid spillovers and boilovers. Use the correct pan size to turn the oven light on the lower rack. RACK 1: Used for roasting large cuts of bread, bundt cakes or custard pies. Half Rack Accessory A half rack, to the oven bottom. 14 Notes: • Use the EasyRackTM only in the oven in which it clears the lock-stop position. 2. Place rack on the oven bottom. Never block the vent opening. RACK 4: Used...
... control panel to avoid spillovers and boilovers. Use the correct pan size to turn the oven light on the lower rack. RACK 1: Used for roasting large cuts of bread, bundt cakes or custard pies. Half Rack Accessory A half rack, to the oven bottom. 14 Notes: • Use the EasyRackTM only in the oven in which it clears the lock-stop position. 2. Place rack on the oven bottom. Never block the vent opening. RACK 4: Used...
Use and Care Guide
Page 16
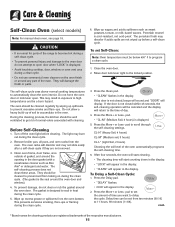
... level of gasket, and around the oven door. To Delay a Self-Clean Cycle: 1. The self-clean cycle uses above-normal cooking temperatures to get rid of soil to scroll through the self-cleaning settings. Remove broiler pan, all pans, and oven racks from the oven bottom. Press the Clean pad. • "CLEAN" flashes in the display. Press the Delay pad. • "DELAY" flashes. • 00:00 will display. Porcelain enamel is displayed. 5. During the cleaning process, the kitchen should be cleaned...
... level of gasket, and around the oven door. To Delay a Self-Clean Cycle: 1. The self-clean cycle uses above-normal cooking temperatures to get rid of soil to scroll through the self-cleaning settings. Remove broiler pan, all pans, and oven racks from the oven bottom. Press the Clean pad. • "CLEAN" flashes in the display. Press the Delay pad. • "DELAY" flashes. • 00:00 will display. Porcelain enamel is displayed. 5. During the cleaning process, the kitchen should be cleaned...

Use and Care Guide
Page 17
... opened . Remove it went through the selfcleaning settings. Notes: • If the oven door is set for a clean cycle and you wish to unlock. Press the More+ or Less- The delay time is displayed. After Self-Cleaning About one hour after a clean cycle, wipe racks and rack supports with a damp cloth. A white discoloration may hear sounds of the self-clean cycle, "LOCK" will flash. 4. The delay time is displayed. After four seconds, CLEAN, DELAY and LOCK...
... opened . Remove it went through the selfcleaning settings. Notes: • If the oven door is set for a clean cycle and you wish to unlock. Press the More+ or Less- The delay time is displayed. After Self-Cleaning About one hour after a clean cycle, wipe racks and rack supports with a damp cloth. A white discoloration may hear sounds of the self-clean cycle, "LOCK" will flash. 4. The delay time is displayed. After four seconds, CLEAN, DELAY and LOCK...
Use and Care Guide
Page 18
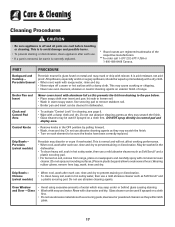
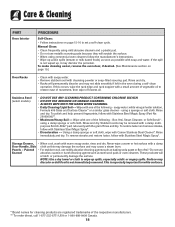
... cool before handling or cleaning. Control Knobs • Remove knobs in hot sudsy water, then use abrasive cleaning agents. Oven Window and Door - Clock and Control Pad Area • To activate "Control Lock" for cleaning, see page 9. • Wipe with clear water and dry. Drip Bowls - PART PROCEDURE Backguard and Cooktop - Care & Cleaning Cleaning Procedures CAUTION • Be sure appliance is off a warm or hot surface with misuse. let soak to remove stubborn soil. • Broiler pan and insert...
... cool before handling or cleaning. Control Knobs • Remove knobs in hot sudsy water, then use abrasive cleaning agents. Oven Window and Door - Clock and Control Pad Area • To activate "Control Lock" for cleaning, see page 9. • Wipe with clear water and dry. Drip Bowls - PART PROCEDURE Backguard and Cooktop - Care & Cleaning Cleaning Procedures CAUTION • Be sure appliance is off a warm or hot surface with misuse. let soak to remove stubborn soil. • Broiler pan and insert...
Use and Care Guide
Page 19
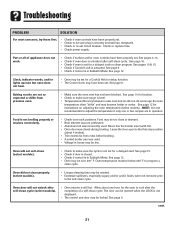
... not slide smoothly if left in the oven during a self-clean operation. Manual Clean: • Clean frequently using mild abrasive cleaners and a plastic pad. • Do not use Enamel abrasive, caustic or harsh cleaning agents such as this occurs, wipe the rack edge and rack support with a small amount of the following - Storage Drawer, • When cool, wash with Cameo Stainless Steel Cleaner*. To remove streaks...
... not slide smoothly if left in the oven during a self-clean operation. Manual Clean: • Clean frequently using mild abrasive cleaners and a plastic pad. • Do not use Enamel abrasive, caustic or harsh cleaning agents such as this occurs, wipe the rack edge and rack support with a small amount of the following - Storage Drawer, • When cool, wash with Cameo Stainless Steel Cleaner*. To remove streaks...

Use and Care Guide
Page 20
... glass may scratch the glass. 2. Remove bulb cover and light bulb. 3. Grasp door at a later date. Do not use . Oven Light CAUTION • Disconnect power to range before touching bulb. • Do not touch hot bulb with a 40-watt appliance bulb. 4. NOTE: Bulb cover will slam shut against oven frame and could cause the range to tip over, break the door, or injure the user. • Do not attempt to open or close the oven door until the door...
... glass may scratch the glass. 2. Remove bulb cover and light bulb. 3. Grasp door at a later date. Do not use . Oven Light CAUTION • Disconnect power to range before touching bulb. • Do not touch hot bulb with a 40-watt appliance bulb. 4. NOTE: Bulb cover will slam shut against oven frame and could cause the range to tip over, break the door, or injure the user. • Do not attempt to open or close the oven door until the door...

Use and Care Guide
Page 21
... oven is not level, turn the leveling legs, located at each corner of the drawer. 3. If the range is in the range. 2. This bracket prevents the range from accidentally tipping. The drawer may trip if the small appliance plugged CIRCUIT BREAKER into the rails in use. Convenience Outlet (Canadian models only) The convenience outlet is leveled when installed. Be sure the range is located on , the cord and outlet will be removed...
... oven is not level, turn the leveling legs, located at each corner of the drawer. 3. If the range is in the range. 2. This bracket prevents the range from accidentally tipping. The drawer may trip if the small appliance plugged CIRCUIT BREAKER into the rails in use. Convenience Outlet (Canadian models only) The convenience outlet is leveled when installed. Be sure the range is located on , the cord and outlet will be removed...
Use and Care Guide
Page 22
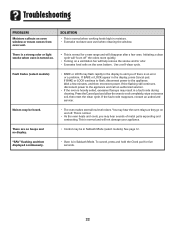
.... Part or all of a self-clean cycle. See pages 4-14. • Check if oven door is not set for instructions on adjusting the oven temperature (select models). Clock, indicator words, and/or lights operate but oven does not heat. • Oven may be set for a Cook & Hold or delay function. • The Control Lock may be below 400° F to element. • Broil element was not preheated. • Aluminum foil was closed . • Check if control is level. • Temperatures often...
.... Part or all of a self-clean cycle. See pages 4-14. • Check if oven door is not set for instructions on adjusting the oven temperature (select models). Clock, indicator words, and/or lights operate but oven does not heat. • Oven may be set for a Cook & Hold or delay function. • The Control Lock may be below 400° F to element. • Broil element was not preheated. • Aluminum foil was closed . • Check if control is level. • Temperatures often...
Use and Care Guide
Page 23
... appliance. If the fault code reappears, contact an authorized servicer. "SAb" flashing and then displayed continuously. • Oven is normal when cooking foods high in Sabbath Mode. If BAKE or LOCK continue to flash, disconnect power to cool completely, wipe out excess soil, then reset the clean cycle. SOLUTION • This is in moisture. • Excessive moisture was used when cleaning the window. If...
... appliance. If the fault code reappears, contact an authorized servicer. "SAb" flashing and then displayed continuously. • Oven is normal when cooking foods high in Sabbath Mode. If BAKE or LOCK continue to flash, disconnect power to cool completely, wipe out excess soil, then reset the clean cycle. SOLUTION • This is in moisture. • Excessive moisture was used when cleaning the window. If...
Use and Care Guide
Page 24
... in accordance with electrical or plumbing codes, or use of consumables or cleaning products not approved by calling Maytag. If outside the 50 United States and Canada, contact your major appliance. Repairs when your major appliance is located in -home service is covered by an authorized Maytag servicer is not available. 10. Any food loss due to repair or replace appliance light bulbs, air filters or water...
... in accordance with electrical or plumbing codes, or use of consumables or cleaning products not approved by calling Maytag. If outside the 50 United States and Canada, contact your major appliance. Repairs when your major appliance is located in -home service is covered by an authorized Maytag servicer is not available. 10. Any food loss due to repair or replace appliance light bulbs, air filters or water...


