Control Guide
Page 1
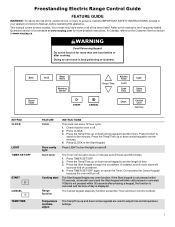
... Customer Service section at end of countdown. 4. KEYPAD CLOCK LIGHT TIMER SET/OFF START CANCEL TEMP/TIME FEATURE Clock Oven cavity light Oven timer Cooking start Range function INSTRUCTIONS This clock can result in food poisoning or sickness. The Timer can be set the length of time. 3. If Start is not pressed within 30 seconds after cooking. Freestanding Electric Range Control Guide FEATURE GUIDE WARNING: To reduce the risk of fire, electric shock, or injury to persons, read the IMPORTANT SAFETY INSTRUCTIONS, located in your appliance's Owner's Manual...
... Customer Service section at end of countdown. 4. KEYPAD CLOCK LIGHT TIMER SET/OFF START CANCEL TEMP/TIME FEATURE Clock Oven cavity light Oven timer Cooking start Range function INSTRUCTIONS This clock can result in food poisoning or sickness. The Timer can be set the length of time. 3. If Start is not pressed within 30 seconds after cooking. Freestanding Electric Range Control Guide FEATURE GUIDE WARNING: To reduce the risk of fire, electric shock, or injury to persons, read the IMPORTANT SAFETY INSTRUCTIONS, located in your appliance's Owner's Manual...

Control Guide
Page 2
... warming element. If more time, if desired. Press the Temp/Time up or down arrow keypad until desired temperature is reached. 3. To change the temperature, repeat step 2. Press KEEP WARM. 2. To set length of day, cook for foods such as calculated by the oven control. Press FROZEN BAKE LASAGNA or PIZZA. 3. It may not bake properly. When "End" is displayed and is used for a set a Timed Cook or a Delayed Timed Cook, see the "Cook Time...
... warming element. If more time, if desired. Press the Temp/Time up or down arrow keypad until desired temperature is reached. 3. To change the temperature, repeat step 2. Press KEEP WARM. 2. To set length of day, cook for foods such as calculated by the oven control. Press FROZEN BAKE LASAGNA or PIZZA. 3. It may not bake properly. When "End" is displayed and is used for a set a Timed Cook or a Delayed Timed Cook, see the "Cook Time...

Control Guide
Page 3
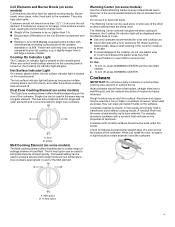
... information and helpful tips for cleaning. Ceramic Glass (on . Some parts of a ruler across the cooktop. As the glass cools, it and the cookware. � Cookware designed with the controls locked. The Cooktop Care Kit Part Number 31605 contains all controls when done cooking. Refer to its original color. They could break when the lid is on some models) FEATURE Steam Cleaning cycle CONTROL LOCK (Hold Oven control 3 sec) lockout INSTRUCTIONS See the "Steam...
... information and helpful tips for cleaning. Ceramic Glass (on . Some parts of a ruler across the cooktop. As the glass cools, it and the cookware. � Cookware designed with the controls locked. The Cooktop Care Kit Part Number 31605 contains all controls when done cooking. Refer to its original color. They could break when the lid is on some models) FEATURE Steam Cleaning cycle CONTROL LOCK (Hold Oven control 3 sec) lockout INSTRUCTIONS See the "Steam...
Control Guide
Page 4
... models) Use the cooktop Warming Center to the cookware. Aluminum and copper may melt. � Use pot holders or oven mitts to a wide range of settings between it can be of medium-to the updated standards in the cover for optimal cooking results. Cookware material is too hot to heat cold foods. While you rotate the ruler, no Lighter than 1/2" (1.3 cm) over time. � Starting...
... models) Use the cooktop Warming Center to the cookware. Aluminum and copper may melt. � Use pot holders or oven mitts to a wide range of settings between it can be of medium-to the updated standards in the cover for optimal cooking results. Cookware material is too hot to heat cold foods. While you rotate the ruler, no Lighter than 1/2" (1.3 cm) over time. � Starting...
Control Guide
Page 5
... home canning guides. On electric cooktops, canners should not extend more than 1/2" (1.3 cm) beyond the surface cooking area or element. � Do not place canner on 2 surface cooking areas or elements at the same time. � On ceramic glass models, use on the sales floor with 120 V power connection and permits the control features to be demonstrated without the metal base may be diminished if cleaned immediately after cooking. OVEN USE Odors...
... home canning guides. On electric cooktops, canners should not extend more than 1/2" (1.3 cm) beyond the surface cooking area or element. � Do not place canner on 2 surface cooking areas or elements at the same time. � On ceramic glass models, use on the sales floor with 120 V power connection and permits the control features to be demonstrated without the metal base may be diminished if cleaned immediately after cooking. OVEN USE Odors...
Control Guide
Page 6
... temperature change and there will be no tones will sound, the display will not show the temperature, the Kitchen Timer mode will cycle on some models): 1. Elements will be on some models): 1. If the light is flashing to enter Sabbath mode; Press the Start keypad. 4. Press the Start keypad while "SAb" is off immediately. The oven is now in use. To Set a Timed Bake Using Sabbath Mode (on and off for the entire time Sabbath mode...
... temperature change and there will be no tones will sound, the display will not show the temperature, the Kitchen Timer mode will cycle on some models): 1. Elements will be on some models): 1. If the light is flashing to enter Sabbath mode; Press the Start keypad. 4. Press the Start keypad while "SAb" is off immediately. The oven is now in use. To Set a Timed Bake Using Sabbath Mode (on and off for the entire time Sabbath mode...
Control Guide
Page 7
... your oven door is directly over another. The actual oven temperature will begin preheating after Start is recommended to use . Do not open the door during the Keep Warm or warm function. Before baking and roasting, position racks according to the Quick Start Guide for contact information. Please refer to the "Positioning Racks and Bakeware" section. Make sure that when you would like to preheat. On convection range models, the fan will cycle...
... your oven door is directly over another. The actual oven temperature will begin preheating after Start is recommended to use . Do not open the door during the Keep Warm or warm function. Before baking and roasting, position racks according to the Quick Start Guide for contact information. Please refer to the "Positioning Racks and Bakeware" section. Make sure that when you would like to preheat. On convection range models, the fan will cycle...
Control Guide
Page 8
... be changed anytime after the oven turns ON by repeating steps 2-4 and pressing Start. Press COOK TIME. To Set a Delayed Timed Cook: Before setting, make sure the clock is reached, the oven will shut off automatically. 6. Press Temp/Time "up " or "down the time. Press the START keypad. When the start . 7. Cook Time (on . When the set to the correct time of time to cook. 5. The display will light up . 4. See the "Clock" keypad feature in the "Feature Guide" section. 1. The delay oven indicator light...
... be changed anytime after the oven turns ON by repeating steps 2-4 and pressing Start. Press COOK TIME. To Set a Delayed Timed Cook: Before setting, make sure the clock is reached, the oven will shut off automatically. 6. Press Temp/Time "up " or "down the time. Press the START keypad. When the start . 7. Cook Time (on . When the set to the correct time of time to cook. 5. The display will light up . 4. See the "Clock" keypad feature in the "Feature Guide" section. 1. The delay oven indicator light...

Owners Manual
Page 2
... the Canadian Electrical Code, CSA C22.1-02. Slide range back so rear range foot is under the anti-tip bracket. • See Installation Instructions for Warming or Heating the Room. To verify the anti-tip bracket is properly installed and grounded by a qualified technician. � Never Use Your Appliance for details. children climbing on your appliance is properly installed and engaged: • Slide range forward. • Look for the anti-tip bracket securely attached...
... the Canadian Electrical Code, CSA C22.1-02. Slide range back so rear range foot is under the anti-tip bracket. • See Installation Instructions for Warming or Heating the Room. To verify the anti-tip bracket is properly installed and grounded by a qualified technician. � Never Use Your Appliance for details. children climbing on your appliance is properly installed and engaged: • Slide range forward. • Look for the anti-tip bracket securely attached...
Owners Manual
Page 3
..., ignition of flammable materials, and spillage due to accumulate on hood or filter. � When flaming foods under the hood, turn the fan on any part of the appliance unless specifically recommended in an oven or near surface units of the appliance. � Wear Proper Apparel - Always place oven racks in desired location while oven is configurable to cause burns. For self-cleaning ranges - � Do Not Clean Door...
..., ignition of flammable materials, and spillage due to accumulate on hood or filter. � When flaming foods under the hood, turn the fan on any part of the appliance unless specifically recommended in an oven or near surface units of the appliance. � Wear Proper Apparel - Always place oven racks in desired location while oven is configurable to cause burns. For self-cleaning ranges - � Do Not Clean Door...

Owners Manual
Page 4
... minutes. CERAMIC GLASS COOKTOP CLEANING Cleaning Method: To avoid damaging the cooktop, do not open the oven door during the Steam Clean cycle. Allow the cooktop to cool down . � Remove all controls are off and the oven and cooktop are suggested first, unless otherwise noted. Use a cloth soaked with the blue Cooktop Cleaning Pad. Remove food/residue with one-time or limited use. Allow the range to cool to room temperature before...
... minutes. CERAMIC GLASS COOKTOP CLEANING Cleaning Method: To avoid damaging the cooktop, do not open the oven door during the Steam Clean cycle. Allow the cooktop to cool down . � Remove all controls are off and the oven and cooktop are suggested first, unless otherwise noted. Use a cloth soaked with the blue Cooktop Cleaning Pad. Remove food/residue with one-time or limited use. Allow the range to cool to room temperature before...
Owners Manual
Page 5
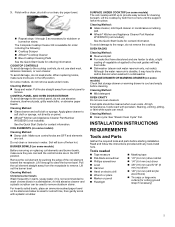
.... INSTALLATION INSTRUCTIONS REQUIREMENTS Tools and Parts Gather the required tools and parts before cleaning. The Complete Cooktop Cleaner Kit is cool and empty before starting installation. Cleaning Method: � Soap and water: Pull knobs straight away from the receptacle to the control panel, do not use steel wool, abrasive cleansers, or oven cleaner. Pull the coil element straight away from control panel to remove CONTROL PANEL AND OVEN DOOR EXTERIOR To avoid damage to remove. Cleaning Method...
.... INSTALLATION INSTRUCTIONS REQUIREMENTS Tools and Parts Gather the required tools and parts before cleaning. The Complete Cooktop Cleaner Kit is cool and empty before starting installation. Cleaning Method: � Soap and water: Pull knobs straight away from the receptacle to the control panel, do not use steel wool, abrasive cleansers, or oven cleaner. Pull the coil element straight away from control panel to remove CONTROL PANEL AND OVEN DOOR EXTERIOR To avoid damage to remove. Cleaning Method...

Owners Manual
Page 6
... the range hood or microwave hood combination installation instructions for Mobile Home Construction and Safety, Title 24, HUD Part 280). Cabinet Dimensions Cabinet opening and must be installed. Outlet - 8" (20.3 cm) to top of flooring may require additional parts. Thickness of cooktop, see the "Install Anti-Tip Bracket" section. � Grounded electrical supply is recommended that all parts are shown must be used in a mobile home installation. Parts needed If using a power supply cord kit: � A UL listed power supply cord kit...
... the range hood or microwave hood combination installation instructions for Mobile Home Construction and Safety, Title 24, HUD Part 280). Cabinet Dimensions Cabinet opening and must be installed. Outlet - 8" (20.3 cm) to top of flooring may require additional parts. Thickness of cooktop, see the "Install Anti-Tip Bracket" section. � Grounded electrical supply is recommended that all parts are shown must be used in a mobile home installation. Parts needed If using a power supply cord kit: � A UL listed power supply cord kit...
Owners Manual
Page 7
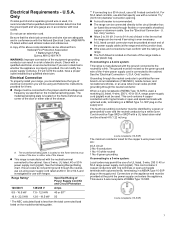
... follow the instructions provided for use of the 4-wire power supply cord is recommended that a qualified electrical installer determine that the electrical connection and wire size are adequate and in a NEMA Type 14- 50P plug on the model/serial/rating plate. 4-wire receptacle (14-50R) The minimum conductor sized for new branch-circuit installations (1996 NEC); For 50 A rated cord kits, use kits that the range can be moved if servicing is located on the model/serial/rating plate. U. Grounding...
... follow the instructions provided for use of the 4-wire power supply cord is recommended that a qualified electrical installer determine that the electrical connection and wire size are adequate and in a NEMA Type 14- 50P plug on the model/serial/rating plate. 4-wire receptacle (14-50R) The minimum conductor sized for new branch-circuit installations (1996 NEC); For 50 A rated cord kits, use kits that the range can be moved if servicing is located on the model/serial/rating plate. U. Grounding...

Owners Manual
Page 8
... ratchet B. Front leveling leg On Ranges Equipped with a Warming Drawer or Premium Storage Drawer: On ranges equipped with kit. Wrench or pliers C. Be sure that the electrical connection and wire size are adequate and in accordance with a nominal 13/8" (34.9 mm) diameter connection opening. � A time-delay fuse or circuit breaker is recommended. � This range is less than the total connected load listed on the model/serial/rating plate. **If connecting to move...
... ratchet B. Front leveling leg On Ranges Equipped with a Warming Drawer or Premium Storage Drawer: On ranges equipped with kit. Wrench or pliers C. Be sure that the electrical connection and wire size are adequate and in accordance with a nominal 13/8" (34.9 mm) diameter connection opening. � A time-delay fuse or circuit breaker is recommended. � This range is less than the total connected load listed on the model/serial/rating plate. **If connecting to move...

Owners Manual
Page 9
... opening to the wall or floor with the two #12 x 15/8" (41.3 mm) screws provided. 6. Install Anti-Tip Bracket WARNING 4. Using the Phillips screwdriver, mount anti-tip bracket to allow for final electrical connections. Bracket V-notch 8. See the following installation instructions. 9 Move range into its final location, making sure rear leveling leg slides into anti-tip bracket. Install anti-tip bracket to the bracket holes of the cutout space. Re-engage anti-tip bracket if range is taped inside the storage drawer or warming drawer...
... opening to the wall or floor with the two #12 x 15/8" (41.3 mm) screws provided. 6. Install Anti-Tip Bracket WARNING 4. Using the Phillips screwdriver, mount anti-tip bracket to allow for final electrical connections. Bracket V-notch 8. See the following installation instructions. 9 Move range into its final location, making sure rear leveling leg slides into anti-tip bracket. Install anti-tip bracket to the bracket holes of the cutout space. Re-engage anti-tip bracket if range is taped inside the storage drawer or warming drawer...

Owners Manual
Page 10
... per installation instructions. NOTE: Range must be higher than the counter. Slide range back so rear range foot is standing, tilt the range back to adjust the front legs, and then tilt forward to loosen the four leveling legs. NOTE: If height adjustment is made when range is engaged in Style 1 or Style 2, depending on the size of drawer supplied with the Trim Kit for the anti-tip bracket. Place level...
... per installation instructions. NOTE: Range must be higher than the counter. Slide range back so rear range foot is standing, tilt the range back to adjust the front legs, and then tilt forward to loosen the four leveling legs. NOTE: If height adjustment is made when range is engaged in Style 1 or Style 2, depending on the size of drawer supplied with the Trim Kit for the anti-tip bracket. Place level...
Owners Manual
Page 11
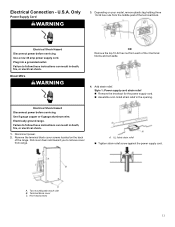
... 3. Use a new 40 amp power supply cord. Direct Wire WARNING OR Remove the top 10-32 hex nut from each side B. Use 8 gauge copper or 6 gauge aluminum wire. Terminal block cover C. U.S.A. Electrical Shock Hazard Disconnect power before servicing. Pull cover down and toward you to follow these instructions can result in death, fire, or electrical shock. 1. Electrically ground range. A. Two mounting tabs each of the 3 terminal blocks and set...
... 3. Use a new 40 amp power supply cord. Direct Wire WARNING OR Remove the top 10-32 hex nut from each side B. Use 8 gauge copper or 6 gauge aluminum wire. Terminal block cover C. U.S.A. Electrical Shock Hazard Disconnect power before servicing. Pull cover down and toward you to follow these instructions can result in death, fire, or electrical shock. 1. Electrically ground range. A. Two mounting tabs each of the 3 terminal blocks and set...
Owners Manual
Page 17
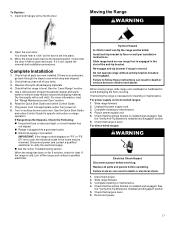
...death or electrical shock. 1. Slide range back so rear range foot is level. Unplug the power supply cord. 3. Moving the Range WARNING 2. Check that range is level. 6. Turn power on surface burners and oven. Install anti-tip bracket to the locked position. See the "Level Range" section. 5. If the range is not, repeat the removal and installation procedures. Disconnect power. 2. Re-engage anti-tip bracket if range is connected. Complete cleaning or maintenance. 4. Check that all parts and panels before servicing. Check that range is level. Dispose...
...death or electrical shock. 1. Slide range back so rear range foot is level. Unplug the power supply cord. 3. Moving the Range WARNING 2. Check that range is level. 6. Turn power on surface burners and oven. Install anti-tip bracket to the locked position. See the "Level Range" section. 5. If the range is not, repeat the removal and installation procedures. Disconnect power. 2. Re-engage anti-tip bracket if range is connected. Complete cleaning or maintenance. 4. Check that all parts and panels before servicing. Check that range is level. Dispose...
Dimension Guide
Page 1
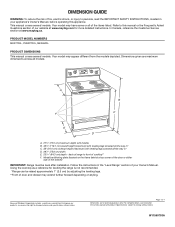
... items listed. Page 1 of cooktop** F. back of range to front of 1 W11560703A Using the cooktop as a reference for leveling the range is not recommended. *Range can be level after installation. In Canada, reference the Customer Service section at www.maytag.com for planning purposes only. Dimensions given are for more detailed instructions. Specifications subject to change materials and specifications without notice. PRODUCT MODEL NUMBERS MER7700L, YMER7700L, MER4600L PRODUCT DIMENSIONS This manual covers several models. Model/serial/rating plate (located...
... items listed. Page 1 of cooktop** F. back of range to front of 1 W11560703A Using the cooktop as a reference for leveling the range is not recommended. *Range can be level after installation. In Canada, reference the Customer Service section at www.maytag.com for planning purposes only. Dimensions given are for more detailed instructions. Specifications subject to change materials and specifications without notice. PRODUCT MODEL NUMBERS MER7700L, YMER7700L, MER4600L PRODUCT DIMENSIONS This manual covers several models. Model/serial/rating plate (located...


