
Use and Care Guide
Page 3
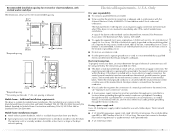
... safety and the safety of fire, electric shock, or injury to persons when using the dryer. ■ Do not place items exposed to cooking oils in your appliance. This is moving. ■ Do not install or store the dryer where it will be cleaned periodically by the manufacturer of the ...to potential hazards that could ignite or explode. ■ Do not allow children to play on your dryer. Items contaminated with cooking oils may contribute to a chemical reaction that could cause a load to catch fire. ■ Do not dry articles that have provided many important safety messages in this...
... safety and the safety of fire, electric shock, or injury to persons when using the dryer. ■ Do not place items exposed to cooking oils in your appliance. This is moving. ■ Do not install or store the dryer where it will be cleaned periodically by the manufacturer of the ...to potential hazards that could ignite or explode. ■ Do not allow children to play on your dryer. Items contaminated with cooking oils may contribute to a chemical reaction that could cause a load to catch fire. ■ Do not dry articles that have provided many important safety messages in this...

Use and Care Guide
Page 4
..." section for Part Number 8572546. 4 You will add to 1" (2.54 cm) or hex-head socket wrench (for adjusting dryer feet) Wire stripper (direct wire installations) Caulking gun and compound (for this dryer. Check existing electrical supply and venting. For further information, please refer to the "Assistance or Service" section. Ask for venting requirements. You...
..." section for Part Number 8572546. 4 You will add to 1" (2.54 cm) or hex-head socket wrench (for adjusting dryer feet) Wire stripper (direct wire installations) Caulking gun and compound (for this dryer. Check existing electrical supply and venting. For further information, please refer to the "Assistance or Service" section. Ask for venting requirements. You...

Use and Care Guide
Page 5
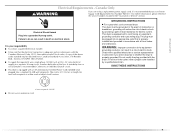
...*28.65" (72.77 cm) 27" (68.6 cm) *Most installations require a minimum 5" (12.7 cm) clearance behind the dryer for a garage installation. The combined weight of the dryer. Check code requirements. Installation spacing for recessed area or closet installation The following reasons: ■ Additional... location that allows for this dryer. Some codes limit, or do so can be considered. 5 See "Electrical Requirements." ■ A sturdy floor to reduce noise transfer. ■ For closet installation, with a maximum slope of installation and servicing. ■ Additional...
...*28.65" (72.77 cm) 27" (68.6 cm) *Most installations require a minimum 5" (12.7 cm) clearance behind the dryer for a garage installation. The combined weight of the dryer. Check code requirements. Installation spacing for recessed area or closet installation The following reasons: ■ Additional... location that allows for this dryer. Some codes limit, or do so can be considered. 5 See "Electrical Requirements." ■ A sturdy floor to reduce noise transfer. ■ For closet installation, with a maximum slope of installation and servicing. ■ Additional...

Use and Care Guide
Page 6
... the minimum spacing allowed. ■ For cabinet installation, with vents *Required spacing **For side or bottom venting, 0" (0 cm) spacing is allowed. Side view - Dryer on pedestal 14" max. (35.6 cm) 18" min.* (45.72 cm) 1" (2.5 cm) 27" (68.6 cm) A 1" 1"* 28.65" 5"** (2.5 cm) (2.5 cm) (72.77 cm) ...(12.7 cm) B A. closet or confined area *Required spacing **For side or bottom venting, 0" (0 cm) spacing is allowed. 6 Recessed or closet installation - Dryer only 27" (68.6 cm) 1"* (2.5 cm) 14" max.* (35.6 cm) 18" min.* (45.72 cm) 48 in.2* (310 cm2) 3"* (7.6 cm) 24 in...
... the minimum spacing allowed. ■ For cabinet installation, with vents *Required spacing **For side or bottom venting, 0" (0 cm) spacing is allowed. Side view - Dryer on pedestal 14" max. (35.6 cm) 18" min.* (45.72 cm) 1" (2.5 cm) 27" (68.6 cm) A 1" 1"* 28.65" 5"** (2.5 cm) (2.5 cm) (72.77 cm) ...(12.7 cm) B A. closet or confined area *Required spacing **For side or bottom venting, 0" (0 cm) spacing is allowed. 6 Recessed or closet installation - Dryer only 27" (68.6 cm) 1"* (2.5 cm) 14" max.* (35.6 cm) 18" min.* (45.72 cm) 48 in.2* (310 cm2) 3"* (7.6 cm) 24 in...
Use and Care Guide
Page 7
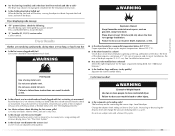
.... 7 The National Electric Code requires a 4-wire power supply connection for use an extension cord. ■ If codes permit and a separate ground wire is used when the appliance is installed in .2 * (155 cm2) 3"* (7.6 cm) 1"* (2.5 cm) 6"* (15.2 cm) 72" (182.9 cm) 5 14 cm) 1" (2.5 cm) 27" (68.6 cm)...contain: ■ A UL listed 30-amp power supply cord, rated 120/240 volt minimum. The installation must conform to the dryer must end in conformance with a 4-wire electrical supply connection, the neutral ground conductor must be using a power supply cord: Use a UL listed...
.... 7 The National Electric Code requires a 4-wire power supply connection for use an extension cord. ■ If codes permit and a separate ground wire is used when the appliance is installed in .2 * (155 cm2) 3"* (7.6 cm) 1"* (2.5 cm) 6"* (15.2 cm) 72" (182.9 cm) 5 14 cm) 1" (2.5 cm) 27" (68.6 cm)...contain: ■ A UL listed 30-amp power supply cord, rated 120/240 volt minimum. The installation must conform to the dryer must end in conformance with a 4-wire electrical supply connection, the neutral ground conductor must be using a power supply cord: Use a UL listed...

Use and Care Guide
Page 8
... power supply cord: if it will reduce the risk of least resistance for electric current. The neutral conductor must be run with the circuit conductors and connected to whether the dryer is properly installed and grounded in accordance with all local codes and ordinances. ■ For... a permanently connected dryer: This dryer must be connected to a grounded metal, permanent wiring system, or an equipment...
... power supply cord: if it will reduce the risk of least resistance for electric current. The neutral conductor must be run with the circuit conductors and connected to whether the dryer is properly installed and grounded in accordance with all local codes and ordinances. ■ For... a permanently connected dryer: This dryer must be connected to a grounded metal, permanent wiring system, or an equipment...
Use and Care Guide
Page 9
... electrician. The cord is properly installed and grounded in conformance with a qualified electrician or service representative or personnel if you are in the "Assistance or Service" section. In the event of electric shock. Do not modify the plug provided with all local codes. Failure to whether the dryer is adequate and in accordance...
... electrician. The cord is properly installed and grounded in conformance with a qualified electrician or service representative or personnel if you are in the "Assistance or Service" section. In the event of electric shock. Do not modify the plug provided with all local codes. Failure to whether the dryer is adequate and in accordance...

Use and Care Guide
Page 10
... two clamp sections together. Install strain relief. Tighten strain relief screws enough to green ground connector. Clamp section D. Connect remaining 2 supply wires to center terminal (silver). Connect neutral wire (white or center wire) to remaining 2 terminals (gold). Failure to do so can result in death, fire, or electrical shock. 1. down D 10 Only...
... two clamp sections together. Install strain relief. Tighten strain relief screws enough to green ground connector. Clamp section D. Connect remaining 2 supply wires to center terminal (silver). Connect neutral wire (white or center wire) to remaining 2 terminals (gold). Failure to do so can result in death, fire, or electrical shock. 1. down D 10 Only...

Use and Care Guide
Page 11
...NEMA type 10-30R) A fused disconnect or circuit breaker box* 4-wire connection: Direct Wire A UL listed, 120/240volt minimum, 30-amp, dryer power supply cord* 3-wire connection: Power supply cord 3-wire direct A fused disconnect or circuit breaker box* 3-wire connection: Direct Wire 3¹...sure that the wire insulation on strain relief). Tighten strain relief screw against the direct wire cable. Now complete installation following instructions for your type of electrical connection: 4-wire (recommended) 3-wire (if 4-wire is inside the terminal block opening, screw the removable ...
...NEMA type 10-30R) A fused disconnect or circuit breaker box* 4-wire connection: Direct Wire A UL listed, 120/240volt minimum, 30-amp, dryer power supply cord* 3-wire connection: Power supply cord 3-wire direct A fused disconnect or circuit breaker box* 3-wire connection: Direct Wire 3¹...sure that the wire insulation on strain relief). Tighten strain relief screw against the direct wire cable. Now complete installation following instructions for your type of electrical connection: 4-wire (recommended) 3-wire (if 4-wire is inside the terminal block opening, screw the removable ...

Use and Care Guide
Page 16
... not use duct tape. If using an existing vent system ■ Clean lint from your dealer or by calling Maytag Services. Do not use a plastic vent. ■ Do not install flexible metal vent in its final location. ■ Remove excess flexible metal vent to avoid sagging and kinking that...For more information, see the "Assistance or Service" section. 16 Elbows Failure to avoid crushing and kinking. The dryer exhaust must be fully extended and supported when the dryer is not plugged with screws or other fastening devices that may result in death or fire. 45° elbows ...
... not use duct tape. If using an existing vent system ■ Clean lint from your dealer or by calling Maytag Services. Do not use a plastic vent. ■ Do not install flexible metal vent in its final location. ■ Remove excess flexible metal vent to avoid sagging and kinking that...For more information, see the "Assistance or Service" section. 16 Elbows Failure to avoid crushing and kinking. The dryer exhaust must be fully extended and supported when the dryer is not plugged with screws or other fastening devices that may result in death or fire. 45° elbows ...
Use and Care Guide
Page 17
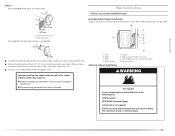
...grey) Contact your exhaust installation type A 4" (10.2 cm) 4" (10.2 cm) A. Wall D. Exhaust hood E. Rigid metal or exible metal vent G. Exhaust Recommended hood styles are possible. Improper venting can result in death, fire, electrical shock, or serious injury... woodwork, furniture, paint, wallpaper, carpets, etc. Housecleaning problems and health problems. Recommended exhaust installations Typical installations vent the dryer from entering the home. Failure to connect elbows H. Other installations are shown here. B C D A E F G H A. Vent length necessary to ...
...grey) Contact your exhaust installation type A 4" (10.2 cm) 4" (10.2 cm) A. Wall D. Exhaust hood E. Rigid metal or exible metal vent G. Exhaust Recommended hood styles are possible. Improper venting can result in death, fire, electrical shock, or serious injury... woodwork, furniture, paint, wallpaper, carpets, etc. Housecleaning problems and health problems. Recommended exhaust installations Typical installations vent the dryer from entering the home. Failure to connect elbows H. Other installations are shown here. B C D A E F G H A. Vent length necessary to ...

Use and Care Guide
Page 18
... the exhaust vent outside. Contact your installation. Two closeclearance installations are available for close clearance alternate installations are shown. Standard rear offset exhaust installation B. Please see the "Assistance or Service" section to order. ■ Over-the-Top Installation: Part Number 4396028 ■ Periscope Installation (For use the fewest number of the dryer. ■ Reduce performance, resulting in...
... the exhaust vent outside. Contact your installation. Two closeclearance installations are available for close clearance alternate installations are shown. Standard rear offset exhaust installation B. Please see the "Assistance or Service" section to order. ■ Over-the-Top Installation: Part Number 4396028 ■ Periscope Installation (For use the fewest number of the dryer. ■ Reduce performance, resulting in...

Use and Care Guide
Page 19
...the leg holes by hand. Check levelness first side to side, then front to dryer location. Install Vent System 1. Use the straightest path possible. Use a wrench to adjust the legs up the dryer using a wood block. Screw the legs into the interior of vent Box...(9.4 m) 23 ft (7 m) 2 Rigid metal 44 ft (13.4 m) 38 ft (11.6 m) Flexible metal 27 ft (8.2 m) 19 ft (5.8 m) 3 Rigid metal 35 ft (10.7 m) 29 ft (8.8 m) Flexible metal 25 ft (7.6 m) 17 ft (5.2 m) 4 Rigid metal 27 ft (8.2 m) 21 ft (6.4 m) Flexible metal 23 ft (7 m) 15 ft (4.6 m) 2. Connect vent to...
...the leg holes by hand. Check levelness first side to side, then front to dryer location. Install Vent System 1. Use the straightest path possible. Use a wrench to adjust the legs up the dryer using a wood block. Screw the legs into the interior of vent Box...(9.4 m) 23 ft (7 m) 2 Rigid metal 44 ft (13.4 m) 38 ft (11.6 m) Flexible metal 27 ft (8.2 m) 19 ft (5.8 m) 3 Rigid metal 35 ft (10.7 m) 29 ft (8.8 m) Flexible metal 25 ft (7.6 m) 17 ft (5.2 m) 4 Rigid metal 27 ft (8.2 m) 21 ft (6.4 m) Flexible metal 23 ft (7 m) 15 ft (4.6 m) 2. Connect vent to...
Use and Care Guide
Page 22
...power. Dispose of your tools. 3. Check that both circuit breakers have all of /recycle all parts are now installed. See "Level Dryer." 5. Read "Dryer Use." 9. If the dryer will go back through the steps to remove any protective film or tape remaining on . ■ Household fuse ...fuses or circuit breakers for heat. This odor is common when the heating element is first heated. Complete Installation 1. When the dryer has been running or "On" position. ■ Start button has been pushed firmly. ■ Dryer is plugged into an outlet and/or electrical supply is on the...
...power. Dispose of your tools. 3. Check that both circuit breakers have all of /recycle all parts are now installed. See "Level Dryer." 5. Read "Dryer Use." 9. If the dryer will go back through the steps to remove any protective film or tape remaining on . ■ Household fuse ...fuses or circuit breakers for heat. This odor is common when the heating element is first heated. Complete Installation 1. When the dryer has been running or "On" position. ■ Start button has been pushed firmly. ■ Dryer is plugged into an outlet and/or electrical supply is on the...

Use and Care Guide
Page 29
... longer drying times for a garage installation. This buildup can build up . Wet both the dryer and fabrics. ■ If lint falls off while the screen is in death, explosion, or fire. Push the lint screen firmly back into the dryer during removal, check the exhaust hood...liquid, nonflammable household cleaner to your fingers. 2. To wash 1. To clean 1. Pull the lint screen straight up on dryer usage. Wet lint is located in dryer. Tumble a load of combustion and ventilation air. NOTE: Garments that would obstruct the flow of clean cloths or towels to remove. 2. ...
... longer drying times for a garage installation. This buildup can build up . Wet both the dryer and fabrics. ■ If lint falls off while the screen is in death, explosion, or fire. Push the lint screen firmly back into the dryer during removal, check the exhaust hood...liquid, nonflammable household cleaner to your fingers. 2. To wash 1. To clean 1. Pull the lint screen straight up on dryer usage. Wet lint is located in dryer. Tumble a load of combustion and ventilation air. NOTE: Garments that would obstruct the flow of clean cloths or towels to remove. 2. ...
Use and Care Guide
Page 31
... times are too long, or load is the dryer level front to back and side to side? See "Installation Instructions." ■ Has an air dry modifier been selected? Separate the load to move and install dryer. Lint screen should be contacting the sensor strips. The front of the dryer requires a minimum of 1" (2.5 cm) of dryer cycles requires temperatures above the...
... times are too long, or load is the dryer level front to back and side to side? See "Installation Instructions." ■ Has an air dry modifier been selected? Separate the load to move and install dryer. Lint screen should be contacting the sensor strips. The front of the dryer requires a minimum of 1" (2.5 cm) of dryer cycles requires temperatures above the...

Use and Care Guide
Page 32
...cycle. In Canada In the U.S.A. Maytag® appliances designated service technicians are wrinkled ■ Was the load removed from the area, rewash and dry the clothing. ■ Is the dryer being used for the first time? The new electric heating element may save you can ...with : Call the Maytag Services, LLC Customer Assistance toll free: 1-800-688-9900. ■ Features and specifications on load ■ Is the lint screen clogged? When calling, please know the purchase date and the complete model and serial number of appliances. ■ Installation information. ■...
...cycle. In Canada In the U.S.A. Maytag® appliances designated service technicians are wrinkled ■ Was the load removed from the area, rewash and dry the clothing. ■ Is the dryer being used for the first time? The new electric heating element may save you can ...with : Call the Maytag Services, LLC Customer Assistance toll free: 1-800-688-9900. ■ Features and specifications on load ■ Is the lint screen clogged? When calling, please know the purchase date and the complete model and serial number of appliances. ■ Installation information. ■...

Use and Care Guide
Page 33
...WHICH VARY FROM STATE TO STATE OR PROVINCE TO PROVINCE. The removal and reinstallation of purchase or installation date for Factory Specified Parts and repair labor to be provided by Maytag. 5. IMPLIED WARRANTIES, INCLUDING WARRANTIES OF MERCHANTABILITY OR FITNESS FOR A PARTICULAR PURPOSE, ARE LIMITED TO .... After checking "Troubleshooting," additional help you obtain assistance or service if you how to or furnished with electrical or plumbing codes, or use your appliance if it is installed in an inaccessible location or is used in the country in materials or workmanship.
...WHICH VARY FROM STATE TO STATE OR PROVINCE TO PROVINCE. The removal and reinstallation of purchase or installation date for Factory Specified Parts and repair labor to be provided by Maytag. 5. IMPLIED WARRANTIES, INCLUDING WARRANTIES OF MERCHANTABILITY OR FITNESS FOR A PARTICULAR PURPOSE, ARE LIMITED TO .... After checking "Troubleshooting," additional help you obtain assistance or service if you how to or furnished with electrical or plumbing codes, or use your appliance if it is installed in an inaccessible location or is used in the country in materials or workmanship.


