

Use and Care Guide
Page 3
... attempt any servicing unless specifically recommended in this Use and Care Guide or in published user-repair instructions that could cause a load to reduce the chance of injury, and tell you understand and have provided many important safety messages in this manual and on or in... tell you what can be killed or seriously injured if you to cooking oils in the dryer. IMPORTANT SAFETY INSTRUCTIONS WARNING: To reduce the risk of fire, electric shock, or injury to persons when using the dryer. ■ Do not place items exposed to potential hazards that could ignite or explode. ■...
... attempt any servicing unless specifically recommended in this Use and Care Guide or in published user-repair instructions that could cause a load to reduce the chance of injury, and tell you understand and have provided many important safety messages in this manual and on or in... tell you what can be killed or seriously injured if you to cooking oils in the dryer. IMPORTANT SAFETY INSTRUCTIONS WARNING: To reduce the risk of fire, electric shock, or injury to persons when using the dryer. ■ Do not place items exposed to potential hazards that could ignite or explode. ■...

Use and Care Guide
Page 4
... shown) The pedestals are included. To do so, you purchased your dryer or refer to stack your dryer. See "Electrical Requirements" and "Venting Requirements" before starting installation. Ask for venting requirements. Check existing electrical supply and venting. To order, call the dealer from dryer drum. The pedestal will need to place the 15.5" (39.4 cm...
... shown) The pedestals are included. To do so, you purchased your dryer or refer to stack your dryer. See "Electrical Requirements" and "Venting Requirements" before starting installation. Ask for venting requirements. Check existing electrical supply and venting. To order, call the dealer from dryer drum. The pedestal will need to place the 15.5" (39.4 cm...

Use and Care Guide
Page 5
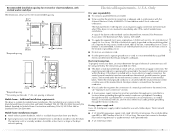
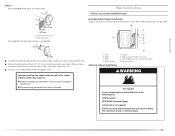
...If using a power supply cord, a grounded electrical outlet located within 2 ft (61 cm) of either side of the dryer. Some codes limit, or do so can be exposed to open fully. 36" (91.4 cm) *28.65" (72.77 cm) 27" (68.6 cm) *Most installations require ...support the total dryer weight of the dryer in death, explosion, or fire. WARNING Location Requirements Dryer Dimensions 50" (128.27 cm) Explosion Hazard Keep flammable materials and vapors, such as gasoline, away from dryer. The combined weight of a companion appliance should be considered. 5 See "Electrical Requirements." &#...
...If using a power supply cord, a grounded electrical outlet located within 2 ft (61 cm) of either side of the dryer. Some codes limit, or do so can be exposed to open fully. 36" (91.4 cm) *28.65" (72.77 cm) 27" (68.6 cm) *Most installations require ...support the total dryer weight of the dryer in death, explosion, or fire. WARNING Location Requirements Dryer Dimensions 50" (128.27 cm) Explosion Hazard Keep flammable materials and vapors, such as gasoline, away from dryer. The combined weight of a companion appliance should be considered. 5 See "Electrical Requirements." &#...
Use and Care Guide
Page 7
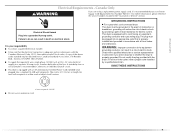
.... 48 in.2 * (310 cm2) 3"* (7.6 cm) *Required spacing 24 in remodeling after 1996, dryer circuits involved in .2 * (155 cm2) 3"* (7.6 cm) 1"* (2.5 cm) 6"* (15.2 cm) 72" (182.9 cm) 5 14 cm) 1" (2.5 cm) 27" (68.6 cm) 1" (2.5 cm) *Required spacing **For venting out the side, 1" (2.5 cm... ■ Metal exhaust system hardware, which is recommended that a qualified electrician determine that connect to introduce outside air into the dryer. Electrical Requirements - A time-delay fuse or circuit breaker is suitable for purchase from the neutral conductor. ■ If local codes ...
.... 48 in.2 * (310 cm2) 3"* (7.6 cm) *Required spacing 24 in remodeling after 1996, dryer circuits involved in .2 * (155 cm2) 3"* (7.6 cm) 1"* (2.5 cm) 6"* (15.2 cm) 72" (182.9 cm) 5 14 cm) 1" (2.5 cm) 27" (68.6 cm) 1" (2.5 cm) *Required spacing **For venting out the side, 1" (2.5 cm... ■ Metal exhaust system hardware, which is recommended that a qualified electrician determine that connect to introduce outside air into the dryer. Electrical Requirements - A time-delay fuse or circuit breaker is suitable for purchase from the neutral conductor. ■ If local codes ...

Use and Care Guide
Page 8
...conductors and connected to the equipment-grounding terminal or lead on the power supply cord: if it will reduce the risk of electric shock by direct wire: Power supply cable must have three 10-gauge copper wires and match a 3-wire receptacle of the ...aluminum). ■ At least 5 ft (1.52 m) long. SAVE THESE INSTRUCTIONS 8 If connecting by providing a path of electric shock. GROUNDING INSTRUCTIONS ■ For a grounded, cord-connected dryer: This dryer must be identified by a qualified electrician. If your outlet looks like this : 3-wire receptacle (10-30R) Then choose a...
...conductors and connected to the equipment-grounding terminal or lead on the power supply cord: if it will reduce the risk of electric shock by direct wire: Power supply cable must have three 10-gauge copper wires and match a 3-wire receptacle of the ...aluminum). ■ At least 5 ft (1.52 m) long. SAVE THESE INSTRUCTIONS 8 If connecting by providing a path of electric shock. GROUNDING INSTRUCTIONS ■ For a grounded, cord-connected dryer: This dryer must be identified by a qualified electrician. If your outlet looks like this : 3-wire receptacle (10-30R) Then choose a...
Use and Care Guide
Page 9
... the plug provided with a CSA International Certified Power Cord intended to an individual branch circuit. ■ This dryer is properly installed and grounded in death or electrical shock. In the event of malfunction or breakdown, grounding will not fit the outlet, have a proper outlet ... please reference the service numbers located in length. A time-delay fuse or circuit breaker is within reach of electric shock by a qualified electrician. This dryer is equipped with a qualified electrician or service representative or personnel if you are in doubt as to do so ...
... the plug provided with a CSA International Certified Power Cord intended to an individual branch circuit. ■ This dryer is properly installed and grounded in death or electrical shock. In the event of malfunction or breakdown, grounding will not fit the outlet, have a proper outlet ... please reference the service numbers located in length. A time-delay fuse or circuit breaker is within reach of electric shock by a qualified electrician. This dryer is equipped with a qualified electrician or service representative or personnel if you are in doubt as to do so ...

Use and Care Guide
Page 11
...(NEMA type 10-30R) A fused disconnect or circuit breaker box* 4-wire connection: Direct Wire A UL listed, 120/240volt minimum, 30-amp, dryer power supply cord* 3-wire connection: Power supply cord 3-wire direct A fused disconnect or circuit breaker box* 3-wire connection: Direct Wire 3¹⁄&#...179;⁄₄" (1.9 cm) UL listed strain relief (UL marking on the power supply cord is not available) Electrical Connection Options If your type of electrical connection: 4-wire (recommended) 3-wire (if 4-wire is inside the terminal block opening . Hole below the terminal ...
...(NEMA type 10-30R) A fused disconnect or circuit breaker box* 4-wire connection: Direct Wire A UL listed, 120/240volt minimum, 30-amp, dryer power supply cord* 3-wire connection: Power supply cord 3-wire direct A fused disconnect or circuit breaker box* 3-wire connection: Direct Wire 3¹⁄&#...179;⁄₄" (1.9 cm) UL listed strain relief (UL marking on the power supply cord is not available) Electrical Connection Options If your type of electrical connection: 4-wire (recommended) 3-wire (if 4-wire is inside the terminal block opening . Hole below the terminal ...
Use and Care Guide
Page 12
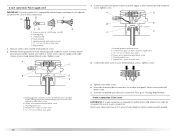
... (white or center wire) 4. Connect the other wires to external ground conductor screw. down screw. 7. Direct wire cable must have completed your electrical connection. Spade terminals with hold- Remove center silver-colored terminal block screw. 2. A D B E C F A. Ground wire (green or ... A C 3. B F A CD E G A. 4-wire receptacle (NEMA type 14-30R) B. 4-prong plug C. Dotted line shows position of dryer rear panel. 4-wire connection: Power supply cord IMPORTANT: A 4-wire connection is required for mobile homes and where local codes do not permit the use ...
... (white or center wire) 4. Connect the other wires to external ground conductor screw. down screw. 7. Direct wire cable must have completed your electrical connection. Spade terminals with hold- Remove center silver-colored terminal block screw. 2. A D B E C F A. Ground wire (green or ... A C 3. B F A CD E G A. 4-wire receptacle (NEMA type 14-30R) B. 4-prong plug C. Dotted line shows position of dryer rear panel. 4-wire connection: Power supply cord IMPORTANT: A 4-wire connection is required for mobile homes and where local codes do not permit the use ...
Use and Care Guide
Page 13
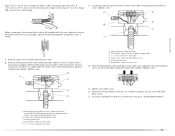
... screw. Insert tab of terminal block cover into slot of wires into a hook shape. 1" (2.5 cm) 3. Neutral ground wire F. You have completed your electrical connection. Neutral wire (white or center wire) E. ¾" (1.9 cm) UL listed strain relief 13 Strip insulation back 1" (2.5 cm). Cut 1¹⁄... screw E. Neutral wire (white or center wire) 4. Center silver-colored terminal block screw C. Squeeze hooked ends together. A. Shape ends of dryer rear panel. Squeeze hooked ends together. Tighten screw. E 7. Strip 5" (12.7 cm) of outer covering from end of the wire under...
... screw. Insert tab of terminal block cover into slot of wires into a hook shape. 1" (2.5 cm) 3. Neutral ground wire F. You have completed your electrical connection. Neutral wire (white or center wire) E. ¾" (1.9 cm) UL listed strain relief 13 Strip insulation back 1" (2.5 cm). Cut 1¹⁄... screw E. Neutral wire (white or center wire) 4. Center silver-colored terminal block screw C. Squeeze hooked ends together. A. Shape ends of dryer rear panel. Squeeze hooked ends together. Tighten screw. E 7. Strip 5" (12.7 cm) of outer covering from end of the wire under...

Use and Care Guide
Page 14
... codes permit connecting cabinet-ground conductor to neutral wire. Tighten screw. You have 5 ft (1.52 m) of extra length so dryer can be moved if needed. Shape ends of wires into slot of the terminal block (hook facing right), squeeze hooked end ...shape. 1" (2.5 cm) 3¹⁄₂" (8.9 cm) When connecting to outer terminal block screws. Direct wire cable must have completed your electrical connection. Now go to "Venting Requirements." 3-wire connection: Direct wire Use where local codes permit connecting cabinet-ground conductor to neutral wire. ...
... codes permit connecting cabinet-ground conductor to neutral wire. Tighten screw. You have 5 ft (1.52 m) of extra length so dryer can be moved if needed. Shape ends of wires into slot of the terminal block (hook facing right), squeeze hooked end ...shape. 1" (2.5 cm) 3¹⁄₂" (8.9 cm) When connecting to outer terminal block screws. Direct wire cable must have completed your electrical connection. Now go to "Venting Requirements." 3-wire connection: Direct wire Use where local codes permit connecting cabinet-ground conductor to neutral wire. ...

Use and Care Guide
Page 15
... ground conductor screw B. Grounding path determined by a qualified electrician 3. Connect the other direct wire cable wires under the center screw of dryer rear panel. Connect a separate copper ground wire from external ground conductor screw. Tighten screw. Insert tab of terminal block cover into slot of...outer terminal block screws (hooks facing right). B A C D E A. Neutral ground wire C. Center silver-colored terminal block screw D. You have completed your electrical connection. Now go to an adequate ground. 6. A. Center silver-colored terminal block screw C.
... ground conductor screw B. Grounding path determined by a qualified electrician 3. Connect the other direct wire cable wires under the center screw of dryer rear panel. Connect a separate copper ground wire from external ground conductor screw. Tighten screw. Insert tab of terminal block cover into slot of...outer terminal block screws (hooks facing right). B A C D E A. Neutral ground wire C. Center silver-colored terminal block screw D. You have completed your electrical connection. Now go to an adequate ground. 6. A. Center silver-colored terminal block screw C.
Use and Care Guide
Page 17
...type A 4" (10.2 cm) 4" (10.2 cm) A. Housecleaning problems and health problems. Recommended exhaust installations Typical installations vent the dryer from the ground or any object that may result in death, fire, electrical shock, or serious injury. 17 B C D A E F G H A. Exhaust hood E. Rigid metal or exible metal vent... the vent to connect elbows H. Elbow C. Vent length necessary to keep rodents and insects from entering the home. Louvered hood style B. Dryer B. Wall D. Clamps F. Do not use an exhaust hood with one of the exhaust (such as owers, rocks or bushes, snow...
...type A 4" (10.2 cm) 4" (10.2 cm) A. Housecleaning problems and health problems. Recommended exhaust installations Typical installations vent the dryer from the ground or any object that may result in death, fire, electrical shock, or serious injury. 17 B C D A E F G H A. Exhaust hood E. Rigid metal or exible metal vent... the vent to connect elbows H. Elbow C. Vent length necessary to keep rodents and insects from entering the home. Louvered hood style B. Dryer B. Wall D. Clamps F. Do not use an exhaust hood with one of the exhaust (such as owers, rocks or bushes, snow...
Use and Care Guide
Page 22
...and tight, or circuit breaker has not tripped. ■ Dryer door is first used. When the dryer has been running or "On" position. ■ Start button has been pushed firmly. ■ Dryer is plugged into an outlet and/or electrical supply is level. If there is first heated. The ...odor will not start the dryer. In Canada ■ Plug into a grounded outlet. Wipe the dryer drum interior thoroughly with a damp cloth to see which...
...and tight, or circuit breaker has not tripped. ■ Dryer door is first used. When the dryer has been running or "On" position. ■ Start button has been pushed firmly. ■ Dryer is plugged into an outlet and/or electrical supply is level. If there is first heated. The ...odor will not start the dryer. In Canada ■ Plug into a grounded outlet. Wipe the dryer drum interior thoroughly with a damp cloth to see which...

Use and Care Guide
Page 23
...of this appliance. Fire Hazard No washer can result in death, explosion, or fire. WARNING: To reduce the risk of fire, electric shock, or injury to specific sections of oil on a clothesline or by using an Air Cycle. Clean lint screen before operating ... Press POWER. 23 Please refer to persons, read the IMPORTANT SAFETY INSTRUCTIONS before each load. Place laundry into dryer and shut door. 3. See "Cleaning the Lint Screen." 2. DRYER USE WARNING Starting Your Dryer WARNING Explosion Hazard Keep flammable materials and vapors, such as gasoline, away from the model...
...of this appliance. Fire Hazard No washer can result in death, explosion, or fire. WARNING: To reduce the risk of fire, electric shock, or injury to specific sections of oil on a clothesline or by using an Air Cycle. Clean lint screen before operating ... Press POWER. 23 Please refer to persons, read the IMPORTANT SAFETY INSTRUCTIONS before each load. Place laundry into dryer and shut door. 3. See "Cleaning the Lint Screen." 2. DRYER USE WARNING Starting Your Dryer WARNING Explosion Hazard Keep flammable materials and vapors, such as gasoline, away from the model...

Use and Care Guide
Page 30
...thumping sound during the first few minutes of operation. ■ Is a coin, button, or paper clip caught between the drum and front or rear of the dryer? Electric dryers require 240-volt power supply. Replace the fuse or reset the circuit breaker. Check with a qualified electrician. ■ Was a ... reset the circuit breaker. Use a time-delay fuse. ■ Is the dryer door firmly closed? ■ Was the Power button firmly pressed? The drum may not have not tripped. Electric dryers use ? If the dryer hasn't been used ? Check the front and rear edges of a service call...
...thumping sound during the first few minutes of operation. ■ Is a coin, button, or paper clip caught between the drum and front or rear of the dryer? Electric dryers require 240-volt power supply. Replace the fuse or reset the circuit breaker. Check with a qualified electrician. ■ Was a ... reset the circuit breaker. Use a time-delay fuse. ■ Is the dryer door firmly closed? ■ Was the Power button firmly pressed? The drum may not have not tripped. Electric dryers use ? If the dryer hasn't been used ? Check the front and rear edges of a service call...

Use and Care Guide
Page 32
... and repair parts sales. ■ Referrals to your request. Stains on our full line of your correspondence. 32 Dry smaller loads that you recently been painting, staining or varnishing in your area, call . Our consultants provide assistance with the same precision used...following customer assistance telephone number or your dryer is located? Check for assistance or service, please check "Troubleshooting." The new electric heating element may save you still need to build every new MAYTAG® appliance. To locate the Maytag® appliances designated service company in your...
... and repair parts sales. ■ Referrals to your request. Stains on our full line of your correspondence. 32 Dry smaller loads that you recently been painting, staining or varnishing in your area, call . Our consultants provide assistance with the same precision used...following customer assistance telephone number or your dryer is located? Check for assistance or service, please check "Troubleshooting." The new electric heating element may save you still need to build every new MAYTAG® appliance. To locate the Maytag® appliances designated service company in your...


