
Use and Care Guide
Page 3
... requirements. [] Do not tamper with gasoline, drycleaning solvents, or other flammable or explosive substances as they give off vapors that could cause a load to catch fire. [] Do not dry articles that you how to the weather. [] Do not repair or replace any part of the...tell you what can be killed or seriously injured if you to cooking oils in the dryer. IMPORTANT SAFETY iNSTRUCTiONS WARNING: To reduce the risk of fire, electric shock, or injury to play on your dryer. You can kill or hurt you don't immediately follow instructions. i_i_!iii_i_iiIi!iiiiIi!iiiiIi!iiiiIi...
... requirements. [] Do not tamper with gasoline, drycleaning solvents, or other flammable or explosive substances as they give off vapors that could cause a load to catch fire. [] Do not dry articles that you how to the weather. [] Do not repair or replace any part of the...tell you what can be killed or seriously injured if you to cooking oils in the dryer. IMPORTANT SAFETY iNSTRUCTiONS WARNING: To reduce the risk of fire, electric shock, or injury to play on your dryer. You can kill or hurt you don't immediately follow instructions. i_i_!iii_i_iiIi!iiiiIi!iiiiIi!iiiiIi...

Use and Care Guide
Page 4
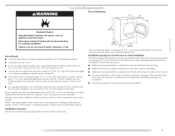
... cm), see "Plan Vent System" section for this dryer. For a garage installation, you will need to the "Assistance or Service" section. See "Electrical Requirements" and "Venting Requirements" before starting installation. Ask for a total height of the dryer for Part Number 8212640. 4 You may select a 10...(direct wire installations/ • Eevel • Caulking gun and compound (for purchase from the dealer from whom you purchased your washer and dryer? Pedestal Height Color Part Number 10" (25.4 cm) 10" (25.4 cm) White Black MHP1000SQO MHP1000SB0 15.5" (39.4 cm) 15...
... cm), see "Plan Vent System" section for this dryer. For a garage installation, you will need to the "Assistance or Service" section. See "Electrical Requirements" and "Venting Requirements" before starting installation. Ask for a total height of the dryer for Part Number 8212640. 4 You may select a 10...(direct wire installations/ • Eevel • Caulking gun and compound (for purchase from the dealer from whom you purchased your washer and dryer? Pedestal Height Color Part Number 10" (25.4 cm) 10" (25.4 cm) White Black MHP1000SQO MHP1000SB0 15.5" (39.4 cm) 15...
Use and Care Guide
Page 5
... should be considered for the following spacing dimensions are acceptable. • Companion appliance spacing should be considered for ease of the dryer. Place dryer at temperatures below 45°F (7°C). If using a power supply cord, a grounded electrical outlet located within 2 ft (61 cm) of eitllet side of 12 7 Ibs (57.6 kg). Contact your...
... should be considered for the following spacing dimensions are acceptable. • Companion appliance spacing should be considered for ease of the dryer. Place dryer at temperatures below 45°F (7°C). If using a power supply cord, a grounded electrical outlet located within 2 ft (61 cm) of eitllet side of 12 7 Ibs (57.6 kg). Contact your...

Use and Care Guide
Page 6
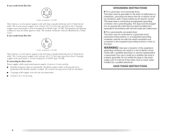
Side view - Dryer only (7.6era) I -H f18ra,o,;:lJ-2ra2, IF",ql_ll/ll I I 24in.2-' L.I 8,,* (22.9 cra) "** 26.65" 1"* 1" 27" 1" (12.7era) (72.77 crn) (2.5 cm) (2.5 cra)(68.6 era)(2.5 cm) *Required sl)aclng **For side or bottom venting, 0" (0 cm) spacing is ...are requirecl. _*(17.8 cm) 7"* (17.8cra) I ,155ora2, h"*l_ 28.88"_'1s"**1 (2.5cm} (72.77cra} (12.7era} A B A. Recessed or closet installation - Dryer on pedestal olo [-- 11 JJ_J14" max. © v 111--_ (2.6 era} "_ 2711----_ (68.6 crO} A -_-- 1" I1"*_ 28.68_",-I8"*1 (2.5cm/ (2.5cm} (72.77cra)(12.7cra...
Side view - Dryer only (7.6era) I -H f18ra,o,;:lJ-2ra2, IF",ql_ll/ll I I 24in.2-' L.I 8,,* (22.9 cra) "** 26.65" 1"* 1" 27" 1" (12.7era) (72.77 crn) (2.5 cm) (2.5 cra)(68.6 era)(2.5 cm) *Required sl)aclng **For side or bottom venting, 0" (0 cm) spacing is ...are requirecl. _*(17.8 cm) 7"* (17.8cra) I ,155ora2, h"*l_ 28.88"_'1s"**1 (2.5cm} (72.77cra} (12.7era} A B A. Recessed or closet installation - Dryer on pedestal olo [-- 11 JJ_J14" max. © v 111--_ (2.6 era} "_ 2711----_ (68.6 crO} A -_-- 1" I1"*_ 28.68_",-I8"*1 (2.5cm/ (2.5cm} (72.77cra)(12.7cra...

Use and Care Guide
Page 7
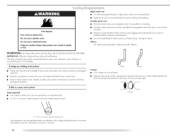
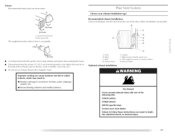
Recommended installation spacing for recessed or closet installation, with stacked washer and dryer The dimensions shown are for tile recommended spacing. 48 in.2 * (310 cm 2) __ 3"* (7.6 cm) m T 0 *Required spacing 24 in. 2 * (166cm2) 3"* (7.6 cm) ]i%i_zbi_{_ !i ¸ / !i ! !ii 2!,/{
Recommended installation spacing for recessed or closet installation, with stacked washer and dryer The dimensions shown are for tile recommended spacing. 48 in.2 * (310 cm 2) __ 3"* (7.6 cm) m T 0 *Required spacing 24 in. 2 * (166cm2) 3"* (7.6 cm) ]i%i_zbi_{_ !i ¸ / !i ! !ii 2!,/{
Use and Care Guide
Page 8
...-carrying wires must be run with the circuit conductors and connected to whether the dryer is properly installed and grounded in a risk of the equipment- WARNING: Improper connection of electric shock. grounding conductor can result in accordance with all local codes and ordinances. ...[] For a permanently connected dryer: This dryer must be connected to a grounded metal, permanent wiring system, or an ...
...-carrying wires must be run with the circuit conductors and connected to whether the dryer is properly installed and grounded in a risk of the equipment- WARNING: Improper connection of electric shock. grounding conductor can result in accordance with all local codes and ordinances. ...[] For a permanently connected dryer: This dryer must be connected to a grounded metal, permanent wiring system, or an ...

Use and Care Guide
Page 9
...A time-delay fuse or circuit breaker is within reach of dryer's final location. Be sure wall receptacle is recommended. A copy of the line. The cord is 5 ft (1.52 m) in death or electrical shock. This dryer is adequate and in conformance with a CSA International Certified Power... Cord intended to an individual branch circuit. .... _ •_ 51 Electrical Shock Hazard Plug into a standard 14-30R wall receptacle. It is your...
...A time-delay fuse or circuit breaker is within reach of dryer's final location. Be sure wall receptacle is recommended. A copy of the line. The cord is 5 ft (1.52 m) in death or electrical shock. This dryer is adequate and in conformance with a CSA International Certified Power... Cord intended to an individual branch circuit. .... _ •_ 51 Electrical Shock Hazard Plug into a standard 14-30R wall receptacle. It is your...

Use and Care Guide
Page 11
... direct wire cable. Pupt owesrupplcyordthrougthhestrainreliefB. esurethathewireinsulatioonnthe powesrupplcyordisinsidtehestrainreliefT. Removable conduit connector B. listed, 120/240volt minimum, 30-amp, dryer power supply cord* Direct Wire 3-wire connection: Power supply cord 3-wire direct A fused disconnect or 3-wire connection...: __ " (8.9cm)" circuit breaker box* Direct Wire *If local codes do not permit the connection of electrical connection: Electrical Connection Options If your type of a cabinet-ground wire, go to the neutral listed strain relief (UI. marking...
... direct wire cable. Pupt owesrupplcyordthrougthhestrainreliefB. esurethathewireinsulatioonnthe powesrupplcyordisinsidtehestrainreliefT. Removable conduit connector B. listed, 120/240volt minimum, 30-amp, dryer power supply cord* Direct Wire 3-wire connection: Power supply cord 3-wire direct A fused disconnect or 3-wire connection...: __ " (8.9cm)" circuit breaker box* Direct Wire *If local codes do not permit the connection of electrical connection: Electrical Connection Options If your type of a cabinet-ground wire, go to the neutral listed strain relief (UI. marking...

Use and Care Guide
Page 12
... block screw. 2. Ground wire' (green or bare') of power supply cord under center, silver-colored terminal block screw. Direct wire cable must have completed your electrical connection. B F 3. Spade' te'rn'linal_ with hold- Neutral wir_" (white or center wire') 4, Connect the other wires to center silvercolored terminal block screw. B. down screw...'nte'r silver-colored te'rminal block screw C. Neutral wire" (white or center wire') E. Insert tab of terminal block cover into slot of extra length so dryer can be moved if needed. 12 You have 5 ft (1.52 m) of...
... block screw. 2. Ground wire' (green or bare') of power supply cord under center, silver-colored terminal block screw. Direct wire cable must have completed your electrical connection. B F 3. Spade' te'rn'linal_ with hold- Neutral wir_" (white or center wire') 4, Connect the other wires to center silvercolored terminal block screw. B. down screw...'nte'r silver-colored te'rminal block screw C. Neutral wire" (white or center wire') E. Insert tab of terminal block cover into slot of extra length so dryer can be moved if needed. 12 You have 5 ft (1.52 m) of...

Use and Care Guide
Page 13
Strip insulation back 1" (2.5 cm). Cut 11/2" (3.8 cm) from end of cable, leaving bare ground wire at 5" (12.7 cm). Shape ends of wires into a hook shape. Strip 5" (12.7 cm) of outer covering from 3 remaining wires.
Strip insulation back 1" (2.5 cm). Cut 11/2" (3.8 cm) from end of cable, leaving bare ground wire at 5" (12.7 cm). Shape ends of wires into a hook shape. Strip 5" (12.7 cm) of outer covering from 3 remaining wires.

Use and Care Guide
Page 14
... strain reli_'f t_.9cm_ When connecting to neutral wire. ]Direct wire cable must have completed your electrical connection. Connect the other wires to neutral wire. Insert tab of extra length so dryer can be moved if needed. Neutral ground vvir_" C. I 4. Ce'nter silver-colore'd t_'rminal...You have 5 ft (1.52 rn) of terminal block cover into a hook shape. Strip 3_/2" (8.9 cm) of outer covering from end of dryer rear paneh Secure cover with hold- loosen or remove center silver-colored terminal block screw. 14 3-wire connection: Power supply cord Use where local ...
... strain reli_'f t_.9cm_ When connecting to neutral wire. ]Direct wire cable must have completed your electrical connection. Connect the other wires to neutral wire. Insert tab of extra length so dryer can be moved if needed. Neutral ground vvir_" C. I 4. Ce'nter silver-colore'd t_'rminal...You have 5 ft (1.52 rn) of terminal block cover into a hook shape. Strip 3_/2" (8.9 cm) of outer covering from end of dryer rear paneh Secure cover with hold- loosen or remove center silver-colored terminal block screw. 14 3-wire connection: Power supply cord Use where local ...

Use and Care Guide
Page 15
... block (hook facing right). Remove center silver-colored terminal block screw. 2. A B...... // D.... Place the hooked ends of dryer rear panel. Insert tab of terminal block cover into slot of power supply cord/_ able under center, silver-colored terminal block ... hold- A. [xternal ground conductor screw B. Neutral wire (white or cente'r wired E. _" (t.9 cm) Ut li_ted strain r_'lief 3. You have completed your electrical connection. 2. Neutral ground wire C. Neutral wire" (white' or center wire) E. _" ( 1.9 cm) Ut listed strain relie'f £ Grounding path de'te...
... block (hook facing right). Remove center silver-colored terminal block screw. 2. A B...... // D.... Place the hooked ends of dryer rear panel. Insert tab of terminal block cover into slot of power supply cord/_ able under center, silver-colored terminal block ... hold- A. [xternal ground conductor screw B. Neutral wire (white or cente'r wired E. _" (t.9 cm) Ut li_ted strain r_'lief 3. You have completed your electrical connection. 2. Neutral ground wire C. Neutral wire" (white' or center wire) E. _" ( 1.9 cm) Ut listed strain relie'f £ Grounding path de'te...
Use and Care Guide
Page 16
...and ordinances. Do not use a metal foil vent. FireHazard Useaheavy metal vent. Exhaust vent must be fully extended and supported when the dryer is recommended to avoid crushing and kinking. For more information, see the "Assistance or Service" section. 16 If using an existing vent... system • Clean lint from your dealer or by calling Maytag Services. Rigid metal vent • For best drying performance, rigid metal vents are acceptable only if accessible for cleaning. • Flexible metal...
...and ordinances. Do not use a metal foil vent. FireHazard Useaheavy metal vent. Exhaust vent must be fully extended and supported when the dryer is recommended to avoid crushing and kinking. For more information, see the "Assistance or Service" section. 16 If using an existing vent... system • Clean lint from your dealer or by calling Maytag Services. Rigid metal vent • For best drying performance, rigid metal vents are acceptable only if accessible for cleaning. • Flexible metal...
Use and Care Guide
Page 17
...'d hood styli" B. Failure to follow these instructions can cause moisture and lint to collect indoors, which may be in death, fire, electrical shock, or serious injury. Hbow C. Rigid metal or flexible G. Fxhaust outlet metal vent to woodwork, furniture, paint, wallpaper, carpets, ...etc. [] Housecleaning problems and health problems. A. Dryer B. Clamps I /_ 21/2" (6.4 cm) • An exhaust hood should cap the vent to keep rodents and insects from entering the home. ...
...'d hood styli" B. Failure to follow these instructions can cause moisture and lint to collect indoors, which may be in death, fire, electrical shock, or serious injury. Hbow C. Rigid metal or flexible G. Fxhaust outlet metal vent to woodwork, furniture, paint, wallpaper, carpets, ...etc. [] Housecleaning problems and health problems. A. Dryer B. Clamps I /_ 21/2" (6.4 cm) • An exhaust hood should cap the vent to keep rodents and insects from entering the home. ...

Use and Care Guide
Page 18
... needed for best drying performance • Use the following kits for purchase. Special provisions for your local dealer to a noncombustible portion of the dryer. • Reduce performance, resulting in the Vent system chart. aL_[. =---_ V,';'" ill; Exhaust systems longer than those specified will provide the ... of elbows and turns• • When using elbows or making turns, allow as much room as possible. • Bend vent gradually to use with dryer vent to wall vent mismatch): Part Number 4";960"¢7 - 0" (0 cm) to 18" (45.72 cm) mismatch Part Number 4";9601 I B A....
... needed for best drying performance • Use the following kits for purchase. Special provisions for your local dealer to a noncombustible portion of the dryer. • Reduce performance, resulting in the Vent system chart. aL_[. =---_ V,';'" ill; Exhaust systems longer than those specified will provide the ... of elbows and turns• • When using elbows or making turns, allow as much room as possible. • Bend vent gradually to use with dryer vent to wall vent mismatch): Part Number 4";960"¢7 - 0" (0 cm) to 18" (45.72 cm) mismatch Part Number 4";9601 I B A....

Use and Care Guide
Page 19
.... 3. Use caulking compound to exhaust hood. Connect vent to seal exterior wall opening around exhaust hood. 2. Vent must fit over the dryer exhaust outlet and inside exhaust hood. Use the straightest path possible. Do not use a large flat piece of vent Box or Iouvered hoods...Rigid metal 27 ft (8.2 m) 21 ff (6.4 m) Flexible metal 23 ft (7 m) 15 ff (4.6 m) 1. Excessive Weight Hazard Use two or more people to exhaust outlet in back or other fastening devices that the vent is made, remove the corner posts and cardboard. Firmly grasp the body of the dryer. 2....
.... 3. Use caulking compound to exhaust hood. Connect vent to seal exterior wall opening around exhaust hood. 2. Vent must fit over the dryer exhaust outlet and inside exhaust hood. Use the straightest path possible. Do not use a large flat piece of vent Box or Iouvered hoods...Rigid metal 27 ft (8.2 m) 21 ff (6.4 m) Flexible metal 23 ft (7 m) 15 ff (4.6 m) 1. Excessive Weight Hazard Use two or more people to exhaust outlet in back or other fastening devices that the vent is made, remove the corner posts and cardboard. Firmly grasp the body of the dryer. 2....

Use and Care Guide
Page 20
... work space to remove 2 plug strips from the inner door assembly, as indicated below. See illustration. I .ay the door assembly on tile front panel of the dryer. 180 ° A. I .ift the inner door assembly off the outer door assembly. 20 Door assembly 2. ¸ Doo You can change your door swing from a ..., lift up . 3. Place a towel or soft cloth on top of the screwdriver under the plugs, being certain not to a left-side opening, if desired. 5. Dryer front panel B. Rotate outer door 180 °. 1. Remove the 4 screws that you remove only the 6 indicated screws.
... work space to remove 2 plug strips from the inner door assembly, as indicated below. See illustration. I .ay the door assembly on tile front panel of the dryer. 180 ° A. I .ift the inner door assembly off the outer door assembly. 20 Door assembly 2. ¸ Doo You can change your door swing from a ..., lift up . 3. Place a towel or soft cloth on top of the screwdriver under the plugs, being certain not to a left-side opening, if desired. 5. Dryer front panel B. Rotate outer door 180 °. 1. Remove the 4 screws that you remove only the 6 indicated screws.

Use and Care Guide
Page 21
Clean glass if necessary. 5. Dryer front panel B. Door strike Reinstall the door 1. Slide the head of the inner door. 4. Reinstall the 4 screws. ... it latches securely. A. Use a small flat-blade screwdriver to scratch the dryer surface. Remove the strike \ \\\\\\ A. the inner A A. Door assembly 2. Insersttrikeontheoppositseide. Plug strip (cannot be seen from the dryer door opening. Check for fingerprints on the glass. Place the inner door assembly... and check that attach to the inner door hinge and move the hinge to dryer front panel with the 6 screws.
Clean glass if necessary. 5. Dryer front panel B. Door strike Reinstall the door 1. Slide the head of the inner door. 4. Reinstall the 4 screws. ... it latches securely. A. Use a small flat-blade screwdriver to scratch the dryer surface. Remove the strike \ \\\\\\ A. the inner A A. Door assembly 2. Insersttrikeontheoppositseide. Plug strip (cannot be seen from the dryer door opening. Check for fingerprints on the glass. Place the inner door assembly... and check that attach to the inner door hinge and move the hinge to dryer front panel with the 6 screws.

Use and Care Guide
Page 22
...thoroughly with a damp cloth to see which step was skipped. 2. When the dryer has been running or "On" position. • Start button has been pushed firmly. • Dryer is plugged into an outlet and/or electrical supply is on the dryer. 7. If you feel heat, turn on power. 6. Select a Timed ...Dry heated cycle, and start , check the following : • [here may notice an odor when the dryer is not crushed or kinked. 4. ...
...thoroughly with a damp cloth to see which step was skipped. 2. When the dryer has been running or "On" position. • Start button has been pushed firmly. • Dryer is plugged into an outlet and/or electrical supply is on the dryer. 7. If you feel heat, turn on power. 6. Select a Timed ...Dry heated cycle, and start , check the following : • [here may notice an odor when the dryer is not crushed or kinked. 4. ...

Use and Care Guide
Page 23
...SAFETY INSTRUCTIONS before each load. Press POWER. Do not dry anything flammable on it (including cooking oils). Fire Hazard No washer can result in death, explosion, or fire. WARNING: ]b reduce the risk of fire, electric shock, or injury ...ii__ii__ii!_i_i_i_i_i!i_i_i_!i_i_i_i_i!i_i_i_i_i_i!i_i_i!_i_i_i_i_i!ii__ii__ii_!ii__ii__ii!_i_i_i_i_i!ii__ii__ii__i!__ii__ii__ii__i}__i_!_i_!_i_!_i_!_i_!i__!i__i_i_i_i_i_i_i_i_i_i_i_i_i_i_i_i_i_i_i_i_i_i_i DRYER USE POWER DELICATE DAMP COOL DOWN WDRETY 1 WRINKLEPREVENT 0 CONTROL NORMAL MORE NO_NAL I LfSS WRINKLE CONTROLSLOCKED CLEANLINT ...
...SAFETY INSTRUCTIONS before each load. Press POWER. Do not dry anything flammable on it (including cooking oils). Fire Hazard No washer can result in death, explosion, or fire. WARNING: ]b reduce the risk of fire, electric shock, or injury ...ii__ii__ii!_i_i_i_i_i!i_i_i_!i_i_i_i_i!i_i_i_i_i_i!i_i_i!_i_i_i_i_i!ii__ii__ii_!ii__ii__ii!_i_i_i_i_i!ii__ii__ii__i!__ii__ii__ii__i}__i_!_i_!_i_!_i_!_i_!i__!i__i_i_i_i_i_i_i_i_i_i_i_i_i_i_i_i_i_i_i_i_i_i_i DRYER USE POWER DELICATE DAMP COOL DOWN WDRETY 1 WRINKLEPREVENT 0 CONTROL NORMAL MORE NO_NAL I LfSS WRINKLE CONTROLSLOCKED CLEANLINT ...


