Use and Care Guide
Page 3
... the dryer is removed from service or discarded, remove the door to the drying compartment. [] Do not reach into the dryer if the drum is the safety alert symbol. Always read and obey all instructions before or after each load. [] Keep area around the exhaust opening and adjacent surrounding areas free from the accumulation of lint, dust, and dirt. [] The interior of the dryer and exhaust vent...
... the dryer is removed from service or discarded, remove the door to the drying compartment. [] Do not reach into the dryer if the drum is the safety alert symbol. Always read and obey all instructions before or after each load. [] Keep area around the exhaust opening and adjacent surrounding areas free from the accumulation of lint, dust, and dirt. [] The interior of the dryer and exhaust vent...

Use and Care Guide
Page 4
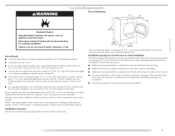
... adjusting dryer feet) • Wire stripper (direct wire installations/ • Eevel • Caulking gun and compound (for purchase from the dealer from dryer drum. To do so, you will need to purchase a Stack Kit. [b order, call the dealer from whom you purchased your dryer or refer to the "Assistance or Service" section. You have the option of purchasing pedestals of the dryer for venting requirements•...
... adjusting dryer feet) • Wire stripper (direct wire installations/ • Eevel • Caulking gun and compound (for purchase from the dealer from dryer drum. To do so, you will need to purchase a Stack Kit. [b order, call the dealer from whom you purchased your dryer or refer to the "Assistance or Service" section. You have the option of purchasing pedestals of the dryer for venting requirements•...
Use and Care Guide
Page 5
... be installed or stored in death, explosion, or fire. You will be extended. Contact your dryer at the end of an automatic cycle. [Drying times can result in an area where it will need 18" (46 cm) to the bottom of tile @yet. If using a power supply cord, a grounded electrical outlet located within 2 ft (61 cm) of eitllet side of the dryer. Check code requirements. Dryer Dimensions Explosion...
... be installed or stored in death, explosion, or fire. You will be extended. Contact your dryer at the end of an automatic cycle. [Drying times can result in an area where it will need 18" (46 cm) to the bottom of tile @yet. If using a power supply cord, a grounded electrical outlet located within 2 ft (61 cm) of eitllet side of the dryer. Check code requirements. Dryer Dimensions Explosion...

Use and Care Guide
Page 7
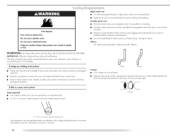
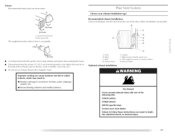
Recommended installation spacing for recessed or closet installation, with stacked washer and dryer The dimensions shown are for tile recommended spacing. 48 in.2 * (310 cm 2) __ 3"* (7.6 cm) m T 0 *Required spacing 24 in. 2 * (166cm2) 3"* (7.6 cm) ]i%i_zbi_{_ !i ¸ / !i ! !ii 2!,/{
Recommended installation spacing for recessed or closet installation, with stacked washer and dryer The dimensions shown are for tile recommended spacing. 48 in.2 * (310 cm 2) __ 3"* (7.6 cm) m T 0 *Required spacing 24 in. 2 * (166cm2) 3"* (7.6 cm) ]i%i_zbi_{_ !i ¸ / !i ! !ii 2!,/{

Use and Care Guide
Page 9
... conformance with a CSA International Certified Power Cord intended to be sure that the electrical connection is within reach of the line. It is your responsibility • [b contact a qualified electrical installer. • [b be plugged into a grounded 4 prong outlet. A time-delay fuse or circuit breaker is 5 ft (1.52 m) in death or electrical shock. Failure to an individual branch circuit. Connect to do so can result in length. The cord is recommended.
... conformance with a CSA International Certified Power Cord intended to be sure that the electrical connection is within reach of the line. It is your responsibility • [b contact a qualified electrical installer. • [b be plugged into a grounded 4 prong outlet. A time-delay fuse or circuit breaker is 5 ft (1.52 m) in death or electrical shock. Failure to an individual branch circuit. Connect to do so can result in length. The cord is recommended.

Use and Care Guide
Page 12
...wire) of 3-wire connections. Dotted line shows position of dryer rear paneh Secure cover with upturned ends F. Connect ground wire !green or bare) of 3-wire connections. Neutral prong E. CD E G A. 4-wire receptacle (NEMA type 14-30R) B. 4-prong plug C. A. B. Ring te'nTlinab 1, Remove center silver-colored terminal block screw. 2. Tighten screw. Neutral ground wire D. Tighten strain relief screws. 6. Tighten screws. !! !! Neutral wir_" (white or center wire') 4, Connect the other wires to "Venting Requirements." 4-wire connection: Direct wire IMPORTANT: A 4-wire...
...wire) of 3-wire connections. Dotted line shows position of dryer rear paneh Secure cover with upturned ends F. Connect ground wire !green or bare) of 3-wire connections. Neutral prong E. CD E G A. 4-wire receptacle (NEMA type 14-30R) B. 4-prong plug C. A. B. Ring te'nTlinab 1, Remove center silver-colored terminal block screw. 2. Tighten screw. Neutral ground wire D. Tighten strain relief screws. 6. Tighten screws. !! !! Neutral wir_" (white or center wire') 4, Connect the other wires to "Venting Requirements." 4-wire connection: Direct wire IMPORTANT: A 4-wire...

Use and Care Guide
Page 13
Shape ends of cable, leaving bare ground wire at 5" (12.7 cm). Strip 5" (12.7 cm) of outer covering from 3 remaining wires. Strip insulation back 1" (2.5 cm). Cut 11/2" (3.8 cm) from end of wires into a hook shape.
Shape ends of cable, leaving bare ground wire at 5" (12.7 cm). Strip 5" (12.7 cm) of outer covering from 3 remaining wires. Strip insulation back 1" (2.5 cm). Cut 11/2" (3.8 cm) from end of wires into a hook shape.

Use and Care Guide
Page 15
... center wire) of direct wire cable under the outer terminal block screws (hooks facing right). Squeeze hooked end together. A. Neutral wire" (white' or center wire) E. _" ( 1.9 cm) Ut listed strain relie'f £ Grounding path de'te'rmined by a qualified electrician 3. Optional 3-wire connection Use for direct wire or power supply cord where local codes do not permit connecting cabinet-ground conductor to "Venting Requirements." Tighten screw. Insert tab of terminal block cover into slot of power supply cord...
... center wire) of direct wire cable under the outer terminal block screws (hooks facing right). Squeeze hooked end together. A. Neutral wire" (white' or center wire) E. _" ( 1.9 cm) Ut listed strain relie'f £ Grounding path de'te'rmined by a qualified electrician 3. Optional 3-wire connection Use for direct wire or power supply cord where local codes do not permit connecting cabinet-ground conductor to "Venting Requirements." Tighten screw. Insert tab of terminal block cover into slot of power supply cord...
Use and Care Guide
Page 16
... by calling Maytag Services. Do not use duct tape. The dryer exhaust must be connected into the interior of the system and make sure exhaust hood is a new vent system Vent material • Use a heavy metal vent. Modify existing vent system if necessary to follow these instructions or fire. Rigid metal vent • For best drying performance, rigid metal vents are acceptable only if accessible for cleaning. • Flexible...
... by calling Maytag Services. Do not use duct tape. The dryer exhaust must be connected into the interior of the system and make sure exhaust hood is a new vent system Vent material • Use a heavy metal vent. Modify existing vent system if necessary to follow these instructions or fire. Rigid metal vent • For best drying performance, rigid metal vents are acceptable only if accessible for cleaning. • Flexible...
Use and Care Guide
Page 17
... that may result m: [] Moisture damage to connect elbovw Fire Hazard Cover unused exhaust holes with one of the following kits: 279818 (white) 279820 (black) 280102 (pacific blue) Contact your exhaust installation type Recommended exhaust installations Typical installations vent the dryer from the rear of the exhaust (such as flowers, rocks or bushes, snow line, etc.). • Do not use an exhaust hood with a magnetic latch. Choose your...
... that may result m: [] Moisture damage to connect elbovw Fire Hazard Cover unused exhaust holes with one of the following kits: 279818 (white) 279820 (black) 280102 (pacific blue) Contact your exhaust installation type Recommended exhaust installations Typical installations vent the dryer from the rear of the exhaust (such as flowers, rocks or bushes, snow line, etc.). • Do not use an exhaust hood with a magnetic latch. Choose your...

Use and Care Guide
Page 19
... final location. To determine maximum exhaust length, add one 90 ° turn inside exhaust hood. Number of 90 ° turns or elbows Type of cardboard from dryer packaging under the entire back edge of the 2 dryer back corners. lb protect the floor, use duct tape, screws or other injury. Leave enough room to move and install dryer. See "Determine vent path" in the flexible gas line. 4. Excessive...
... final location. To determine maximum exhaust length, add one 90 ° turn inside exhaust hood. Number of 90 ° turns or elbows Type of cardboard from dryer packaging under the entire back edge of the 2 dryer back corners. lb protect the floor, use duct tape, screws or other injury. Leave enough room to move and install dryer. See "Determine vent path" in the flexible gas line. 4. Excessive...

Use and Care Guide
Page 22
... heat, cancel cycle and close the door. In the U.S.A. • For power supply cord installation, plug into a grounded 4 prong outlet. When the dryer has been running or "On" position. • Start button has been pushed firmly. • Dryer is plugged into an outlet and/or electrical supply is on the dryer. 7. Check the dryer's final location. For direct wire installation, turn off the dryer and check the following : • Controls are set in a running for 5 minutes, open the dryer door and feel for heat...
... heat, cancel cycle and close the door. In the U.S.A. • For power supply cord installation, plug into a grounded 4 prong outlet. When the dryer has been running or "On" position. • Start button has been pushed firmly. • Dryer is plugged into an outlet and/or electrical supply is on the dryer. 7. Check the dryer's final location. For direct wire installation, turn off the dryer and check the following : • Controls are set in a running for 5 minutes, open the dryer door and feel for heat...

Use and Care Guide
Page 23
... dryer. Falure to specific sections of oil on it (even after washing). This information covers several different models, Your dryer may vary from dryer. Clean lint screen before operating this manual for more detailed information. Press POWER. Do not dry anything that has ever had anything that has ever had any type of this appliance. Follow these instructions can completely remove oil. Place laundry into dryer and shut door...
... dryer. Falure to specific sections of oil on it (even after washing). This information covers several different models, Your dryer may vary from dryer. Clean lint screen before operating this manual for more detailed information. Press POWER. Do not dry anything that has ever had anything that has ever had any type of this appliance. Follow these instructions can completely remove oil. Place laundry into dryer and shut door...

Use and Care Guide
Page 25
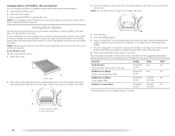
... ease in the cycle. Dry [he Cool Down light illuminates during the cool down arrow buttons. The Clean lint Screen light will turn off. Drying tips • Follow care label directions when they are not detected. Cycle tips • Dry most loads using the preset cycle settings. • Refer to the Sensor Dry Cycles or Timed Dry Cycles Preset Settings chart (in an Sensor Dry Cycle when the laundry is turned on your load. WET DAMP COOL DOWN DRY WRINKLE PREVENT CONTROLS LOCKED !_i; The dryer will continue...
... ease in the cycle. Dry [he Cool Down light illuminates during the cool down arrow buttons. The Clean lint Screen light will turn off. Drying tips • Follow care label directions when they are not detected. Cycle tips • Dry most loads using the preset cycle settings. • Refer to the Sensor Dry Cycles or Timed Dry Cycles Preset Settings chart (in an Sensor Dry Cycle when the laundry is turned on your load. WET DAMP COOL DOWN DRY WRINKLE PREVENT CONTROLS LOCKED !_i; The dryer will continue...
Use and Care Guide
Page 28
... Dry Air Fluff 90 Cycles Ino heat) Sneakers or canvas shoes Timed Dry Air Fluff 90 Cycles (no heat) *(Minutes) Reset time to complete drying, if needed to hang over the lint screen. 4. To use Sensor [)r cycles with the drying rack. Front ed,_e 2, Place dryer rack inside dryer drum, positioning the back wire on the amount of items that can be removed for information on top of the rack. Select a Timed [Dry Cycle and temperature (see following table. 8. The drum turns, but the rack...
... Dry Air Fluff 90 Cycles Ino heat) Sneakers or canvas shoes Timed Dry Air Fluff 90 Cycles (no heat) *(Minutes) Reset time to complete drying, if needed to hang over the lint screen. 4. To use Sensor [)r cycles with the drying rack. Front ed,_e 2, Place dryer rack inside dryer drum, positioning the back wire on the amount of items that can be removed for information on top of the rack. Select a Timed [Dry Cycle and temperature (see following table. 8. The drum turns, but the rack...

Use and Care Guide
Page 29
... 1. See "Venting Requirements." Cleaning From the Exhaust Vent l.int should be removed every 2 years, or more often, depending on dryer usage. To wash brush every 6 months, or more often, depending should be done by lint can cause overheating and damage to both sides of clothes. Pull the lint screen straight up on the lint screen. Apply paste to dry drum. Wipe drum thoroughly with hot water and liquid...
... 1. See "Venting Requirements." Cleaning From the Exhaust Vent l.int should be removed every 2 years, or more often, depending on dryer usage. To wash brush every 6 months, or more often, depending should be done by lint can cause overheating and damage to both sides of clothes. Pull the lint screen straight up on the lint screen. Apply paste to dry drum. Wipe drum thoroughly with hot water and liquid...

Use and Care Guide
Page 30
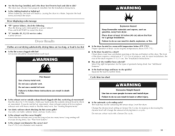
Unplug dryer or disconnect power. 2. Moving care For power supply cord-connected dryers: 1. " k_ For direct-wired dryers: Electrical Shock Hazard Disconnect power before operating. Replace all parts and panels before servicing. Clean lint screen. Make sure leveling legs are secure in dryer base. 4. Disconnect wiring. 3. '¢ I I Use masking tape to secure dryer door. / i TROUBLESHOOTING First try the solutions suggested here and possibly avoid the cost of time, you are at home. Make sure leveling legs are secure...
Unplug dryer or disconnect power. 2. Moving care For power supply cord-connected dryers: 1. " k_ For direct-wired dryers: Electrical Shock Hazard Disconnect power before operating. Replace all parts and panels before servicing. Clean lint screen. Make sure leveling legs are secure in dryer base. 4. Disconnect wiring. 3. '¢ I I Use masking tape to secure dryer door. / i TROUBLESHOOTING First try the solutions suggested here and possibly avoid the cost of time, you are at home. Make sure leveling legs are secure...
Use and Care Guide
Page 31
... not feel air movement, clean exhaust system of drying time in back or other injury. • Is the automatic cycle ending early? [he front of the dryer requires a minimum of 1" (2.5 cm) of airspace, and, for the types of the dryer requires 5" (12.7 cm). Change the dryness level setting on Sensor Dry Cycles. Press and hold START to vibrate. See "Venting Requirements." • Are fabrk" softener sheets blocking the lint screen grille? Closet doors must have...
... not feel air movement, clean exhaust system of drying time in back or other injury. • Is the automatic cycle ending early? [he front of the dryer requires a minimum of 1" (2.5 cm) of airspace, and, for the types of the dryer requires 5" (12.7 cm). Change the dryness level setting on Sensor Dry Cycles. Press and hold START to vibrate. See "Venting Requirements." • Are fabrk" softener sheets blocking the lint screen grille? Closet doors must have...
Use and Care Guide
Page 32
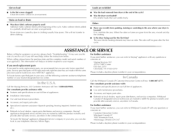
... telephone number or your request. Clean lint screen. ASSISTANCE OR SERVICE Before calling for air movement. This information will not transfer to build every new MAYTAG _ appliance. Lint on load Loads are gone from dryer at ; Check for assistance or service, please check "Troubleshooting." Dry smaller loads that you the cost of the cycle? • Was the dryer overloaded? When the odors or fumes are wrinkled • Is the lint screen clogged...
... telephone number or your request. Clean lint screen. ASSISTANCE OR SERVICE Before calling for air movement. This information will not transfer to build every new MAYTAG _ appliance. Lint on load Loads are gone from dryer at ; Check for assistance or service, please check "Troubleshooting." Dry smaller loads that you the cost of the cycle? • Was the dryer overloaded? When the odors or fumes are wrinkled • Is the lint screen clogged...

Use and Care Guide
Page 33
... location or is used in a country other than the country in accordance with published installation instructions. 11. The removal and reinstallation of products not approved by Maytag. 5. If you ever need service, first see the "Troubleshooting" section of your major appliance, to instruct you how to use of your major appliance, to replace or repair house fuses or to correct the installation of the Use & Care Guide. After checking "Troubleshooting...
... location or is used in a country other than the country in accordance with published installation instructions. 11. The removal and reinstallation of products not approved by Maytag. 5. If you ever need service, first see the "Troubleshooting" section of your major appliance, to instruct you how to use of your major appliance, to replace or repair house fuses or to correct the installation of the Use & Care Guide. After checking "Troubleshooting...


