Owners Manual
Page 4
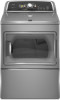
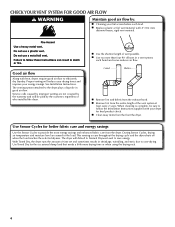
... require good air flow to the dryer plays a big role in shrinkage, wrinkling, and static due to save energy. n Use the shortest length of time set and sometimes results in good air flow. During Sensor Cycles, drying air temperature and moisture level are not covered by the customer, regardless of the...
... require good air flow to the dryer plays a big role in shrinkage, wrinkling, and static due to save energy. n Use the shortest length of time set and sometimes results in good air flow. During Sensor Cycles, drying air temperature and moisture level are not covered by the customer, regardless of the...

Owners Manual
Page 5
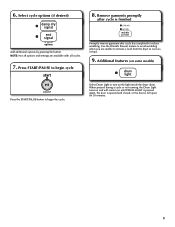
... Timed Cycles only) Select a drying temperature based on the fabrics in process to pause it stops, wrinkles can form. NOTE: When the Wrinkle Prevent setting is selected and the End Signal is selected. Turn the knob to remove a load of cycles. 3 START/PAUSE BUTTON Press to start a cycle,... models with two choices, 90 minutes for models with Timed Cycles only) Will run the dryer for your clothes are removed, or the Wrinkle Prevent setting ends. 6 CYCLE STATUS LIGHTS Lights indicate the progress of a cycle. n Get up to help keep wrinkles from the dryer as soon as it . ...
... Timed Cycles only) Select a drying temperature based on the fabrics in process to pause it stops, wrinkles can form. NOTE: When the Wrinkle Prevent setting is selected and the End Signal is selected. Turn the knob to remove a load of cycles. 3 START/PAUSE BUTTON Press to start a cycle,... models with two choices, 90 minutes for models with Timed Cycles only) Will run the dryer for your clothes are removed, or the Wrinkle Prevent setting ends. 6 CYCLE STATUS LIGHTS Lights indicate the progress of a cycle. n Get up to help keep wrinkles from the dryer as soon as it . ...
Owners Manual
Page 6
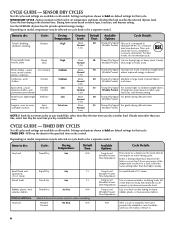
... Senses moisture in the shortest time. Depending on model, temperature may be selected on fabric type, load size, and dryness setting. 30 Damp Dry Signal For gently drying delicate items. Wrinkle Prevent 25 Damp Dry Signal For gently drying delicate items. Wrinkle ...load. Will run to completion to medium-weight fabrics. SENSOR DRY CYCLES Not all cycles and settings are default settings for a load, select the lower setting rather than the higher setting. Settings and options shown in the dryer too long. Wrinkle No heat N/A Prevent Available Options: Temp...
... Senses moisture in the shortest time. Depending on model, temperature may be selected on fabric type, load size, and dryness setting. 30 Damp Dry Signal For gently drying delicate items. Wrinkle Prevent 25 Damp Dry Signal For gently drying delicate items. Wrinkle ...load. Will run to completion to medium-weight fabrics. SENSOR DRY CYCLES Not all cycles and settings are default settings for a load, select the lower setting rather than the higher setting. Settings and options shown in the dryer too long. Wrinkle No heat N/A Prevent Available Options: Temp...

Owners Manual
Page 7
... a drying temperature based on the fabrics in the dryer. An Extra-Low heat setting may be able to tumble freely. 7 Use a no heat (air dry) setting for various loads, refer to Medium heat setting may be used for drying lightweight items such as lingerie. Clean the lint screen ... screen firmly back into place. Close the door. Temperature Tips If your dryer has multiple heat settings: A High heat setting may be used for a load, select the lower setting rather than the higher setting. Pull the lint screen straight up. For additional cleaning information, see "Dryer Care." Do not...
... a drying temperature based on the fabrics in the dryer. An Extra-Low heat setting may be able to tumble freely. 7 Use a no heat (air dry) setting for various loads, refer to Medium heat setting may be used for drying lightweight items such as lingerie. Clean the lint screen ... screen firmly back into place. Close the door. Temperature Tips If your dryer has multiple heat settings: A High heat setting may be used for a load, select the lower setting rather than the higher setting. Pull the lint screen straight up. For additional cleaning information, see "Dryer Care." Do not...
Owners Manual
Page 8
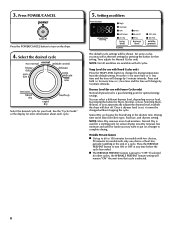
... used for use with all modifiers are available with Timed Cycles only) Press the TEMP LEVEL button to put on your load. The default cycle settings will shut off. Dryness Level (for loads you may want to change by 5-minute intervals. Less Dry removes less moisture and used for a ...starting point for More, Normal, or Less. Press and hold (+) for models with Sensor Cycles only) Normal dryness level is set, it cannot be shown. NOTE: More Dry removes more time or (-) less time and the time will change the drying temperature from the default...
... used for use with all modifiers are available with Timed Cycles only) Press the TEMP LEVEL button to put on your load. The default cycle settings will shut off. Dryness Level (for loads you may want to change by 5-minute intervals. Less Dry removes less moisture and used for a ...starting point for More, Normal, or Less. Press and hold (+) for models with Sensor Cycles only) Normal dryness level is set, it cannot be shown. NOTE: More Dry removes more time or (-) less time and the time will change the drying temperature from the default...
Owners Manual
Page 9
..., the Drum Light turns on and will remain on the light inside the dryer drum. Select cycle options (if desired) 8. NOTE: Not all options and settings are unable to turn on until DRUM LIGHT is pressed again, the door is opened and closed, or the door is finished Add additional options...
..., the Drum Light turns on and will remain on the light inside the dryer drum. Select cycle options (if desired) 8. NOTE: Not all options and settings are unable to turn on until DRUM LIGHT is pressed again, the door is opened and closed, or the door is finished Add additional options...
Owners Manual
Page 11
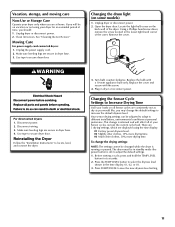
... different installations, environmental conditions or personal preference. Unplug dryer or disconnect power. 2. Unplug the power supply cord. 2. Changing the Sensor Cycle Settings to increase the default dryness level. Before starting a cycle, press and hold the TEMP LEVEL button for an extended period of the cover.... Make sure leveling legs are consistently not as dry as you would like, you may change the drying settings: NOTE: The settings cannot be on all Sensor cycles are secure in dryer base. 3. Use tape to secure dryer door. Changing the drum light ...
... different installations, environmental conditions or personal preference. Unplug dryer or disconnect power. 2. Unplug the power supply cord. 2. Changing the Sensor Cycle Settings to increase the default dryness level. Before starting a cycle, press and hold the TEMP LEVEL button for an extended period of the cover.... Make sure leveling legs are consistently not as dry as you would like, you may change the drying settings: NOTE: The settings cannot be on all Sensor cycles are secure in dryer base. 3. Use tape to secure dryer door. Changing the drum light ...

Owners Manual
Page 13
...lower temperature, and use a sensor drying cycle. These cycles sense the temperature or the moisture level in the area where your garments. In Canada www.maytag.ca If you recently been painting, staining, or varnishing in the load and shut off when the load reaches the selected dryness. This cycle is... before Cool Down may not be contacting the sensor strips. Loads are consistently ending too early, see also Changing the Sensor Dry Default Settings. If loads are wrinkled Load not removed from dryer at the beginning of a service call...In U.S.A. Change the dryness level...
...lower temperature, and use a sensor drying cycle. These cycles sense the temperature or the moisture level in the area where your garments. In Canada www.maytag.ca If you recently been painting, staining, or varnishing in the load and shut off when the load reaches the selected dryness. This cycle is... before Cool Down may not be contacting the sensor strips. Loads are consistently ending too early, see also Changing the Sensor Dry Default Settings. If loads are wrinkled Load not removed from dryer at the beginning of a service call...In U.S.A. Change the dryness level...
Installation Instructions
Page 16
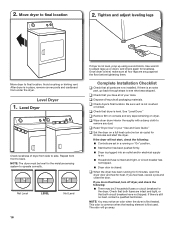
... on console and any dust. q Read "Dryer Use" in a running for 5 minutes, open the dryer door and feel for levelness. Avoid crushing or kinking vent. q Set the dryer on dryer. If you do not feel heat, cancel cycle and close the door. If there is not level, prop up or down... the dryer will go back through steps to back. If there is not crushed or kinked. After dryer is level, make sure all parts are set in your tools. Level Dryer Check levelness of /recycle all of your "Use and Care Guide." Once dryer is in place, remove corner posts and...
... on console and any dust. q Read "Dryer Use" in a running for 5 minutes, open the dryer door and feel for levelness. Avoid crushing or kinking vent. q Set the dryer on dryer. If you do not feel heat, cancel cycle and close the door. If there is not level, prop up or down... the dryer will go back through steps to back. If there is not crushed or kinked. After dryer is level, make sure all parts are set in your tools. Level Dryer Check levelness of /recycle all of your "Use and Care Guide." Once dryer is in place, remove corner posts and...

Installation Instructions
Page 17
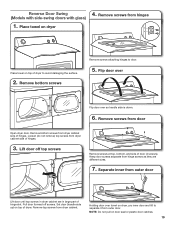
.... Pull door forward off top screws Remove screws at top, bottom, and side of door (5 screws). Take outer door and rotate it 180º and set it from inner door. Keep door screws separate from hinges Place towel on inner door. Holding door over towel on dryer, grasp sides of dryer... from hinge screws as they are in dryer cabinet are different sizes. Rotate outer door Lift door until top screws in large part of dryer. Set door (handle side up) on the side where hinges were just removed. Reattach outer door panel to inner door panel so handle is on top...
.... Pull door forward off top screws Remove screws at top, bottom, and side of door (5 screws). Take outer door and rotate it 180º and set it from inner door. Keep door screws separate from hinges Place towel on inner door. Holding door over towel on dryer, grasp sides of dryer... from hinge screws as they are in dryer cabinet are different sizes. Rotate outer door Lift door until top screws in large part of dryer. Set door (handle side up) on the side where hinges were just removed. Reattach outer door panel to inner door panel so handle is on top...
Installation Instructions
Page 19
... of door (4 screws). Reverse Door Swing (Models with side-swing doors with glass) 1. Place towel on top of dryer to door. 5. Lift door off screws. Set door (handle side up) on dryer 4. NOTE: Do not pull on top of dryer. Remove screws from outer door.
... of door (4 screws). Reverse Door Swing (Models with side-swing doors with glass) 1. Place towel on top of dryer to door. 5. Lift door off screws. Set door (handle side up) on dryer 4. NOTE: Do not pull on top of dryer. Remove screws from outer door.
Installation Instructions
Page 20
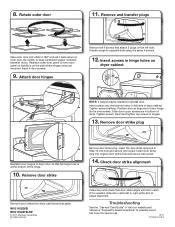
... 2Al0l rights reserved Close door and check that the larger hole is over screws. Check door strike alignment Remove door strike from dryer cabinet and set it is on dryer cabinet NOTE: 2 people maybe needed to inner door panel so handle is needed, slide door catch left or right within ... door strike removed in bottom of dryer cabinet. Rotate outer door 11. Remove and transfer plugs Take outer door and rotate it 180º and set aside. Attach door hinges Remove the 4 screws that attach 2 plugs on inner door. 8. Insert screws in hinges. 13. If it back down on the...
... 2Al0l rights reserved Close door and check that the larger hole is over screws. Check door strike alignment Remove door strike from dryer cabinet and set it is on dryer cabinet NOTE: 2 people maybe needed to inner door panel so handle is needed, slide door catch left or right within ... door strike removed in bottom of dryer cabinet. Rotate outer door 11. Remove and transfer plugs Take outer door and rotate it 180º and set aside. Attach door hinges Remove the 4 screws that attach 2 plugs on inner door. 8. Insert screws in hinges. 13. If it back down on the...


