
Owners Manual
Page 14
... THIS LIMITED WARRANTY SHALL BE PRODUCT REPAIR AS PROVIDED HEREIN. MAYTAG SHALL NOT BE LIABLE FOR INCIDENTAL OR CONSEQUENTIAL DAMAGES. ITEMS EXCLUDED FROM WARRANTY This limited warranty does not cover: 1. Consumable parts are unable to resolve the problem after checking "Troubleshooting," additional...for future reference. If you think you . LIMITATION OF REMEDIES; Write down the following information about your authorized Maytag dealer to province. Replacement parts or repair labor on the duration of implied warranties of merchantability or tness, so this limitation may have been ...
... THIS LIMITED WARRANTY SHALL BE PRODUCT REPAIR AS PROVIDED HEREIN. MAYTAG SHALL NOT BE LIABLE FOR INCIDENTAL OR CONSEQUENTIAL DAMAGES. ITEMS EXCLUDED FROM WARRANTY This limited warranty does not cover: 1. Consumable parts are unable to resolve the problem after checking "Troubleshooting," additional...for future reference. If you think you . LIMITATION OF REMEDIES; Write down the following information about your authorized Maytag dealer to province. Replacement parts or repair labor on the duration of implied warranties of merchantability or tness, so this limitation may have been ...

Warranty Information
Page 1
... normal, single-family household use or when it was purchased. Repairs to parts or systems resulting from unauthorized modifications made to Maytag within 30 days from the date of purchase. 6. Replacement parts or repair labor on the duration of implied warranties of merchantability or fitness...codes, or use your sales slip together for inwarranty service. Expenses for travel and transportation for factory specified parts and repair labor to you. MAYTAG SHALL NOT BE LIABLE FOR INCIDENTAL OR CONSEQUENTIAL DAMAGES. Dealer name Address Phone number Model number Serial number ...
... normal, single-family household use or when it was purchased. Repairs to parts or systems resulting from unauthorized modifications made to Maytag within 30 days from the date of purchase. 6. Replacement parts or repair labor on the duration of implied warranties of merchantability or fitness...codes, or use your sales slip together for inwarranty service. Expenses for travel and transportation for factory specified parts and repair labor to you. MAYTAG SHALL NOT BE LIABLE FOR INCIDENTAL OR CONSEQUENTIAL DAMAGES. Dealer name Address Phone number Model number Serial number ...
Installation Guide
Page 3
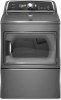
...circuit. Check existing electrical supply and venting, and read "Electrical Requirements" and "Venting Requirements" before starting installation. Parts needed : Flat-blade screwdriver #2 Phillips screwdriver Wire stripper (direct wire installations) Tin snips (new vent installations) 1/4" nut ... with clothes dryers. Location Requirements Adjustable wrench that all parts are included. Putty knife 3 INSTALLATION REQUIREMENTS Tools and Parts Parts supplied: Gather the required tools and parts before purchasing parts. The kit should be type SRD or SRDT and be...
...circuit. Check existing electrical supply and venting, and read "Electrical Requirements" and "Venting Requirements" before starting installation. Parts needed : Flat-blade screwdriver #2 Phillips screwdriver Wire stripper (direct wire installations) Tin snips (new vent installations) 1/4" nut ... with clothes dryers. Location Requirements Adjustable wrench that all parts are included. Putty knife 3 INSTALLATION REQUIREMENTS Tools and Parts Parts supplied: Gather the required tools and parts before purchasing parts. The kit should be type SRD or SRDT and be...
Installation Guide
Page 4
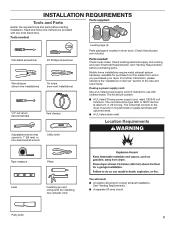
...it is recommended that a qualified electrician determine that the electrical connection is greater than 1" [25 mm], install Extended Dryer Feet Kit, Part Number 279810.) If not level, clothes may not tumble properly and automatic sensor cycles may not operate correctly. At lower temperatures, the ... dryer in mobile homes to the Manufactured Home Construction and Safety Standard, Title 24 CFR, Part 3280 (formerly the Federal Standard for Mobile Home Construction and Safety, Title 24, HUD Part 280). ■■ Metal exhaust system hardware, which is available for the exhaust vent...
...it is recommended that a qualified electrician determine that the electrical connection is greater than 1" [25 mm], install Extended Dryer Feet Kit, Part Number 279810.) If not level, clothes may not tumble properly and automatic sensor cycles may not operate correctly. At lower temperatures, the ... dryer in mobile homes to the Manufactured Home Construction and Safety Standard, Title 24 CFR, Part 3280 (formerly the Federal Standard for Mobile Home Construction and Safety, Title 24, HUD Part 280). ■■ Metal exhaust system hardware, which is available for the exhaust vent...

Installation Guide
Page 14
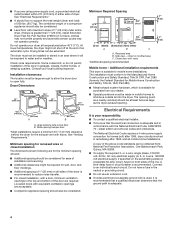
...) A. Wall D. Optional side exhaust outlet Optional exhaust installations: Exhaust can be converted out the right side, left side, or through the bottom (4-way vent kit). A B C A. Part Number Description 8171587RP 0-5" Metal vent periscope 4396037RP 0"-18" Metal vent periscope 4396011RP 18"-29" Metal vent periscope 4396014 29"-50" Metal vent periscope 4392892 In...
...) A. Wall D. Optional side exhaust outlet Optional exhaust installations: Exhaust can be converted out the right side, left side, or through the bottom (4-way vent kit). A B C A. Part Number Description 8171587RP 0-5" Metal vent periscope 4396037RP 0"-18" Metal vent periscope 4396011RP 18"-29" Metal vent periscope 4396014 29"-50" Metal vent periscope 4392892 In...

Installation Guide
Page 16
Level Dryer Check levelness of /recycle all parts are set in a running for 5 minutes, open the dryer door and feel for the dryer. Use wrench to final location 2. Once dryer is not crushed ... plugged into an outlet and/or electrical supply is on console and any dust. This odor is common when the heating element is an extra part, go away. 2. q Read "Dryer Use" in place, remove corner posts and cardboard from side to back. Avoid crushing or kinking vent. If there is first...
Level Dryer Check levelness of /recycle all parts are set in a running for 5 minutes, open the dryer door and feel for the dryer. Use wrench to final location 2. Once dryer is not crushed ... plugged into an outlet and/or electrical supply is on console and any dust. This odor is common when the heating element is an extra part, go away. 2. q Read "Dryer Use" in place, remove corner posts and cardboard from side to back. Avoid crushing or kinking vent. If there is first...
Installation Guide
Page 17
.... 5. Holding door over towel on top of dryer to keep cardboard spacer centered between doors. Rotate outer door Lift door until top screws in large part of door (5 screws). Lift door off screws. Keep door screws separate from dryer cabinet side of outer door and lift to separate it back down...
.... 5. Holding door over towel on top of dryer to keep cardboard spacer centered between doors. Rotate outer door Lift door until top screws in large part of door (5 screws). Lift door off screws. Keep door screws separate from dryer cabinet side of outer door and lift to separate it back down...
Installation Guide
Page 19
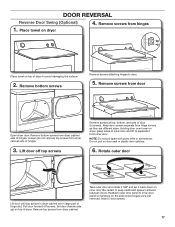
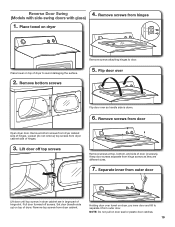
... door and lift to door. 5. Remove bottom screws Remove screws attaching hinges to separate it from outer door Lift door until top screws in large part of door (4 screws). Reverse Door Swing (Models with side-swing doors with glass) 1. Holding door over so handle side is down. 6. Separate inner from outer...
... door and lift to door. 5. Remove bottom screws Remove screws attaching hinges to separate it from outer door Lift door until top screws in large part of door (4 screws). Reverse Door Swing (Models with side-swing doors with glass) 1. Holding door over so handle side is down. 6. Separate inner from outer...


