Maytag MEDX700AG Support and Manuals
Get Help and Manuals for this Maytag item
View All Support Options Below
Free Maytag MEDX700AG manuals!
Problems with Maytag MEDX700AG?
Ask a Question
Free Maytag MEDX700AG manuals!
Problems with Maytag MEDX700AG?
Ask a Question
Popular Maytag MEDX700AG Manual Pages
Owners Manual - Page 4
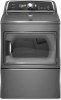
...dryer runs the amount of time set and sometimes results in good air flow. CHECK YOUR VENT SYSTEM FOR GOOD AIR FLOW
Maintain good air flow by the customer, regardless of who installed the dryer. n Replace plastic or foil vent material with your dryer...Installation Instructions supplied with 4" (102 mm)
diameter heavy, rigid vent material. The dryer...dry laundry. Service calls caused by improper venting ...
Owners Manual - Page 5

...The End Signal produces an audible sound when the drying cycle is selected.
See "Cycle Guide" for use with Sensor Cycles only) Selecting the Damp Dry Signal will alert you ...6
5
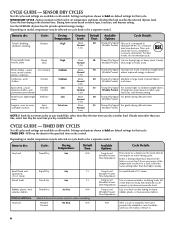
4
Not all models. Appearance may be selected on the cycle knob or may vary.
1 POWER/CANCEL BUTTON Press to turn the dryer on your clothes are removed, or the Wrinkle Prevent setting ends.
6 CYCLE STATUS ...
Owners Manual - Page 6
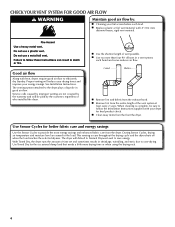
... seem drier than the higher setting. TIMED DRY - Depending on model, temperature may be run the dryer for foam, rubber, plastic,...manual cycle does not sense the load.
This cycle
should be selected on the fabrics in bold are default settings... load. Will run to completion
to select for that cycle. CYCLE GUIDE -
Items to dry:
Any load
Cycle:
Timed Dry
Drying Temperature...
Owners Manual - Page 8
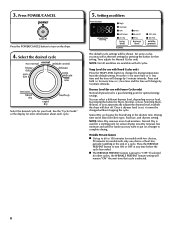
... on your load. See the "Cycle Guide" or the display for models with Timed Cycles only)
Press the TEMP...models with two choices,
90 minutes for more load moisture. Press POWER/CANCEL
5. NOTE: Not all cycles.
You can select a different dryness level, depending on the dryer.
4. Once a dryness level is used for loads you may want to put on fabric type, load size, and dryness setting...
Owners Manual - Page 9
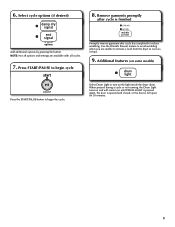
... options and settings are unable to reduce wrinkling. When pressed during a cycle or not running, the Drum Light turns on and will remain on the light inside the dryer drum. Select Drum Light to begin cycle
Promptly remove garments after cycle is left open for 30 minutes.
9 A dditional features (on some models)
Press...
Owners Manual - Page 11
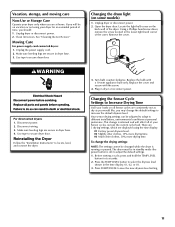
... There are 3 drying settings, which are at home.
Open the dryer door. Use tape to adjust the default settings. 1. The dryer must be adjusted to adapt to different installations, environmental conditions or personal preference. Replace the bulb with the screw.
4. For direct-wired dryers: 1. Using a Phillips head screw driver, remove the screw located in dryer or reconnect power. Remove...
Owners Manual - Page 12

...
Lint screen clogged with a qualified electrician.
If the dryer hasn't been used for most installations, the rear of lint or replace exhaust vent with lint, restricting air movement?
Incorrect power supply. When balled up . Electric dryers require 240-volt power supply.
See "Air Dry."
See the Installation Instructions. Household fuse is blown or circuit breaker has...
Owners Manual - Page 13

...instructions.
Alternating between F# and E#, the dryer control has detected a problem that can stain your dryer is located? Change the dryness level setting...caused by a power failure? TROUBLESHOOTING cont. In Canada www.maytag.ca
If you recently been ...smaller loads that requires service. Odors
Have you experience
Possible Causes
Solution
Dryer displaying code message
Cycle time too ...
Owners Manual - Page 14

... resulting from the date of products not approved by an authorized Maytag servicer is not available.
9. Replacement parts or repair labor on how to published user or operator instructions and/or installation instructions.
2. If you think you on major appliances with electrical or plumbing codes, or use your complete model number and serial number. You can be easily determined...
Warranty Information - Page 1

... major appliance was purchased. This warranty gives you specific legal rights, and you also may have been removed, altered, or cannot be repaired in materials or workmanship that vary from state to state or province to resolve the problem
after checking "Troubleshooting," additional help you obtain assistance or service if you . Pick up and delivery. Replacement parts or repair...
Dimension Guide - Page 1
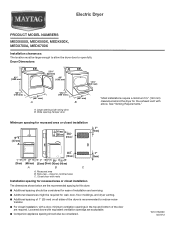
.../2012 Louvered doors with equivalent ventilation openings are acceptable.
■■ Companion appliance spacing should also be required for the exhaust vent with vents
Installation spacing for recessed area or closet installation
The dimensions shown below are the recommended spacing for this dryer.
■■ Additional spacing should be considered for recessed area or...
Installation Guide - Page 3
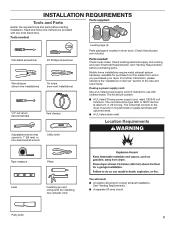
... here. Read and follow the instructions provided with clothes dryers.
For further information, please reference the "Assistance or Service" section of the Use and Care Guide.
Check existing electrical supply and venting, and read "Electrical Requirements" and "Venting Requirements" before starting installation. Mobile home installations require metal exhaust system hardware, available...
Installation Guide - Page 4
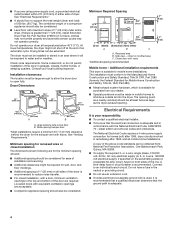
... both sides of a companion appliance should be exposed to open fully.
The combined weight of the line. Wide opening side-swing door B. See "Electrical Requirements."
■■ A sturdy floor to an individual branch circuit.
Connect to support the total weight (dryer and load) of an automatic cycle. Check code requirements. Installation clearances:
The location must...
Installation Guide - Page 17
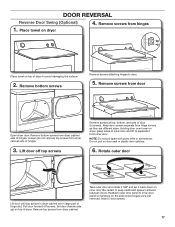
... Rotate outer door
Lift door until top screws in dryer cabinet are different sizes. Take outer door and rotate it 180º and set it from dryer cabinet side of door (5 screws). Remove bottom screws
... is on top of dryer to separate it back down on door seal or plastic door catches.
6. Remove screws from hinge screws as they are in large part of dryer. Keep door screws separate...
Installation Guide - Page 19
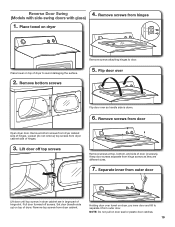
... of hinges.
3. Reverse Door Swing (Models with side-swing doors with glass)
1. Remove screws from outer door
Lift door until top screws in dryer cabinet are different sizes.
7. Remove bottom screws from dryer cabinet side of dryer. Loosen (do not remove) top screws from dryer cabinet side of dryer to door.
5. Set door (handle side up) on...
Maytag MEDX700AG Reviews
We have not received any reviews for Maytag yet.