
Warranty Information
Page 1
...8. The removal and reinstallation of your major appliance is located in a remote area where service by an authorized Maytag servicer is not available. 9. Replacement parts or repair labor on the product. This warranty gives you specific legal rights, and you also may have other... see the "Troubleshooting" section of the Use & Care Guide. This major appliance is intended to be borne by a Maytag designated service company. Repairs to parts or systems resulting from warranty coverage. 4. The cost of purchase. 6. DISCLAIMER OF IMPLIED WARRANTIES IMPLIED WARRANTIES, INCLUDING ANY ...
...8. The removal and reinstallation of your major appliance is located in a remote area where service by an authorized Maytag servicer is not available. 9. Replacement parts or repair labor on the product. This warranty gives you specific legal rights, and you also may have other... see the "Troubleshooting" section of the Use & Care Guide. This major appliance is intended to be borne by a Maytag designated service company. Repairs to parts or systems resulting from warranty coverage. 4. The cost of purchase. 6. DISCLAIMER OF IMPLIED WARRANTIES IMPLIED WARRANTIES, INCLUDING ANY ...
Use & Care Guide
Page 8
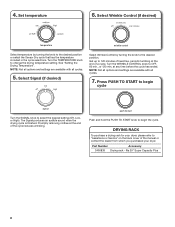
... Turn the SIGNAL knob to begin the cycle. fits 29" Super Capacity Plus 8 The Signal produces an audible sound when the drying cycle is finished. Part Number Accessory 3406839 Drying rack - Select Wrinkle Control (if desired) Select temperature by turning the knob to the desired position or select the Sensor Dry...
... Turn the SIGNAL knob to begin the cycle. fits 29" Super Capacity Plus 8 The Signal produces an audible sound when the drying cycle is finished. Part Number Accessory 3406839 Drying rack - Select Wrinkle Control (if desired) Select temperature by turning the knob to the desired position or select the Sensor Dry...

Use & Care Guide
Page 10
Use tape to locate, level, and connect the dryer. 3. Unplug dryer or disconnect power. 2. Replace all parts and panels before servicing. Disconnect wiring. 3. Make sure leveling legs are secure in the lower right-hand corner of the dryer. Cap the open fuel ...
Use tape to locate, level, and connect the dryer. 3. Unplug dryer or disconnect power. 2. Replace all parts and panels before servicing. Disconnect wiring. 3. Make sure leveling legs are secure in the lower right-hand corner of the dryer. Cap the open fuel ...

Use & Care Guide
Page 13
... other than the limited warranty that comes with electrical or plumbing codes, or use your sales slip together for factory specified replacement parts and repair labor to the appliance. 8. MAYTAG® LAUNDRY WARRANTY LIMITED WARRANTY For one year from the date of purchase, when this major appliance is installed, operated, and maintained...
... other than the limited warranty that comes with electrical or plumbing codes, or use your sales slip together for factory specified replacement parts and repair labor to the appliance. 8. MAYTAG® LAUNDRY WARRANTY LIMITED WARRANTY For one year from the date of purchase, when this major appliance is installed, operated, and maintained...
Installation Guide
Page 4
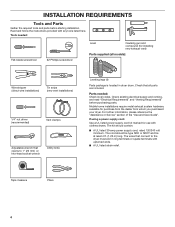
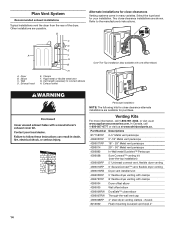
... : Flat-blade screwdriver #2 Phillips screwdriver Level Caulking gun and compound (for installing new exhaust vent) Parts supplied (all parts are included. Mobile home installations require metal exhaust system hardware, available for use with any tools listed here. ...) 1/4" nut driver (recommended) Vent clamps Adjustable wrench that connect to 1" (25 mm) or hex-head socket wrench Utility knife Leveling legs (4) Parts package is located in ring terminals or spade terminals with upturned ends. ■■ A UL listed strain relief. Tape measure Pliers 4 For further...
... : Flat-blade screwdriver #2 Phillips screwdriver Level Caulking gun and compound (for installing new exhaust vent) Parts supplied (all parts are included. Mobile home installations require metal exhaust system hardware, available for use with any tools listed here. ...) 1/4" nut driver (recommended) Vent clamps Adjustable wrench that connect to 1" (25 mm) or hex-head socket wrench Utility knife Leveling legs (4) Parts package is located in ring terminals or spade terminals with upturned ends. ■■ A UL listed strain relief. Tape measure Pliers 4 For further...
Installation Guide
Page 5
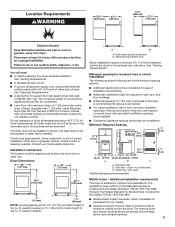
... made in mobile homes to the Manufactured Home Construction and Safety Standard, Title 24 CFR, Part 3280 (formerly the Federal Standard for Mobile Home Construction and Safety, Title 24, HUD Part 280). ■■ Metal exhaust system hardware, which is suitable for mobile home installations....9632;■ Additional spacing of 1" (25 mm) on all sides of the dryer is greater than 1" [25 mm], install Extended Dryer Feet Kit, Part Number 279810.) If not level, clothes may not tumble properly and automatic sensor cycles may not operate correctly. A B A. Location Requirements 223/4" (578 ...
... made in mobile homes to the Manufactured Home Construction and Safety Standard, Title 24 CFR, Part 3280 (formerly the Federal Standard for Mobile Home Construction and Safety, Title 24, HUD Part 280). ■■ Metal exhaust system hardware, which is suitable for mobile home installations....9632;■ Additional spacing of 1" (25 mm) on all sides of the dryer is greater than 1" [25 mm], install Extended Dryer Feet Kit, Part Number 279810.) If not level, clothes may not tumble properly and automatic sensor cycles may not operate correctly. A B A. Location Requirements 223/4" (578 ...
Installation Guide
Page 14
... are available for purchase. Exhaust hood C D E F G B H E. Rigid metal or flexible metal vent G. In Canada, call 1-800-901-2042, or visit us at www.applianceaccessories.com. Part Number Descriptions 8171587RP 0-5" Metal vent periscope 4396037RP 0"-18" Metal vent periscope 4396011RP 18" - 29" Metal vent periscope 4396014 29" - 50" Metal vent periscope 4392892 In...
... are available for purchase. Exhaust hood C D E F G B H E. Rigid metal or flexible metal vent G. In Canada, call 1-800-901-2042, or visit us at www.applianceaccessories.com. Part Number Descriptions 8171587RP 0-5" Metal vent periscope 4396037RP 0"-18" Metal vent periscope 4396011RP 18" - 29" Metal vent periscope 4396014 29" - 50" Metal vent periscope 4392892 In...
Installation Guide
Page 16
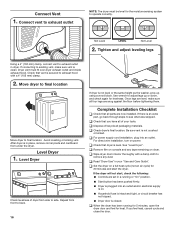
..., open the dryer door and feel heat, cancel cycle and close the door. If the dryer will not start the dryer. If you have all parts are set in your tools. Avoid crushing or kinking vent. Level Dryer Check levelness of /recycle all four legs are snug against the floor before... in dryer. q When the dryer has been running or "On" position. ■■ Start button has been pushed firmly. ■■ Dryer is an extra part, go back through steps to remove any tape remaining on power. Connect vent to exhaust outlet NOTE: The dryer must fit over dryer exhaust outlet...
..., open the dryer door and feel heat, cancel cycle and close the door. If the dryer will not start the dryer. If you have all parts are set in your tools. Avoid crushing or kinking vent. Level Dryer Check levelness of /recycle all four legs are snug against the floor before... in dryer. q When the dryer has been running or "On" position. ■■ Start button has been pushed firmly. ■■ Dryer is an extra part, go back through steps to remove any tape remaining on power. Connect vent to exhaust outlet NOTE: The dryer must fit over dryer exhaust outlet...
Installation Guide
Page 17
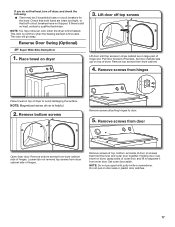
... Remove screws attaching hinges to avoid damaging the surface. Remove screws at top, bottom, and side of door (4 screws) that both fuses are in large part of dryer. Lift door off screws. Remove screws from inner door. The odor will go away. Set door (handle side up) on top of hinges...
... Remove screws attaching hinges to avoid damaging the surface. Remove screws at top, bottom, and side of door (4 screws) that both fuses are in large part of dryer. Lift door off screws. Remove screws from inner door. The odor will go away. Set door (handle side up) on top of hinges...


