

Owners Manual
Page 12
...a time-delay fuse. Clean out pockets before each load. Supply line valve not open on the supply line. The dryer may be turning, but you may not have heat. Electric dryers require 240-volt power supply. TROUBLESHOOTING First try the solutions suggested here or visit our website and reference FAQs (Frequently.... Exhaust vent the correct length? When balled up . The drum may be cleaned before laundering. See "Installation Instructions." If you hear the dryer drum moving. Incorrect power supply. http://www.maytag.com/help - Dryer will not run Door not closed completely.
...a time-delay fuse. Clean out pockets before each load. Supply line valve not open on the supply line. The dryer may be turning, but you may not have heat. Electric dryers require 240-volt power supply. TROUBLESHOOTING First try the solutions suggested here or visit our website and reference FAQs (Frequently.... Exhaust vent the correct length? When balled up . The drum may be cleaned before laundering. See "Installation Instructions." If you hear the dryer drum moving. Incorrect power supply. http://www.maytag.com/help - Dryer will not run Door not closed completely.

Owners Manual
Page 13
... contacting the sensor strips. Load is located? http://www.maytag.com/help - Alternating between F# and E#, the dryer control has detected a problem that can stain your dryer is too hot Is the electric dryer being used , or was a separate temperature control set on load or drum Dryer fabric softener not properly used. Increasing or decreasing the dryness...
... contacting the sensor strips. Load is located? http://www.maytag.com/help - Alternating between F# and E#, the dryer control has detected a problem that can stain your dryer is too hot Is the electric dryer being used , or was a separate temperature control set on load or drum Dryer fabric softener not properly used. Increasing or decreasing the dryness...
Installation Instructions
Page 3
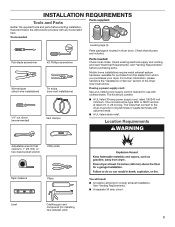
.... If using a power supply cord: Use a UL listed power supply cord kit marked for purchase from the dealer from whom you purchased your dryer. See "Venting Requirements." ■■ A separate 30 amp circuit. 3 The wires that connect to 1" (25 mm) or hex-head ...Tools and Parts Parts supplied: Gather the required tools and parts before purchasing parts. Tools needed : Check local codes. Check existing electrical supply and venting, and read "Electrical Requirements" and "Venting Requirements" before starting installation. The kit should be type SRD or SRDT and be at least 4 ft...
.... If using a power supply cord: Use a UL listed power supply cord kit marked for purchase from the dealer from whom you purchased your dryer. See "Venting Requirements." ■■ A separate 30 amp circuit. 3 The wires that connect to 1" (25 mm) or hex-head ...Tools and Parts Parts supplied: Gather the required tools and parts before purchasing parts. Tools needed : Check local codes. Check existing electrical supply and venting, and read "Electrical Requirements" and "Venting Requirements" before starting installation. The kit should be type SRD or SRDT and be at least 4 ft...
Installation Instructions
Page 4
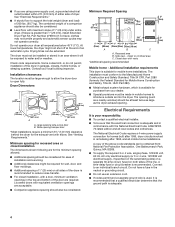
... *Most installations require a minimum 5½" (140 mm) clearance behind the dryer for mobile home installations. Side view - The installation must be made in mobile homes to open fully. Electrical Requirements It is your dealer. ■■ Special provisions must not be sure...) 48 in conformance with vents *Additional spacing recommended 3"* (76 mm) Mobile home - The dryer must be large enough to allow the dryer door to introduce outside air into the dryer. See "Electrical Requirements." ■■ A sturdy floor to water and/or weather. Drying times can be...
... *Most installations require a minimum 5½" (140 mm) clearance behind the dryer for mobile home installations. Side view - The installation must be made in mobile homes to open fully. Electrical Requirements It is your dealer. ■■ Special provisions must not be sure...) 48 in conformance with vents *Additional spacing recommended 3"* (76 mm) Mobile home - The dryer must be large enough to allow the dryer door to introduce outside air into the dryer. See "Electrical Requirements." ■■ A sturdy floor to water and/or weather. Drying times can be...

Installation Instructions
Page 5
... choose a 4-wire power supply cord with a 3-wire electrical supply connection. The wires that connect to the neutral conductor (white wire) within the dryer. Electrical Connection To properly install your dryer, you must determine the type of electrical connection you will be using a power supply cord: Use... from the neutral conductor. ■■ A 4-wire power supply connection must be used when the dryer is installed in ring terminals or spade terminals with a 4-wire electrical supply connection, the neutral ground wire must have 4 10-gauge solid copper wires and match a 4-...
... choose a 4-wire power supply cord with a 3-wire electrical supply connection. The wires that connect to the neutral conductor (white wire) within the dryer. Electrical Connection To properly install your dryer, you must determine the type of electrical connection you will be using a power supply cord: Use... from the neutral conductor. ■■ A 4-wire power supply connection must be used when the dryer is installed in ring terminals or spade terminals with a 4-wire electrical supply connection, the neutral ground wire must have 4 10-gauge solid copper wires and match a 4-...

Installation Instructions
Page 6
...place under entire back edge of cardboard from dryer carton; To avoid damaging floor, use a wrench to finish turning legs until it is no longer visible. Failure to move and install dryer. diamond marking 1. Prepare dryer for electrical connection and to its feet. Screw legs ...into leg holes by hand, use a large flat piece of dryer. Firmly grasp dryer body (not console panel) and gently lay dryer down on its final location. ...
...place under entire back edge of cardboard from dryer carton; To avoid damaging floor, use a wrench to finish turning legs until it is no longer visible. Failure to move and install dryer. diamond marking 1. Prepare dryer for electrical connection and to its feet. Screw legs ...into leg holes by hand, use a large flat piece of dryer. Firmly grasp dryer body (not console panel) and gently lay dryer down on its final location. ...

Installation Instructions
Page 16
... vent is first used. q Wipe dryer drum interior thoroughly with a damp cloth to side. q When the dryer has been running or "On" position. ■■ Start button has been pushed firmly. ■■ Dryer is plugged into an outlet and/or electrical supply is on. ■■ ...Household fuse is intact and tight, or circuit breaker has not tripped. ■■ Dryer door is level. Complete Installation Checklist q Check that you have...
... vent is first used. q Wipe dryer drum interior thoroughly with a damp cloth to side. q When the dryer has been running or "On" position. ■■ Start button has been pushed firmly. ■■ Dryer is plugged into an outlet and/or electrical supply is on. ■■ ...Household fuse is intact and tight, or circuit breaker has not tripped. ■■ Dryer door is level. Complete Installation Checklist q Check that you have...


