Warranty Information
Page 1
... days. 10. light bulbs, batteries, air or water filters, preservation solutions, etc.). 5. Defects or damage caused by Maytag. 8. Conversion of surfaces resulting from natural gas or L.P. gas or reversal of non-genuine Maytag parts or accessories. 6. Damage from state to state or province to or furnished with published user, operator, or installation instructions. 2. Cosmetic damage including scratches, dents, chips, and other than the limited warranty that existed when...
... days. 10. light bulbs, batteries, air or water filters, preservation solutions, etc.). 5. Defects or damage caused by Maytag. 8. Conversion of surfaces resulting from natural gas or L.P. gas or reversal of non-genuine Maytag parts or accessories. 6. Damage from state to state or province to or furnished with published user, operator, or installation instructions. 2. Cosmetic damage including scratches, dents, chips, and other than the limited warranty that existed when...
Use & Care Guide
Page 3
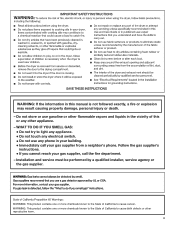
... the gas supplier's instructions. • If you cannot reach your gas supplier, call your building. • Immediately call the re department. - WHAT TO DO IF YOU SMELL GAS: • Do not try to light any appliance. • Do not touch any electrical switch. • Do not use gasoline or other appliance. - Installation and service must be performed by a quali ed installer, service...
... the gas supplier's instructions. • If you cannot reach your gas supplier, call your building. • Immediately call the re department. - WHAT TO DO IF YOU SMELL GAS: • Do not try to light any appliance. • Do not touch any electrical switch. • Do not use gasoline or other appliance. - Installation and service must be performed by a quali ed installer, service...
Use & Care Guide
Page 4
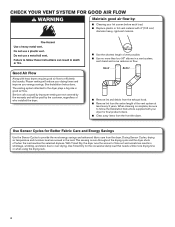
... dryer for final product check. ■■ Clear away items from the dryer. n Use the shortest length of who installed the dryer. Use Timed Dry for Better Fabric Care and Energy Savings Use the Sensor Cycles to efficiently dry laundry. The venting system attached to follow the Installation Instructions supplied with heat, dryers require good air flow to provide the most energy savings and enhanced fabric care from the front the dryer. Use Sensor Cycles for the occasional damp load that needs...
... dryer for final product check. ■■ Clear away items from the dryer. n Use the shortest length of who installed the dryer. Use Timed Dry for Better Fabric Care and Energy Savings Use the Sensor Cycles to efficiently dry laundry. The venting system attached to follow the Installation Instructions supplied with heat, dryers require good air flow to provide the most energy savings and enhanced fabric care from the front the dryer. Use Sensor Cycles for the occasional damp load that needs...
Use & Care Guide
Page 5
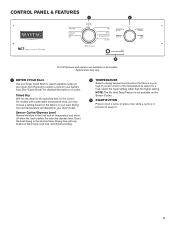
... "Cycle Guide" for the specified time on the control. Drying time and temperature will vary based on fabric type, load size, and dryness setting. 2 TEMPERATURE Select a drying temperature based on the fabrics in your load. NOTE: The No Heat Temp Feature is not available on the Sensor Cycles. 3 START BUTTON Press to start a cycle, or press once while a cycle is in your load. Appearance may choose a setting based on the fabrics in process to select a cycle...
... "Cycle Guide" for the specified time on the control. Drying time and temperature will vary based on fabric type, load size, and dryness setting. 2 TEMPERATURE Select a drying temperature based on the fabrics in your load. NOTE: The No Heat Temp Feature is not available on the Sensor Cycles. 3 START BUTTON Press to start a cycle, or press once while a cycle is in your load. Appearance may choose a setting based on the fabrics in process to select a cycle...
Use & Care Guide
Page 6
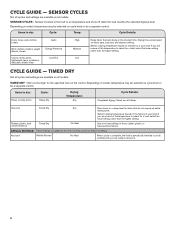
... fabrics Timed Dry No Heat Use a no heat setting for items that do not require an entire drying cycle. Any load Wrinkle Prevent No Heat After a cycle is complete, the load is periodically tumbled to avoid wrinkles until you are added at the end of the temperature to dry: Cycle: Temp: Cycle Details: Jeans, heavy work clothes, towels Work clothes, medium weight fabrics, sheets Casual, shirts, pants, lightweight items, synthetics, delicates, athletic wear Jeans Energy...
... fabrics Timed Dry No Heat Use a no heat setting for items that do not require an entire drying cycle. Any load Wrinkle Prevent No Heat After a cycle is complete, the load is periodically tumbled to avoid wrinkles until you are added at the end of the temperature to dry: Cycle: Temp: Cycle Details: Jeans, heavy work clothes, towels Work clothes, medium weight fabrics, sheets Casual, shirts, pants, lightweight items, synthetics, delicates, athletic wear Jeans Energy...
Use & Care Guide
Page 8
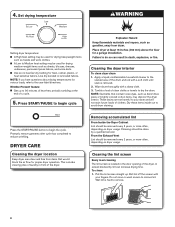
... the door opening of a cycle. 5. A screen blocked by a qualified servicer. Do not rinse or wash screen to the care label directions. NOTE: If you have questions about drying temperatures for drying heavyweight items such as towels and work clothes. ■■ A Low to 90 minutes of heat-free, periodic tumbling at the end of the dryer. Apply a liquid, nonflammable household cleaner to begin the cycle. To clean: 1. From the Exhaust Vent Lint...
... the door opening of a cycle. 5. A screen blocked by a qualified servicer. Do not rinse or wash screen to the care label directions. NOTE: If you have questions about drying temperatures for drying heavyweight items such as towels and work clothes. ■■ A Low to 90 minutes of heat-free, periodic tumbling at the end of the dryer. Apply a liquid, nonflammable household cleaner to begin the cycle. To clean: 1. From the Exhaust Vent Lint...
Use & Care Guide
Page 9
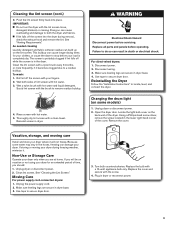
... longer drying times for an extended period of the cover. WARNING Electrical Shock Hazard Disconnect power before operating. Changing the drum light (on the back wall of lint screen with the brush to locate, level, and connect the dryer. Vacation, storage, and moving your dryer during removal, check the exhaust hood and remove the lint. Moving Care For power supply cord-connected dryers: 1. Make sure leveling legs are at home. Turn bulb counterclockwise. IMPORTANT: n Do not run the dryer...
... longer drying times for an extended period of the cover. WARNING Electrical Shock Hazard Disconnect power before operating. Changing the drum light (on the back wall of lint screen with the brush to locate, level, and connect the dryer. Vacation, storage, and moving your dryer during removal, check the exhaust hood and remove the lint. Moving Care For power supply cord-connected dryers: 1. Make sure leveling legs are at home. Turn bulb counterclockwise. IMPORTANT: n Do not run the dryer...
Use & Care Guide
Page 10
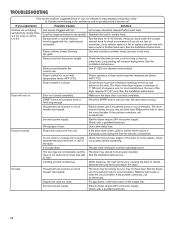
.... Run the dryer for small objects. If you hear the dryer drum moving. Press the START button until you do not feel air movement, clean exhaust system of lint or replace exhaust vent with lint. Incorrect power supply. Wrong type of dryer cycles requires temperatures above 45ºF (7ºC). to tumble freely. Clothing knotted or balled up , the load will bounce, causing the dryer to dry quickly. Replace both fuses or reset the circuit breaker. For gas dryers, is too hot Lint screen clogged...
.... Run the dryer for small objects. If you hear the dryer drum moving. Press the START button until you do not feel air movement, clean exhaust system of lint or replace exhaust vent with lint. Incorrect power supply. Wrong type of dryer cycles requires temperatures above 45ºF (7ºC). to tumble freely. Clothing knotted or balled up , the load will bounce, causing the dryer to dry quickly. Replace both fuses or reset the circuit breaker. For gas dryers, is too hot Lint screen clogged...
Use & Care Guide
Page 11
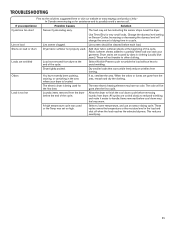
... softener sheets added to finish the cool down may feel very warm. The electric dryer is being used . The new electric heating element may not be cleaned before the end of the cycle. If you experience Possible Causes Solution Cycle time too short Sensor Cycle ending early. Use Timed Dry for the first time. Lint on Sensor Cycles. Dry smaller loads that can stain your dryer is too hot Laundry items removed from dryer at www.maytag.com...
... softener sheets added to finish the cool down may feel very warm. The electric dryer is being used . The new electric heating element may not be cleaned before the end of the cycle. If you experience Possible Causes Solution Cycle time too short Sensor Cycle ending early. Use Timed Dry for the first time. Lint on Sensor Cycles. Dry smaller loads that can stain your dryer is too hot Laundry items removed from dryer at www.maytag.com...

Use & Care Guide
Page 12
... service company. light bulbs, batteries, air or water filters, preservation solutions, etc.). 5. Defects or damage caused by our authorized Maytag Service Providers. gas or reversal of purchase including dealer or retailer name and address IF YOU NEED SERVICE: 1. Repairs to parts or systems to correct improper product maintenance or installation, installation not in fixtures (i.e. Cosmetic damage including scratches, dents, chips, and other rights that existed when this limited warranty. 1. Removal...
... service company. light bulbs, batteries, air or water filters, preservation solutions, etc.). 5. Defects or damage caused by our authorized Maytag Service Providers. gas or reversal of purchase including dealer or retailer name and address IF YOU NEED SERVICE: 1. Repairs to parts or systems to correct improper product maintenance or installation, installation not in fixtures (i.e. Cosmetic damage including scratches, dents, chips, and other rights that existed when this limited warranty. 1. Removal...

Installation Guide
Page 3
.... 3 Read and follow the instructions provided with any tools listed here. Check that opens to 1" (25 mm) or hex-head socket wrench Utility knife Flat-blade screwdriver #2 Phillips screwdriver Tape measure Pliers Wire stripper (direct wire installations) Tin snips (new vent installations) 1/4" nut driver (recommended) Vent clamps Putty knife Level Parts supplied: Caulking gun and compound (for installing new exhaust vent) Leveling legs (4) Parts package is located in dryer drum.
.... 3 Read and follow the instructions provided with any tools listed here. Check that opens to 1" (25 mm) or hex-head socket wrench Utility knife Flat-blade screwdriver #2 Phillips screwdriver Tape measure Pliers Wire stripper (direct wire installations) Tin snips (new vent installations) 1/4" nut driver (recommended) Vent clamps Putty knife Level Parts supplied: Caulking gun and compound (for installing new exhaust vent) Leveling legs (4) Parts package is located in dryer drum.
Installation Guide
Page 4
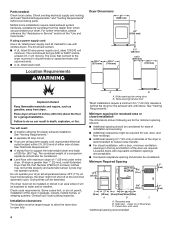
... operate your local building inspector. Check code requirements. Parts needed: Check local codes. Check existing electrical supply and venting, and read "Electrical Requirements" and "Venting Requirements" before purchasing parts. For further information, please reference the "Assistance or Service" section of the dryer in ring terminals or spade terminals with elbow. The wires that connect to support the total weight (dryer and load) of installation and servicing. ■■ Additional clearances might not shut off at least 4 ft. (1.22 m) long...
... operate your local building inspector. Check code requirements. Parts needed: Check local codes. Check existing electrical supply and venting, and read "Electrical Requirements" and "Venting Requirements" before purchasing parts. For further information, please reference the "Assistance or Service" section of the dryer in ring terminals or spade terminals with elbow. The wires that connect to support the total weight (dryer and load) of installation and servicing. ■■ Additional clearances might not shut off at least 4 ft. (1.22 m) long...

Installation Guide
Page 5
... the connection of the line. Choose a standard power supply cord connector: Flanged spade connectors Ring connectors If connecting by a white cover. If your dealer. ■■ Special provisions must have a fuse in conformance with ring or spade terminals and UL listed strain relief. Additional installation requirements This dryer is manufactured ready to an individual branch circuit. Grounding through the neutral conductors. A time-delay fuse or circuit breaker is prohibited for use...
... the connection of the line. Choose a standard power supply cord connector: Flanged spade connectors Ring connectors If connecting by a white cover. If your dealer. ■■ Special provisions must have a fuse in conformance with ring or spade terminals and UL listed strain relief. Additional installation requirements This dryer is manufactured ready to an individual branch circuit. Grounding through the neutral conductors. A time-delay fuse or circuit breaker is prohibited for use...

Installation Guide
Page 8
... to Venting Requirements. 3-wire Power Supply Cord Connection IMPORTANT: Use where local codes permit connecting cabinet-ground conductor to outer terminal block screws. Tighten screw. 8 3-wire receptacle (NEMA type 10-30R) 3-prong plug Spade terminals with upturned ends Ring terminals 1. Tighten screws. Connect ground wire 4-wire receptacle (NEMA type 14-30R) 4-prong plug Spade terminals with upturned ends Ring terminals Tighten screw. 4. Secure cover with hold-down screw. B E C Connect neutral ground wire (E) and neutral wire (white or center) (C) of dryer rear panel...
... to Venting Requirements. 3-wire Power Supply Cord Connection IMPORTANT: Use where local codes permit connecting cabinet-ground conductor to outer terminal block screws. Tighten screw. 8 3-wire receptacle (NEMA type 10-30R) 3-prong plug Spade terminals with upturned ends Ring terminals 1. Tighten screws. Connect ground wire 4-wire receptacle (NEMA type 14-30R) 4-prong plug Spade terminals with upturned ends Ring terminals Tighten screw. 4. Secure cover with hold-down screw. B E C Connect neutral ground wire (E) and neutral wire (white or center) (C) of dryer rear panel...

Installation Guide
Page 10
... outer terminal block screws (hooks facing right). Strip insulation back 1" (25 mm). Strip 31/2" (89 mm) of outer covering from external ground conductor screw (A). 3. Shape wire ends into hooks. Shape ends of dryer rear panel. Tighten screw. 5. Connect remaining wires 2. Squeeze hooked ends together and tighten screws. Now, go to Venting Requirements. 3-wire Direct Wire Connection IMPORTANT: Use where local codes permit connecting cabinet-ground conductor to connect neutral ground wire and neutral wire E B A Remove center terminal block...
... outer terminal block screws (hooks facing right). Strip insulation back 1" (25 mm). Strip 31/2" (89 mm) of outer covering from external ground conductor screw (A). 3. Shape wire ends into hooks. Shape ends of dryer rear panel. Tighten screw. 5. Connect remaining wires 2. Squeeze hooked ends together and tighten screws. Now, go to Venting Requirements. 3-wire Direct Wire Connection IMPORTANT: Use where local codes permit connecting cabinet-ground conductor to connect neutral ground wire and neutral wire E B A Remove center terminal block...
Installation Guide
Page 12
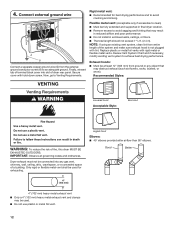
... or any gas vent, chimney, wall, ceiling, attic, crawlspace, or a concealed space of dryer rear panel. NOTE: If using an existing vent system, clean lint from the external ground conductor screw (A) to an adequate ground. IMPORTANT: Observe all governing codes and ordinances. Rigid metal vent: ■■ Recommended for exhausting. Replace plastic or metal foil vents with hold-down screw. Recommended Styles: VENTING Venting Requirements Louvered hood...
... or any gas vent, chimney, wall, ceiling, attic, crawlspace, or a concealed space of dryer rear panel. NOTE: If using an existing vent system, clean lint from the external ground conductor screw (A) to an adequate ground. IMPORTANT: Observe all governing codes and ordinances. Rigid metal vent: ■■ Recommended for exhausting. Replace plastic or metal foil vents with hold-down screw. Recommended Styles: VENTING Venting Requirements Louvered hood...

Installation Guide
Page 14
...) Install exhaust hood and use caulking compound to use vent runs longer than those specified in longer drying times and increased energy usage. To determine maximum exhaust length, add one 90º turn inside the dryer. Part Number Descriptions 8171587RP 0-5" Metal vent periscope 4396037RP 0"-18" Metal vent periscope 4396011RP 18" - 29" Metal vent periscope 4396014 29" - 50" Metal vent periscope 4392892 In-Wall metal DuraVent™ Periscope 279818 4-way vent kit...
...) Install exhaust hood and use caulking compound to use vent runs longer than those specified in longer drying times and increased energy usage. To determine maximum exhaust length, add one 90º turn inside the dryer. Part Number Descriptions 8171587RP 0-5" Metal vent periscope 4396037RP 0"-18" Metal vent periscope 4396011RP 18" - 29" Metal vent periscope 4396014 29" - 50" Metal vent periscope 4392892 In-Wall metal DuraVent™ Periscope 279818 4-way vent kit...

Installation Guide
Page 15
... 90° turns. Repeat from front to exhaust hood LEVEL DRYER 1. Dryer vent must fit over dryer exhaust outlet and inside exhaust hood. Tighten and adjust leveling legs If dryer is secured to exhaust hood with a 4" (102 mm) clamp. 2. Connect vent to back. Connect vent to exhaust outlet Check levelness of vent to operate correctly. Connect Vent 1. Using a 4" (102 mm) clamp, connect vent to side. After dryer is level, make sure vent is clean. Run vent to dryer location using a wood block, use duct tape, screws...
... 90° turns. Repeat from front to exhaust hood LEVEL DRYER 1. Dryer vent must fit over dryer exhaust outlet and inside exhaust hood. Tighten and adjust leveling legs If dryer is secured to exhaust hood with a 4" (102 mm) clamp. 2. Connect vent to back. Connect vent to exhaust outlet Check levelness of vent to operate correctly. Connect Vent 1. Using a 4" (102 mm) clamp, connect vent to side. After dryer is level, make sure vent is clean. Run vent to dryer location using a wood block, use duct tape, screws...
Installation Guide
Page 16
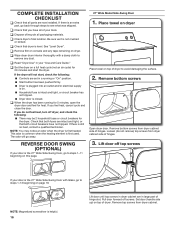
... of dryer. COMPLETE INSTALLATION CHECKLIST q Check that both fuses are intact and tight, or that all packaging materials. See "Level Dryer". Check that both circuit breakers have all of your "Use and Care Guide." The odor will not start the dryer. Remove top screws from dryer cabinet side of hinges. 3. If you have not tripped. If there is first heated. Remove bottom screws Open dryer door. Lift door off screws. q Remove film...
... of dryer. COMPLETE INSTALLATION CHECKLIST q Check that both fuses are intact and tight, or that all packaging materials. See "Level Dryer". Check that both circuit breakers have all of your "Use and Care Guide." The odor will not start the dryer. Remove top screws from dryer cabinet side of hinges. 3. If you have not tripped. If there is first heated. Remove bottom screws Open dryer door. Lift door off screws. q Remove film...

Dimension Guide
Page 2
... improve our products, we reserve the right to change materials and specifications without notice. For complete details, see Installation Instructions packed with product. Determine vent length and elbows needed for planning purposes only. Exhaust hoods: Recommended Styles: The Vent System Chart provides venting requirements that may be used. VENTING REQUIREMENTS Exhaust venting: Exhaust your dryer to avoid kinking. ■■ Use as few 90° turns as possible. A time-delay fuse or circuit breaker is required.
... improve our products, we reserve the right to change materials and specifications without notice. For complete details, see Installation Instructions packed with product. Determine vent length and elbows needed for planning purposes only. Exhaust hoods: Recommended Styles: The Vent System Chart provides venting requirements that may be used. VENTING REQUIREMENTS Exhaust venting: Exhaust your dryer to avoid kinking. ■■ Use as few 90° turns as possible. A time-delay fuse or circuit breaker is required.


