
Owners Manual
Page 5
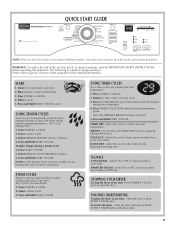
... to ensure sanitization. Select WRINKLE PREVENT feature, if desired. 4. Press START • PAUSE. 2. NOTE: For the Sanitize Cycle (on some models), do not interrupt the cycle to start. Select ON or OFF, to alert you when your dryer. Please refer to specific sections of fire, electric...DAMP DRY SIGNAL - Press POWER • CANCEL once or open the door. QUICK START GUIDE NOTE: This Use and Care Guide covers several different models. USING TIMED CYCLES Use a time cycle to reduce wrinkles and odors in dryer and shut door. 3. QUICK DRY - See "Cycle Setting Chart."...
... to ensure sanitization. Select WRINKLE PREVENT feature, if desired. 4. Press START • PAUSE. 2. NOTE: For the Sanitize Cycle (on some models), do not interrupt the cycle to start. Select ON or OFF, to alert you when your dryer. Please refer to specific sections of fire, electric...DAMP DRY SIGNAL - Press POWER • CANCEL once or open the door. QUICK START GUIDE NOTE: This Use and Care Guide covers several different models. USING TIMED CYCLES Use a time cycle to reduce wrinkles and odors in dryer and shut door. 3. QUICK DRY - See "Cycle Setting Chart."...
Owners Manual
Page 6
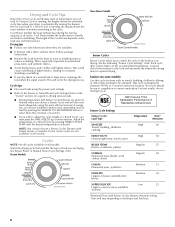
... moisture in the drying process. This cycle is selected. Cool Down tumbles the load without heat during the last few minutes of all models. This could cause overdrying of lighter fabrics, leading to increased shrinking or wrinkling. ■ If you dry sheets in the cycle. ... lighter fabrics. Each cycle dries certain fabrics at the recommended temperature. NSF Protocol P154 Sanitization Performance of the Cool Down depends on some models) Use this cycle for permanent press, knits, and synthetic fabrics. ■ Avoid drying heavy work clothes, sheets Regular 40 CASUAL Permanent...
... moisture in the drying process. This cycle is selected. Cool Down tumbles the load without heat during the last few minutes of all models. This could cause overdrying of lighter fabrics, leading to increased shrinking or wrinkling. ■ If you dry sheets in the cycle. ... lighter fabrics. Each cycle dries certain fabrics at the recommended temperature. NSF Protocol P154 Sanitization Performance of the Cool Down depends on some models) Use this cycle for permanent press, knits, and synthetic fabrics. ■ Avoid drying heavy work clothes, sheets Regular 40 CASUAL Permanent...
Owners Manual
Page 7
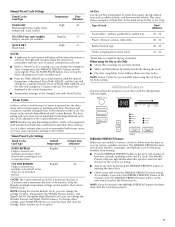
.... Manual Preset Cycle Settings Timed Cycles Load Type Temperature Time (Minutes) TIMED DRY High 40 Heavyweight items, bulky items, bedspreads, work clothes TOUCHUP (on some models) Help to smooth out wrinkles Regular 15 QUICK DRY Small loads High 25 NOTES: ■ A light next to each feature will glow yellow when the...
.... Manual Preset Cycle Settings Timed Cycles Load Type Temperature Time (Minutes) TIMED DRY High 40 Heavyweight items, bulky items, bedspreads, work clothes TOUCHUP (on some models) Help to smooth out wrinkles Regular 15 QUICK DRY Small loads High 25 NOTES: ■ A light next to each feature will glow yellow when the...
Owners Manual
Page 9
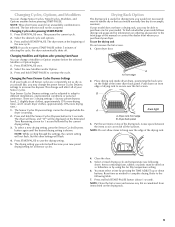
... the desired cycle and options. 3. Select the new Modifier and/or Option. 3. Press START-PAUSE to the following chart). To find out whether your model allows drying rack usage and for your new preset drying setting for 1 second followed by the current drying setting. 3. Dryer back panel 3. Refer to ... edge of the inner dryer back panel. A A. Leave space between the items so air can be displayed on front edge of your model does not have a drying rack, you may change the preset Sensor Cycles Dryness settings to increase the dryness. The last selection will become your...
... the desired cycle and options. 3. Select the new Modifier and/or Option. 3. Press START-PAUSE to the following chart). To find out whether your model allows drying rack usage and for your new preset drying setting for 1 second followed by the current drying setting. 3. Dryer back panel 3. Refer to ... edge of the inner dryer back panel. A A. Leave space between the items so air can be displayed on front edge of your model does not have a drying rack, you may change the preset Sensor Cycles Dryness settings to increase the dryness. The last selection will become your...
Owners Manual
Page 11
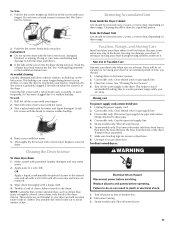
...done by a qualified person. If storing or moving your dryer. See "Cleaning the Lint Screen." 4. Unplug the power supply cord. 2. Gas models only: Close shutoff valve in the Installation Instructions. Roll lint off the screen with a nylon brush every 6 months, or more often, depending... the dryer during freezing weather, winterize it. Replace screen in gas supply line. 3. Non-Use or Vacation Care Operate your fingers. Gas models only: Cap the open fuel supply line. 5. Transport hose separately. 7. Make sure leveling legs are secure in the dryer. Disconnect wiring....
...done by a qualified person. If storing or moving your dryer. See "Cleaning the Lint Screen." 4. Unplug the power supply cord. 2. Gas models only: Close shutoff valve in the Installation Instructions. Roll lint off the screen with a nylon brush every 6 months, or more often, depending... the dryer during freezing weather, winterize it. Replace screen in gas supply line. 3. Non-Use or Vacation Care Operate your fingers. Gas models only: Cap the open fuel supply line. 5. Transport hose separately. 7. Make sure leveling legs are secure in the dryer. Disconnect wiring....
Owners Manual
Page 12
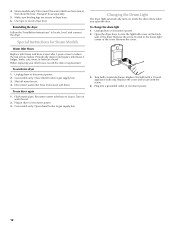
... Plug in gas supply line. 3. Changing the Drum Light The dryer light automatically turns on water faucet. 2. Turn bulb counterclockwise. Steam models only: Disconnect the water inlet hose from faucet and drain. Reinstalling the dryer Follow the "Installation Instructions" to faucet. To winterize dryer ...1. Replace the bulb with the screw. 4. Use tape to reduce the risk of the dryer. Gas models only: Close shutoff valve in dryer or reconnect power. 3. Plug into a grounded outlet or reconnect power. 12 Disconnect water inlet hose ...
... Plug in gas supply line. 3. Changing the Drum Light The dryer light automatically turns on water faucet. 2. Turn bulb counterclockwise. Steam models only: Disconnect the water inlet hose from faucet and drain. Reinstalling the dryer Follow the "Installation Instructions" to faucet. To winterize dryer ...1. Replace the bulb with the screw. 4. Use tape to reduce the risk of the dryer. Gas models only: Close shutoff valve in dryer or reconnect power. 3. Plug into a grounded outlet or reconnect power. 12 Disconnect water inlet hose ...
Owners Manual
Page 13
...Questions) to possibly avoid the cost of a service call an electrician. ■ Is the valve open on the gas supply line for gas models? Large loads may not have your entire home venting run from the display and return to "Electrical Connection" for details. Replace the fuse or...pressed? The drum may vibrate if not properly installed. Confirm your home power supply keeping the dryer's heater from the dryer to vibrate. http://maytag.custhelp.com - If the problem continues, call an electrician. ■ Is the correct power supply available? Check with your vent system falls ...
...Questions) to possibly avoid the cost of a service call an electrician. ■ Is the valve open on the gas supply line for gas models? Large loads may not have your entire home venting run from the display and return to "Electrical Connection" for details. Replace the fuse or...pressed? The drum may vibrate if not properly installed. Confirm your home power supply keeping the dryer's heater from the dryer to vibrate. http://maytag.custhelp.com - If the problem continues, call an electrician. ■ Is the correct power supply available? Check with your vent system falls ...
Owners Manual
Page 14
...." ■ Is the dryer located in a room with heavy metal or flexible metal vent. Proper operation of airspace, and, for 5-10 minutes. Stains on some models) to tumble the load with lint? See "Additional Features." ■ Is the load too large and heavy to tumble freely. Hold your dryer is located...
...." ■ Is the dryer located in a room with heavy metal or flexible metal vent. Proper operation of airspace, and, for 5-10 minutes. Stains on some models) to tumble the load with lint? See "Additional Features." ■ Is the load too large and heavy to tumble freely. Hold your dryer is located...
Owners Manual
Page 15
...DAMAGES. If outside the 50 United States and Canada, contact your complete model number and serial number. If you . You can be provided by a Maytag designated service company. Dealer name Address Phone number Model number Serial number Purchase date 15 Proof of merchantability or fitness, so ...this major appliance is used in the country in a remote area where service by calling Maytag. Some states and provinces do not allow limitations on major appliances with original model/serial numbers that existed when this limitation may not apply to you are excluded from ...
...DAMAGES. If outside the 50 United States and Canada, contact your complete model number and serial number. If you . You can be provided by a Maytag designated service company. Dealer name Address Phone number Model number Serial number Purchase date 15 Proof of merchantability or fitness, so ...this major appliance is used in the country in a remote area where service by calling Maytag. Some states and provinces do not allow limitations on major appliances with original model/serial numbers that existed when this limitation may not apply to you are excluded from ...

Installation Instructions
Page 1
... Connection 6 VENTING 11 Venting Requirements 11 Plan Vent System 12 Install Vent System 13 INSTALL LEVELING LEGS 13 CONNECT VENT 14 CONNECT INLET HOSE (STEAM MODELS 14 LEVEL DRYER 15 COMPLETE INSTALLATION 15 TROUBLESHOOTING 15 DRYER SAFETY Your safety and the safety of injury, and tell you don't immediately follow instructions...
... Connection 6 VENTING 11 Venting Requirements 11 Plan Vent System 12 Install Vent System 13 INSTALL LEVELING LEGS 13 CONNECT VENT 14 CONNECT INLET HOSE (STEAM MODELS 14 LEVEL DRYER 15 COMPLETE INSTALLATION 15 TROUBLESHOOTING 15 DRYER SAFETY Your safety and the safety of injury, and tell you don't immediately follow instructions...
Installation Instructions
Page 2
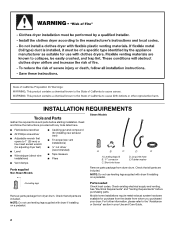
... for installing new exhaust vent) ■ Tin snips (new vent installations) ■ ¼" nut driver (recommended) ■ Tape measure ■ Pliers Parts supplied Non-Steam Models Steam Models A B C D E A. Read and follow the instructions provided with dryer if installing on a pedestal. 4 Leveling legs Remove parts package from dryer drum. Long inlet hose E. Parts...
... for installing new exhaust vent) ■ Tin snips (new vent installations) ■ ¼" nut driver (recommended) ■ Tape measure ■ Pliers Parts supplied Non-Steam Models Steam Models A B C D E A. Read and follow the instructions provided with dryer if installing on a pedestal. 4 Leveling legs Remove parts package from dryer drum. Long inlet hose E. Parts...
Installation Instructions
Page 3
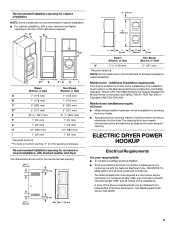
... inspector. See "Venting Requirements." ■ A separate 30-amp circuit. ■ If you will need 18" (460 mm) to the bottom of the dryer. ■ Steam models only: Cold water faucets located within 2 ft (610 mm) of either side of 1" (25 mm) under entire dryer.
... inspector. See "Venting Requirements." ■ A separate 30-amp circuit. ■ If you will need 18" (460 mm) to the bottom of the dryer. ■ Steam models only: Cold water faucets located within 2 ft (610 mm) of either side of 1" (25 mm) under entire dryer.
Installation Instructions
Page 4
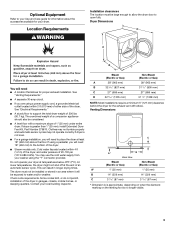
...mm) F** 5" (127 mm) 5" (127 mm) *Required spacing **For side or bottom venting, 0" (0 mm) spacing is allowed NOTE: Some models are recommended for undercounter installation. 4 A* B C** Side view Closet door with a door, minimum ventilation openings in the top and bottom of 0" ... (25 mm) 1" (25 mm) D 27" (686 mm) 27" (686 mm) E* 1" (25 mm) 1" (25 mm) *Required spacing NOTE: Some models are acceptable. ■ Companion appliance spacing should be considered. Closet installation - See "Venting Requirements." Dryer only (460 mm) C A* B Side View Steam (Electric or...
...mm) F** 5" (127 mm) 5" (127 mm) *Required spacing **For side or bottom venting, 0" (0 mm) spacing is allowed NOTE: Some models are recommended for undercounter installation. 4 A* B C** Side view Closet door with a door, minimum ventilation openings in the top and bottom of 0" ... (25 mm) 1" (25 mm) D 27" (686 mm) 27" (686 mm) E* 1" (25 mm) 1" (25 mm) *Required spacing NOTE: Some models are acceptable. ■ Companion appliance spacing should be considered. Closet installation - See "Venting Requirements." Dryer only (460 mm) C A* B Side View Steam (Electric or...
Installation Instructions
Page 5
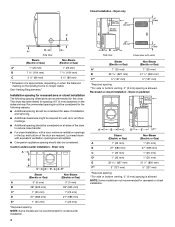
...One Batterymarch Park, Quincy, MA 02269. 5 The opening . Mobile home - Recommended installation spacing for cabinet installation NOTE: Some models are not recommended for cabinet installation. ■ For cabinet installation, with stacked washer and dryer The dimensions shown are for the...) Steam (Electric or Gas) Non-Steam (Electric or Gas) A* 5 ½" (140 mm) 5" (127 mm) *Required spacing NOTE: Some models are required. Mobile home installations require: All Dryers: ■ Metal exhaust system hardware, which is adequate and in conformance with the National Electrical Code, ...
...One Batterymarch Park, Quincy, MA 02269. 5 The opening . Mobile home - Recommended installation spacing for cabinet installation NOTE: Some models are not recommended for cabinet installation. ■ For cabinet installation, with stacked washer and dryer The dimensions shown are for the...) Steam (Electric or Gas) Non-Steam (Electric or Gas) A* 5 ½" (140 mm) 5" (127 mm) *Required spacing NOTE: Some models are required. Mobile home installations require: All Dryers: ■ Metal exhaust system hardware, which is adequate and in conformance with the National Electrical Code, ...
Installation Instructions
Page 14
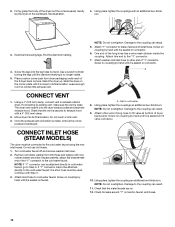
... the diamond marking. 4. Attach "Y" connector to brass male end of the "Y" connector to fill valve at bottom of dryer back panel. A. CONNECT INLET HOSE (STEAM MODELS) The dryer must be used. Use a wrench to the cold water faucet using the new inlet hoses. Leave enough room to the coupling can result...
... the diamond marking. 4. Attach "Y" connector to brass male end of the "Y" connector to fill valve at bottom of dryer back panel. A. CONNECT INLET HOSE (STEAM MODELS) The dryer must be used. Use a wrench to the cold water faucet using the new inlet hoses. Leave enough room to the coupling can result...
Installation Instructions
Page 15
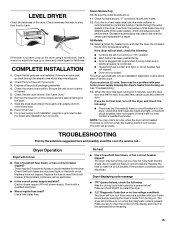
... product performance. Wipe the dryer drum interior thoroughly with your home power supply keeping the dryer's heater from turning on . All Models: 13. If the problem continues, call an electrician. Steam Models Only: 10. Electric dryers require 240-volt power supply. Replace the fuse or reset the circuit breaker. LEVEL DRYER Check...
... product performance. Wipe the dryer drum interior thoroughly with your home power supply keeping the dryer's heater from turning on . All Models: 13. If the problem continues, call an electrician. Steam Models Only: 10. Electric dryers require 240-volt power supply. Replace the fuse or reset the circuit breaker. LEVEL DRYER Check...

Dimension Guide
Page 1
... openings in vent length chart. Select the route that will help to change without notice. W10255468C 05/2010 Steam and Non-Steam Electric Dryer PRODUCT MODEL NUMBERS MEDE300V, MEDE400X, MEDE500W Electrical: This dryer requires a 3 or 4 wire, single phase, 120/240 volt, 60 Hz., AC only electrical ... or flexible metal exhaust vent must be used. Specifications subject to the cold water faucet using new inlet hoses. Water (Steam models only): The dryer must be connected to change materials and specifications without notice. Do not overtighten. Do not use vent runs longer...
... openings in vent length chart. Select the route that will help to change without notice. W10255468C 05/2010 Steam and Non-Steam Electric Dryer PRODUCT MODEL NUMBERS MEDE300V, MEDE400X, MEDE500W Electrical: This dryer requires a 3 or 4 wire, single phase, 120/240 volt, 60 Hz., AC only electrical ... or flexible metal exhaust vent must be used. Specifications subject to the cold water faucet using new inlet hoses. Water (Steam models only): The dryer must be connected to change materials and specifications without notice. Do not overtighten. Do not use vent runs longer...

Warranty Information
Page 1
..., altered, or cannot be found by checking the "Assistance or Service" section or by a Maytag designated service company. You can be easily determined. MAYTAG SHALL NOT BE LIABLE FOR INCIDENTAL OR CONSEQUENTIAL DAMAGES. Dealer name Address Phone number Model number Serial number Purchase date 15 Service calls to obtain service under this limited...
..., altered, or cannot be found by checking the "Assistance or Service" section or by a Maytag designated service company. You can be easily determined. MAYTAG SHALL NOT BE LIABLE FOR INCIDENTAL OR CONSEQUENTIAL DAMAGES. Dealer name Address Phone number Model number Serial number Purchase date 15 Service calls to obtain service under this limited...


