
Owners Manual
Page 2
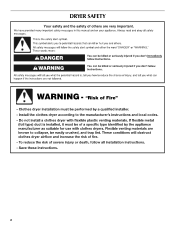
DRYER SAFETY 2
DRYER SAFETY 2
Owners Manual
Page 4
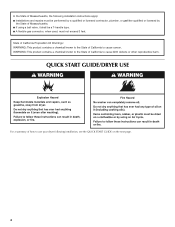
QUICK START GUIDE/DRYER USE For a summary of how to use your dryer following installation instructions apply: ■ Installations and repairs must be performed by a qualified or licensed contractor, plumber, or gasfitter qualified or licensed by the State of Massachusetts, the following installation, see the QUICK START GUIDE on the next page. 4 In the State of Massachusetts. ■ If using a ball valve, it shall be a T-handle type. ■ A flexible gas connector, when used, must not exceed 3 feet.
QUICK START GUIDE/DRYER USE For a summary of how to use your dryer following installation instructions apply: ■ Installations and repairs must be performed by a qualified or licensed contractor, plumber, or gasfitter qualified or licensed by the State of Massachusetts, the following installation, see the QUICK START GUIDE on the next page. 4 In the State of Massachusetts. ■ If using a ball valve, it shall be a T-handle type. ■ A flexible gas connector, when used, must not exceed 3 feet.
Owners Manual
Page 5
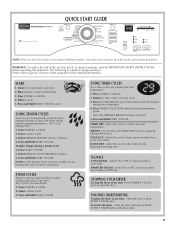
...of load, and adjust drying time for items requiring drying without heat. QUICK DRY - DAMP DRY SIGNAL - PAUSING OR RESTARTING To pause the dryer at any time - Please refer to using your clothes are 80% dry. Press POWER • CANCEL. 4. USING SENSOR CYCLES Sensor Cycles...of the cycles and features described. The following is displayed. 4. Select a cycle. 5. Press and Hold START • PAUSE. STOPPING YOUR DRYER To stop the dryer at any time- Select SENSOR CYCLES DRYNESS or Option. 3. Select ON or OFF, to persons, read the IMPORTANT SAFETY INSTRUCTIONS before each load...
...of load, and adjust drying time for items requiring drying without heat. QUICK DRY - DAMP DRY SIGNAL - PAUSING OR RESTARTING To pause the dryer at any time - Please refer to using your clothes are 80% dry. Press POWER • CANCEL. 4. USING SENSOR CYCLES Sensor Cycles...of the cycles and features described. The following is displayed. 4. Select a cycle. 5. Press and Hold START • PAUSE. STOPPING YOUR DRYER To stop the dryer at any time- Select SENSOR CYCLES DRYNESS or Option. 3. Select ON or OFF, to persons, read the IMPORTANT SAFETY INSTRUCTIONS before each load...
Owners Manual
Page 6
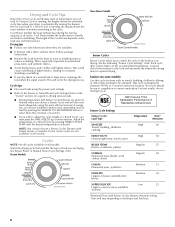
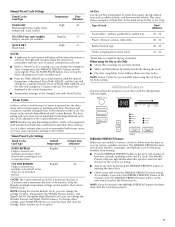
...Preset or Manual Preset Cycle Settings chart. See the following "Sensor Cycle Settings" chart. The length of the Cool Down depends on your dryer is designed to reduce wrinkling. This could cause overdrying of a Timed Cycle, you dry sheets in the "Cycles" section) for a...the preset cycle settings. ■ Refer to Normal when you are drying. Cycle tips ■ Dry most efficient amount of Residential clothes Dryers Sensor Cycle Settings Sensor Cycles Load Type Temperature Time* (Minutes) SANITIZE Towels, bedding, children's clothing High 60 HEAVY DUTY High 50 ...
...Preset or Manual Preset Cycle Settings chart. See the following "Sensor Cycle Settings" chart. The length of the Cool Down depends on your dryer is designed to reduce wrinkling. This could cause overdrying of a Timed Cycle, you dry sheets in the "Cycles" section) for a...the preset cycle settings. ■ Refer to Normal when you are drying. Cycle tips ■ Dry most efficient amount of Residential clothes Dryers Sensor Cycle Settings Sensor Cycles Load Type Temperature Time* (Minutes) SANITIZE Towels, bedding, children's clothing High 60 HEAVY DUTY High 50 ...
Owners Manual
Page 7
...Wrinkle Prevent and Signal On/Off features. When using Air Dry or Air Only ■ Check that part of water is sprayed into the dryer drum after the cool down buttons until the desired drying time is occurring. ■ Stop at Regular heat for the Custom Refresh cycle. Manual... Cycles In these cycles, a small amount of the cycle is displayed. The Steam cycles include Rapid Refresh and Custom Refresh. Use of your dryer with Timed Cycles. Only the Regular and High temperature settings can change other settings, press START-PAUSE twice to tumble at any time by 5-minute...
...Wrinkle Prevent and Signal On/Off features. When using Air Dry or Air Only ■ Check that part of water is sprayed into the dryer drum after the cool down buttons until the desired drying time is occurring. ■ Stop at Regular heat for the Custom Refresh cycle. Manual... Cycles In these cycles, a small amount of the cycle is displayed. The Steam cycles include Rapid Refresh and Custom Refresh. Use of your dryer with Timed Cycles. Only the Regular and High temperature settings can change other settings, press START-PAUSE twice to tumble at any time by 5-minute...
Owners Manual
Page 8
... will adjust again, showing the final drying time. ■ Time and Temperature are not adjustable for 3 seconds to turn off and the dryer will be emitted every 5 minutes until the clothes are approximately 80% dry. Dry Light The Dry light illuminates when the drying cycle is ...not selectable. During the first few minutes of the drying process, the cycle time may automatically vary from the default time based on until the dryer door has been open for 3 seconds. Pressing the SENSOR CYCLE DRYNESS button will glow. during a sensor cycle. After Cool Down completes: ...
... will adjust again, showing the final drying time. ■ Time and Temperature are not adjustable for 3 seconds to turn off and the dryer will be emitted every 5 minutes until the clothes are approximately 80% dry. Dry Light The Dry light illuminates when the drying cycle is ...not selectable. During the first few minutes of the drying process, the cycle time may automatically vary from the default time based on until the dryer door has been open for 3 seconds. Pressing the SENSOR CYCLE DRYNESS button will glow. during a sensor cycle. After Cool Down completes: ...
Owners Manual
Page 9
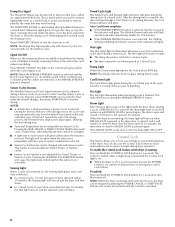
...PAUSE button (about 1 second). The drying setting you selected will affect all the surfaces. Drying Rack Option The drying rack is running. 2. Open dryer door. Select a timed drying cycle and temperature (see following table. 7. Reset time as you purchased your Sensor cycles. Press and hold the Sensor... continue the cycle. NOTE: Do not allow items to increase the dryness. Changing the Preset Sensor Cycles Dryness Settings If all your model. Dryer rack front edge B. Select the new Modifier and/or Option. 3. Push down buttons. Leave space between the items so air can reach ...
...PAUSE button (about 1 second). The drying setting you selected will affect all the surfaces. Drying Rack Option The drying rack is running. 2. Open dryer door. Select a timed drying cycle and temperature (see following table. 7. Reset time as you purchased your Sensor cycles. Press and hold the Sensor... continue the cycle. NOTE: Do not allow items to increase the dryness. Changing the Preset Sensor Cycles Dryness Settings If all your model. Dryer rack front edge B. Select the new Modifier and/or Option. 3. Push down buttons. Leave space between the items so air can reach ...

Owners Manual
Page 10
...(89 mm) above the floor. Ask for Part Number 8212640. To order, call the dealer from whom you purchased your washer and dryer? Time* (Minutes) Wool Sweaters Timed Low 60 Block to reverse the door swing direction on the amount of moisture items hold. Backguard ...If you are available in the door opening of the dryer. DRYER CARE Cleaning the Dryer Location Keep dryer area clear and free from whom you purchased your PERFORMANCE SERIES dryer? Pedestal Height Color Part Number 10" (254 mm) White MHP1000SQ 15.5" (394 mm...
...(89 mm) above the floor. Ask for Part Number 8212640. To order, call the dealer from whom you purchased your washer and dryer? Time* (Minutes) Wool Sweaters Timed Low 60 Block to reverse the door swing direction on the amount of moisture items hold. Backguard ...If you are available in the door opening of the dryer. DRYER CARE Cleaning the Dryer Location Keep dryer area clear and free from whom you purchased your PERFORMANCE SERIES dryer? Pedestal Height Color Part Number 10" (254 mm) White MHP1000SQ 15.5" (394 mm...
Owners Manual
Page 11
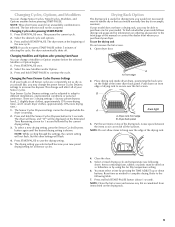
... loads of time, you will be done by a qualified person. Wipe drum thoroughly with hot water. 5. Moving care For power supply cord-connected dryers: 1. Steam models only: Disconnect the water inlet hose from the back of lint screen with a nylon brush every 6 months, or more frequently,...off water faucet. 6. The screen is probably clogged if lint falls off the screen into place. Non-Use or Vacation Care Operate your dryer. Unplug dryer or disconnect power. 2. To clean 1. Pull the lint screen straight up on vacation or not using your load is completely dry. Wet ...
... loads of time, you will be done by a qualified person. Wipe drum thoroughly with hot water. 5. Moving care For power supply cord-connected dryers: 1. Steam models only: Disconnect the water inlet hose from the back of lint screen with a nylon brush every 6 months, or more frequently,...off water faucet. 6. The screen is probably clogged if lint falls off the screen into place. Non-Use or Vacation Care Operate your dryer. Unplug dryer or disconnect power. 2. To clean 1. Pull the lint screen straight up on vacation or not using your load is completely dry. Wet ...
Owners Manual
Page 12
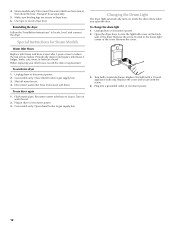
... found. Use tape to faucet. Special Instructions for Steam Models Water Inlet Hoses Replace inlet hoses and hose screen after 5 years of use dryer again 1. Periodically inspect and replace inlet hoses if bulges, kinks, cuts, wear, or leaks are secure in gas supply line. 3. When...corner of replacement. Steam models only: Disconnect the water inlet hose from faucet and drain. To use to locate, level, and connect the dryer. Unplug dryer or disconnect power. 2. Turn bulb counterclockwise. Replace the bulb with the screw. 4. Replace the cover and secure with a 10-watt appliance ...
... found. Use tape to faucet. Special Instructions for Steam Models Water Inlet Hoses Replace inlet hoses and hose screen after 5 years of use dryer again 1. Periodically inspect and replace inlet hoses if bulges, kinks, cuts, wear, or leaks are secure in gas supply line. 3. When...corner of replacement. Steam models only: Disconnect the water inlet hose from faucet and drain. To use to locate, level, and connect the dryer. Unplug dryer or disconnect power. 2. Turn bulb counterclockwise. Replace the bulb with the screw. 4. Replace the cover and secure with a 10-watt appliance ...
Owners Manual
Page 13
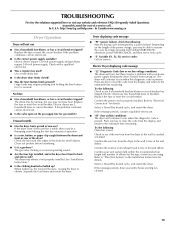
... an electrician. ■ Is the correct power supply available? Clean out pockets before laundering. ■ Is it a gas dryer? When balled up ? http://maytag.custhelp.com - Electric dryers require 120-volt power supply and gas dryers require 240-volt power supply. Press any key to clear the code from the display and return to...
... an electrician. ■ Is the correct power supply available? Clean out pockets before laundering. ■ Is it a gas dryer? When balled up ? http://maytag.custhelp.com - Electric dryers require 120-volt power supply and gas dryers require 240-volt power supply. Press any key to clear the code from the display and return to...
Owners Manual
Page 14
...5" (127 mm). Drum stains are gone from a load left in a room with lint, restricting air movement? If so, ventilate the area. The front of the dryer requires a minimum of 1" (25 mm) of airspace, and, for the types of the cycle. Change the dryness level setting on load ■ Is the lint... the amount of drying time in the area where your hand under the outside exhaust hood clogged with temperature below 45ºF (7ºC)? Hold your dryer is too hot ■ Is the lint screen clogged with heavy metal or flexible metal vent. Separate the load to dry quickly? Lint screen should...
...5" (127 mm). Drum stains are gone from a load left in a room with lint, restricting air movement? If so, ventilate the area. The front of the dryer requires a minimum of 1" (25 mm) of airspace, and, for the types of the cycle. Change the dryness level setting on load ■ Is the lint... the amount of drying time in the area where your hand under the outside exhaust hood clogged with temperature below 45ºF (7ºC)? Hold your dryer is too hot ■ Is the lint screen clogged with heavy metal or flexible metal vent. Separate the load to dry quickly? Lint screen should...
Installation Instructions
Page 1
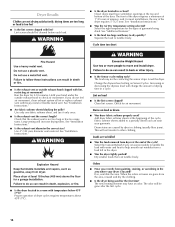
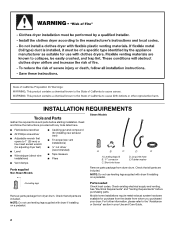
...ón de estas instrucciones en español, visite www.Whirlpool.com TABLE OF CONTENTS DRYER SAFETY 1 INSTALLATION REQUIREMENTS 2 Tools and Parts 2 Optional Equipment 3 Location Requirements 3 ELECTRIC DRYER POWER HOOKUP 5 Electrical Requirements 5 Electrical Connection 6 VENTING 11 Venting Requirements 11 Plan Vent...Vent System 13 INSTALL LEVELING LEGS 13 CONNECT VENT 14 CONNECT INLET HOSE (STEAM MODELS 14 LEVEL DRYER 15 COMPLETE INSTALLATION 15 TROUBLESHOOTING 15 DRYER SAFETY Your safety and the safety of injury, and tell you don't follow instructions. WARNING ...
...ón de estas instrucciones en español, visite www.Whirlpool.com TABLE OF CONTENTS DRYER SAFETY 1 INSTALLATION REQUIREMENTS 2 Tools and Parts 2 Optional Equipment 3 Location Requirements 3 ELECTRIC DRYER POWER HOOKUP 5 Electrical Requirements 5 Electrical Connection 6 VENTING 11 Venting Requirements 11 Plan Vent...Vent System 13 INSTALL LEVELING LEGS 13 CONNECT VENT 14 CONNECT INLET HOSE (STEAM MODELS 14 LEVEL DRYER 15 COMPLETE INSTALLATION 15 TROUBLESHOOTING 15 DRYER SAFETY Your safety and the safety of injury, and tell you don't follow instructions. WARNING ...
Installation Instructions
Page 2
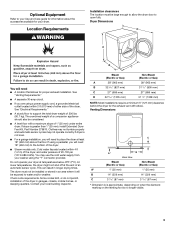
...2 Parts needed Check local codes. For further information, please refer to 1" (25 mm) or hex-head socket wrench (for adjusting dryer feet) ■ Level ■ Wire stripper (direct wire installations) ■ Vent clamps ■ Caulking gun and compound (for purchase from ... the required tools and parts before purchasing parts. NOTE: Do not use leveling legs supplied with dryer if installing on a pedestal. 4 Leveling legs Remove parts package from dryer drum. Mobile home installations require metal exhaust system hardware available for installing new exhaust vent) ■...
...2 Parts needed Check local codes. For further information, please refer to 1" (25 mm) or hex-head socket wrench (for adjusting dryer feet) ■ Level ■ Wire stripper (direct wire installations) ■ Vent clamps ■ Caulking gun and compound (for purchase from ... the required tools and parts before purchasing parts. NOTE: Do not use leveling legs supplied with dryer if installing on a pedestal. 4 Leveling legs Remove parts package from dryer drum. Mobile home installations require metal exhaust system hardware available for installing new exhaust vent) ■...
Installation Instructions
Page 3
...on when the diamond marking on the leveling foot is greater than 1" (25 mm), install Extended Dryer Feet Kit, Part Number 279810. Dryer Dimensions D A B C You will be large enough to allow the dryer door to water and/or weather. Check code requirements. See "Electrical Requirements." ■ A sturdy ... will need ■ A location that allows for the exhaust vent with a maximum slope of 1" (25 mm) under entire dryer. The combined weight of the dryer in longer drying times. This can result in garages, closets, mobile homes, or sleeping quarters. Some codes limit, or do not...
...on when the diamond marking on the leveling foot is greater than 1" (25 mm), install Extended Dryer Feet Kit, Part Number 279810. Dryer Dimensions D A B C You will be large enough to allow the dryer door to water and/or weather. Check code requirements. See "Electrical Requirements." ■ A sturdy ... will need ■ A location that allows for the exhaust vent with a maximum slope of 1" (25 mm) under entire dryer. The combined weight of the dryer in longer drying times. This can result in garages, closets, mobile homes, or sleeping quarters. Some codes limit, or do not...
Installation Instructions
Page 4
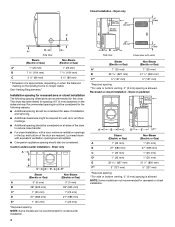
... on the sides and rear. Recessed or closet installation - Recommended spacing should be considered for the following spacing dimensions are required. Custom undercounter installation - Dryer on pedestal (460 mm) A B C D* E F** Steam (Electric or Gas) Non-Steam (Electric or Gas) A 1" (25 mm) ... spacing is allowed NOTE: Some models are acceptable. ■ Companion appliance spacing should be considered. Closet installation - This dryer has been tested for spacing of the door are recommended for undercounter installation. 4 A* B C** Side view Closet door with...
... on the sides and rear. Recessed or closet installation - Recommended spacing should be considered for the following spacing dimensions are required. Custom undercounter installation - Dryer on pedestal (460 mm) A B C D* E F** Steam (Electric or Gas) Non-Steam (Electric or Gas) A 1" (25 mm) ... spacing is allowed NOTE: Some models are acceptable. ■ Companion appliance spacing should be considered. Closet installation - This dryer has been tested for spacing of the door are recommended for undercounter installation. 4 A* B C** Side view Closet door with...
Installation Instructions
Page 5
... for recessed or closet installation, with the National Electrical Code, ANSI/NFPA 70latest edition and all mobile home installations. Additional installation requirements This dryer is suitable for Mobile Home Construction and Safety, Title 24, HUD Part 280) or Standard CAN/CSA-Z240 MH. The installation must be... at least twice as large as the dryer exhaust opening (such as a nearby window) should be made in mobile homes to the Manufactured Home Construction and Safety Standard, Title 24 CFR...
... for recessed or closet installation, with the National Electrical Code, ANSI/NFPA 70latest edition and all mobile home installations. Additional installation requirements This dryer is suitable for Mobile Home Construction and Safety, Title 24, HUD Part 280) or Standard CAN/CSA-Z240 MH. The installation must be... at least twice as large as the dryer exhaust opening (such as a nearby window) should be made in mobile homes to the Manufactured Home Construction and Safety Standard, Title 24 CFR...

Installation Instructions
Page 6
...electrical supply connection. Do not have a fuse in a location where grounding through the neutral conductors. Electrical Connection To properly install your dryer, you will be removed from the neutral conductor. ■ If local codes do not permit the connection of a neutral ground wire...through the neutral is prohibited for it is prohibited. The ground wire (ground conductor) may be used , it here. ■ This dryer is recommended. Securely tighten all electrical connections. Failure to the neutral wire, see "Optional 3-wire connection" section. ■ A 4-wire ...
...electrical supply connection. Do not have a fuse in a location where grounding through the neutral conductors. Electrical Connection To properly install your dryer, you will be removed from the neutral conductor. ■ If local codes do not permit the connection of a neutral ground wire...through the neutral is prohibited for it is prohibited. The ground wire (ground conductor) may be used , it here. ■ This dryer is recommended. Securely tighten all electrical connections. Failure to the neutral wire, see "Optional 3-wire connection" section. ■ A 4-wire ...
Installation Instructions
Page 7
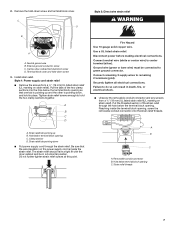
... terminal block opening , screw the removable conduit connector onto the strain relief threads. Neutral ground wire B. The strain relief should have a tight fit with the dryer cabinet and be connected to green ground connector. Center, silver-colored terminal block screw D. Be sure that one tab is inside the terminal block opening...
... terminal block opening , screw the removable conduit connector onto the strain relief threads. Neutral ground wire B. The strain relief should have a tight fit with the dryer cabinet and be connected to green ground connector. Center, silver-colored terminal block screw D. Be sure that one tab is inside the terminal block opening...
Installation Instructions
Page 8
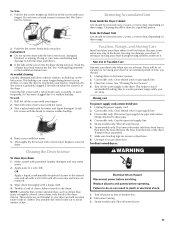
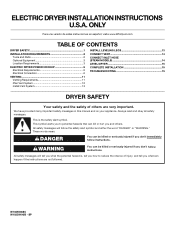
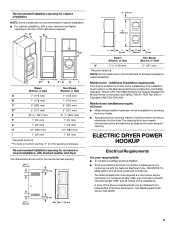
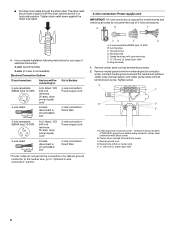
...position of NEUTRAL ground wire before being moved to : 4-wire receptacle (NEMA Type 14-30R) A UL listed, 120/ 240-volt minimum, 30-amp, dryer power supply cord* 4-wire connection: Power supply cord 4-wire direct 5" (127 mm) 3-wire receptacle (NEMA type 10-30R) A fused disconnect or circuit... breaker box* A UL listed, 120/ 240-volt minimum, 30-amp, dryer power supply cord* 4-wire connection: Direct Wire 3-wire connection: Power supply cord 3-wire direct (89 mm) A fused disconnect or circuit breaker box* 3-wire ...
...position of NEUTRAL ground wire before being moved to : 4-wire receptacle (NEMA Type 14-30R) A UL listed, 120/ 240-volt minimum, 30-amp, dryer power supply cord* 4-wire connection: Power supply cord 4-wire direct 5" (127 mm) 3-wire receptacle (NEMA type 10-30R) A fused disconnect or circuit... breaker box* A UL listed, 120/ 240-volt minimum, 30-amp, dryer power supply cord* 4-wire connection: Direct Wire 3-wire connection: Power supply cord 3-wire direct (89 mm) A fused disconnect or circuit breaker box* 3-wire ...


