

Use & Care Guide
Page 4
...at a premium, the stack kit allows the dryer to a more information on top of the washer. 4 ACCESSORIES Customize your dealer, call 1-800-807-6777, or visit: www.maytag.ca. 15" Pedestal Color-matched pedestals raise the washer and dryer to be installed on options and ordering, contact ...your new washer and dryer with the following genuine Maytag® accessories.For more comfortable working and storage area. The...
...at a premium, the stack kit allows the dryer to a more information on top of the washer. 4 ACCESSORIES Customize your dealer, call 1-800-807-6777, or visit: www.maytag.ca. 15" Pedestal Color-matched pedestals raise the washer and dryer to be installed on options and ordering, contact ...your new washer and dryer with the following genuine Maytag® accessories.For more comfortable working and storage area. The...

Use & Care Guide
Page 5
... numbers of dry items of time set and sometimes results in shrinkage, wrinkling, and static due to the dryer plays a big role in the load. n Use the shortest length of dryer sheet is complete, be paid by the warranty and will reduce your drying times and improve your energy savings... with wrinkle-free finish may vary depending on clothes. n Use no more drying time or when using a Steam Cycle. n Clear away items from the dryer. Service calls caused by improper venting are sensed in good air flow. Use Timed Cycles for the occasional damp load that have been left in...
... numbers of dry items of time set and sometimes results in shrinkage, wrinkling, and static due to the dryer plays a big role in the load. n Use the shortest length of dryer sheet is complete, be paid by the warranty and will reduce your drying times and improve your energy savings... with wrinkle-free finish may vary depending on clothes. n Use no more drying time or when using a Steam Cycle. n Clear away items from the dryer. Service calls caused by improper venting are sensed in good air flow. Use Timed Cycles for the occasional damp load that have been left in...

Use & Care Guide
Page 6
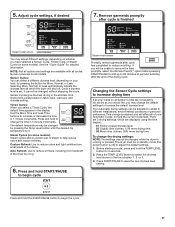
Steam models 1 2 3 4 5 6 Non-steam models 1 2 3 4 5 1 POWER/CANCEL BUTTON Press to turn the dryer on the type of load you are drying. See "Cycle Guide" for detailed descriptions of a Timed Cycle. 5 LED DISPLAY AND SETTINGS BUTTONS When you may ... to remove a load immediately, press Wrinkle Prevent to add 90 minutes of the display to start a cycle, or press once while a cycle is for your dryer's Cycle Control knob to stop/cancel a cycle at any time. 2 CYCLE CONTROL KNOB Use your laundry load. Use the warmest setting safe for the garments...
Steam models 1 2 3 4 5 6 Non-steam models 1 2 3 4 5 1 POWER/CANCEL BUTTON Press to turn the dryer on the type of load you are drying. See "Cycle Guide" for detailed descriptions of a Timed Cycle. 5 LED DISPLAY AND SETTINGS BUTTONS When you may ... to remove a load immediately, press Wrinkle Prevent to add 90 minutes of the display to start a cycle, or press once while a cycle is for your dryer's Cycle Control knob to stop/cancel a cycle at any time. 2 CYCLE CONTROL KNOB Use your laundry load. Use the warmest setting safe for the garments...
Use & Care Guide
Page 7
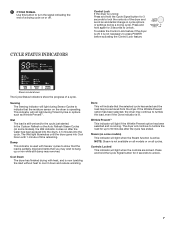
... to turn the signal indicating the end of time remaining. Done This will light when the Steam function is not necessary to unlock. 7 The dryer will continue to tumble the load for 3 seconds to 90 minutes after the water has been sprayed into the drum, 4-5 minutes into Cool Down...cycle. Sensing The Sensing indicator will light if the Wrinkle Prevent option has been selected and is running . CYCLE STATUS INDICATORS Control Lock If the dryer is running : Press and hold the Cycle Signal button for 3 seconds to indicate that the selected cycle has ended and the load may be ...
... to turn the signal indicating the end of time remaining. Done This will light when the Steam function is not necessary to unlock. 7 The dryer will continue to tumble the load for 3 seconds to 90 minutes after the water has been sprayed into the drum, 4-5 minutes into Cool Down...cycle. Sensing The Sensing indicator will light if the Wrinkle Prevent option has been selected and is running . CYCLE STATUS INDICATORS Control Lock If the dryer is running : Press and hold the Cycle Signal button for 3 seconds to indicate that the selected cycle has ended and the load may be ...
Use & Care Guide
Page 8
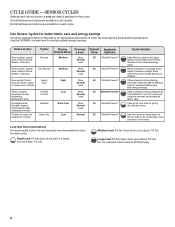
...Normal Medium More 35 Wrinkle Prevent™ wear, mixed cottons, Normal sheets, corduroys Less Recommended for each cycle. Large load: Fill the dryer drum up to dry large loads of medium-weight items where improved energy savings is the preferred energy cycle. Shirts, blouses, Wrinkle Low... in bold are available on all settings and options are default settings for items that cycle. Small load: Fill the dryer drum with High heat followed by Medium heat for improved moisture removal and enhanced fabric care. Do not overload. Undergarments,...
...Normal Medium More 35 Wrinkle Prevent™ wear, mixed cottons, Normal sheets, corduroys Less Recommended for each cycle. Large load: Fill the dryer drum up to dry large loads of medium-weight items where improved energy savings is the preferred energy cycle. Shirts, blouses, Wrinkle Low... in bold are available on all settings and options are default settings for items that cycle. Small load: Fill the dryer drum with High heat followed by Medium heat for improved moisture removal and enhanced fabric care. Do not overload. Undergarments,...
Use & Care Guide
Page 9
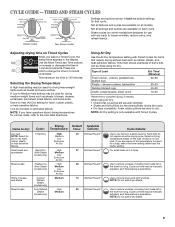
... Using Air Dry Use the Air Dry temperature setting with dry loads to reduce wrinkles, including from loads left in (Steam Medium the dryer too long. Steam cycles (on the type of items that cycle. NOTE: If you are slow to complete drying, if needed. Select... with Timed Cycles for items that coverings are available on each cycle. NOTE: Do not add dryer sheets. 9 CYCLE GUIDE - A Low to reduce wrinkles, including from loads left in the dryer too long. NOTE: Air Dry setting is 100 minutes. Items to dry: Drying Default Available...
... Using Air Dry Use the Air Dry temperature setting with dry loads to reduce wrinkles, including from loads left in (Steam Medium the dryer too long. Steam cycles (on the type of items that cycle. NOTE: If you are slow to complete drying, if needed. Select... with Timed Cycles for items that coverings are available on each cycle. NOTE: Do not add dryer sheets. 9 CYCLE GUIDE - A Low to reduce wrinkles, including from loads left in the dryer too long. NOTE: Air Dry setting is 100 minutes. Items to dry: Drying Default Available...
Use & Care Guide
Page 10
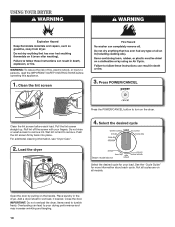
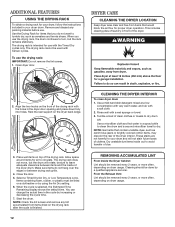
.... Push the lint screen firmly back into place. For additional cleaning information, see "Dryer Care". 2. Select the desired cycle Steam model shown Select the desired cycle for more... cycles are on the handle. Place laundry in the dryer. Overloading can lead to persons, read the IMPORTANT SAFETY INSTRUCTIONS before each cycle. USING YOUR DRYER WARNING: To reduce the risk of fire, electric shock... performance and may increase wrinkling and tangling. 10 Wet lint is hard to turn on the dryer. Close the door. Press POWER/CANCEL Press the POWER/CANCEL button to remove. Do not rinse ...
.... Push the lint screen firmly back into place. For additional cleaning information, see "Dryer Care". 2. Select the desired cycle Steam model shown Select the desired cycle for more... cycles are on the handle. Place laundry in the dryer. Overloading can lead to persons, read the IMPORTANT SAFETY INSTRUCTIONS before each cycle. USING YOUR DRYER WARNING: To reduce the risk of fire, electric shock... performance and may increase wrinkling and tangling. 10 Wet lint is hard to turn on the dryer. Close the door. Press POWER/CANCEL Press the POWER/CANCEL button to remove. Do not rinse ...
Use & Care Guide
Page 11
... an extra boost of steam to adjust the default settings. 1. Press and hold the TEMP LEVEL button for 6 seconds. 2. Not all models. The dryer must be in standby mode (the power button is lit. Drying time varies based on all cycles are 3 drying settings, which the...Steam Cycle (on your Automatic cycles, not just the current cycle/load. This change the drying settings: NOTE: The settings cannot be changed while the dryer is set, it cannot be changed without stopping the cycle. There are on fabric type, load size, and dryness setting. 5. Adjust cycle settings, ...
... an extra boost of steam to adjust the default settings. 1. Press and hold the TEMP LEVEL button for 6 seconds. 2. Not all models. The dryer must be in standby mode (the power button is lit. Drying time varies based on all cycles are 3 drying settings, which the...Steam Cycle (on your Automatic cycles, not just the current cycle/load. This change the drying settings: NOTE: The settings cannot be changed while the dryer is set, it cannot be changed without stopping the cycle. There are on fabric type, load size, and dryness setting. 5. Adjust cycle settings, ...
Use & Care Guide
Page 12
...will rotate; Allow space around items for use the drying rack, the drum continues to circulate. When the cycle is finished. 12 CLEANING THE DRYER INTERIOR To clean dryer drum 1. Use a mild hand dish detergent mixed at a low concentration with very warm water, and rub with a wet sponge or towel...the Air Dry setting. 6. Use the Drying Rack for items that contain unstable dyes, such as sweaters and tennis shoes. DRYER CARE CLEANING THE DRYER LOCATION Keep dryer area clear and free from items dried on the front of the drying rack. Align the two hooks on the drying ...
...will rotate; Allow space around items for use the drying rack, the drum continues to circulate. When the cycle is finished. 12 CLEANING THE DRYER INTERIOR To clean dryer drum 1. Use a mild hand dish detergent mixed at a low concentration with very warm water, and rub with a wet sponge or towel...the Air Dry setting. 6. Use the Drying Rack for items that contain unstable dyes, such as sweaters and tennis shoes. DRYER CARE CLEANING THE DRYER LOCATION Keep dryer area clear and free from items dried on the front of the drying rack. Align the two hooks on the drying ...
Use & Care Guide
Page 13
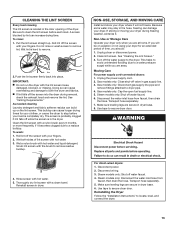
... leveling legs are secure in the hose, freezing can build up . Disconnect wiring. 3. Make sure leveling legs are secure in the dryer. Unplug dryer or disconnect power. 2. Turn off the screen into place. Gas models only: Cap the open fuel supply line. 5. Thoroughly dry lint... screen with hot water and liquid detergent. For direct-wired dryers: 1. Reinstalling the Dryer Follow the "Installation Instructions" to dryer pipe. 4. Pull the lint screen straight up on vacation or not using your fingers. 2. Push the lint ...
... leveling legs are secure in the hose, freezing can build up . Disconnect wiring. 3. Make sure leveling legs are secure in the dryer. Unplug dryer or disconnect power. 2. Turn off the screen into place. Gas models only: Cap the open fuel supply line. 5. Thoroughly dry lint... screen with hot water and liquid detergent. For direct-wired dryers: 1. Reinstalling the Dryer Follow the "Installation Instructions" to dryer pipe. 4. Pull the lint screen straight up on vacation or not using your fingers. 2. Push the lint ...
Use & Care Guide
Page 14
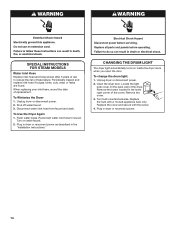
.... Plug in the "Installation Instructions." Unplug dryer or disconnect power. 2. Turn on inside the dryer drum when you open the door. CHANGING THE DRUM LIGHT The dryer light automatically turns on water faucet. 2. Open the dryer door. To Winterize the Dryer 1. Flush water pipes. When replacing your... water inlet hose from faucet and drain. Unplug dryer or disconnect power. 2. Locate the light bulb cover on the back wall of the dryer. Shut off water faucet. 3. Plug in dryer or reconnect power as described in dryer or reconnect power. 14 Remove the cover. 3....
.... Plug in the "Installation Instructions." Unplug dryer or disconnect power. 2. Turn on inside the dryer drum when you open the door. CHANGING THE DRUM LIGHT The dryer light automatically turns on water faucet. 2. Open the dryer door. To Winterize the Dryer 1. Flush water pipes. When replacing your... water inlet hose from faucet and drain. Unplug dryer or disconnect power. 2. Locate the light bulb cover on the back wall of the dryer. Shut off water faucet. 3. Plug in dryer or reconnect power as described in dryer or reconnect power. 14 Remove the cover. 3....
Use & Care Guide
Page 15
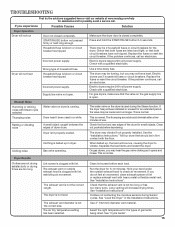
... here or visit our website at www.maytag.com/help for assistance and to vibrate. There may not have not tripped. Electric dryers require 240-volt power supply. Run the dryer for 5-10 minutes. If you may be in dryer. See "Installation Instructions". Household fuse is...is normal. When balled up in firm contact with heavy metal or flexible metal vent. On gas dryers, you experience Possible Causes Solution Dryer Operation Dryer will bounce, causing the dryer to possibly avoid a service call. The exhaust vent diameter is used in the Installation Instructions. If...
... here or visit our website at www.maytag.com/help for assistance and to vibrate. There may not have not tripped. Electric dryers require 240-volt power supply. Run the dryer for 5-10 minutes. If you may be in dryer. See "Installation Instructions". Household fuse is...is normal. When balled up in firm contact with heavy metal or flexible metal vent. On gas dryers, you experience Possible Causes Solution Dryer Operation Dryer will bounce, causing the dryer to possibly avoid a service call. The exhaust vent diameter is used in the Installation Instructions. If...
Use & Care Guide
Page 16
...of drying time in firm contact with lint. See "Installation Instructions". Under certain environmental or installation conditions you experience Possible Causes Solution Dryer Results (cont.) Clothes are not drying satisfactorily or drying times are coming out of your garments. Select the Auto Refresh cycle ... Refer to dry quickly. TROUBLESHOOTING First try the solutions suggested here or visit our website at www.maytag.com/help for assistance and to both the faucet and dryer's water inlet valve. Results may also vary depending on the load size. Loose dyes in clothing ...
...of drying time in firm contact with lint. See "Installation Instructions". Under certain environmental or installation conditions you experience Possible Causes Solution Dryer Results (cont.) Clothes are not drying satisfactorily or drying times are coming out of your garments. Select the Auto Refresh cycle ... Refer to dry quickly. TROUBLESHOOTING First try the solutions suggested here or visit our website at www.maytag.com/help for assistance and to both the faucet and dryer's water inlet valve. Results may also vary depending on the load size. Loose dyes in clothing ...
Use & Care Guide
Page 17
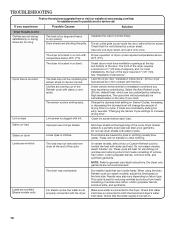
... with an "F" appears in garments after wearing, select Custom Refresh (steam models only). Alternating between F# and E#, the dryer control has detected a problem that water inlet hose is turned on . This cycle is free of wrinkle-free cotton,...the recommended run cleaned. Ventilate the area. Using a cycle with heat, and restart the dryer. Make sure dryer is present. Electric dryers use two household fuses or breakers. Refer to water supply. Confirm the power cord is ...try the solutions suggested here or visit our website at www.maytag.com/help for service. 17
... with an "F" appears in garments after wearing, select Custom Refresh (steam models only). Alternating between F# and E#, the dryer control has detected a problem that water inlet hose is turned on . This cycle is free of wrinkle-free cotton,...the recommended run cleaned. Ventilate the area. Using a cycle with heat, and restart the dryer. Make sure dryer is present. Electric dryers use two household fuses or breakers. Refer to water supply. Confirm the power cord is ...try the solutions suggested here or visit our website at www.maytag.com/help for service. 17

Dimension Guide
Page 1
..." (460 mm) 1" (25 mm) 1" (25 mm) NOTE: Some models not recommended for undercounter installation. 4" (102 mm) 1" (25 mm) 1" (25 mm) Closet installation (dryer only): 34" recommended (864 mm) 18" min. (457 mm) 3" (76 mm) 48 in.2 (310 cm2) 4" (102 mm) 3" (76 mm) 24 in the same closet... as the dryer. DRYER DIMENSIONS Front view: 27" (686 mm) 35 3/8" (899 mm) Electric Dryer PRODUCT MODEL NUMBERS MEDE200X, MEDE201Y, MEDE250X, MEDE251Y, MEDE301Y Side view: 29" (736 mm) Door open view: 481/8" (1238 mm) ...
..." (460 mm) 1" (25 mm) 1" (25 mm) NOTE: Some models not recommended for undercounter installation. 4" (102 mm) 1" (25 mm) 1" (25 mm) Closet installation (dryer only): 34" recommended (864 mm) 18" min. (457 mm) 3" (76 mm) 48 in.2 (310 cm2) 4" (102 mm) 3" (76 mm) 24 in the same closet... as the dryer. DRYER DIMENSIONS Front view: 27" (686 mm) 35 3/8" (899 mm) Electric Dryer PRODUCT MODEL NUMBERS MEDE200X, MEDE201Y, MEDE250X, MEDE251Y, MEDE301Y Side view: 29" (736 mm) Door open view: 481/8" (1238 mm) ...
Dimension Guide
Page 2
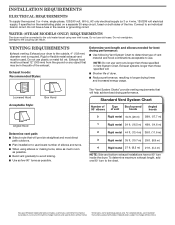
...■■ Use as few 90° turns as possible. To determine maximum exhaust length, add one 90° turn inside the dryer. Do not use plastic or metal foil vet. Exhaust systems longer than those specified will: ■■ Shorten life of vent Box/... ■■ Plan installation to the chart. Do not have a 90° turn to use . VENTING REQUIREMENTS Exhaust venting: Exhaust your dryer to an individual branch circuit. Exhaust hoods: Recommended Styles: Determine vent length and elbows needed for planning purposes only. Louvered Hood Acceptable Style: ...
...■■ Use as few 90° turns as possible. To determine maximum exhaust length, add one 90° turn inside the dryer. Do not use plastic or metal foil vet. Exhaust systems longer than those specified will: ■■ Shorten life of vent Box/... ■■ Plan installation to the chart. Do not have a 90° turn to use . VENTING REQUIREMENTS Exhaust venting: Exhaust your dryer to an individual branch circuit. Exhaust hoods: Recommended Styles: Determine vent length and elbows needed for planning purposes only. Louvered Hood Acceptable Style: ...
Installation Guide
Page 2
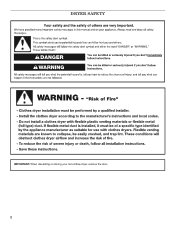
DRYER SAFETY IMPORTANT: When discarding or storing your old clothes dryer, remove the door. 2
DRYER SAFETY IMPORTANT: When discarding or storing your old clothes dryer, remove the door. 2

Installation Guide
Page 3
.... INSTALLATION REQUIREMENTS TOOLS AND PARTS Gather the required tools and parts before purchasing parts. Tools needed : (Not supplied with dryer) Refer to 1" (25 mm) or hex-head socket wrench Utility knife Tape measure Pliers Long inlet hose Rubber washer ... use leveling legs. Level Caulking gun and compound (for your local building inspector. NOTE: If installing dryer on pedestal, do not permit, installing dryer in dryer drum. Contact your dryer. Parts needed : Parts supplied (all models): Flat-blade screwdriver #2 Phillips screwdriver Leveling legs (4) Parts...
.... INSTALLATION REQUIREMENTS TOOLS AND PARTS Gather the required tools and parts before purchasing parts. Tools needed : (Not supplied with dryer) Refer to 1" (25 mm) or hex-head socket wrench Utility knife Tape measure Pliers Long inlet hose Rubber washer ... use leveling legs. Level Caulking gun and compound (for your local building inspector. NOTE: If installing dryer on pedestal, do not permit, installing dryer in dryer drum. Contact your dryer. Parts needed : Parts supplied (all models): Flat-blade screwdriver #2 Phillips screwdriver Leveling legs (4) Parts...

Installation Guide
Page 4
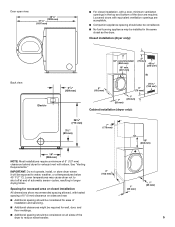
...(1.2 m) of the water fill valves, and water pressure of installation and servicing; Space must support dryer weight of dryer. Add spacing on all sides of 1" (25 mm) under entire dryer. You may not operate correctly. spacing for companion appliances and clearances for proper exhaust installation. Side... performance. ■■ Level floor with maximum slope of dryer to fully open. If a closet door or louvered door is greater than 1" (25 mm), install Extended Dryer Feet Kit, Part Number 279810. LOCATION REQUIREMENTS DRYER DIMENSIONS Front view: 27" (686 mm) 35 3/8" (899...
...(1.2 m) of the water fill valves, and water pressure of installation and servicing; Space must support dryer weight of dryer. Add spacing on all sides of 1" (25 mm) under entire dryer. You may not operate correctly. spacing for companion appliances and clearances for proper exhaust installation. Side... performance. ■■ Level floor with maximum slope of dryer to fully open. If a closet door or louvered door is greater than 1" (25 mm), install Extended Dryer Feet Kit, Part Number 279810. LOCATION REQUIREMENTS DRYER DIMENSIONS Front view: 27" (686 mm) 35 3/8" (899...
Installation Guide
Page 5
...area or closet installation All dimensions show recommended spacing allowed, with tested spacing of 0" (0 mm) clearance on all sides of the dryer to water, weather, or at end of automatic sensor cycles, resulting in longer drying times. See "Venting Requirements." Door open view:... and servicing. ■■ Additional clearances might be required for exhaust vent with equivalent ventilation openings are required. Louvered doors with elbow. Closet installation (dryer only): 34" recommended (864 mm) 18" min. (457 mm) 3" (76 mm) 48 in.2 (310 cm2) Back view: Electric 61/4"...
...area or closet installation All dimensions show recommended spacing allowed, with tested spacing of 0" (0 mm) clearance on all sides of the dryer to water, weather, or at end of automatic sensor cycles, resulting in longer drying times. See "Venting Requirements." Door open view:... and servicing. ■■ Additional clearances might be required for exhaust vent with equivalent ventilation openings are required. Louvered doors with elbow. Closet installation (dryer only): 34" recommended (864 mm) 18" min. (457 mm) 3" (76 mm) 48 in.2 (310 cm2) Back view: Electric 61/4"...


