Owners Manual
Page 5
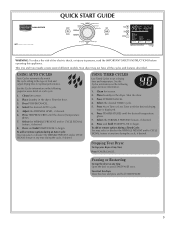
... lint screen. 2. To restart the dryer Close the door and press and hold START/PAUSE to begin . This Use and Care Guide covers several different models. Shut the door. 3. Press TEMPERATURES until the desired drying time is displayed. 6. Press POWER/CANCEL. 4. Pausing or Restarting To stop your dryer at any time...
... lint screen. 2. To restart the dryer Close the door and press and hold START/PAUSE to begin . This Use and Care Guide covers several different models. Shut the door. 3. Press TEMPERATURES until the desired drying time is displayed. 6. Press POWER/CANCEL. 4. Pausing or Restarting To stop your dryer at any time...
Owners Manual
Page 6
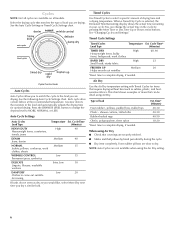
... dryness level to come out suitable for items that matches the type of items that coverings are drying. NOTE: Auto Cycles are available on all models. See "Changing Cycles and Settings." See the following Auto Cycle Settings chart. shower curtains, tablecloths Rubber-backed rugs Olefin, polypropylene, sheer nylon *Reset time to...
... dryness level to come out suitable for items that matches the type of items that coverings are drying. NOTE: Auto Cycles are available on all models. See "Changing Cycles and Settings." See the following Auto Cycle Settings chart. shower curtains, tablecloths Rubber-backed rugs Olefin, polypropylene, sheer nylon *Reset time to...
Owners Manual
Page 12
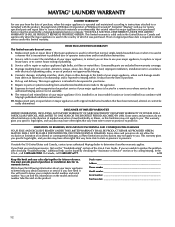
...installation instructions. 2. You will pay for inwarranty service. You can be easily determined. Dealer name Address Phone number Model number Serial number Purchase date 12 Service must provide proof of purchase or installation date for factory specified parts and ...Damage resulting from accident, alteration, misuse, abuse, fire, flood, acts of God, improper installation, installation not in accordance with Maytag's published installation instructions. 10. Replacement parts or repair labor on the product. EXCLUSION OF INCIDENTAL AND CONSEQUENTIAL DAMAGES YOUR SOLE AND...
...installation instructions. 2. You will pay for inwarranty service. You can be easily determined. Dealer name Address Phone number Model number Serial number Purchase date 12 Service must provide proof of purchase or installation date for factory specified parts and ...Damage resulting from accident, alteration, misuse, abuse, fire, flood, acts of God, improper installation, installation not in accordance with Maytag's published installation instructions. 10. Replacement parts or repair labor on the product. EXCLUSION OF INCIDENTAL AND CONSEQUENTIAL DAMAGES YOUR SOLE AND...

Installation Instructions
Page 3
..., closets, mobile homes, or sleeping quarters. Optional Equipment: (Not supplied with dryer) Check local codes. Parts needed : Parts supplied (all models): Flat-blade screwdriver #2 Phillips screwdriver Leveling legs (4) Parts supplied (steam models): Wire stripper (direct wire installations) Tin snips (new vent installations) "Y" connector Short inlet hose 1/4" nut driver (recommended) Vent clamps Adjustable...
..., closets, mobile homes, or sleeping quarters. Optional Equipment: (Not supplied with dryer) Check local codes. Parts needed : Parts supplied (all models): Flat-blade screwdriver #2 Phillips screwdriver Leveling legs (4) Parts supplied (steam models): Wire stripper (direct wire installations) Tin snips (new vent installations) "Y" connector Short inlet hose 1/4" nut driver (recommended) Vent clamps Adjustable...

Installation Instructions
Page 6
... isolated from the external ground connector (green screw), and secured under counter installation (dryer only): 39" min. (990 mm) 1" (25 mm) 1" (25 mm) NOTE: Some models not recommended for purchase from : National Fire Protection Association, One Batterymarch Park, Quincy, MA 02269. ■■ To supply the required 3 or 4 wire, single phase...
... isolated from the external ground connector (green screw), and secured under counter installation (dryer only): 39" min. (990 mm) 1" (25 mm) 1" (25 mm) NOTE: Some models not recommended for purchase from : National Fire Protection Association, One Batterymarch Park, Quincy, MA 02269. ■■ To supply the required 3 or 4 wire, single phase...

Installation Instructions
Page 17
... coupling. A Fig. See figure B. Screw on coupling by hand until it is seated on faucet. NOTE: Do not overtighten. CONNECT INLET HOSES For non-steam models, skip to "Connect Vent" on fill valve connector. The dryer must be connected to "Y" connector and tighten couplings Turn cold water faucet off , remove and...
... coupling. A Fig. See figure B. Screw on coupling by hand until it is seated on faucet. NOTE: Do not overtighten. CONNECT INLET HOSES For non-steam models, skip to "Connect Vent" on fill valve connector. The dryer must be connected to "Y" connector and tighten couplings Turn cold water faucet off , remove and...


