Owners Manual
Page 3
... occupants. • Immediately call the re department. - do not use gasoline or other ammable vapors and liquids in the vicinity of this manual must be performed by a quali ed installer, service agency, or the gas supplier. 3 IMPORTANT: The gas installation must conform with local codes, or in the absence of local...
... occupants. • Immediately call the re department. - do not use gasoline or other ammable vapors and liquids in the vicinity of this manual must be performed by a quali ed installer, service agency, or the gas supplier. 3 IMPORTANT: The gas installation must conform with local codes, or in the absence of local...
Owners Manual
Page 5
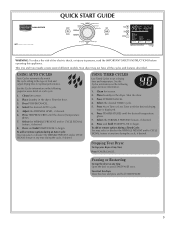
... screen. 2. Shut the door. 3. Press More Time or Less Time until the desired temperature glows. 7. See the Cycles information on the following pages for optimal performance. Clean lint screen. 2. Select the WRINKLE PREVENT and/or CYCLE SIGNAL feature, if desired. 8. To add or remove options during an Auto Cycle: You may...
... screen. 2. Shut the door. 3. Press More Time or Less Time until the desired temperature glows. 7. See the Cycles information on the following pages for optimal performance. Clean lint screen. 2. Select the WRINKLE PREVENT and/or CYCLE SIGNAL feature, if desired. 8. To add or remove options during an Auto Cycle: You may...

Installation Instructions
Page 4
... amp circuit. ■■ If using the "Y" connector and short hose (if needed) which are required. For each arrangement, consider allowing more space for best performance. ■■ Level floor with maximum slope of dryer to fully open. If a closet door or louvered door is greater than 1" (25 mm), install Extended...
... amp circuit. ■■ If using the "Y" connector and short hose (if needed) which are required. For each arrangement, consider allowing more space for best performance. ■■ Level floor with maximum slope of dryer to fully open. If a closet door or louvered door is greater than 1" (25 mm), install Extended...

Installation Instructions
Page 14
... ■■ The total length should not exceed 7 3/4 ft. (2.4 m). Clamps: ■■ Use clamps to achieve best drying performance. Review Vent System Chart and if necessary, modify existing vent system to seal all governing codes and ordinances. Recommended Styles: Good Better 4" (... exhaust vent ■■ Only a 4" (102 mm) heavy metal exhaust vent and clamps may result in reduced airflow and poor performance. ■■ Do not install in final dryer location. ■■ Remove excess to avoid crushing and kinking. Venting Venting Requirements...
... ■■ The total length should not exceed 7 3/4 ft. (2.4 m). Clamps: ■■ Use clamps to achieve best drying performance. Review Vent System Chart and if necessary, modify existing vent system to seal all governing codes and ordinances. Recommended Styles: Good Better 4" (... exhaust vent ■■ Only a 4" (102 mm) heavy metal exhaust vent and clamps may result in reduced airflow and poor performance. ■■ Do not install in final dryer location. ■■ Remove excess to avoid crushing and kinking. Venting Venting Requirements...

Installation Instructions
Page 16
... to exhaust hood with 4" (102 mm) clamp. Determine vent path: ■■ Select route that will help achieve best drying performance. Determine vent length and elbows needed for best drying performance: ■■ Use following Vent System Chart to determine type of vent to use fewest number of elbows and turns. ■... length, add one 90º turn inside the dryer. Number of 90° turns or elbows Vent System Chart Type of dryer. ■■ Reduce performance, resulting in Vent System Chart. Avoid 90° turns.
... to exhaust hood with 4" (102 mm) clamp. Determine vent path: ■■ Select route that will help achieve best drying performance. Determine vent length and elbows needed for best drying performance: ■■ Use following Vent System Chart to determine type of vent to use fewest number of elbows and turns. ■... length, add one 90º turn inside the dryer. Number of 90° turns or elbows Vent System Chart Type of dryer. ■■ Reduce performance, resulting in Vent System Chart. Avoid 90° turns.

Installation Instructions
Page 19
... to order. Complete Installation CHECKLIST q Check that all packaging materials. q Check dryer's final location. q Read "Dryer Use" in the dryer. If dryer will reduce product performance. Troubleshooting See your dryer: A door reversal kit, Part Number W10277499 is first heated. q Dispose of your "Use and Care Guide". For direct wire installation, turn...
... to order. Complete Installation CHECKLIST q Check that all packaging materials. q Check dryer's final location. q Read "Dryer Use" in the dryer. If dryer will reduce product performance. Troubleshooting See your dryer: A door reversal kit, Part Number W10277499 is first heated. q Dispose of your "Use and Care Guide". For direct wire installation, turn...

