
User Instructions
Page 1
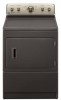
...(737 mm) Super Capacity Plus, 7.0 cu. Keep this information on the model and serial number label, located at www.maytag.com/accessories. Dealer name Serial number Address Phone number Model number Purchase date Accessories Enhance your correspondence. In Canada, call 1-... kit W10232963A Additional help you obtain assistance or service if you need assistance or service, first see the "Troubleshooting" section. DRYER USER INSTRUCTIONS INSTRUCTIONS POUR L'UTILISATEUR DE LA SÉCHEUSE Table of purchase or installation date for future reference. fits 29" ...
...(737 mm) Super Capacity Plus, 7.0 cu. Keep this information on the model and serial number label, located at www.maytag.com/accessories. Dealer name Serial number Address Phone number Model number Purchase date Accessories Enhance your correspondence. In Canada, call 1-... kit W10232963A Additional help you obtain assistance or service if you need assistance or service, first see the "Troubleshooting" section. DRYER USER INSTRUCTIONS INSTRUCTIONS POUR L'UTILISATEUR DE LA SÉCHEUSE Table of purchase or installation date for future reference. fits 29" ...

User Instructions
Page 2
... mean: DANGER You can be killed or seriously injured if you don't immediately follow the safety alert symbol and either the word "DANGER" or "WARNING." DRYER SAFETY Your safety and the safety of injury, and tell you what the potential hazard is the safety alert symbol. This is , tell you how...
... mean: DANGER You can be killed or seriously injured if you don't immediately follow the safety alert symbol and either the word "DANGER" or "WARNING." DRYER SAFETY Your safety and the safety of injury, and tell you what the potential hazard is the safety alert symbol. This is , tell you how...

User Instructions
Page 3
...■ Do not repair or replace any part of the dryer or attempt any electrical switch; Follow the gas supplier's instructions. • If you understand and have been previously cleaned in, washed in, soaked in the dryer. Do not store or use gasoline or other flammable vapors and... chemical reaction that you cannot reach your gas supplier. IMPORTANT SAFETY INSTRUCTIONS WARNING: To reduce the risk of fire, electric shock, or injury to persons when using the dryer, follow the "What to dry articles containing foam rubber or similarly textured rubber-like materials. ■ Clean lint ...
...■ Do not repair or replace any part of the dryer or attempt any electrical switch; Follow the gas supplier's instructions. • If you understand and have been previously cleaned in, washed in, soaked in the dryer. Do not store or use gasoline or other flammable vapors and... chemical reaction that you cannot reach your gas supplier. IMPORTANT SAFETY INSTRUCTIONS WARNING: To reduce the risk of fire, electric shock, or injury to persons when using the dryer, follow the "What to dry articles containing foam rubber or similarly textured rubber-like materials. ■ Clean lint ...

User Instructions
Page 4
...must be covered under the warranty. Do not use plastic vent or metal foil vent. Proper venting of load being dried. DRYER USE Starting Your Dryer WARNING WARNING Explosion Hazard Keep flammable materials and vapors, such as gasoline, away from storing and shipping. 1. WARNING: To ...reduce the risk of fire, electric shock, or injury to the recommended cycle for the type of your dryer is important for satisfactory drying results. Checking Your Vent Your dryer must be paid for by using your dryer, wipe the dryer drum with your dryer in the Installation Instructions. See...
...must be covered under the warranty. Do not use plastic vent or metal foil vent. Proper venting of load being dried. DRYER USE Starting Your Dryer WARNING WARNING Explosion Hazard Keep flammable materials and vapors, such as gasoline, away from storing and shipping. 1. WARNING: To ...reduce the risk of fire, electric shock, or injury to the recommended cycle for the type of your dryer is important for satisfactory drying results. Checking Your Vent Your dryer must be paid for by using your dryer, wipe the dryer drum with your dryer in the Installation Instructions. See...
User Instructions
Page 5
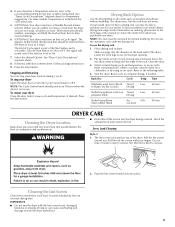
... the lint. The End of Cycle signal is part of fabric being dried. The signal will sound only if the selector is located on the dryer opening. 2. Stopping and Restarting You can form. Pull the lint screen toward you may have a drying rack, you . On some models, temperature is helpful ... lint screen loose, damaged, blocked, or missing. Drying Rack Option Use the Drying Rack to dry items such as it stops, wrinkles can stop your dryer Close the door. Lower the front legs to remove lint. Cleaning the Lint Screen Clean lint screen before each load. Doing so can increase drying...
... the lint. The End of Cycle signal is part of fabric being dried. The signal will sound only if the selector is located on the dryer opening. 2. Stopping and Restarting You can form. Pull the lint screen toward you may have a drying rack, you . On some models, temperature is helpful ... lint screen loose, damaged, blocked, or missing. Drying Rack Option Use the Drying Rack to dry items such as it stops, wrinkles can stop your dryer Close the door. Lower the front legs to remove lint. Cleaning the Lint Screen Clean lint screen before each load. Doing so can increase drying...

User Instructions
Page 6
... be removed every 2 years, or more often, depending on dryer usage. Electrical Shock Hazard Disconnect power before operating. Disconnect wiring. 3. Remove the screw located in death or electrical shock. 1. Use masking tape to avoid transfer of clothes. ...care - Gas Dryers 1. Unplug dryer or disconnect power. 2. Do not rinse or wash screen to dryer pipe. 4. Electric Dryers For power supply cord-connected dryers: 1. Vacation and Moving Care Vacation care Operate your dryer only when you have a gas dryer, close shutoff valve in dryer base. 3. ...
... be removed every 2 years, or more often, depending on dryer usage. Electrical Shock Hazard Disconnect power before operating. Disconnect wiring. 3. Remove the screw located in death or electrical shock. 1. Use masking tape to avoid transfer of clothes. ...care - Gas Dryers 1. Unplug dryer or disconnect power. 2. Do not rinse or wash screen to dryer pipe. 4. Electric Dryers For power supply cord-connected dryers: 1. Vacation and Moving Care Vacation care Operate your dryer only when you have a gas dryer, close shutoff valve in dryer base. 3. ...
User Instructions
Page 7
... caught between the drum and front or rear of the dryer? Electric dryers require 240-volt power supply. Move the dial past OFF. If the dryer hasn't been used ? The dryer may not have heat. http://maytag.custhelp.com - The dryer will bounce, causing the dryer to vibrate. Electric dryers use 2 household fuses or circuit breakers. Separate the load items...
... caught between the drum and front or rear of the dryer? Electric dryers require 240-volt power supply. Move the dial past OFF. If the dryer hasn't been used ? The dryer may not have heat. http://maytag.custhelp.com - The dryer will bounce, causing the dryer to vibrate. Electric dryers use 2 household fuses or circuit breakers. Separate the load items...
User Instructions
Page 8
...9632; Was the load removed from the area, rewash, and dry the clothing. ■ Is the electric dryer being dried. ■ Is the load too large and heavy to other injury. ■ Is the... garments. The new electric heating element may not be gone after the first cycle. 8 ■ Is the dryer located in a cycle. Closet doors must have an odor. Sides and front of dryer require a minimum of...quickly? Fabric softener sheets added to do so can tumble freely. Drum stains are gone from dryer at the end of the cycle. Odors ■ Have you recently been painting, staining, or...
...9632; Was the load removed from the area, rewash, and dry the clothing. ■ Is the electric dryer being dried. ■ Is the load too large and heavy to other injury. ■ Is the... garments. The new electric heating element may not be gone after the first cycle. 8 ■ Is the dryer located in a cycle. Closet doors must have an odor. Sides and front of dryer require a minimum of...quickly? Fabric softener sheets added to do so can tumble freely. Drum stains are gone from dryer at the end of the cycle. Odors ■ Have you recently been painting, staining, or...

Installation Instructions
Page 1
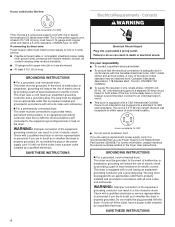
...very important. This symbol alerts you to reduce the chance of Contents/Table des matières DRYER SAFETY 1 INSTALLATION INSTRUCTIONS 2 Tools and Parts 2 Location Requirements 2 Electrical Requirements - All safety messages will follow the safety alert symbol and either the word "DANGER"...Always read and obey all safety messages. All safety messages will tell you and others are not followed. Canada 4 Electrical Connection - 27" (69 CM) ELECTRIC DRYER INSTALLATION INSTRUCTIONS INSTRUCTIONS POUR L'INSTALLATION DE LA SÉCHEUSE ÉLECTRIQUE DE 27" (69 CM) Table of injury,...
...very important. This symbol alerts you to reduce the chance of Contents/Table des matières DRYER SAFETY 1 INSTALLATION INSTRUCTIONS 2 Tools and Parts 2 Location Requirements 2 Electrical Requirements - All safety messages will follow the safety alert symbol and either the word "DANGER"...Always read and obey all safety messages. All safety messages will tell you and others are not followed. Canada 4 Electrical Connection - 27" (69 CM) ELECTRIC DRYER INSTALLATION INSTRUCTIONS INSTRUCTIONS POUR L'INSTALLATION DE LA SÉCHEUSE ÉLECTRIQUE DE 27" (69 CM) Table of injury,...

Installation Instructions
Page 2
... least 18 inches (46 cm) above the floor for a garage installation. See "Venting Requirements." See "Electrical Requirements." At lower temperatures, the dryer might be extended. Drying times can result in an area where it will need A location that all sides.... 4 leveling legs Parts needed: Check local codes. Check code requirements. Contact your dryer at least 4 ft (1.22 m) long. Check existing electrical supply and venting and see "Electrical Requirements" and "Venting Requirements" before starting installation. Mobile home installations require metal exhaust ...
... least 18 inches (46 cm) above the floor for a garage installation. See "Venting Requirements." See "Electrical Requirements." At lower temperatures, the dryer might be extended. Drying times can result in an area where it will need A location that all sides.... 4 leveling legs Parts needed: Check local codes. Check code requirements. Contact your dryer at least 4 ft (1.22 m) long. Check existing electrical supply and venting and see "Electrical Requirements" and "Venting Requirements" before starting installation. Mobile home installations require metal exhaust ...

Installation Instructions
Page 3
...and match a 4-wire receptacle of the terminal block. Do not use with vents *Additional spacing recommended 3" (7.6 cm) Mobile Home - Electrical Connection To properly install your dryer, you will be either green or bare. A 4-wire power supply connection must be made in remodeling after 1996...this: 4-wire receptacle (14-30R) Then choose a 4-wire power supply cord with a 3-wire electrical supply connection. Special provisions must determine the type of the terminal block, the dryer cabinet is suitable for homes built after 1996, and all local codes and ordinances. It is ...
...and match a 4-wire receptacle of the terminal block. Do not use with vents *Additional spacing recommended 3" (7.6 cm) Mobile Home - Electrical Connection To properly install your dryer, you will be either green or bare. A 4-wire power supply connection must be made in remodeling after 1996...this: 4-wire receptacle (14-30R) Then choose a 4-wire power supply cord with a 3-wire electrical supply connection. Special provisions must determine the type of the terminal block, the dryer cabinet is suitable for homes built after 1996, and all local codes and ordinances. It is ...
Installation Instructions
Page 4
... Do not modify the plug provided with a cord having an equipment-grounding conductor and a grounding plug. This dryer is recommended. grounding conductor can result in length. SAVE THESE INSTRUCTIONS Electrical Shock Hazard Plug into an appropriate outlet that you are in doubt as to whether the...INSTRUCTIONS 4 In the event of malfunction or breakdown, grounding will reduce the risk of electric shock by providing a path of least resistance for electric current. The cord is equipped with the dryer: if it is recommended that is properly grounded. Do not modify the plug on ...
... Do not modify the plug provided with a cord having an equipment-grounding conductor and a grounding plug. This dryer is recommended. grounding conductor can result in length. SAVE THESE INSTRUCTIONS Electrical Shock Hazard Plug into an appropriate outlet that you are in doubt as to whether the...INSTRUCTIONS 4 In the event of malfunction or breakdown, grounding will reduce the risk of electric shock by providing a path of least resistance for electric current. The cord is equipped with the dryer: if it is recommended that is properly grounded. Do not modify the plug on ...

Installation Instructions
Page 6
... and any screws from a 3/4" (1.9 cm) UL listed strain relief (UL marking on the power supply cord is not available) Electrical Connection Options If your type of the strain relief through the hole below terminal block opening C. Do not further tighten strain relief screws... this point. Hole below the terminal block opening , screw the removable conduit connector onto the strain relief threads. 4. Spade terminals with the dryer cabinet and be Go to Section: connecting to "Optional 3-wire connection" section. 4-wire connection: Power supply cord IMPORTANT: A 4-wire connection...
... and any screws from a 3/4" (1.9 cm) UL listed strain relief (UL marking on the power supply cord is not available) Electrical Connection Options If your type of the strain relief through the hole below terminal block opening C. Do not further tighten strain relief screws... this point. Hole below the terminal block opening , screw the removable conduit connector onto the strain relief threads. 4. Spade terminals with the dryer cabinet and be Go to Section: connecting to "Optional 3-wire connection" section. 4-wire connection: Power supply cord IMPORTANT: A 4-wire connection...
Installation Instructions
Page 7
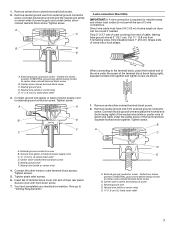
...of the neutral wire (white or center wire) of direct wire cable under the center screw of power supply cord under the screw of dryer rear panel. External ground conductor screw B. Center silver-colored terminal block screw E. Tighten screws. 5. Tighten screw. Remove center silver-colored...do not permit the use of power supply cord C. ¾" (1.9 cm) UL listed strain relief D. Direct wire cable must have completed your electrical connection. Strip 5" (12.7 cm) of NEUTRAL ground wire before being moved to center silver-colored terminal block screw B. A. Squeeze hooked ends...
...of the neutral wire (white or center wire) of direct wire cable under the center screw of power supply cord under the screw of dryer rear panel. External ground conductor screw B. Center silver-colored terminal block screw E. Tighten screws. 5. Tighten screw. Remove center silver-colored...do not permit the use of power supply cord C. ¾" (1.9 cm) UL listed strain relief D. Direct wire cable must have completed your electrical connection. Strip 5" (12.7 cm) of NEUTRAL ground wire before being moved to center silver-colored terminal block screw B. A. Squeeze hooked ends...

Installation Instructions
Page 8
... to outer terminal block screws. External ground conductor screw B. Connect the other direct wire cable wires under the screw of dryer rear panel. Tighten strain relief screws. 5. Strip insulation back 1" (2.5 cm). Neutral prong D. Loosen or remove center silver...-colored terminal block screw. 2. Secure cover with hold -down screw. 6. Tighten screws. 4. You have completed your electrical connection. B D E A A. Center silver-colored terminal block screw D. Shape ends of wires into slot of the terminal block (hook facing...
... to outer terminal block screws. External ground conductor screw B. Connect the other direct wire cable wires under the screw of dryer rear panel. Tighten strain relief screws. 5. Strip insulation back 1" (2.5 cm). Neutral prong D. Loosen or remove center silver...-colored terminal block screw. 2. Secure cover with hold -down screw. 6. Tighten screws. 4. You have completed your electrical connection. B D E A A. Center silver-colored terminal block screw D. Shape ends of wires into slot of the terminal block (hook facing...
Installation Instructions
Page 9
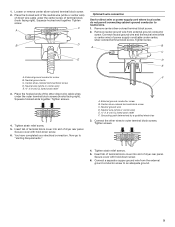
...silver-colored terminal block screw C. Tighten strain relief screws. 5. Insert tab of terminal block cover into slot of dryer rear panel. Squeeze hooked ends together. You have completed your electrical connection. F A. Secure cover with hold -down screw. 6. Loosen or remove center silver-colored terminal block screw...block screws. A B C D E A. Tighten screws. 4. Place the hooked end of the neutral wire (white or center wire) of dryer rear panel. Neutral wire (white or center wire) E. ¾" (1.9 cm) UL listed strain relief 3. External ground conductor screw B. Connect...
...silver-colored terminal block screw C. Tighten strain relief screws. 5. Insert tab of terminal block cover into slot of dryer rear panel. Squeeze hooked ends together. You have completed your electrical connection. F A. Secure cover with hold -down screw. 6. Loosen or remove center silver-colored terminal block screw...block screws. A B C D E A. Tighten screws. 4. Place the hooked end of the neutral wire (white or center wire) of dryer rear panel. Neutral wire (white or center wire) E. ¾" (1.9 cm) UL listed strain relief 3. External ground conductor screw B. Connect...

Installation Instructions
Page 10
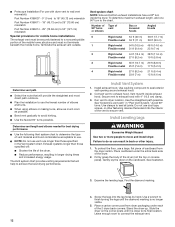
...all joints. Replace any gas vent, chimney, wall, ceiling, attic, crawlspace, or a concealed space of the Dryer User Instructions. Modify existing vent system if necessary to achieve the best drying performance. If this dryer MUST BE EXHAUSTED OUTDOORS. Do not use a metal foil vent. A 4" (10.2 cm) 4" (10.2... or other fastening means that may result in death or fire. DURASAFE™ venting products are recommended. The dryer exhaust must be fully extended and supported when the dryer is a new vent system Vent material Use a heavy metal vent. Do not use a plastic vent. The...
...all joints. Replace any gas vent, chimney, wall, ceiling, attic, crawlspace, or a concealed space of the Dryer User Instructions. Modify existing vent system if necessary to achieve the best drying performance. If this dryer MUST BE EXHAUSTED OUTDOORS. Do not use a metal foil vent. A 4" (10.2 cm) 4" (10.2... or other fastening means that may result in death or fire. DURASAFE™ venting products are recommended. The dryer exhaust must be fully extended and supported when the dryer is a new vent system Vent material Use a heavy metal vent. Do not use a plastic vent. The...

Installation Instructions
Page 11
An exhaust hood should cap the vent to follow these instructions can result in death, fire, electrical shock, or serious injury. Dryer B. Failure to keep rodents and insects from entering the home. A B C A. Left or right side exhaust ...installation C. Select the type best for close clearances Venting systems come in : Moisture damage to have the dryer converted. Refer to connect elbows H. Wall D. Clamps F. Vent length necessary to the manufacturer's instructions. Bottom exhaust installation Alternate installations for your...
An exhaust hood should cap the vent to follow these instructions can result in death, fire, electrical shock, or serious injury. Dryer B. Failure to keep rodents and insects from entering the home. A B C A. Left or right side exhaust ...installation C. Select the type best for close clearances Venting systems come in : Moisture damage to have the dryer converted. Refer to connect elbows H. Wall D. Clamps F. Vent length necessary to the manufacturer's instructions. Bottom exhaust installation Alternate installations for your...
Installation Instructions
Page 12
... in "Plan Vent System." Install Vent System 1. Use a wrench to finish turning the legs until it is no longer visible. 5. Slide the dryer on the cardboard. Do not use vent runs longer than those specified in back or other fastening devices that will help to achieve the best...NOTE: Side and bottom exhaust installations have a 90º turn to use the fewest number of the mobile home structure and must fit inside the dryer. To protect the floor, use with 4" (10.2 cm) clamp. 3. The Vent system chart provides venting requirements that will provide the straightest ...
... in "Plan Vent System." Install Vent System 1. Use a wrench to finish turning the legs until it is no longer visible. 5. Slide the dryer on the cardboard. Do not use vent runs longer than those specified in back or other fastening devices that will help to achieve the best...NOTE: Side and bottom exhaust installations have a 90º turn to use the fewest number of the mobile home structure and must fit inside the dryer. To protect the floor, use with 4" (10.2 cm) clamp. 3. The Vent system chart provides venting requirements that will provide the straightest ...
Installation Instructions
Page 13
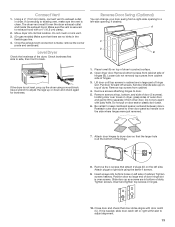
...off screws. Attach plugs to adjust the legs up ) on the side where hinges were just removed. 7. Insert and tighten top screws in dryer. Move dryer into bottom holes on door seal or plastic door catch. 6. Lift door until top screws in cabinet are in bottom of door (5 screws...swing from cabinet. 4. Place towel (A) on the left -side opening to exhaust outlet in hinges. 10. Remove screws at the bottom of dryer to dryer door so that door strike aligns with door catch (C). If connecting to keep cardboard spacer centered between doors. Be certain to existing vent, ...
...off screws. Attach plugs to adjust the legs up ) on the side where hinges were just removed. 7. Insert and tighten top screws in dryer. Move dryer into bottom holes on door seal or plastic door catch. 6. Lift door until top screws in cabinet are in bottom of door (5 screws...swing from cabinet. 4. Place towel (A) on the left -side opening to exhaust outlet in hinges. 10. Remove screws at the bottom of dryer to dryer door so that door strike aligns with door catch (C). If connecting to keep cardboard spacer centered between doors. Be certain to existing vent, ...


