
User Instructions
Page 1
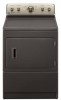
For service in the U.S.A., or write: Maytag Services, LLC, Attn: CAIR® Center P.O. You must provide proof of Contents ASSISTANCE OR SERVICE 1 ACCESSORIES 1 DRYER SAFETY 2 DRYER USE 4 DRYER CARE 5 TROUBLESHOOTING 7 WARRANTY 9 Table des matières ASSISTANCE OU SERVICE 10 ACCESSOIRES 10 SÉCURITÉ DE... find this book and your sales slip together for in your dryer with these premium accessories. For more high-quality items or to know your appliance to help is available by calling our Maytag Services, LLC, Customer Assistance at www.whirlpoolparts.ca. side swing...
For service in the U.S.A., or write: Maytag Services, LLC, Attn: CAIR® Center P.O. You must provide proof of Contents ASSISTANCE OR SERVICE 1 ACCESSORIES 1 DRYER SAFETY 2 DRYER USE 4 DRYER CARE 5 TROUBLESHOOTING 7 WARRANTY 9 Table des matières ASSISTANCE OU SERVICE 10 ACCESSOIRES 10 SÉCURITÉ DE... find this book and your sales slip together for in your dryer with these premium accessories. For more high-quality items or to know your appliance to help is available by calling our Maytag Services, LLC, Customer Assistance at www.whirlpoolparts.ca. side swing...

User Instructions
Page 2
... symbol and either the word "DANGER" or "WARNING." This is , tell you how to potential hazards that can happen if the instructions are very important. DRYER SAFETY Your safety and the safety of injury, and tell you don't immediately follow instructions. This symbol alerts you to reduce the chance of others...
... symbol and either the word "DANGER" or "WARNING." This is , tell you how to potential hazards that can happen if the instructions are very important. DRYER SAFETY Your safety and the safety of injury, and tell you don't immediately follow instructions. This symbol alerts you to reduce the chance of others...

User Instructions
Page 3
...lint, dust, and dirt. ■ The interior of the dryer and exhaust vent should be cleaned periodically by smell. Items contaminated with controls. ■ Do not repair or replace any part of the dryer or attempt any electrical switch; IMPORTANT SAFETY INSTRUCTIONS WARNING: To reduce the risk of... fire, electric shock, or injury to persons when using the dryer. ■ Do not place items exposed to cooking oils in your...
...lint, dust, and dirt. ■ The interior of the dryer and exhaust vent should be cleaned periodically by smell. Items contaminated with controls. ■ Do not repair or replace any part of the dryer or attempt any electrical switch; IMPORTANT SAFETY INSTRUCTIONS WARNING: To reduce the risk of... fire, electric shock, or injury to persons when using the dryer. ■ Do not place items exposed to cooking oils in your...

User Instructions
Page 4
... is complete, be sure to persons, read the IMPORTANT SAFETY INSTRUCTIONS before each load. WARNING: To reduce the risk of fire, electric shock, or injury to follow these instructions can result in death, explosion, or fire. Clean lint screen before operating this appliance. Use...Instructions. Allow space for satisfactory drying results. Failure to tumble freely. 3. See the Installation Instructions for by using your dryer, wipe the dryer drum with your dryer for the type of load being dried. Fire Hazard No washer can result in death or fire. Items containing foam...
... is complete, be sure to persons, read the IMPORTANT SAFETY INSTRUCTIONS before each load. WARNING: To reduce the risk of fire, electric shock, or injury to follow these instructions can result in death, explosion, or fire. Clean lint screen before operating this appliance. Use...Instructions. Allow space for satisfactory drying results. Failure to tumble freely. 3. See the Installation Instructions for by using your dryer, wipe the dryer drum with your dryer for the type of load being dried. Fire Hazard No washer can result in death or fire. Items containing foam...
User Instructions
Page 5
On some models, temperature is helpful when drying items that would obstruct the flow of fabric being dried. The signal is included in dryer. Turn the Start button to complete drying, if needed. If desired, add fabric softener sheet. Stopping and Restarting You can cause overheating... and for temperature suggestions. Cleaning the Lint Screen Clean lint screen before each load. Lower the front legs to the following table. 4. See "Dryer Cycle Descriptions" (separate sheet) for information on top of the manual or contact the dealer from items that should point to On. 7. This ...
On some models, temperature is helpful when drying items that would obstruct the flow of fabric being dried. The signal is included in dryer. Turn the Start button to complete drying, if needed. If desired, add fabric softener sheet. Stopping and Restarting You can cause overheating... and for temperature suggestions. Cleaning the Lint Screen Clean lint screen before each load. Lower the front legs to the following table. 4. See "Dryer Cycle Descriptions" (separate sheet) for information on top of the manual or contact the dealer from items that should point to On. 7. This ...

User Instructions
Page 6
..., or more often, depending on the back wall of the cover. Unplug dryer or disconnect power. 2. Make sure leveling legs are secure in dryer. Remove the cover. 3. Electric Dryers For power supply cord-connected dryers: 1. For direct-wired dryers: WARNING 2. If you should be on dryer usage. Clean lint screen. Disconnect power. 2. Cap the open fuel supply...
..., or more often, depending on the back wall of the cover. Unplug dryer or disconnect power. 2. Make sure leveling legs are secure in dryer. Remove the cover. 3. Electric Dryers For power supply cord-connected dryers: 1. For direct-wired dryers: WARNING 2. If you should be on dryer usage. Clean lint screen. Disconnect power. 2. Cap the open fuel supply...
User Instructions
Page 7
... or circuit breakers. See the Installation Instructions. ■ Is the exhaust vent diameter the correct size? In Canada www.maytag.ca Dryer Operation Dryer will bounce, causing the dryer to vibrate. Check the front and rear edges of the drum for 5-10 minutes. Clean out pockets before each load.... your hand under the outside exhaust hood clogged with heavy metal or flexible metal vent. Check that the exhaust vent is mostly dry. Electric dryers use a metal foil vent. Replace the fuse or reset the circuit breaker. When balled up ? The timer moves only when the ...
... or circuit breakers. See the Installation Instructions. ■ Is the exhaust vent diameter the correct size? In Canada www.maytag.ca Dryer Operation Dryer will bounce, causing the dryer to vibrate. Check the front and rear edges of the drum for 5-10 minutes. Clean out pockets before each load.... your hand under the outside exhaust hood clogged with heavy metal or flexible metal vent. Check that the exhaust vent is mostly dry. Electric dryers use a metal foil vent. Replace the fuse or reset the circuit breaker. When balled up ? The timer moves only when the ...
User Instructions
Page 8
...? Loads are wrinkled ■ Was the load removed from the area, rewash, and dry the clothing. ■ Is the electric dryer being used ? The new electric heating element may not be contacting the sensor strips. Select the right cycle for the first time? Separate the load to do so can result ...in a cycle. The load may have ventilation openings at the top and bottom of drying time in back or other clothing. Level the dryer. Change...
...? Loads are wrinkled ■ Was the load removed from the area, rewash, and dry the clothing. ■ Is the electric dryer being used ? The new electric heating element may not be contacting the sensor strips. Select the right cycle for the first time? Separate the load to do so can result ...in a cycle. The load may have ventilation openings at the top and bottom of drying time in back or other clothing. Level the dryer. Change...

Installation Instructions
Page 1
... important. All safety messages will follow the safety alert symbol and either the word "DANGER" or "WARNING." 27" (69 CM) ELECTRIC DRYER INSTALLATION INSTRUCTIONS INSTRUCTIONS POUR L'INSTALLATION DE LA SÉCHEUSE ÉLECTRIQUE DE 27" (69 CM) Table of others . only 5 ...d'ouverture de la porte (facultatif 21 Achever l'installation 22 DRYER SAFETY Your safety and the safety of Contents/Table des matières DRYER SAFETY 1 INSTALLATION INSTRUCTIONS 2 Tools and Parts 2 Location Requirements 2 Electrical Requirements - We have provided many important safety messages in ...
... important. All safety messages will follow the safety alert symbol and either the word "DANGER" or "WARNING." 27" (69 CM) ELECTRIC DRYER INSTALLATION INSTRUCTIONS INSTRUCTIONS POUR L'INSTALLATION DE LA SÉCHEUSE ÉLECTRIQUE DE 27" (69 CM) Table of others . only 5 ...d'ouverture de la porte (facultatif 21 Achever l'installation 22 DRYER SAFETY Your safety and the safety of Contents/Table des matières DRYER SAFETY 1 INSTALLATION INSTRUCTIONS 2 Tools and Parts 2 Location Requirements 2 Electrical Requirements - We have provided many important safety messages in ...

Installation Instructions
Page 2
... Number 279810.) Clothes may not operate correctly if dryer is recommended to reduce noise transfer. Drying times can result in an area where it will need A location that connect to water and/or weather. Check code requirements. Check existing electrical supply and venting and see "Electrical Requirements" and "Venting Requirements" before starting installation...
... Number 279810.) Clothes may not operate correctly if dryer is recommended to reduce noise transfer. Drying times can result in an area where it will need A location that connect to water and/or weather. Check code requirements. Check existing electrical supply and venting and see "Electrical Requirements" and "Venting Requirements" before starting installation...

Installation Instructions
Page 3
... determine that connect to an individual branch circuit. If your dealer. To be sure that the electrical connection is installed with clothes dryers. If the dryer is adequate and in ring terminals or spade terminals with upturned ends. A 4-wire power supply ...listed strain relief. The opening (such as the dryer exhaust opening. U.S.A. A copy of the line. Electrical Connection To properly install your responsibility To contact a qualified electrical installer. Recessed area B. Additional Installation Requirements This dryer is suitable for it is prohibited. The neutral...
... determine that connect to an individual branch circuit. If your dealer. To be sure that the electrical connection is installed with clothes dryers. If the dryer is adequate and in ring terminals or spade terminals with upturned ends. A 4-wire power supply ...listed strain relief. The opening (such as the dryer exhaust opening. U.S.A. A copy of the line. Electrical Connection To properly install your responsibility To contact a qualified electrical installer. Recessed area B. Additional Installation Requirements This dryer is suitable for it is prohibited. The neutral...
Installation Instructions
Page 4
...equipment-grounding conductor must be plugged into an appropriate outlet that is recommended that the electrical connection is properly grounded. Check with the dryer: if it will reduce the risk of electric shock by a qualified electrician. Do not modify the plug provided with a qualified ... circuit, fused on the power supply cord: if it is properly installed and grounded in length. This dryer is 5 ft (1.52 m) in accordance with the Canadian Electrical Code, C22.1-latest edition and all local codes and ordinances. All current-carrying wires must match power supply...
...equipment-grounding conductor must be plugged into an appropriate outlet that is recommended that the electrical connection is properly grounded. Check with the dryer: if it will reduce the risk of electric shock by a qualified electrician. Do not modify the plug provided with a qualified ... circuit, fused on the power supply cord: if it is properly installed and grounded in length. This dryer is 5 ft (1.52 m) in accordance with the Canadian Electrical Code, C22.1-latest edition and all local codes and ordinances. All current-carrying wires must match power supply...

Installation Instructions
Page 6
... opening, screw the removable conduit connector onto the strain relief threads. 4. The strain relief should have a tight fit with the dryer cabinet and be in a horizontal position. Removable conduit connector B. Ring terminals 6 Tighten strain relief screw against the direct wire cable...Section: connecting to "Optional 3-wire connection" section. 4-wire connection: Power supply cord IMPORTANT: A 4-wire connection is not available) Electrical Connection Options If your home has: And you will be in a horizontal position. The strain relief should have a tight fit ...
... opening, screw the removable conduit connector onto the strain relief threads. 4. The strain relief should have a tight fit with the dryer cabinet and be in a horizontal position. Removable conduit connector B. Ring terminals 6 Tighten strain relief screw against the direct wire cable...Section: connecting to "Optional 3-wire connection" section. 4-wire connection: Power supply cord IMPORTANT: A 4-wire connection is not available) Electrical Connection Options If your home has: And you will be in a horizontal position. The strain relief should have a tight fit ...
Installation Instructions
Page 7
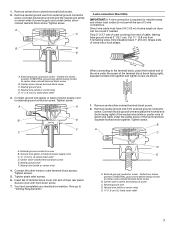
...Connect neutral ground wire and place the hooked end (hook facing right) of the neutral wire (white or center wire) of dryer rear panel. You have 5 ft (1.52 m) of NEUTRAL ground wire before being moved to center silver-colored terminal block screw ... strain relief screws. 6. Now go to outer terminal block screws. Center silver-colored terminal block screw C. Direct wire cable must have completed your electrical connection. External ground conductor screw B. Remove center silver-colored terminal block screw. 2. A C B D E 4-wire connection: Direct Wire IMPORTANT:...
...Connect neutral ground wire and place the hooked end (hook facing right) of the neutral wire (white or center wire) of dryer rear panel. You have 5 ft (1.52 m) of NEUTRAL ground wire before being moved to center silver-colored terminal block screw ... strain relief screws. 6. Now go to outer terminal block screws. Center silver-colored terminal block screw C. Direct wire cable must have completed your electrical connection. External ground conductor screw B. Remove center silver-colored terminal block screw. 2. A C B D E 4-wire connection: Direct Wire IMPORTANT:...

Installation Instructions
Page 8
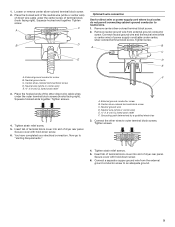
... hooked end of the wire under the outer terminal block screws (hooks facing right). B D E A A. Direct wire cable must have completed your electrical connection. Neutral ground wire F. Place the hooked ends of dryer rear panel. Insert tab of terminal block cover into a hook shape. 1 C GF A. 3-wire receptacle (NEMA type 10-30R) B. 3-wire plug...
... hooked end of the wire under the outer terminal block screws (hooks facing right). B D E A A. Direct wire cable must have completed your electrical connection. Neutral ground wire F. Place the hooked ends of dryer rear panel. Insert tab of terminal block cover into a hook shape. 1 C GF A. 3-wire receptacle (NEMA type 10-30R) B. 3-wire plug...
Installation Instructions
Page 9
...screws. 4. Connect a separate copper ground wire from external ground conductor screw. Squeeze hooked end together. Tighten screws. 4. You have completed your electrical connection. Neutral wire (white or center wire) E. ¾" (1.9 cm) UL listed strain relief F. Loosen or remove center silver-colored terminal...other direct wire cable wires under the outer terminal block screws (hooks facing right). Insert tab of terminal block cover into slot of dryer rear panel. Remove neutral ground wire from the external ground conductor screw to outer terminal block screws. A B C D E ...
...screws. 4. Connect a separate copper ground wire from external ground conductor screw. Squeeze hooked end together. Tighten screws. 4. You have completed your electrical connection. Neutral wire (white or center wire) E. ¾" (1.9 cm) UL listed strain relief F. Loosen or remove center silver-colored terminal...other direct wire cable wires under the outer terminal block screws (hooks facing right). Insert tab of terminal block cover into slot of dryer rear panel. Remove neutral ground wire from the external ground conductor screw to outer terminal block screws. A B C D E ...

Installation Instructions
Page 10
... crushing and kinking. Modify existing vent system if necessary to follow these instructions can be fully extended and supported when the dryer is recommended to avoid sagging and kinking that extend into any plastic or metal foil vent with screws or other fastening means...all governing codes and ordinances. Failure to achieve the best drying performance. Review Vent system chart. Do not use a plastic vent. If this dryer MUST BE EXHAUSTED OUTDOORS. For more information, see the "Assistance or Service" section of flexible metal vent shall not exceed 8 ft (2.4 m)....
... crushing and kinking. Modify existing vent system if necessary to follow these instructions can be fully extended and supported when the dryer is recommended to avoid sagging and kinking that extend into any plastic or metal foil vent with screws or other fastening means...all governing codes and ordinances. Failure to achieve the best drying performance. Review Vent system chart. Do not use a plastic vent. If this dryer MUST BE EXHAUSTED OUTDOORS. For more information, see the "Assistance or Service" section of flexible metal vent shall not exceed 8 ft (2.4 m)....

Installation Instructions
Page 11
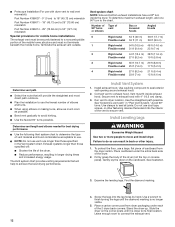
.... Standard rear offset exhaust installation B. Bottom exhaust installation Alternate installations for close clearances Venting systems come in death, fire, electrical shock, or serious injury. Exhaust hood must be at least 12" (30.5 cm) from the ground or any object...dealer to woodwork, furniture, paint, wallpaper, carpets, etc. B A A. Improper venting can be in : Moisture damage to have the dryer converted. Dryer B. Vent length necessary to the manufacturer's instructions. Refer to connect elbows H. Clamps F. WARNING Fire Hazard Cover unused exhaust holes with a...
.... Standard rear offset exhaust installation B. Bottom exhaust installation Alternate installations for close clearances Venting systems come in death, fire, electrical shock, or serious injury. Exhaust hood must be at least 12" (30.5 cm) from the ground or any object...dealer to woodwork, furniture, paint, wallpaper, carpets, etc. B A A. Improper venting can be in : Moisture damage to have the dryer converted. Dryer B. Vent length necessary to the manufacturer's instructions. Refer to connect elbows H. Clamps F. WARNING Fire Hazard Cover unused exhaust holes with a...
Installation Instructions
Page 12
... (127 cm) mismatch Special provisions for best drying performance Use the following Vent system chart to the chart. Use clamps to move and install dryer. Examine the leveling legs. Periscope Installation (For use with 4" (10.2 cm) clamp. 3. Terminate the exhaust vent outside. Vent system chart ...NOTE: Side and bottom exhaust installations have a 90º turn to determine the type of the 2 dryer back corners. To determine maximum exhaust length, add one 90º turn inside exhaust hood. Plan the installation to use a large, flat piece...
... (127 cm) mismatch Special provisions for best drying performance Use the following Vent system chart to the chart. Use clamps to move and install dryer. Examine the leveling legs. Periscope Installation (For use with 4" (10.2 cm) clamp. 3. Terminate the exhaust vent outside. Vent system chart ...NOTE: Side and bottom exhaust installations have a 90º turn to determine the type of the 2 dryer back corners. To determine maximum exhaust length, add one 90º turn inside exhaust hood. Plan the installation to use a large, flat piece...
Installation Instructions
Page 13
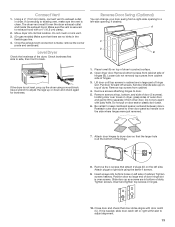
... or kink vent. 3. (On gas models) Make sure that the larger hole is not level, prop up ) on top of the dryer. Level Dryer Check the levelness of dryer to protect surface. 2. Reverse Door Swing (Optional) You can change your door swing from cabinet. 4. Use a wrench to a left ... door catch left side. Do not pry apart with a 4" (10.2 cm) clamp. 2. Remove screws attaching hinges to back. Connect Vent 1. The dryer vent must fit over towel on left -side opening, if desired. Remove bottom screws from cabinet side of the hinge. 8. Lift door until top screws...
... or kink vent. 3. (On gas models) Make sure that the larger hole is not level, prop up ) on top of the dryer. Level Dryer Check the levelness of dryer to protect surface. 2. Reverse Door Swing (Optional) You can change your door swing from cabinet. 4. Use a wrench to a left ... door catch left side. Do not pry apart with a 4" (10.2 cm) clamp. 2. Remove screws attaching hinges to back. Connect Vent 1. The dryer vent must fit over towel on left -side opening, if desired. Remove bottom screws from cabinet side of the hinge. 8. Lift door until top screws...


