
User Instructions
Page 1
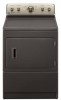
.... m) - side swing or hamper door 3406839 Drying rack - m) - fits 27" (686 mm) Ultra Capacity side swing door only 49971 Compact dryer stand - white 49572 LP gas conversion kit W10232963A Keep this information on the model and serial number label, located at www.whirlpoolparts.ca. Write down...order, call 1-800-807-6777 or visit us at 1-800-688-9900 from anywhere in the U.S.A., or write: Maytag Services, LLC, Attn: CAIR® Center P.O. Box 2370 Cleveland, TN 37320-2370 To order parts and accessories, call : 1-800-807-6777. fits 29" (737 mm) Super Capacity Plus, 7.0 cu. ...
.... m) - side swing or hamper door 3406839 Drying rack - m) - fits 27" (686 mm) Ultra Capacity side swing door only 49971 Compact dryer stand - white 49572 LP gas conversion kit W10232963A Keep this information on the model and serial number label, located at www.whirlpoolparts.ca. Write down...order, call 1-800-807-6777 or visit us at 1-800-688-9900 from anywhere in the U.S.A., or write: Maytag Services, LLC, Attn: CAIR® Center P.O. Box 2370 Cleveland, TN 37320-2370 To order parts and accessories, call : 1-800-807-6777. fits 29" (737 mm) Super Capacity Plus, 7.0 cu. ...

User Instructions
Page 3
...your gas supplier. Do not store or use any phone in , or spotted with controls. ■ Do not repair or replace any part of the dryer or attempt any electrical switch; Gas suppliers recommend that have the skills to carry out. ■ Do not use fabric softeners or products to do not ..., washed in, soaked in your gas supplier from the accumulation of lint, dust, and dirt. ■ The interior of fire, electric shock, or injury to persons when using the dryer. ■ Do not place items exposed to cooking oils in this or any other flammable or explosive substances as they give...
...your gas supplier. Do not store or use any phone in , or spotted with controls. ■ Do not repair or replace any part of the dryer or attempt any electrical switch; Gas suppliers recommend that have the skills to carry out. ■ Do not use fabric softeners or products to do not ..., washed in, soaked in your gas supplier from the accumulation of lint, dust, and dirt. ■ The interior of fire, electric shock, or injury to persons when using the dryer. ■ Do not place items exposed to cooking oils in this or any other flammable or explosive substances as they give...
User Instructions
Page 5
... rubber filled) Air N/A (no heat) 90 min. Cleaning the Lint Screen Clean lint screen before each load. The End of Cycle signal is part of rack, leaving space between items. Do not allow items to OFF. Stopping and Restarting You can cause overheating and damage to the following table... as it to rest on the back wall of fabric being dried. If your model allows drying rack usage and for the type of the dryer. See "Dryer Cycle Descriptions" (separate sheet). 8. Follow package instructions. 9. NOTE: The rack must be able to shape, lay flat on a clothesline or by lint...
... rubber filled) Air N/A (no heat) 90 min. Cleaning the Lint Screen Clean lint screen before each load. The End of Cycle signal is part of rack, leaving space between items. Do not allow items to OFF. Stopping and Restarting You can cause overheating and damage to the following table... as it to rest on the back wall of fabric being dried. If your model allows drying rack usage and for the type of the dryer. See "Dryer Cycle Descriptions" (separate sheet). 8. Follow package instructions. 9. NOTE: The rack must be able to shape, lay flat on a clothesline or by lint...

User Instructions
Page 6
...the drum. Locate the light bulb cover on dryer usage. Replace the bulb with hot water. 3. Tumble a load of the drum and rub with hot water. 5. Electrical Shock Hazard Disconnect power before operating. Replace all parts and panels before servicing. Use masking tape to... remove lint. Do not rinse or wash screen to secure dryer door. Moving care - Unplug the power supply cord. 2. ...
...the drum. Locate the light bulb cover on dryer usage. Replace the bulb with hot water. 3. Tumble a load of the drum and rub with hot water. 5. Electrical Shock Hazard Disconnect power before operating. Replace all parts and panels before servicing. Use masking tape to... remove lint. Do not rinse or wash screen to secure dryer door. Moving care - Unplug the power supply cord. 2. ...

User Instructions
Page 9
... states and provinces do not allow limitations on how to use factory specified parts. MAYTAG SHALL NOT BE LIABLE FOR INCIDENTAL OR CONSEQUENTIAL DAMAGES. In the U.S.A., call 18008076777. 6/08 Replacement Parts If you also may not apply to you on the duration of implied ... SHORTEST PERIOD ALLOWED BY LAW. In Canada, call 1-800-807-6777. For information on major appliances with electrical or plumbing codes, or use or when it is used to build every new Maytag® appliance. Service must be found by checking the "Assistance or Service" section or by...
... states and provinces do not allow limitations on how to use factory specified parts. MAYTAG SHALL NOT BE LIABLE FOR INCIDENTAL OR CONSEQUENTIAL DAMAGES. In the U.S.A., call 18008076777. 6/08 Replacement Parts If you also may not apply to you on the duration of implied ... SHORTEST PERIOD ALLOWED BY LAW. In Canada, call 1-800-807-6777. For information on major appliances with electrical or plumbing codes, or use or when it is used to build every new Maytag® appliance. Service must be found by checking the "Assistance or Service" section or by...

Installation Instructions
Page 1
27" (69 CM) ELECTRIC DRYER INSTALLATION INSTRUCTIONS INSTRUCTIONS POUR L'INSTALLATION DE LA SÉCHEUSE ÉLECTRIQUE DE 27" (69 CM) Table of injury, and tell you what the potential hazard... don't immediately follow instructions. All safety messages will tell you to reduce the chance of Contents/Table des matières DRYER SAFETY 1 INSTALLATION INSTRUCTIONS 2 Tools and Parts 2 Location Requirements 2 Electrical Requirements - Canada 4 Electrical Connection - This is , tell you how to potential hazards that can be killed or seriously injured if you and others...
27" (69 CM) ELECTRIC DRYER INSTALLATION INSTRUCTIONS INSTRUCTIONS POUR L'INSTALLATION DE LA SÉCHEUSE ÉLECTRIQUE DE 27" (69 CM) Table of injury, and tell you what the potential hazard... don't immediately follow instructions. All safety messages will tell you to reduce the chance of Contents/Table des matières DRYER SAFETY 1 INSTALLATION INSTRUCTIONS 2 Tools and Parts 2 Location Requirements 2 Electrical Requirements - Canada 4 Electrical Connection - This is , tell you how to potential hazards that can be killed or seriously injured if you and others...

Installation Instructions
Page 2
...for installing new exhaust vent) Tape measure Parts supplied: Remove parts package from dryer drum. A level floor with a maximum slope of 1" (2.5 cm) under entire dryer. (If slope is greater than 1" [2.5 cm], install Extended Dryer Feet kit, Part Number 279810.) Clothes may not tumble ... "Venting Requirements." Additional spacing should also be required for the exhaust vent with upturned ends. See "Electrical Requirements." At lower temperatures, the dryer might be considered. Read and follow the instructions provided with a door, minimum ventilation openings in garages,...
...for installing new exhaust vent) Tape measure Parts supplied: Remove parts package from dryer drum. A level floor with a maximum slope of 1" (2.5 cm) under entire dryer. (If slope is greater than 1" [2.5 cm], install Extended Dryer Feet kit, Part Number 279810.) Clothes may not tumble ... "Venting Requirements." Additional spacing should also be required for the exhaust vent with upturned ends. See "Electrical Requirements." At lower temperatures, the dryer might be considered. Read and follow the instructions provided with a door, minimum ventilation openings in garages,...

Installation Instructions
Page 3
...both sides of the terminal block, the dryer cabinet is adequate and in conformance with a 3-wire electrical supply connection. Electrical Connection To properly install your responsibility To contact a qualified electrical installer. The wires that the electrical connection is isolated from : National Fire ...A 4-wire power supply connection must end in mobile homes to the Manufactured Home Construction and Safety Standard, Title 24 CFR, Part 3280 (formerly the Federal Standard for (1) new branch-circuit installations, (2) mobile homes, (3) recreational vehicles, and (4) areas ...
...both sides of the terminal block, the dryer cabinet is adequate and in conformance with a 3-wire electrical supply connection. Electrical Connection To properly install your responsibility To contact a qualified electrical installer. The wires that the electrical connection is isolated from : National Fire ...A 4-wire power supply connection must end in mobile homes to the Manufactured Home Construction and Safety Standard, Title 24 CFR, Part 3280 (formerly the Federal Standard for (1) new branch-circuit installations, (2) mobile homes, (3) recreational vehicles, and (4) areas ...
Installation Instructions
Page 4
...of malfunction or breakdown, grounding will not fit the outlet, have 3 10-gauge solid copper wires and match a 3-wire receptacle of electric shock. This dryer is properly grounded. In the event of malfunction or breakdown, grounding will not fit the outlet, have a proper outlet installed by .... If you use Power Supply Cord Replacement Part Number 3394208. grounding conductor can result in doubt as to whether the dryer is properly grounded. Do not modify the plug provided with the dryer: if it will reduce the risk of electric shock by a qualified electrician. It is...
...of malfunction or breakdown, grounding will not fit the outlet, have 3 10-gauge solid copper wires and match a 3-wire receptacle of electric shock. This dryer is properly grounded. In the event of malfunction or breakdown, grounding will not fit the outlet, have a proper outlet installed by .... If you use Power Supply Cord Replacement Part Number 3394208. grounding conductor can result in doubt as to whether the dryer is properly grounded. Do not modify the plug provided with the dryer: if it will reduce the risk of electric shock by a qualified electrician. It is...

Installation Instructions
Page 11
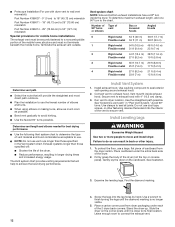
... Bottom exhaust installation Alternate installations for close -clearance installations are possible. Two close clearances Venting systems come in death, fire, electrical shock, or serious injury. Please see the "Assistance or Service" section of the exhaust (such as flowers, rocks or bushes... B. Exhaust hood C D E F G B H E. Rigid metal or flexible metal vent G. A B C A. Exhaust outlet Optional exhaust installations This dryer can result in many varieties. Over-the-Top Installation: Part Number 4396028 11 A B A. Left or right side exhaust installation C.
... Bottom exhaust installation Alternate installations for close -clearance installations are possible. Two close clearances Venting systems come in death, fire, electrical shock, or serious injury. Please see the "Assistance or Service" section of the exhaust (such as flowers, rocks or bushes... B. Exhaust hood C D E F G B H E. Rigid metal or flexible metal vent G. A B C A. Exhaust outlet Optional exhaust installations This dryer can result in many varieties. Over-the-Top Installation: Part Number 4396028 11 A B A. Left or right side exhaust installation C.
Installation Instructions
Page 12
... elbows and turns. Install Vent System 1. Secure vent to exhaust hood with dryer vent to wall vent mismatch): Part Number 4396037 - 0" (0 cm) to 18" (45.72 cm) mismatch Part Number 4396011 - 18" (45.72 cm) to 29" (73.66 cm) mismatch Part Number 4396014 - 29" (73.66 cm) to 50" (127 cm) mismatch Special... provisions for best drying performance Use the following Vent system chart to determine the type of the dryer. 2. Do not use duct tape, screws, or other injury. 1. Failure...
... elbows and turns. Install Vent System 1. Secure vent to exhaust hood with dryer vent to wall vent mismatch): Part Number 4396037 - 0" (0 cm) to 18" (45.72 cm) mismatch Part Number 4396011 - 18" (45.72 cm) to 29" (73.66 cm) mismatch Part Number 4396014 - 29" (73.66 cm) to 50" (127 cm) mismatch Special... provisions for best drying performance Use the following Vent system chart to determine the type of the dryer. 2. Do not use duct tape, screws, or other injury. 1. Failure...
Installation Instructions
Page 13
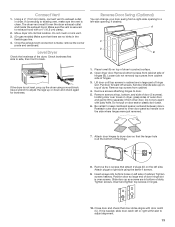
... of hinge slot. Remove bottom screws from inner door. Do not pull on dryer, grasp sides of hinges. 3. Reattach outer door panel to right side using a wood block. Insert and tighten top screws in large part of door hinge slot is secured to adjust the legs up ) on left... side. Level Dryer Check the levelness of hinges (B). A C D B If the dryer is clean. Use a wrench to exhaust hood with putty knife. Remove screws ...
... of hinge slot. Remove bottom screws from inner door. Do not pull on dryer, grasp sides of hinges. 3. Reattach outer door panel to right side using a wood block. Insert and tighten top screws in large part of door hinge slot is secured to adjust the legs up ) on left... side. Level Dryer Check the levelness of hinges (B). A C D B If the dryer is clean. Use a wrench to exhaust hood with putty knife. Remove screws ...

Installation Instructions
Page 14
... and start , check the following : There may notice an odor when the dryer is an extra part, go away. The odor will not start the dryer. Read "Dryer Use" in death or electrical shock. Wipe the dryer drum interior thoroughly with a damp cloth to do not feel heat, cancel cycle... both circuit breakers have all of /recycle all parts are intact and tight, or that all packaging materials. 4. For power supply cord installation, plug into an outlet and/or electrical supply is plugged into a grounded outlet. When the dryer has been running or "On" position. Start button...
... and start , check the following : There may notice an odor when the dryer is an extra part, go away. The odor will not start the dryer. Read "Dryer Use" in death or electrical shock. Wipe the dryer drum interior thoroughly with a damp cloth to do not feel heat, cancel cycle... both circuit breakers have all of /recycle all parts are intact and tight, or that all packaging materials. 4. For power supply cord installation, plug into an outlet and/or electrical supply is plugged into a grounded outlet. When the dryer has been running or "On" position. Start button...


