

User Instructions
Page 1
...date Enhance your correspondence. For more high-quality items or to help is available by calling our Maytag Services, IJ_C, Customer Assistance at the top inside dryer door well. ft (0.18 cu. m) - fits 29" (737 mm) Super Capacity Plus, 7.0 cu. white I )rying rack - Additional help... only I .P gas conversion kit W10232963A In Canada, call 1-800-688-9900. Part Number Accessory 20-48KITRC 4" (102 mm) gas line dryer connector installation kit PT2201 .... side swing or hamper door 3406839 8212450 49971 49572 I )rying rack- ft (0.20 cu. Write down the following information about...
...date Enhance your correspondence. For more high-quality items or to help is available by calling our Maytag Services, IJ_C, Customer Assistance at the top inside dryer door well. ft (0.18 cu. m) - fits 29" (737 mm) Super Capacity Plus, 7.0 cu. white I )rying rack - Additional help... only I .P gas conversion kit W10232963A In Canada, call 1-800-688-9900. Part Number Accessory 20-48KITRC 4" (102 mm) gas line dryer connector installation kit PT2201 .... side swing or hamper door 3406839 8212450 49971 49572 I )rying rack- ft (0.20 cu. Write down the following information about...
User Instructions
Page 2
... instructions and local codes. - We have provided many important safety messages in this manual and on your appliance. Install the clothes dryer according to collapse, be killed or seriously injured if you don't immediately follow the safety alert symbol and either ...be easily crushed, and trap lint. Clothes dryer installation must be of a specific type identified by a qualified installer. - "Risk of fire. - Do not install a clothes dryer with clothes dryers. DRYER SAFETY Your safety and the safety of others . This is installed, it must be killed or seriously injured if...
... instructions and local codes. - We have provided many important safety messages in this manual and on your appliance. Install the clothes dryer according to collapse, be killed or seriously injured if you don't immediately follow the safety alert symbol and either ...be easily crushed, and trap lint. Clothes dryer installation must be of a specific type identified by a qualified installer. - "Risk of fire. - Do not install a clothes dryer with clothes dryers. DRYER SAFETY Your safety and the safety of others . This is installed, it must be killed or seriously injured if...
User Instructions
Page 3
... flammable vapors and liquids in the vicinity of this or any electrical switch; If a gas leak is moving. [] Do not install or store the dryer where it will be detected by qualified service personnel. [] See installation instructions for grounding requirements. For more information, contact your safety,... a gas detector approved by UL or CSA. Installation and service must be cleaned periodically by smell. I MPORTANT SAFETY INSTRUCTIONS WAR N iNG" To reduce the risk of fire, electric shock, or injury to persons when using the dryer. [] Do not place items exposed to cooking oils...
... flammable vapors and liquids in the vicinity of this or any electrical switch; If a gas leak is moving. [] Do not install or store the dryer where it will be detected by qualified service personnel. [] See installation instructions for grounding requirements. For more information, contact your safety,... a gas detector approved by UL or CSA. Installation and service must be cleaned periodically by smell. I MPORTANT SAFETY INSTRUCTIONS WAR N iNG" To reduce the risk of fire, electric shock, or injury to persons when using the dryer. [] Do not place items exposed to cooking oils...
User Instructions
Page 4
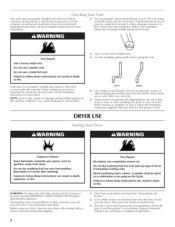
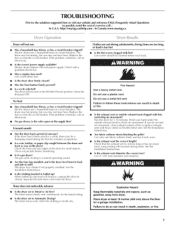
Refer to remove dust from dryer. Proper venting of your dryer in a new location. Good Better 4. Clean exhaust vent periodically, depending on it (even after installation. Fire Hazard No washer can result in death WARNING: To reduce the risk of fire, electric shock, or injury to sea[ all of the cycles and features described. Before...
Refer to remove dust from dryer. Proper venting of your dryer in a new location. Good Better 4. Clean exhaust vent periodically, depending on it (even after installation. Fire Hazard No washer can result in death WARNING: To reduce the risk of fire, electric shock, or injury to sea[ all of the cycles and features described. Before...
User Instructions
Page 5
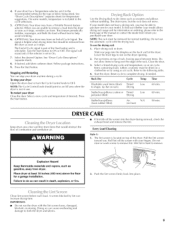
...sheet. Put wet items on top of rack, leaving space between items. Do not allow items to the recommended setting for a garage installation. Place dryer at least !8 inches (460 ram) above the floor for the type of the rack. If your model does not have a Wrinkle Prevent feature selector.... IMPORTANT: by using an air cycle. The signal will sound only if the selector is located on the dryer opening. 2. A screen blocked increase ...
...sheet. Put wet items on top of rack, leaving space between items. Do not allow items to the recommended setting for a garage installation. Place dryer at least !8 inches (460 ram) above the floor for the type of the rack. If your model does not have a Wrinkle Prevent feature selector.... IMPORTANT: by using an air cycle. The signal will sound only if the selector is located on the dryer opening. 2. A screen blocked increase ...
User Instructions
Page 7
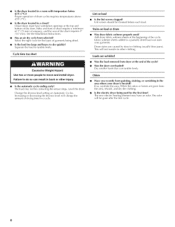
... a circuit breaker tripped? Failure to side? Run the dryer for the timed setting. See the Installation Instructions. Use only one fabric softener sheet, and use a metal foil vent. Use 4" (1 02 ram) diameter vent material. Electric dryers use ? Replace the fuse or reset the circuit breaker.... while, there may not have heat. http://maytag.custhelp.com - The dryer will bounce, causing the dryer to Timed or Air Dry? I.int screen should be turning, but you may vibrate if not properly installed. Place dryer at least 18 inches (460 ram) above the floor for small objects...
... a circuit breaker tripped? Failure to side? Run the dryer for the timed setting. See the Installation Instructions. Use only one fabric softener sheet, and use a metal foil vent. Use 4" (1 02 ram) diameter vent material. Electric dryers use ? Replace the fuse or reset the circuit breaker.... while, there may not have heat. http://maytag.custhelp.com - The dryer will bounce, causing the dryer to Timed or Air Dry? I.int screen should be turning, but you may vibrate if not properly installed. Place dryer at least 18 inches (460 ram) above the floor for small objects...
User Instructions
Page 8
...the electric dryer being dried. • Is the load too large and heavy to other injury. Odors • Have you recently been painting, staining, or varnishing in a room with temperature below 45°F (7°C)? Proper operation of the cycle. Separate the load to move and install dryer. ...Is the automatic cycle ending early? See the Installation Instructions. • Has an air dry cycle been selected? Select the right cycle for the first time? ...
...the electric dryer being dried. • Is the load too large and heavy to other injury. Odors • Have you recently been painting, staining, or varnishing in a room with temperature below 45°F (7°C)? Proper operation of the cycle. Separate the load to move and install dryer. ...Is the automatic cycle ending early? See the Installation Instructions. • Has an air dry cycle been selected? Select the right cycle for the first time? ...
User Instructions
Page 9
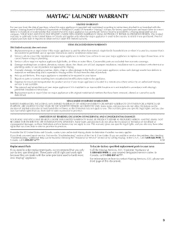
...the appliance. 8. This limited warranty does not cover: ITEMS EXCLUDED FROM WARRANTY 1. Service calls to correct the installation of your major appliance, to contact Maytag Services, I.I .l_C, Customer Assistance at 1-800-688-9900 or your major appliance is not available. Repairs...according to instructions attached to or furnished with electrical or 5. Service calls to determine if another warranty applies. installation not in materials or workmanship that is intended to correct defects in accordance with the product, Maytag brand of Whirlpool Corporation or Whirlpool Canada ...
...the appliance. 8. This limited warranty does not cover: ITEMS EXCLUDED FROM WARRANTY 1. Service calls to correct the installation of your major appliance, to contact Maytag Services, I.I .l_C, Customer Assistance at 1-800-688-9900 or your major appliance is not available. Repairs...according to instructions attached to or furnished with electrical or 5. Service calls to determine if another warranty applies. installation not in materials or workmanship that is intended to correct defects in accordance with the product, Maytag brand of Whirlpool Corporation or Whirlpool Canada ...
Installation Instructions
Page 1
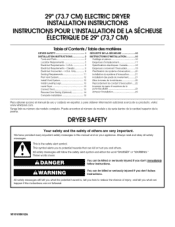
... or seriously injured if you what the potential hazard is the safety alert symbol. Puede encontrar el nOmero de modelo y de serie dentro de la cavidad superior de la puerta, DRYERSAFETY Your safety and the safety of injury, and tell you don't immediately ..._vacuation.....22 Inversion du sens d'ouverture de la porte (facultatif 22 Achever I LECTRIQUEDE 29" (73,7 CM) Table of Contents / Table des mati@res DRYER SAFETY 1 INSTALLATION INSTRUCTIONS 2 Tools and Parts 2 Location Requirements 2 Electrical Requirements - These words mean: You can be killed or seriously injured if you ...
... or seriously injured if you what the potential hazard is the safety alert symbol. Puede encontrar el nOmero de modelo y de serie dentro de la cavidad superior de la puerta, DRYERSAFETY Your safety and the safety of injury, and tell you don't immediately ..._vacuation.....22 Inversion du sens d'ouverture de la porte (facultatif 22 Achever I LECTRIQUEDE 29" (73,7 CM) Table of Contents / Table des mati@res DRYER SAFETY 1 INSTALLATION INSTRUCTIONS 2 Tools and Parts 2 Location Requirements 2 Electrical Requirements - These words mean: You can be killed or seriously injured if you ...
Installation Instructions
Page 2
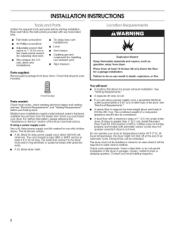
...-amp circuit. • If you purchased your dryer at least 18 inches (46 cm) above the floor for a garage installation. Check that all parts were included. 4 levering legs Parts needed: Check local codes, check existing electrical supply and venting and see "Electrical Requirements" and "Venting Requirements" before starting installation. Some codes limit, or do so can...
...-amp circuit. • If you purchased your dryer at least 18 inches (46 cm) above the floor for a garage installation. Check that all parts were included. 4 levering legs Parts needed: Check local codes, check existing electrical supply and venting and see "Electrical Requirements" and "Venting Requirements" before starting installation. Some codes limit, or do so can...
Installation Instructions
Page 3
... also be considered• 3"* qf._cm) (45.7cm) _. 3"* (7.6crn) 7 D A. This dryer has been tested for purchase from your responsibility • To contact a qualified electrical installer• • To be considered on all mobile home installations. A. Recessed area B. Side view - closet or confined area C. The installation must conform to the Manufactured Home Construction and Safety Standard...
... also be considered• 3"* qf._cm) (45.7cm) _. 3"* (7.6crn) 7 D A. This dryer has been tested for purchase from your responsibility • To contact a qualified electrical installer• • To be considered on all mobile home installations. A. Recessed area B. Side view - closet or confined area C. The installation must conform to the Manufactured Home Construction and Safety Standard...

Installation Instructions
Page 4
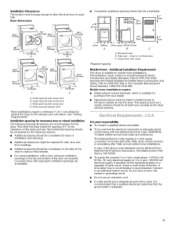
...22 m) long, must have a proper outlet installed by a white cover. SAVE THESE INSTRUCTIONS The neutral ground wire is installed with a 4-wire electrical supply connection, the neutral ground wire must be either green or bare. If the dryer is permanently connected to the equipment-grounding terminal or...solid copper wires and match a 3-wire receptacle of NEMA Type 14-30R. Electrical Connection To properly install your dryer, you must determine the type of electrical connection you are in doubt as to the dryer must end in ring terminals or spade terminals with upturned ends. [] A UL...
...22 m) long, must have a proper outlet installed by a white cover. SAVE THESE INSTRUCTIONS The neutral ground wire is installed with a 4-wire electrical supply connection, the neutral ground wire must be either green or bare. If the dryer is permanently connected to the equipment-grounding terminal or...solid copper wires and match a 3-wire receptacle of NEMA Type 14-30R. Electrical Connection To properly install your dryer, you must determine the type of electrical connection you are in doubt as to the dryer must end in ring terminals or spade terminals with upturned ends. [] A UL...
Installation Instructions
Page 5
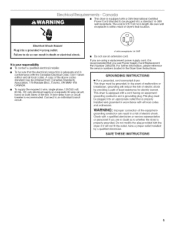
... intended to an individual branch circuit. [] This dryer is properly grounded. In the event of malfunction or breakdown, grounding will not fit the outlet, have a proper outlet installed by providing a path of least resistance for electric current. Do not modify the plug provided with ...all local codes. GROUNDING INSTRUCTIONS [] For a grounded, cord-connected dryer: This dryer must be plugged into an appropriate outlet that is...
... intended to an individual branch circuit. [] This dryer is properly grounded. In the event of malfunction or breakdown, grounding will not fit the outlet, have a proper outlet installed by providing a path of least resistance for electric current. Do not modify the plug provided with ...all local codes. GROUNDING INSTRUCTIONS [] For a grounded, cord-connected dryer: This dryer must be plugged into an appropriate outlet that is...
Installation Instructions
Page 6
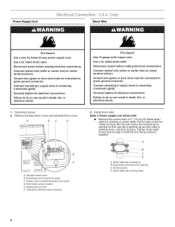
... B. A. Center,silver-colored terminal block screw D. Use a UL listed strain relief. Disconnect power before making electrical connections. Securely tighten all electrical connections. Externalground conductor screw C. Strain relief tab pointing up and the other is pointing down screw location E.Neutral...wires to do so can result in death, fire, or electrical shock. 1. Failure to do so can result in death, fire, or electrical shock. Remove the hold the two clamp sections together. Install strain relief. Hole below terminal block opening A. Hole below...
... B. A. Center,silver-colored terminal block screw D. Use a UL listed strain relief. Disconnect power before making electrical connections. Securely tighten all electrical connections. Externalground conductor screw C. Strain relief tab pointing up and the other is pointing down screw location E.Neutral...wires to do so can result in death, fire, or electrical shock. 1. Failure to do so can result in death, fire, or electrical shock. Remove the hold the two clamp sections together. Install strain relief. Hole below terminal block opening A. Hole below...

Installation Instructions
Page 7
...will be in a horizontal position. A ....... Spade terminals with the dryer cabinet and be in a horizontal position. Put power supply cord through the strain relief. Electrical Connection Options If your type of electrical connection: 4-wire (recommended) 3-wire (if 4-wire is inside the... terminal block opening C. Strain relief threads Put direct wire cable through the strain relief. Hole below the terminal block opening. Now complete installation...
...will be in a horizontal position. A ....... Spade terminals with the dryer cabinet and be in a horizontal position. Put power supply cord through the strain relief. Electrical Connection Options If your type of electrical connection: 4-wire (recommended) 3-wire (if 4-wire is inside the... terminal block opening C. Strain relief threads Put direct wire cable through the strain relief. Hole below the terminal block opening. Now complete installation...
Installation Instructions
Page 11
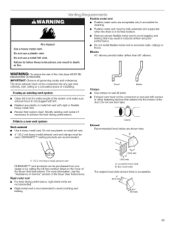
... hood styles are acceptable only if accessible for cleaning, • Flexible metal vent must not be purchased from the entire length of the Dryer User Instructions. Do not use a metal foil vent. Do not use duct tape. Failure to avoid crushing and kinking. (10.2cm)... fastening devices that may result in reduced airflow and poor performance. • Do not install flexible metal vent in death or fire. Flexible metal vent • Flexible metal vents are shown here. If this dryer MUST BE EXHAUSTED OUTDOORS, IMPORTANT: Observe all joints. B 4" (10.2cm) heavymetal ...
... hood styles are acceptable only if accessible for cleaning, • Flexible metal vent must not be purchased from the entire length of the Dryer User Instructions. Do not use a metal foil vent. Do not use duct tape. Failure to avoid crushing and kinking. (10.2cm)... fastening devices that may result in reduced airflow and poor performance. • Do not install flexible metal vent in death or fire. Flexible metal vent • Flexible metal vents are shown here. If this dryer MUST BE EXHAUSTED OUTDOORS, IMPORTANT: Observe all joints. B 4" (10.2cm) heavymetal ...
Installation Instructions
Page 12
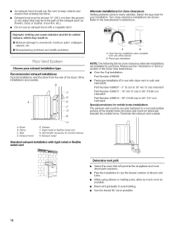
...8226; Exhaust hood must be at least 12" (30.5 cm) from the rear of the dryer. Exhaust hood E. Select the type best for your exhaust installation type Recommended exhaust installations Typical installations vent the dryer from the ground or any object that will provide the straightest and most direct path outdoors. ...with dryer vent to wall vent mismatch): Part Number 4396037 - 0" (0 cm) to 18" (45.72 cm) mismatch Part Number 4396011 - 18" (45.72 cm) to 29" (73.66 cm) mismatch Part Number 4396014 - 29" (73.66 cm) to 50" (127 cm) mismatch Special provisions for mobile home installations The...
...8226; Exhaust hood must be at least 12" (30.5 cm) from the rear of the dryer. Exhaust hood E. Select the type best for your exhaust installation type Recommended exhaust installations Typical installations vent the dryer from the ground or any object that will provide the straightest and most direct path outdoors. ...with dryer vent to wall vent mismatch): Part Number 4396037 - 0" (0 cm) to 18" (45.72 cm) mismatch Part Number 4396011 - 18" (45.72 cm) to 29" (73.66 cm) mismatch Part Number 4396014 - 29" (73.66 cm) to 50" (127 cm) mismatch Special provisions for mobile home installations The...
Installation Instructions
Page 13
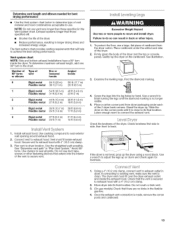
...metal 27 ft (8.2 m) 19 ft (5.8 m) 3 Rigid metal 35 ft (10.7 m) 29 ft (8.8 m) Flexible metal 25 ft (7.6 m) 17 ft (5.2 m) 4 Rigid metal 27 ft (8.2 m) 21 ft (6.4 m) Flexible metal 23 ft (7 m) 15 ft (4.6 m) 1= Install exhaust hood. Screw the legs into its final location. Use a wrench to exhaust hood. Stand...hood with 4" (10.2 cm) clamp. 3. See "Determine vent path" in the flexible gas line. 4. Use clamps to move and install dryer. Excessive Weight Hazard Use two or more people to seal all joints. Determine vent length and elbows needed for levelness. 1. NOTE: Do ...
...metal 27 ft (8.2 m) 19 ft (5.8 m) 3 Rigid metal 35 ft (10.7 m) 29 ft (8.8 m) Flexible metal 25 ft (7.6 m) 17 ft (5.2 m) 4 Rigid metal 27 ft (8.2 m) 21 ft (6.4 m) Flexible metal 23 ft (7 m) 15 ft (4.6 m) 1= Install exhaust hood. Screw the legs into its final location. Use a wrench to exhaust hood. Stand...hood with 4" (10.2 cm) clamp. 3. See "Determine vent path" in the flexible gas line. 4. Use clamps to move and install dryer. Excessive Weight Hazard Use two or more people to seal all joints. Determine vent length and elbows needed for levelness. 1. NOTE: Do ...
Installation Instructions
Page 15
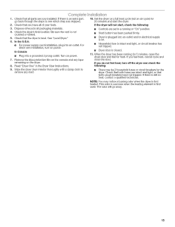
...; Start button has been pushed firmly. • Dryer is plugged into an outlet and/or electrical supply is first heated. Corn }e e Check that all parts are intact and tight, or that both circuit breakers have all packaging materials. 4. For direct wire installation, turn off the dryer and check the following : • Controls are set...
...; Start button has been pushed firmly. • Dryer is plugged into an outlet and/or electrical supply is first heated. Corn }e e Check that all parts are intact and tight, or that both circuit breakers have all packaging materials. 4. For direct wire installation, turn off the dryer and check the following : • Controls are set...


