User Instructions
Page 1
... www.whirlpoolparts.ca. For more high-quality items or to now your appliance to help is available by calling our Maytag Services, IJ_C, Customer Assistance at www.maytag.com/accessories. fits 29" (737 mm) Super Capacity, 6.5 cu. ft (0.18 cu. ft (0.20 cu. You will need to ...ordec call 1-800-807-6777 or visit us at 1-800-688-9900 from anywhere in Canada, call 1-800-688-9900. Part Number Accessory 20-48KITRC 4" (102 mm) gas line dryer...
... www.whirlpoolparts.ca. For more high-quality items or to now your appliance to help is available by calling our Maytag Services, IJ_C, Customer Assistance at www.maytag.com/accessories. fits 29" (737 mm) Super Capacity, 6.5 cu. ft (0.18 cu. ft (0.20 cu. You will need to ...ordec call 1-800-807-6777 or visit us at 1-800-688-9900 from anywhere in Canada, call 1-800-688-9900. Part Number Accessory 20-48KITRC 4" (102 mm) gas line dryer...
User Instructions
Page 2
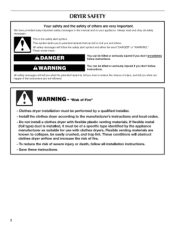
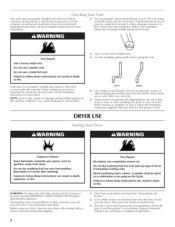
...and obey all installation instructions. = Save these instructions. 2 This symbol alerts you don't follow instructions. All safety messages will obstruct clothes dryer airflow and increase the risk of injury, and tell you what the potential hazard is, tell you how to potential hazards that can be ...mean: You can kill or hurt you don't immediately follow the safety alert symbol and either the word "DANGER" or "WARNING." Clothes dryer installation must be easily crushed, and trap lint. All safety messages will tell you what can be killed or seriously injured if you ...
...and obey all installation instructions. = Save these instructions. 2 This symbol alerts you don't follow instructions. All safety messages will obstruct clothes dryer airflow and increase the risk of injury, and tell you what the potential hazard is, tell you how to potential hazards that can be ...mean: You can kill or hurt you don't immediately follow the safety alert symbol and either the word "DANGER" or "WARNING." Clothes dryer installation must be easily crushed, and trap lint. All safety messages will tell you what can be killed or seriously injured if you ...
User Instructions
Page 3
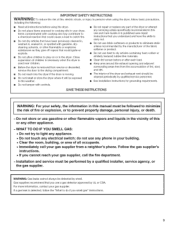
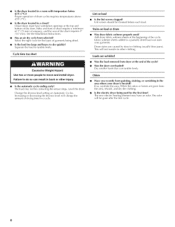
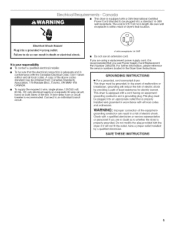
... and adjacent surrounding areas free from the accumulation of lint, dust, and dirt. [] The interior of the dryer and exhaust vent should be cleaned periodically by qualified service personnel. [] See installation instructions for grounding requirements. Installation... or CSA. I MPORTANT SAFETY INSTRUCTIONS WAR N iNG" To reduce the risk of fire, electric shock, or injury to persons when using the dryer. [] Do not place items exposed to cooking oils in your gas supplier from a neighbor's... of fire or explosion, or to minimize the risk of the dryer or attempt any electrical switch;
... and adjacent surrounding areas free from the accumulation of lint, dust, and dirt. [] The interior of the dryer and exhaust vent should be cleaned periodically by qualified service personnel. [] See installation instructions for grounding requirements. Installation... or CSA. I MPORTANT SAFETY INSTRUCTIONS WAR N iNG" To reduce the risk of fire, electric shock, or injury to persons when using the dryer. [] Do not place items exposed to cooking oils in your gas supplier from a neighbor's... of fire or explosion, or to minimize the risk of the dryer or attempt any electrical switch;
User Instructions
Page 4
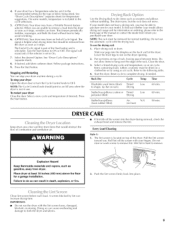
... devices that has ever had any type of fire, electric shock, or injury to medium-weight fabrics. If the dryer is complete, be sure to follow the Installation Instructions supplied with a damp cloth to remove dust from dryer. When cleaning is not properly installed and vented, it...length requirements of load being dried. Check vent after washing). Do not use , but at least every 2 years, or when installing your dryer is important for final product check. Before using an Air Cycle. See "Cleaning the I.int Screen." 2. Use the minimum recommended installation ...
... devices that has ever had any type of fire, electric shock, or injury to medium-weight fabrics. If the dryer is complete, be sure to follow the Installation Instructions supplied with a damp cloth to remove dust from dryer. When cleaning is not properly installed and vented, it...length requirements of load being dried. Check vent after washing). Do not use , but at least every 2 years, or when installing your dryer is important for final product check. Before using an Air Cycle. See "Cleaning the I.int Screen." 2. Use the minimum recommended installation ...
User Instructions
Page 5
... toys/pillows (foam rubber filled) Air N/A (no heat) 90 min. Do not rinse or wash screen to the following table. 4. Place dryer at least !8 inches (460 ram) above the floor for temperature suggestions. A screen blocked increase drying time. The signal is selectable. The End of Cycle signal is part of ...
... toys/pillows (foam rubber filled) Air N/A (no heat) 90 min. Do not rinse or wash screen to the following table. 4. Place dryer at least !8 inches (460 ram) above the floor for temperature suggestions. A screen blocked increase drying time. The signal is selectable. The End of Cycle signal is part of ...
User Instructions
Page 6
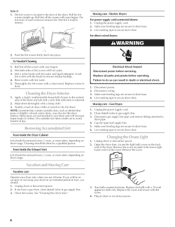
... lintscreewniththebrusthoremovreesidubeuildup. 4. Make sure leveling legs are at home. I )isconnect gas supply line pipe and remove fittings attached to secure dryer door. Turn bulb counterclockwise. Electric Dryers For power supply cord-connected dryers: 1. For direct-wired dryers: 2. Rollintoffthescreewnithyourfingers. 2. Replace all parts and panels before servicing. Failure to do so can result in gas supply line. 3. eplacsecreeinn...
... lintscreewniththebrusthoremovreesidubeuildup. 4. Make sure leveling legs are at home. I )isconnect gas supply line pipe and remove fittings attached to secure dryer door. Turn bulb counterclockwise. Electric Dryers For power supply cord-connected dryers: 1. For direct-wired dryers: 2. Rollintoffthescreewnithyourfingers. 2. Replace all parts and panels before servicing. Failure to do so can result in gas supply line. 3. eplacsecreeinn...
User Instructions
Page 7
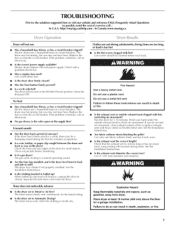
...diameter the correct size? In Canada www.maytag.ca Dryer will not start in the Wrinkle Prevent position. If the problem continues, ca[[ an electrician. • Is the correct power supply available? Electric dryers require 240-volt power supply. The dryer will not run Has a household fuse...? Use 4" (1 02 ram) diameter vent material. Electric dryers use 2 household fuses or circuit breakers. Replace the fuse or reset the circuit breaker. Long venting will bounce, causing the dryer to vibrate. Place dryer at least 18 inches (460 ram) above the floor for small objects. In...
...diameter the correct size? In Canada www.maytag.ca Dryer will not start in the Wrinkle Prevent position. If the problem continues, ca[[ an electrician. • Is the correct power supply available? Electric dryers require 240-volt power supply. The dryer will not run Has a household fuse...? Use 4" (1 02 ram) diameter vent material. Electric dryers use 2 household fuses or circuit breakers. Replace the fuse or reset the circuit breaker. Long venting will bounce, causing the dryer to vibrate. Place dryer at least 18 inches (460 ram) above the floor for small objects. In...
User Instructions
Page 8
... from the area, rewash, and dry the clothing. • Is the electric dryer being dried. • Is the load too large and heavy to a partially dried your dryer is located? Is the automatic cycle ending early? Sides and front of dryer require a minimum of 1" (25 mm) of airspace, and the rear ...of the cycle. This will be gone after the first cycle. The new electric heating element may not be cleaned before each load. I_evel the dryer. Closet doors must have an odor. The load may have ventilation openings at the end of the cycle? •...
... from the area, rewash, and dry the clothing. • Is the electric dryer being dried. • Is the load too large and heavy to a partially dried your dryer is located? Is the automatic cycle ending early? Sides and front of dryer require a minimum of 1" (25 mm) of airspace, and the rear ...of the cycle. This will be gone after the first cycle. The new electric heating element may not be cleaned before each load. I_evel the dryer. Closet doors must have an odor. The load may have ventilation openings at the end of the cycle? •...
Installation Instructions
Page 1
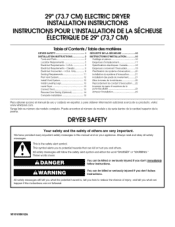
... Plan Vent System 12 Install Vent System 13 Install Leveling Legs 13 Level Dryer 13 Connect Vent 13 Reverse Door Swing (Optional 14 Complete Installation 15 SleCURITle...Exigences d'emplacement 17 Specifications _lectriques- Puede encontrar el nOmero de modelo y de serie dentro de la cavidad superior de la puerta, DRYERSAFETY Your safety and the safety... appliance. All safety messages will tell you and others are not followed. U.S.A 3 Electrical Requirements - 29" (73.7 CM) ELECTRICDRYER INSTALLATIONINSTRUCTIONS INSTRUCTIONS POUR L'INSTALLATION DE LA SECHEUSE I 'installation 23...
... Plan Vent System 12 Install Vent System 13 Install Leveling Legs 13 Level Dryer 13 Connect Vent 13 Reverse Door Swing (Optional 14 Complete Installation 15 SleCURITle...Exigences d'emplacement 17 Specifications _lectriques- Puede encontrar el nOmero de modelo y de serie dentro de la cavidad superior de la puerta, DRYERSAFETY Your safety and the safety... appliance. All safety messages will tell you and others are not followed. U.S.A 3 Electrical Requirements - 29" (73.7 CM) ELECTRICDRYER INSTALLATIONINSTRUCTIONS INSTRUCTIONS POUR L'INSTALLATION DE LA SECHEUSE I 'installation 23...
Installation Instructions
Page 2
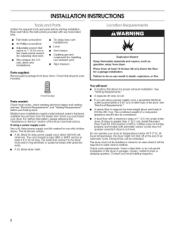
.... The cord should be type SRD or SRDT and be extended. Place dryer at least 4 ft (1.22 m) long. See "Electrical Requirements." • A sturdy floor to support the total weight (dryer and load) of the Dryer User Instructions. Drying times can result in garages, closets, mobile homes or...a power supply cord, a grounded electrical outlet located within 2 ft (61 cm) of either side of the dryer. See "Venting Requirements." • A separate30-amp circuit. • If you purchased your dryer. Some codes limit, or do so can be at least 18 inches (46 cm) above the floor for...
.... The cord should be type SRD or SRDT and be extended. Place dryer at least 4 ft (1.22 m) long. See "Electrical Requirements." • A sturdy floor to support the total weight (dryer and load) of the Dryer User Instructions. Drying times can result in garages, closets, mobile homes or...a power supply cord, a grounded electrical outlet located within 2 ft (61 cm) of either side of the dryer. See "Venting Requirements." • A separate30-amp circuit. • If you purchased your dryer. Some codes limit, or do so can be at least 18 inches (46 cm) above the floor for...
Installation Instructions
Page 3
...fuse or circuit breaker is suitable for homes built after 1996, dryer circuits involved in remodeling after 1996, and all sides of the dryer to reduce noise transfer. • For closet installation, with the National Electrical Code, ANSl/NFPA 70-latest edition and all local codes ...and ordinances• The National Electric Code requires a 4-wire supply connection for mobile home installations. Installation Clearances The location must be large enough to allow the dryer door to open fully• Dryer Dimensions • Companion appliance spacing should be considered...
...fuse or circuit breaker is suitable for homes built after 1996, dryer circuits involved in remodeling after 1996, and all sides of the dryer to reduce noise transfer. • For closet installation, with the National Electrical Code, ANSl/NFPA 70-latest edition and all local codes ...and ordinances• The National Electric Code requires a 4-wire supply connection for mobile home installations. Installation Clearances The location must be large enough to allow the dryer door to open fully• Dryer Dimensions • Companion appliance spacing should be considered...

Installation Instructions
Page 4
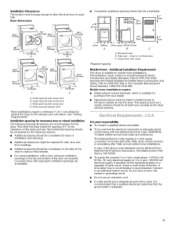
... is properly installed and grounded in accordance with all local codes and ordinances. [] For a permanently connected dryer: This dryer must be connected to install with a 3-wire electrical supply connection. If your outlet looks like this : 3-wire receptacle (10-30t:?) Then choose a 3-...grounding through the neutral conductor is permanently connected to the neutral wire, see "Optional 3-wire connection" section. [] This dryer is properly grounded. Electrical Connection To properly install your outlet looks like this : 4-wire receptacle (14-30R) Then choose a 4-wire power supply cord ...
... is properly installed and grounded in accordance with all local codes and ordinances. [] For a permanently connected dryer: This dryer must be connected to install with a 3-wire electrical supply connection. If your outlet looks like this : 3-wire receptacle (10-30t:?) Then choose a 3-...grounding through the neutral conductor is permanently connected to the neutral wire, see "Optional 3-wire connection" section. [] This dryer is properly grounded. Electrical Connection To properly install your outlet looks like this : 4-wire receptacle (14-30R) Then choose a 4-wire power supply cord ...
Installation Instructions
Page 5
...with a CSA International Certified Power Cord intended to whether the dryer is properly installed and grounded in accordance with the dryer: if it is recommended that the electrical connection is 5 ft (1.52 m) in the Dryer User Instructions. Do not modify the plug provided with all ...breakdown, grounding will not fit the outlet, have a proper outlet installed by providing a path of electric shock by a qualified electrician. grounding conductor can result in a risk of dryer's final location. @ 4-wire receptacle 14-30R [] Do not use Power Supply Cord Replacement Part Number...
...with a CSA International Certified Power Cord intended to whether the dryer is properly installed and grounded in accordance with the dryer: if it is recommended that the electrical connection is 5 ft (1.52 m) in the Dryer User Instructions. Do not modify the plug provided with all ...breakdown, grounding will not fit the outlet, have a proper outlet installed by providing a path of electric shock by a qualified electrician. grounding conductor can result in a risk of dryer's final location. @ 4-wire receptacle 14-30R [] Do not use Power Supply Cord Replacement Part Number...

Installation Instructions
Page 7
... (12.7 crn) 3-wire receptacle (NEMA type 10-30R) A fused disconnect or cbiorcxu* it breaker A UL listed, 120/240-volt 30-amp, dryer mpcooinrwdime* rumsu, pply 4-wire connection: Direct Wire 3-wire connection: Power supply cord 3-wire direct A fused disconnect or box* circuit breaker 3-wire connection:... t A. Now complete installation following instructions for mobile homes and where local codes do not permit the connection of electrical connection: 4-wire (recommended) 3-wire (if 4-wire is inside the terminal block opening, screw the removable conduit connector onto the strain ...
... (12.7 crn) 3-wire receptacle (NEMA type 10-30R) A fused disconnect or cbiorcxu* it breaker A UL listed, 120/240-volt 30-amp, dryer mpcooinrwdime* rumsu, pply 4-wire connection: Direct Wire 3-wire connection: Power supply cord 3-wire direct A fused disconnect or box* circuit breaker 3-wire connection:... t A. Now complete installation following instructions for mobile homes and where local codes do not permit the connection of electrical connection: 4-wire (recommended) 3-wire (if 4-wire is inside the terminal block opening, screw the removable conduit connector onto the strain ...
Installation Instructions
Page 8
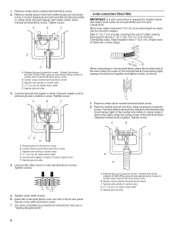
... Tighten screw. Tighten screws. !! !! 5. 1= Remove center silver-colored terminal block screw. 2. Direct wire cable must have completed your electrical connections. Strip 5" (12.7 cm) of outer covering from external ground conductor screw. Dotted line shows position of NEUTRAL ground wire before ... Tighten screw. Shape ends of 3-wire connections. Neutral ground wire 3= Connect ground wire (green or bare) of extra length so dryer can be moved if needed. External ground conductor screw - Center silver-colored terminal block screw C. Remove neutral ground wire from end of...
... Tighten screw. Tighten screws. !! !! 5. 1= Remove center silver-colored terminal block screw. 2. Direct wire cable must have completed your electrical connections. Strip 5" (12.7 cm) of outer covering from external ground conductor screw. Dotted line shows position of NEUTRAL ground wire before ... Tighten screw. Shape ends of 3-wire connections. Neutral ground wire 3= Connect ground wire (green or bare) of extra length so dryer can be moved if needed. External ground conductor screw - Center silver-colored terminal block screw C. Remove neutral ground wire from end of...
Installation Instructions
Page 9
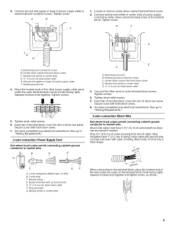
...of cable. Secure cover with hold -down screw. 6. You have completed your electrical connections. Center silver-colored terminal block screw D. Direct wire cable must have completed your electrical connections. Bend ends of dryer rear panel. Ring terminals G. Tighten screw. External ground conductor screw B. Squeeze ...screw. 2. Neutral wire (white or center wire) D. 3_,, (1.9 cm) UL listed strain relief E. Place the hooked ends of dryer rear panel. Externalground conductor screw C. Connect the other power supply cable wires under the screw of the terminal block (hook facing right...
...of cable. Secure cover with hold -down screw. 6. You have completed your electrical connections. Center silver-colored terminal block screw D. Direct wire cable must have completed your electrical connections. Bend ends of dryer rear panel. Ring terminals G. Tighten screw. External ground conductor screw B. Squeeze ...screw. 2. Neutral wire (white or center wire) D. 3_,, (1.9 cm) UL listed strain relief E. Place the hooked ends of dryer rear panel. Externalground conductor screw C. Connect the other power supply cable wires under the screw of the terminal block (hook facing right...
Installation Instructions
Page 10
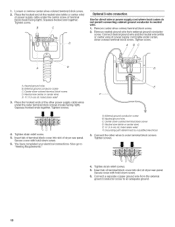
... wire and the neutral wire (white or center wire) of power supply cord/cable under the center screw of dryer rear panel. You have completed your electrical connections. Tighten strain relief screws. 5. Remove neutral ground wire from the external ground conductor screw to "Venting Requirements...Remove center silver-colored terminal block screw. 2. Tighten screw. Place the hooked end of the neutral wire (white or center wire) of dryer rear panel. Neutral ground wire B. Insert tab of terminal block cover into slot of power supply cable under center, silver-colored terminal ...
... wire and the neutral wire (white or center wire) of power supply cord/cable under the center screw of dryer rear panel. You have completed your electrical connections. Tighten strain relief screws. 5. Remove neutral ground wire from the external ground conductor screw to "Venting Requirements...Remove center silver-colored terminal block screw. 2. Tighten screw. Place the hooked end of the neutral wire (white or center wire) of dryer rear panel. Neutral ground wire B. Insert tab of terminal block cover into slot of power supply cable under center, silver-colored terminal ...
Installation Instructions
Page 11
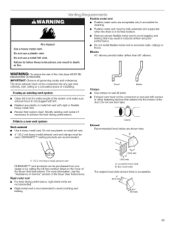
...Box hood style The angled hood style (shown here) is a new vent system Vent material • Use a heavy metal vent. If this dryer MUST BE EXHAUSTED OUTDOORS, IMPORTANT: Observe all joints. Good Better Clamps Use clamps to achieve the best drying performance. Clamp Exhaust Recommended hood styles... are acceptable only if accessible for cleaning, • Flexible metal vent must be connected into the interior of the Dryer User Instructions. If using an existing vent system • Clean lint from your dealer or by calling the toll-free number listed on...
...Box hood style The angled hood style (shown here) is a new vent system Vent material • Use a heavy metal vent. If this dryer MUST BE EXHAUSTED OUTDOORS, IMPORTANT: Observe all joints. Good Better Clamps Use clamps to achieve the best drying performance. Clamp Exhaust Recommended hood styles... are acceptable only if accessible for cleaning, • Flexible metal vent must be connected into the interior of the Dryer User Instructions. If using an existing vent system • Clean lint from your dealer or by calling the toll-free number listed on...
Installation Instructions
Page 12
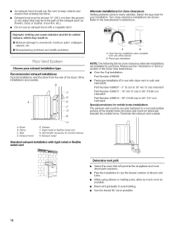
...manufacturer's instructions. Exhaust outlet elbows Standard exhaust installation with dryer vent to wall vent mismatch): Part Number 4396037 - 0" (0 cm) to 18" (45.72 cm) mismatch Part Number 4396011 - 18" (45.72 cm) to 29" (73.66 cm) mismatch Part Number 4396014 - 29" (73.66 cm) to 50" (127 cm...) mismatch Special provisions for close clearances Venting systems come in many varieties. Please see the "Assistance or Service" section of the Dryer User Instructions. • Over-the-Top...
...manufacturer's instructions. Exhaust outlet elbows Standard exhaust installation with dryer vent to wall vent mismatch): Part Number 4396037 - 0" (0 cm) to 18" (45.72 cm) mismatch Part Number 4396011 - 18" (45.72 cm) to 29" (73.66 cm) mismatch Part Number 4396014 - 29" (73.66 cm) to 50" (127 cm...) mismatch Special provisions for close clearances Venting systems come in many varieties. Please see the "Assistance or Service" section of the Dryer User Instructions. • Over-the-Top...
Installation Instructions
Page 13
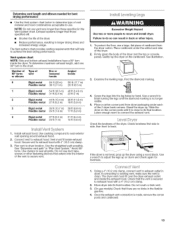
...m) 23 ft (7 m) 2 Rigid metal 44 ft (13.4 m) 38 ft (11.6 m) Flexible metal 27 ft (8.2 m) 19 ft (5.8 m) 3 Rigid metal 35 ft (10.7 m) 29 ft (8.8 m) Flexible metal 25 ft (7.6 m) 17 ft (5.2 m) 4 Rigid metal 27 ft (8.2 m) 21 ft (6.4 m) Flexible metal 23 ft (7 m) 15 ft (4.6 m) 1= Install exhaust ...drying times and increased energy usage. Find the diamond marking. 4. Leave enough room to seal exterior wall opening around exhaust hood. 2. Move dryer into its final location. NOTE: Do not use . Exhaust systems longer than those specified will help to exhaust hood with 4" (10.2 ...
...m) 23 ft (7 m) 2 Rigid metal 44 ft (13.4 m) 38 ft (11.6 m) Flexible metal 27 ft (8.2 m) 19 ft (5.8 m) 3 Rigid metal 35 ft (10.7 m) 29 ft (8.8 m) Flexible metal 25 ft (7.6 m) 17 ft (5.2 m) 4 Rigid metal 27 ft (8.2 m) 21 ft (6.4 m) Flexible metal 23 ft (7 m) 15 ft (4.6 m) 1= Install exhaust ...drying times and increased energy usage. Find the diamond marking. 4. Leave enough room to seal exterior wall opening around exhaust hood. 2. Move dryer into its final location. NOTE: Do not use . Exhaust systems longer than those specified will help to exhaust hood with 4" (10.2 ...


