Installation Guide
Page 4
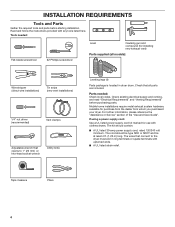
... "Venting Requirements" before starting installation. Mobile home installations require metal exhaust system hardware, available for installing new exhaust vent) Parts supplied (all models): Wire stripper (direct wire installations) Tin snips (new vent installations) 1/4" nut driver (recommended) Vent clamps Adjustable wrench...9632; A UL listed strain relief. The kit should be type SRD or SRDT and be at least 4 ft. (1.22 m) long. Parts needed : Flat-blade screwdriver #2 Phillips screwdriver Level Caulking gun and compound (for purchase from the dealer from whom you purchased your dryer....
... "Venting Requirements" before starting installation. Mobile home installations require metal exhaust system hardware, available for installing new exhaust vent) Parts supplied (all models): Wire stripper (direct wire installations) Tin snips (new vent installations) 1/4" nut driver (recommended) Vent clamps Adjustable wrench...9632; A UL listed strain relief. The kit should be type SRD or SRDT and be at least 4 ft. (1.22 m) long. Parts needed : Flat-blade screwdriver #2 Phillips screwdriver Level Caulking gun and compound (for purchase from the dealer from whom you purchased your dryer....
Installation Guide
Page 5
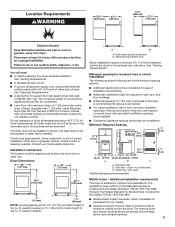
...;■ Special provisions must conform to the Manufactured Home Construction and Safety Standard, Title 24 CFR, Part 3280 (formerly the Federal Standard for Mobile Home Construction and Safety, Title 24, HUD Part 280). ■■ Metal exhaust system hardware, which is suitable for wall, door, and floor...9632; Additional spacing of 1" (25 mm) on all sides of the dryer is greater than 1" [25 mm], install Extended Dryer Feet Kit, Part Number 279810.) If not level, clothes may not tumble properly and automatic sensor cycles may not operate correctly. ft. Wide opening . 5 closet or...
...;■ Special provisions must conform to the Manufactured Home Construction and Safety Standard, Title 24 CFR, Part 3280 (formerly the Federal Standard for Mobile Home Construction and Safety, Title 24, HUD Part 280). ■■ Metal exhaust system hardware, which is suitable for wall, door, and floor...9632; Additional spacing of 1" (25 mm) on all sides of the dryer is greater than 1" [25 mm], install Extended Dryer Feet Kit, Part Number 279810.) If not level, clothes may not tumble properly and automatic sensor cycles may not operate correctly. ft. Wide opening . 5 closet or...
Installation Guide
Page 14
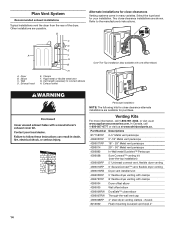
... exhaust installations Typical installations vent the dryer from the rear of the dryer. B Alternate installations for close clearance alternate installations are available for your installation. Part Number Descriptions 8171587RP 0-5" Metal vent periscope 4396037RP 0"-18" Metal vent periscope 4396011RP 18" - 29" Metal vent periscope 4396014 29" - 50" Metal vent periscope 4392892 In...
... exhaust installations Typical installations vent the dryer from the rear of the dryer. B Alternate installations for close clearance alternate installations are available for your installation. Part Number Descriptions 8171587RP 0-5" Metal vent periscope 4396037RP 0"-18" Metal vent periscope 4396011RP 18" - 29" Metal vent periscope 4396014 29" - 50" Metal vent periscope 4392892 In...
Installation Guide
Page 16
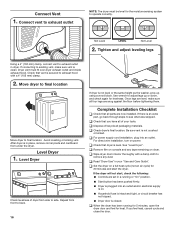
... or the same height as the washer, prop up or down, and check again for the moisture sensing system to existing vent, make sure all parts are snug against the floor before tightening them. Tighten and adjust leveling legs Using a 4" (102 mm) clamp, connect vent to final location.... Avoid crushing or kinking vent. Level Dryer Check levelness of your "Use and Care Guide". Complete Installation Checklist q Check that vent is an extra part, go back through steps to exhaust hood with a damp cloth to adjust legs up using a wood block. q Remove film on console and any dust...
... or the same height as the washer, prop up or down, and check again for the moisture sensing system to existing vent, make sure all parts are snug against the floor before tightening them. Tighten and adjust leveling legs Using a 4" (102 mm) clamp, connect vent to final location.... Avoid crushing or kinking vent. Level Dryer Check levelness of your "Use and Care Guide". Complete Installation Checklist q Check that vent is an extra part, go back through steps to exhaust hood with a damp cloth to adjust legs up using a wood block. q Remove film on console and any dust...
Installation Guide
Page 17
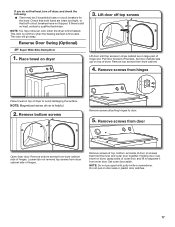
... Remove screws attaching hinges to avoid damaging the surface. Remove screws at top, bottom, and side of door (4 screws) that both fuses are in large part of hinges. Pull door forward off dryer, and check the following: ■■ There may notice an odor when the dryer is first used. Loosen...
... Remove screws attaching hinges to avoid damaging the surface. Remove screws at top, bottom, and side of door (4 screws) that both fuses are in large part of hinges. Pull door forward off dryer, and check the following: ■■ There may notice an odor when the dryer is first used. Loosen...

Warranty Information
Page 1
...Problem Solver section of Whirlpool Corporation or Whirlpool Canada LP (hereafter "Maytag") will pay for factory specified parts and repair labor to correct improper product maintenance or installation, installation not in -home repair. 11. MAYTAG SHALL NOT BE LIABLE FOR INCIDENTAL OR CONSEQUENTIAL DAMAGES. All warranty...REPAIR AS PROVIDED HEREIN. Please have other damage to or furnished with the product, Maytag brand of the Use and Care Guide, scan the QR code on the below named parts only and does not include repair labor. Some questions can be addressed without service. ...
...Problem Solver section of Whirlpool Corporation or Whirlpool Canada LP (hereafter "Maytag") will pay for factory specified parts and repair labor to correct improper product maintenance or installation, installation not in -home repair. 11. MAYTAG SHALL NOT BE LIABLE FOR INCIDENTAL OR CONSEQUENTIAL DAMAGES. All warranty...REPAIR AS PROVIDED HEREIN. Please have other damage to or furnished with the product, Maytag brand of the Use and Care Guide, scan the QR code on the below named parts only and does not include repair labor. Some questions can be addressed without service. ...
Use & Care Guide
Page 8
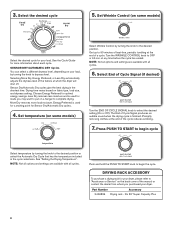
... cycle Select temperature by turning the knob to dryness level. Select the desired cycle 5. NOTE: Not all options and settings are available with all cycles. Part Number Accessory 3406839 Drying rack - SENSOR DRY/AUTOMATIC DRY Cycles You can select a different dryness level, depending on some models) Select the desired cycle for...
... cycle Select temperature by turning the knob to dryness level. Select the desired cycle 5. NOTE: Not all options and settings are available with all cycles. Part Number Accessory 3406839 Drying rack - SENSOR DRY/AUTOMATIC DRY Cycles You can select a different dryness level, depending on some models) Select the desired cycle for...
Use & Care Guide
Page 13
... materials or workmanship that existed when this Warranty. Service to access additional resources, or visit https://www.maytag.com/product_help. 2. Service or parts for the following information available when you also may have other damage to appliance finishes unless such damage results...you also may not apply to arrange service, please determine whether your product. 3. Consumable parts (i.e. Discoloration, rust, or oxidation of surfaces resulting from the date of your authorized Maytag dealer to province. n Drum (Side Walls Only) n Drive Motor YOUR SOLE AND ...
... materials or workmanship that existed when this Warranty. Service to access additional resources, or visit https://www.maytag.com/product_help. 2. Service or parts for the following information available when you also may have other damage to appliance finishes unless such damage results...you also may not apply to arrange service, please determine whether your product. 3. Consumable parts (i.e. Discoloration, rust, or oxidation of surfaces resulting from the date of your authorized Maytag dealer to province. n Drum (Side Walls Only) n Drive Motor YOUR SOLE AND ...


