Owners Manual
Page 5
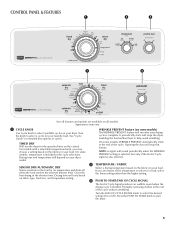
... to help avoid wrinkling. NOTE: A signal will depend on the control. On some models, temperature is also selected. 2 TEMPERATURE / FABRIC Select a drying temperature based on some models, WRINKLE PREVENT automatically starts at the end of Cycle Signal produces an audible sound when the...and options are unsure of the cycle. CONTROL PANEL & FEATURES 1 2 3 1 3 Not all models. On models with a selectable temperature knob, you are available on the fabrics in your dryer model. Turn the END OF CYCLE SIGNAL knob to select available cycles on fabric type, load size, ...
... to help avoid wrinkling. NOTE: A signal will depend on the control. On some models, temperature is also selected. 2 TEMPERATURE / FABRIC Select a drying temperature based on some models, WRINKLE PREVENT automatically starts at the end of Cycle Signal produces an audible sound when the...and options are unsure of the cycle. CONTROL PANEL & FEATURES 1 2 3 1 3 Not all models. On models with a selectable temperature knob, you are available on the fabrics in your dryer model. Turn the END OF CYCLE SIGNAL knob to select available cycles on fabric type, load size, ...

Owners Manual
Page 6
...the dryer for optimal energy savings. Setting the Drying Temperature If your load. Line dry bonded or laminated fabrics. CYCLE GUIDE - Not all models. Settings and options shown in the shortest time. Drying time varies based on the fabrics in the load or air temperature and shuts off when...if items are still damp. Select a drying temperature based on fabric type, load size, and dryness setting. TIMED DRY CYCLES TIMED DRY - Not all models. No heat drying. Use the Air Fluff (no heat) setting for various loads, refer to dry: Jeans, heavy work clothes. SENSOR DRY/AUTOMATIC ...
...the dryer for optimal energy savings. Setting the Drying Temperature If your load. Line dry bonded or laminated fabrics. CYCLE GUIDE - Not all models. Settings and options shown in the shortest time. Drying time varies based on the fabrics in the load or air temperature and shuts off when...if items are still damp. Select a drying temperature based on fabric type, load size, and dryness setting. TIMED DRY CYCLES TIMED DRY - Not all models. No heat drying. Use the Air Fluff (no heat) setting for various loads, refer to dry: Jeans, heavy work clothes. SENSOR DRY/AUTOMATIC ...
Owners Manual
Page 7
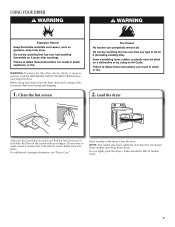
... "Dryer Care". USING YOUR DRYER WARNING: To reduce the risk of its holder. Load the dryer Clean the lint screen before operating this dryer. Some models have a different door than the one shown. clothes should be able to remove lint. Do not tightly pack the dryer; NOTE: Your... model may have drop down doors. Do not rinse or wash screen to tumble freely. 7 Push the lint screen firmly back into place. Place laundry in ...
... "Dryer Care". USING YOUR DRYER WARNING: To reduce the risk of its holder. Load the dryer Clean the lint screen before operating this dryer. Some models have a different door than the one shown. clothes should be able to remove lint. Do not tightly pack the dryer; NOTE: Your... model may have drop down doors. Do not rinse or wash screen to tumble freely. 7 Push the lint screen firmly back into place. Place laundry in ...
Owners Manual
Page 8
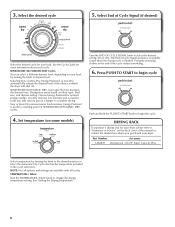
... setting. NOTE: Not all options and settings are available with all cycles. TEMPERATURE / Fabric Turn the TEMPERATURE / Fabric knob to "Assistance or Service" on some models) Turn the END OF CYCLE SIGNAL knob to complete drying. Less Dry removes less moisture and is used for a starting point for optimal energy savings...
... setting. NOTE: Not all options and settings are available with all cycles. TEMPERATURE / Fabric Turn the TEMPERATURE / Fabric knob to "Assistance or Service" on some models) Turn the END OF CYCLE SIGNAL knob to complete drying. Less Dry removes less moisture and is used for a starting point for optimal energy savings...
Owners Manual
Page 10
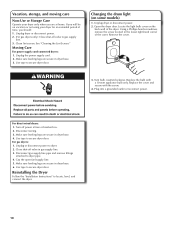
... power supply cord. 2. Make sure leveling legs are at fuse or breaker box. 2. Unplug dryer or disconnect power. 2. Locate the light bulb cover on some models) 1. Remove the cover. 3. Turn bulb counterclockwise. Turn off power at home. Disconnect wiring. 3. For gas dryers: 1. Unplug or disconnect power to locate, level, and connect...
... power supply cord. 2. Make sure leveling legs are at fuse or breaker box. 2. Unplug dryer or disconnect power. 2. Locate the light bulb cover on some models) 1. Remove the cover. 3. Turn bulb counterclockwise. Turn off power at home. Disconnect wiring. 3. For gas dryers: 1. Unplug or disconnect power to locate, level, and connect...

Owners Manual
Page 13
... installation not in materials or workmanship and is intended to be easily determined. If you on major appliances with Maytag published installation instructions. 10. Write down the following information about your major appliance, to instruct you are excluded ...MAYTAG® LAUNDRY WARRANTY LIMITED WARRANTY For one year from the date of purchase, when this major appliance is inconsistent to published user or operator instructions and/or installation instructions. 2. Replacement parts or repair labor if this major appliance is used in the country in accordance with original model...
... installation not in materials or workmanship and is intended to be easily determined. If you on major appliances with Maytag published installation instructions. 10. Write down the following information about your major appliance, to instruct you are excluded ...MAYTAG® LAUNDRY WARRANTY LIMITED WARRANTY For one year from the date of purchase, when this major appliance is inconsistent to published user or operator instructions and/or installation instructions. 2. Replacement parts or repair labor if this major appliance is used in the country in accordance with original model...
Installation Instructions
Page 3
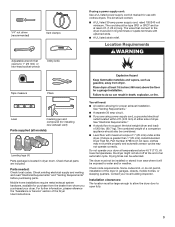
... for proper exhaust installation. See "Venting Requirements." ■■ A separate 30 amp circuit. ■■ If you purchased your local building inspector. Check that all models): Leveling legs (4) Parts package is greater than 1" [25 mm], install Extended Dryer Feet Kit, Part Number 279810.) If not level, clothes may not tumble properly...
... for proper exhaust installation. See "Venting Requirements." ■■ A separate 30 amp circuit. ■■ If you purchased your local building inspector. Check that all models): Leveling legs (4) Parts package is greater than 1" [25 mm], install Extended Dryer Feet Kit, Part Number 279810.) If not level, clothes may not tumble properly...

Installation Instructions
Page 14
... Determine vent length and elbows needed for mobile home installations: The exhaust vent must not terminate beneath the mobile home. Vent System Chart (Long Vent Models Only) Number of 90° turns or elbows Type of vent Box/louvered, or Angled hoods 0 Rigid metal 120 ft. (36.6 m) 1 Rigid metal 110 ft...
... Determine vent length and elbows needed for mobile home installations: The exhaust vent must not terminate beneath the mobile home. Vent System Chart (Long Vent Models Only) Number of 90° turns or elbows Type of vent Box/louvered, or Angled hoods 0 Rigid metal 120 ft. (36.6 m) 1 Rigid metal 110 ft...


