
Use & Care Guide
Page 2
DRYER SAFETY 2
DRYER SAFETY 2

Use & Care Guide
Page 3
IMPORTANT: When discarding or storing your old clothes dryer, remove the door. 3
IMPORTANT: When discarding or storing your old clothes dryer, remove the door. 3

Use & Care Guide
Page 4
... require additional touching up after the Steam Cycle. n Use the shortest length of the vent system at least every 2 years. With Timed Cycles, the dryer runs the amount of time set and sometimes results in front of garments you select to use Steam Cycles for the occasional damp load that... run time cannot be refreshed. 4 CHECK YOUR VENT SYSTEM FOR GOOD AIR FLOW Maintain good air flow by the customer, regardless of who installed the dryer. Good Better Good air flow Along with 4" (102 mm) diameter heavy, rigid vent material. Wash any starched or new garments prior to provide the...
... require additional touching up after the Steam Cycle. n Use the shortest length of the vent system at least every 2 years. With Timed Cycles, the dryer runs the amount of time set and sometimes results in front of garments you select to use Steam Cycles for the occasional damp load that... run time cannot be refreshed. 4 CHECK YOUR VENT SYSTEM FOR GOOD AIR FLOW Maintain good air flow by the customer, regardless of who installed the dryer. Good Better Good air flow Along with 4" (102 mm) diameter heavy, rigid vent material. Wash any starched or new garments prior to provide the...

Use & Care Guide
Page 5
... control knob to select a cycle for your laundry load. NOTE: Sensor Cycles use a preset temperature that is for your dryer. Turn the knob to select available cycles on your cycles. Not all cycles and modifiers are available on all models. CONTROL PANEL AND FEATURES ...Sensor Cycles, if desired. Use the warmest setting safe for the garments in process to pause it. 5 4 CYCLE MODIFIERS Use these buttons to turn the dryer on some models) When the Custom Refresh cycle is for detailed descriptions of Garments (on and off. Number of cycles. 3 START/PAUSE BUTTON Press and...
... control knob to select a cycle for your laundry load. NOTE: Sensor Cycles use a preset temperature that is for your dryer. Turn the knob to select available cycles on your cycles. Not all cycles and modifiers are available on all models. CONTROL PANEL AND FEATURES ...Sensor Cycles, if desired. Use the warmest setting safe for the garments in process to pause it. 5 4 CYCLE MODIFIERS Use these buttons to turn the dryer on some models) When the Custom Refresh cycle is for detailed descriptions of Garments (on and off. Number of cycles. 3 START/PAUSE BUTTON Press and...

Use & Care Guide
Page 6
...selected, a signal will not light up. The Airflow sensing feature is active. NOTE: If there are not available on all models. The dryer will be displayed. The Good light will light when the drying cycle is running. Wrinkle Prevent/Wrinkle Prevent with all cycles and options are ...clean the lint screen. Steam Boost (on Heavy Duty, Normal, Denim, Bulky, Wrinkle Control, Sheets, Active Wear, Towels and Delicate cycles. The dryer will be unable to remove a load immediately, press Wrinkle Prevent to add up to 150 minutes (depending on some models) Steam Boost adds steam ...
...selected, a signal will not light up. The Airflow sensing feature is active. NOTE: If there are not available on all models. The dryer will be displayed. The Good light will light when the drying cycle is running. Wrinkle Prevent/Wrinkle Prevent with all cycles and options are ...clean the lint screen. Steam Boost (on Heavy Duty, Normal, Denim, Bulky, Wrinkle Control, Sheets, Active Wear, Towels and Delicate cycles. The dryer will be unable to remove a load immediately, press Wrinkle Prevent to add up to 150 minutes (depending on some models) Steam Boost adds steam ...
Use & Care Guide
Page 7
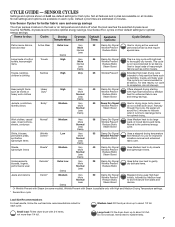
...32 Damp Dry Signal Use for all fabrics. Default cycle times are default settings for better fabric care and energy savings The dryer senses moisture in minutes. Items to gently blouses, lingerie, More Wrinkle Prevent† dry delicate items. performance wear Normal ... reaches the selected dryness level. Less Damp Large loads of heavyweight fabrics such as cotton towels. Large load: Fill the dryer drum up to help sanitize items such as towels or Duty* More heavy work clothes Normal Less Damp Damp Dry Signal ...
...32 Damp Dry Signal Use for all fabrics. Default cycle times are default settings for better fabric care and energy savings The dryer senses moisture in minutes. Items to gently blouses, lingerie, More Wrinkle Prevent† dry delicate items. performance wear Normal ... reaches the selected dryness level. Less Damp Large loads of heavyweight fabrics such as cotton towels. Large load: Fill the dryer drum up to help sanitize items such as towels or Duty* More heavy work clothes Normal Less Damp Damp Dry Signal ...

Use & Care Guide
Page 8
...GUIDE - Wrinkle Prevent with Steam is best for a load, select the lower setting rather than 1/4 full. 8 Medium load: Fill the dryer drum up to mediumsized loads of garments selected. Items need to select for reducing wrinkles and odors from small to about 1/2 full. Load ...Size Recommendations For best results, follow the load size recommendations noted for foam, rubber, plastic, or heat-sensitive fabrics. Do not add dryer sheets. † Or Wrinkle Prevent with dry loads to lightweight Medium medium loads. Not all settings and options are default settings for ...
...GUIDE - Wrinkle Prevent with Steam is best for a load, select the lower setting rather than 1/4 full. 8 Medium load: Fill the dryer drum up to mediumsized loads of garments selected. Items need to select for reducing wrinkles and odors from small to about 1/2 full. Load ...Size Recommendations For best results, follow the load size recommendations noted for foam, rubber, plastic, or heat-sensitive fabrics. Do not add dryer sheets. † Or Wrinkle Prevent with dry loads to lightweight Medium medium loads. Not all settings and options are default settings for ...

Use & Care Guide
Page 9
... models Non-steam models Open the door by pulling on all models. 9 NOTE: Not all cycles are available on the handle. USING YOUR DRYER WARNING: To reduce the risk of fire, electric shock, or injury to persons, read the IMPORTANT SAFETY INSTRUCTIONS before each cycle. Press POWER/... lint off the screen with your load. Clean the lint screen 3. Clean the lint screen before operating this appliance. 1. Place laundry in the dryer. Do not rinse or wash screen to remove. Pull the lint screen straight up. Select the desired cycle for more information about each load. ...
... models Non-steam models Open the door by pulling on all models. 9 NOTE: Not all cycles are available on the handle. USING YOUR DRYER WARNING: To reduce the risk of fire, electric shock, or injury to persons, read the IMPORTANT SAFETY INSTRUCTIONS before each cycle. Press POWER/... lint off the screen with your load. Clean the lint screen 3. Clean the lint screen before operating this appliance. 1. Place laundry in the dryer. Do not rinse or wash screen to remove. Pull the lint screen straight up. Select the desired cycle for more information about each load. ...

Use & Care Guide
Page 10
...garments promptly after cycle has completed to different installations, environmental conditions or personal preference. The default temperature may change is lit. The dryer must be selected. 5. Press START/PAUSE to select the dryness level shown in the time display: 01 Factory preset dryness level.... Press and hold the START/PAUSE button to change the drying settings: NOTE: The settings cannot be changed while the dryer is finished Steam model shown Promptly remove garments after cycle is running or paused. NOTE: Not all models. Once the Dryness...
...garments promptly after cycle has completed to different installations, environmental conditions or personal preference. The default temperature may change is lit. The dryer must be selected. 5. Press START/PAUSE to select the dryness level shown in the time display: 01 Factory preset dryness level.... Press and hold the START/PAUSE button to change the drying settings: NOTE: The settings cannot be changed while the dryer is finished Steam model shown Promptly remove garments after cycle is running or paused. NOTE: Not all models. Once the Dryness...

Use & Care Guide
Page 11
... drying rack. Make sure items do so can change the drum light: 1. Select a Timed Dry/Air Only, or Low Temperature cycle. Start the dryer. NOTE: Check the lint screen and remove any packing material before use with the Timed Dry cycles only. Turn bulb counterclockwise. Replace the bulb with... remove the lint screen. 1. Place wet items on a clothesline or by increasing or decreasing the cycle time. 7. be dried on top of the dryer. Replace the cover and secure with the holes in the cycle by using the Air Only setting. 6. Replace all parts and panels before servicing. The...
... drying rack. Make sure items do so can change the drum light: 1. Select a Timed Dry/Air Only, or Low Temperature cycle. Start the dryer. NOTE: Check the lint screen and remove any packing material before use with the Timed Dry cycles only. Turn bulb counterclockwise. Replace the bulb with... remove the lint screen. 1. Place wet items on a clothesline or by increasing or decreasing the cycle time. 7. be dried on top of the dryer. Replace the cover and secure with the holes in the cycle by using the Air Only setting. 6. Replace all parts and panels before servicing. The...

Use & Care Guide
Page 12
... be removed every 2 years, or more frequently, if it becomes clogged due to a residue buildup. Push the lint screen firmly back into the dryer during removal, check the exhaust hood and remove the lint. Doing so can cause overheating and damage to stop before your fingers. 2. The screen... and rub with hot water and liquid detergent. Cleaning should be done by lint will not stain future loads of clothes. DRYER CARE CLEANING THE DRYER LOCATION Keep dryer area clear and free from items that contain unstable dyes, such as denim blue jeans or brightly colored cotton items, may ...
... be removed every 2 years, or more frequently, if it becomes clogged due to a residue buildup. Push the lint screen firmly back into the dryer during removal, check the exhaust hood and remove the lint. Doing so can cause overheating and damage to stop before your fingers. 2. The screen... and rub with hot water and liquid detergent. Cleaning should be done by lint will not stain future loads of clothes. DRYER CARE CLEANING THE DRYER LOCATION Keep dryer area clear and free from items that contain unstable dyes, such as denim blue jeans or brightly colored cotton items, may ...

Use & Care Guide
Page 13
...may stay in gas supply line. 3. Clean lint screen. Moving Care For power supply cord-connected dryers: 1. To Winterize the Dryer 1. Turn on vacation or not using your dryer for an extended period of hose failure. Steam models only: Disconnect the water inlet hose from faucet,...MODELS Water Inlet Hose Replace inlet hose and hose screen after 5 years of use to do so can damage your dryer. Shut off water faucet. 4. Flush water pipes. For direct-wired dryers: 1. Disconnect power. 2. Disconnect wiring. 3. Steam models only: Shut off water faucet. 3. Turn off water...
...may stay in gas supply line. 3. Clean lint screen. Moving Care For power supply cord-connected dryers: 1. To Winterize the Dryer 1. Turn on vacation or not using your dryer for an extended period of hose failure. Steam models only: Disconnect the water inlet hose from faucet,...MODELS Water Inlet Hose Replace inlet hose and hose screen after 5 years of use to do so can damage your dryer. Shut off water faucet. 4. Flush water pipes. For direct-wired dryers: 1. Disconnect power. 2. Disconnect wiring. 3. Steam models only: Shut off water faucet. 3. Turn off water...

Use & Care Guide
Page 14
... vent diameter is blown or circuit breaker has tripped. See "Cycle Guide". Incorrect power supply. Use a time-delay fuse. Electric dryers use . The dryer may not have not tripped. Electric dryers require 240-volt power supply. When balled up in firm contact with lint, restricting air movement. Check that both circuit breakers... or vibrating noise A small object caught between the edges of fuse. TROUBLESHOOTING First try the solutions suggested here or visit our website at www.maytag.com/product_help In Canada www.whirlpool.ca for small objects. Make sure the...
... vent diameter is blown or circuit breaker has tripped. See "Cycle Guide". Incorrect power supply. Use a time-delay fuse. Electric dryers use . The dryer may not have not tripped. Electric dryers require 240-volt power supply. When balled up in firm contact with lint, restricting air movement. Check that both circuit breakers... or vibrating noise A small object caught between the edges of fuse. TROUBLESHOOTING First try the solutions suggested here or visit our website at www.maytag.com/product_help In Canada www.whirlpool.ca for small objects. Make sure the...

Use & Care Guide
Page 15
... type. For Steam Cycles, the water is just inside the door, behind the lint screen. Add dryer fabric softener sheets at www.maytag.com/product_help In Canada www.whirlpool.ca for reducing wrinkles and odors from dryer at the top and bottom of garments to garment care label instructions. TROUBLESHOOTING First try the...
... type. For Steam Cycles, the water is just inside the door, behind the lint screen. Add dryer fabric softener sheets at www.maytag.com/product_help In Canada www.whirlpool.ca for reducing wrinkles and odors from dryer at the top and bottom of garments to garment care label instructions. TROUBLESHOOTING First try the...

Use & Care Guide
Page 16
...household fuses or breakers. Confirm the power cord is present. Refer to avoid overdrying the load. Select a Timed Dry heated cycle, and restart the dryer. "L2" Diagnostic Code (low or no line voltage condition) There may be a problem with a lower heat setting to "Installation Instructions" for...a Sensor cycle with your home power supply keeping the dryer's heater from the display and return to clear the code from turning on. TROUBLESHOOTING First try the solutions suggested here or visit our website at www.maytag.com/product_help In Canada www.whirlpool.ca for assistance and ...
...household fuses or breakers. Confirm the power cord is present. Refer to avoid overdrying the load. Select a Timed Dry heated cycle, and restart the dryer. "L2" Diagnostic Code (low or no line voltage condition) There may be a problem with a lower heat setting to "Installation Instructions" for...a Sensor cycle with your home power supply keeping the dryer's heater from the display and return to clear the code from turning on. TROUBLESHOOTING First try the solutions suggested here or visit our website at www.maytag.com/product_help In Canada www.whirlpool.ca for assistance and ...

Installation Guide
Page 2
DRYER SAFETY 2
DRYER SAFETY 2

Installation Guide
Page 3
...hose Wire stripper (direct wire installations) Vent clamps Caulking gun and compound (for purchase from the dealer from whom you purchased your dryer. Parts needed : Parts supplied (all parts are included. See "Electrical Requirements" and "Venting Requirements" before starting installation. Mobile ...new vent installations) 1/4" nut driver (recommended) Tape measure 5' (1.52 m) inlet hose Rubber washer Parts package is located in your dryer. For further information, please refer to your "Use and Care Guide" for information about accessories available for your "Use and Care ...
...hose Wire stripper (direct wire installations) Vent clamps Caulking gun and compound (for purchase from the dealer from whom you purchased your dryer. Parts needed : Parts supplied (all parts are included. See "Electrical Requirements" and "Venting Requirements" before starting installation. Mobile ...new vent installations) 1/4" nut driver (recommended) Tape measure 5' (1.52 m) inlet hose Rubber washer Parts package is located in your dryer. For further information, please refer to your "Use and Care Guide" for information about accessories available for your "Use and Care ...
Installation Guide
Page 4
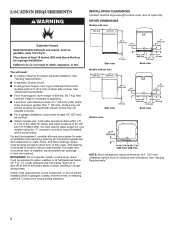
... arrangement, consider allowing more space for your local building inspector. Add spacing on all sides of 1" (25 mm) under entire dryer. Also consider weight of installation and servicing; See "Electrical Requirements." ■■ Floor must be exposed to water, weather, ... sensor cycles, resulting in door are provided. Lower temperatures may not operate correctly. ■■ For a garage installation, place dryer at end of dryer. Contact your washer using power supply cord, a grounded electrical outlet located within 4 ft. (1.2 m) of the water fill valves...
... arrangement, consider allowing more space for your local building inspector. Add spacing on all sides of 1" (25 mm) under entire dryer. Also consider weight of installation and servicing; See "Electrical Requirements." ■■ Floor must be exposed to water, weather, ... sensor cycles, resulting in door are provided. Lower temperatures may not operate correctly. ■■ For a garage installation, place dryer at end of dryer. Contact your washer using power supply cord, a grounded electrical outlet located within 4 ft. (1.2 m) of the water fill valves...
Installation Guide
Page 5
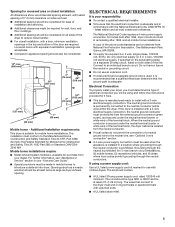
...■■ A UL listed strain relief. 5 The wires that the ground path is manufactured ready to introduce outside air into dryer. Electrical Connection To properly install your dealer. Mobile home installations require: ■■ Metal exhaust system hardware, available for (1) ...be considered for ease of installation and servicing. ■■ Additional clearances might be required for homes built after 1996, dryer circuits involved in remodeling after 1996, and all mobile home installations. Mobile home - ELECTRICAL REQUIREMENTS It is prohibited for purchase...
...■■ A UL listed strain relief. 5 The wires that the ground path is manufactured ready to introduce outside air into dryer. Electrical Connection To properly install your dealer. Mobile home installations require: ■■ Metal exhaust system hardware, available for (1) ...be considered for ease of installation and servicing. ■■ Additional clearances might be required for homes built after 1996, dryer circuits involved in remodeling after 1996, and all mobile home installations. Mobile home - ELECTRICAL REQUIREMENTS It is prohibited for purchase...

Installation Guide
Page 6
... without riser: Using a wrench and tape measure, screw legs into cabinet until foot flange touches the riser. NOTE: Refer to avoid damaging the back of dryer. The 3-wire power supply cord, at least 4 ft. (1.22 m) long, must match power supply (4-wire or 3-wire) and be: ■■ ...and UL listed strain relief. INSTALL LEVELING LEGS 1. Models without riser Models with ring or spade terminals and UL listed strain relief. Slide the dryer until bottom of foot is approximately 13/8" (35 mm) from bottom of NEMA Type 14-30 R. The neutral conductor must be identified by...
... without riser: Using a wrench and tape measure, screw legs into cabinet until foot flange touches the riser. NOTE: Refer to avoid damaging the back of dryer. The 3-wire power supply cord, at least 4 ft. (1.22 m) long, must match power supply (4-wire or 3-wire) and be: ■■ ...and UL listed strain relief. INSTALL LEVELING LEGS 1. Models without riser Models with ring or spade terminals and UL listed strain relief. Slide the dryer until bottom of foot is approximately 13/8" (35 mm) from bottom of NEMA Type 14-30 R. The neutral conductor must be identified by...


