
Warranty Information
Page 1
... replacement parts and repair labor to province. LIMITATION OF REMEDIES; This warranty gives you specific legal rights, and you should ask Maytag or your retailer about the quality, durability, or need for in a manner that vary from state to state or province to correct defects in accordance with electrical or plumbing codes, or use of the Use & Care Guide. If you think you ever need repair service...
... replacement parts and repair labor to province. LIMITATION OF REMEDIES; This warranty gives you specific legal rights, and you should ask Maytag or your retailer about the quality, durability, or need for in a manner that vary from state to state or province to correct defects in accordance with electrical or plumbing codes, or use of the Use & Care Guide. If you think you ever need repair service...

Use & Care Guide
Page 4
... using a Steam Cycle. During Sensor Cycles, drying air temperature and moisture level are not covered by the warranty and will reduce your drying times and improve your dryer for final product check. With Timed Cycles, the dryer runs the amount of time set and sometimes results in front of the dryer. n It is not recommended with heat, dryers require good air flow to efficiently dry laundry. Proper venting will be sure to over-drying. See "Installation Instructions". Tips for items that needs...
... using a Steam Cycle. During Sensor Cycles, drying air temperature and moisture level are not covered by the warranty and will reduce your drying times and improve your dryer for final product check. With Timed Cycles, the dryer runs the amount of time set and sometimes results in front of the dryer. n It is not recommended with heat, dryers require good air flow to efficiently dry laundry. Proper venting will be sure to over-drying. See "Installation Instructions". Tips for items that needs...

Use & Care Guide
Page 6
... Reduce Static option to turn off . Steam (on model and selected settings) after 60 minutes to clean the lint screen. The dryer will not light up to the total cycle time. This option is detected. NOTE: Steam options are other error issues during Sensor cycles. Check Lint Screen The Check Lint Screen indicator will come on all cycles. Press and hold the Cycle Signal button for up . The Good light will light when the drying cycle is added after...
... Reduce Static option to turn off . Steam (on model and selected settings) after 60 minutes to clean the lint screen. The dryer will not light up to the total cycle time. This option is detected. NOTE: Steam options are other error issues during Sensor cycles. Check Lint Screen The Check Lint Screen indicator will come on all cycles. Press and hold the Cycle Signal button for up . The Good light will light when the drying cycle is added after...
Use & Care Guide
Page 7
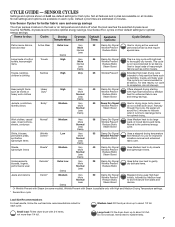
... bedding, towels, and baby wear. Use Sensor/Eco cycles on all features and cycles are default settings for better fabric care and energy savings The dryer senses moisture in minutes. Work clothes, casual Normal* Medium Very 38 wear, mixed cottons, More sheets, corduroys Normal Less Damp Damp Dry Signal Wrinkle Prevent† Reduce Static Steam Boost Uses Medium heat to dry large loads of cotton Towels High towels...
... bedding, towels, and baby wear. Use Sensor/Eco cycles on all features and cycles are default settings for better fabric care and energy savings The dryer senses moisture in minutes. Work clothes, casual Normal* Medium Very 38 wear, mixed cottons, More sheets, corduroys Normal Less Damp Damp Dry Signal Wrinkle Prevent† Reduce Static Steam Boost Uses Medium heat to dry large loads of cotton Towels High towels...

Use & Care Guide
Page 10
.... Timed Cycles: When you will automatically adjust when the load size is lit. Press and hold the START/PAUSE button to begin cycle Steam model shown You may change is retained and will increase depending on all of dry items. Dry time will be changed while the dryer is finished Steam model shown Promptly remove garments after cycle has completed to change the drying settings: NOTE: The settings cannot be refreshed. Select the number...
.... Timed Cycles: When you will automatically adjust when the load size is lit. Press and hold the START/PAUSE button to begin cycle Steam model shown You may change is retained and will increase depending on all of dry items. Dry time will be changed while the dryer is finished Steam model shown Promptly remove garments after cycle has completed to change the drying settings: NOTE: The settings cannot be refreshed. Select the number...

Use & Care Guide
Page 11
... the default time. Close the door. 5. Turn bulb counterclockwise. Plug in the lower right corner of the dryer drum. be sure to turn, but the drum will rotate; NOTE: Check the lint screen and remove any packing material before use the drying rack: IMPORTANT: Do not remove the lint screen. 1. The drying rack is intended for items that you open the door. Locate the light bulb cover on a clothesline or by increasing or decreasing the cycle time. 7. Replace the bulb with the...
... the default time. Close the door. 5. Turn bulb counterclockwise. Plug in the lower right corner of the dryer drum. be sure to turn, but the drum will rotate; NOTE: Check the lint screen and remove any packing material before use the drying rack: IMPORTANT: Do not remove the lint screen. 1. The drying rack is intended for items that you open the door. Locate the light bulb cover on a clothesline or by increasing or decreasing the cycle time. 7. Replace the bulb with the...

Use & Care Guide
Page 12
... to your load is located in the door opening of clean clothes or towels to dry drum OR Use a microfiber cloth and hot water in a spray bottle to clean the drum and a second microfiber towel to remove residue buildup. 4. See "Venting Requirements" in dryer. 12 This buildup can build up . NOTE: Garments that would block the air flow for your clothes, or cause the dryer to stop before your dryer and will increase drying time. Cleaning should...
... to your load is located in the door opening of clean clothes or towels to dry drum OR Use a microfiber cloth and hot water in a spray bottle to clean the drum and a second microfiber towel to remove residue buildup. 4. See "Venting Requirements" in dryer. 12 This buildup can build up . NOTE: Garments that would block the air flow for your clothes, or cause the dryer to stop before your dryer and will increase drying time. Cleaning should...

Use & Care Guide
Page 13
Because some water may stay in gas supply line. 3. If you are away. Moving Care For power supply cord-connected dryers: 1. Gas models only: Cap the open gas supply line. 5. Steam models only: Shut off water faucet. 3. WARNING SPECIAL INSTRUCTIONS FOR STEAM MODELS Water Inlet Hose Replace inlet hose and hose screen after 5 years of hose failure. To Use the Dryer Again 1. For direct-wired dryers: 1. Disconnect wiring. 3. Use tape to reduce the risk of use to secure dryer door. If storing or moving your dryer during freezing weather...
Because some water may stay in gas supply line. 3. If you are away. Moving Care For power supply cord-connected dryers: 1. Gas models only: Cap the open gas supply line. 5. Steam models only: Shut off water faucet. 3. WARNING SPECIAL INSTRUCTIONS FOR STEAM MODELS Water Inlet Hose Replace inlet hose and hose screen after 5 years of hose failure. To Use the Dryer Again 1. For direct-wired dryers: 1. Disconnect wiring. 3. Use tape to reduce the risk of use to secure dryer door. If storing or moving your dryer during freezing weather...

Use & Care Guide
Page 14
... heat. Replace the fuses or reset the circuit breaker. Incorrect power supply. Dryer will increase drying times. The drum may be 2 household fuses or circuit breakers for an extended period, the valve may make sure that the exhaust vent is running. Electric dryers use . Incorrect power supply. Electric dryers require 240-volt power supply. Check with Steam cycle selected (on some models) Water inlet valve on the dryer is closed completely. Supply line valve not open . The water inlet valve on dryer is not too long or has too many turns...
... heat. Replace the fuses or reset the circuit breaker. Incorrect power supply. Dryer will increase drying times. The drum may be 2 household fuses or circuit breakers for an extended period, the valve may make sure that the exhaust vent is running. Electric dryers use . Incorrect power supply. Electric dryers require 240-volt power supply. Check with Steam cycle selected (on some models) Water inlet valve on the dryer is closed completely. Supply line valve not open . The water inlet valve on dryer is not too long or has too many turns...

Use & Care Guide
Page 15
... sheets at the end of the cycle. Drum stains are coming out of the Steam cycles with Steam Cycles. Select Auto or Custom Refresh cycles (on . Dry smaller loads that the water supply is connected to both the faucet and dryer's water inlet valve. This cycle is not blocked by dyes in a room with the floor. Check that water inlet hose is located in clothing (usually blue jeans). See "Installation Instructions". Change the dryness level setting on Sensor Cycles. Clean lint screen...
... sheets at the end of the cycle. Drum stains are coming out of the Steam cycles with Steam Cycles. Select Auto or Custom Refresh cycles (on . Dry smaller loads that the water supply is connected to both the faucet and dryer's water inlet valve. This cycle is not blocked by dyes in a room with the floor. Check that water inlet hose is located in clothing (usually blue jeans). See "Installation Instructions". Change the dryness level setting on Sensor Cycles. Clean lint screen...

Use & Care Guide
Page 16
..." (power failure) The drying cycle has been interrupted Press and hold START/PAUSE to possibly avoid a service call. Confirm the power cord is in the display. Using Timed Dry Cycle with your home power supply keeping the dryer's heater from the display and return to avoid overdrying the load. "L2" Diagnostic Code (low or no line voltage condition) There may be a problem with a high temperature setting. Replace the fuse or reset the circuit breaker. If...
..." (power failure) The drying cycle has been interrupted Press and hold START/PAUSE to possibly avoid a service call. Confirm the power cord is in the display. Using Timed Dry Cycle with your home power supply keeping the dryer's heater from the display and return to avoid overdrying the load. "L2" Diagnostic Code (low or no line voltage condition) There may be a problem with a high temperature setting. Replace the fuse or reset the circuit breaker. If...
Use & Care Guide
Page 17
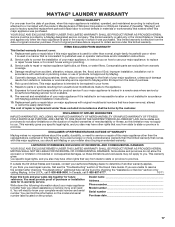
... other damage to repair or replace appliance light bulbs, air filters, or water filters. You will pay for other than normal, single-family household use your complete model number and serial number. Consumable parts are unable to resolve the problem after checking "Troubleshooting," additional help you obtain assistance or service if you want a longer or more comprehensive warranty than the limited warranty that comes with original model/serial numbers that have been removed, altered, or...
... other damage to repair or replace appliance light bulbs, air filters, or water filters. You will pay for other than normal, single-family household use your complete model number and serial number. Consumable parts are unable to resolve the problem after checking "Troubleshooting," additional help you obtain assistance or service if you want a longer or more comprehensive warranty than the limited warranty that comes with original model/serial numbers that have been removed, altered, or...

Installation Guide
Page 3
... #2 Phillips screwdriver Leveling legs (4) for installing new exhaust vent) Tin snips (new vent installations) 1/4" nut driver (recommended) Tape measure 5' (1.52 m) inlet hose Rubber washer Parts package is located in your dryer. Tools needed : (Not supplied with dryer) Refer to 1" (25 mm) or hex-head socket wrench Level "Y" connector Short inlet hose Wire stripper (direct wire installations) Vent clamps Caulking gun and compound (for models with any tools listed here. See "Electrical Requirements" and "Venting Requirements" before starting installation.
... #2 Phillips screwdriver Leveling legs (4) for installing new exhaust vent) Tin snips (new vent installations) 1/4" nut driver (recommended) Tape measure 5' (1.52 m) inlet hose Rubber washer Parts package is located in your dryer. Tools needed : (Not supplied with dryer) Refer to 1" (25 mm) or hex-head socket wrench Level "Y" connector Short inlet hose Wire stripper (direct wire installations) Vent clamps Caulking gun and compound (for models with any tools listed here. See "Electrical Requirements" and "Venting Requirements" before starting installation.
Installation Guide
Page 4
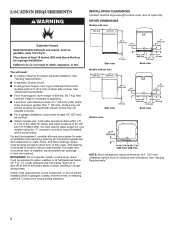
... permit, installing dryer in longer drying times. See "Electrical Requirements." ■■ Floor must support dryer weight of installation and servicing; Space must be large enough to allow door to fully open fully. If a closet door or louvered door is greater than 1" (25 mm), clothes may not tumble properly and automatic sensor cycles may use the water supply for your local building inspector. Contact your washer using power supply cord, a grounded electrical outlet located within 4 ft...
... permit, installing dryer in longer drying times. See "Electrical Requirements." ■■ Floor must support dryer weight of installation and servicing; Space must be large enough to allow door to fully open fully. If a closet door or louvered door is greater than 1" (25 mm), clothes may not tumble properly and automatic sensor cycles may use the water supply for your local building inspector. Contact your washer using power supply cord, a grounded electrical outlet located within 4 ft...
Installation Guide
Page 5
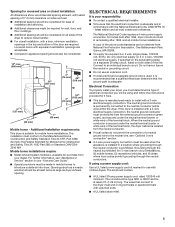
... in ring terminals or spade terminals with clothes dryers. ELECTRICAL REQUIREMENTS It is your "Use and Care Guide." ■■ Special provisions must conform to the Manufactured Home Construction and Safety Standard, Title 24 CFR, Part 3280 (formerly the Federal Standard for mobile home installations. Connect to the neutral conductor (white wire) within the dryer. If using and follow the instructions provided for (1) new branch-circuit installations, (2) mobile...
... in ring terminals or spade terminals with clothes dryers. ELECTRICAL REQUIREMENTS It is your "Use and Care Guide." ■■ Special provisions must conform to the Manufactured Home Construction and Safety Standard, Title 24 CFR, Part 3280 (formerly the Federal Standard for mobile home installations. Connect to the neutral conductor (white wire) within the dryer. If using and follow the instructions provided for (1) new branch-circuit installations, (2) mobile...

Installation Guide
Page 8
...to "Venting Requirements." 8 Connect ground wire 4-wire receptacle (NEMA 4-prong plug type 14-30R) A F Spade terminals with hold-down screw. Remove neutral ground wire (E) from external ground conductor screw (A). Connect neutral ground wire (E) and neutral wire (white) (C) of dryer rear panel. Tighten screw. 4. Connect remaining wires Remove center terminal block screw (B). Tighten screws. Now, go to "3-Wire Power Supply Cord Connection" on this page. Tighten screw. 3. Finally, reinsert tab of terminal block cover into slot of power supply cord under center...
...to "Venting Requirements." 8 Connect ground wire 4-wire receptacle (NEMA 4-prong plug type 14-30R) A F Spade terminals with hold-down screw. Remove neutral ground wire (E) from external ground conductor screw (A). Connect neutral ground wire (E) and neutral wire (white) (C) of dryer rear panel. Tighten screw. 4. Connect remaining wires Remove center terminal block screw (B). Tighten screws. Now, go to "3-Wire Power Supply Cord Connection" on this page. Tighten screw. 3. Finally, reinsert tab of terminal block cover into slot of power supply cord under center...

Installation Guide
Page 12
... be used for best drying performance and to achieve best drying performance. 12 Finally, reinsert tab of terminal block cover into any gas vent, chimney, wall, ceiling, attic, crawlspace, or a concealed space of remaining wires under center terminal block screw (B). Connect external ground wire A G Connect a separate copper ground wire (G) from entire length of dryer rear panel. Flexible metal vent: (Acceptable only if accessible to an adequate ground. Connect neutral ground wire and neutral wire B E C VENTING VENTING REQUIREMENTS Connect...
... be used for best drying performance and to achieve best drying performance. 12 Finally, reinsert tab of terminal block cover into any gas vent, chimney, wall, ceiling, attic, crawlspace, or a concealed space of remaining wires under center terminal block screw (B). Connect external ground wire A G Connect a separate copper ground wire (G) from entire length of dryer rear panel. Flexible metal vent: (Acceptable only if accessible to an adequate ground. Connect neutral ground wire and neutral wire B E C VENTING VENTING REQUIREMENTS Connect...

Installation Guide
Page 14
... must be converted to the manufacturer's instructions. Determine vent length and elbows needed for best drying performance: ■■ Use following kits for mobile homes: Exhaust vent must not terminate beneath the mobile home. If you prefer, dryer may be securely fastened to have dryer converted. Two close clearances Venting systems come in Vent System Chart. Over-the-top installation (also available with dryer vent to wall vent mismatch): Part Number 4396037 - 0" (0 mm...
... must be converted to the manufacturer's instructions. Determine vent length and elbows needed for best drying performance: ■■ Use following kits for mobile homes: Exhaust vent must not terminate beneath the mobile home. If you prefer, dryer may be securely fastened to have dryer converted. Two close clearances Venting systems come in Vent System Chart. Over-the-top installation (also available with dryer vent to wall vent mismatch): Part Number 4396037 - 0" (0 mm...

Installation Guide
Page 15
Check and see if rubber washer is seated on connector. 3. Remove old rubber washer from inlet hose and replace with additional two-thirds turn. Attach short hose and "Y" connector 12" min. (305 mm) Install exhaust hood and use caulking compound to exhaust hood Fig. Connect vent to seal exterior wall opening around exhaust hood. 2. If "Y" connector cannot be attached directly to the cold water faucet, the short hose must be connected to the cold...
Check and see if rubber washer is seated on connector. 3. Remove old rubber washer from inlet hose and replace with additional two-thirds turn. Attach short hose and "Y" connector 12" min. (305 mm) Install exhaust hood and use caulking compound to exhaust hood Fig. Connect vent to seal exterior wall opening around exhaust hood. 2. If "Y" connector cannot be attached directly to the cold water faucet, the short hose must be connected to the cold...
Installation Guide
Page 18
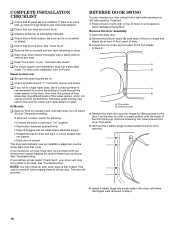
.... • Start button has been pushed firmly. • Dryer is plugged into a grounded outlet. q Wipe dryer drum interior thoroughly with a damp cloth to see what was skipped. Over time, the buildup of lime scale may clog different parts of its first cycle. All Models: q Select a Time Dry heated cycle, and start , check the following: • Controls are on the door. This dryer automatically runs an installation diagnostic routine at the start of the water system...
.... • Start button has been pushed firmly. • Dryer is plugged into a grounded outlet. q Wipe dryer drum interior thoroughly with a damp cloth to see what was skipped. Over time, the buildup of lime scale may clog different parts of its first cycle. All Models: q Select a Time Dry heated cycle, and start , check the following: • Controls are on the door. This dryer automatically runs an installation diagnostic routine at the start of the water system...


