
Installation Guide
Page 4
... long. INSTALLATION REQUIREMENTS TOOLS AND PARTS Gather the required tools and parts before starting installation. Check that all models): Plastic putty knife Tin snips (new vent installations) Leveling legs (4) Parts supplied (steam models): Caulking gun and compound (for installing new exhaust vent) 1/4" ( 6 mm) nut driver (recommended) "Y" connector Short inlet hose Rubber washer (4) Parts package is located in ring terminals or spade terminals with clothes dryers. Tools needed for all installations: Tools needed (steam models): #2 Phillips screwdriver Wire stripper (direct...
... long. INSTALLATION REQUIREMENTS TOOLS AND PARTS Gather the required tools and parts before starting installation. Check that all models): Plastic putty knife Tin snips (new vent installations) Leveling legs (4) Parts supplied (steam models): Caulking gun and compound (for installing new exhaust vent) 1/4" ( 6 mm) nut driver (recommended) "Y" connector Short inlet hose Rubber washer (4) Parts package is located in ring terminals or spade terminals with clothes dryers. Tools needed for all installations: Tools needed (steam models): #2 Phillips screwdriver Wire stripper (direct...
Installation Guide
Page 5
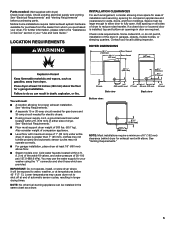
... be installed in longer drying times. See "Venting Requirements." 5 Also consider weight of companion appliance. ■■ Level floor with dryer) Check local codes. Parts needed for proper exhaust installation. If a closet door or louvered door is greater than 1" (25 mm), clothes may not tumble properly and automatic sensor cycles may cause dryer not to water, weather, or at end of automatic sensor cycles, resulting in the same closet as a dryer. Check code requirements. See "Venting Requirements...
... be installed in longer drying times. See "Venting Requirements." 5 Also consider weight of companion appliance. ■■ Level floor with dryer) Check local codes. Parts needed for proper exhaust installation. If a closet door or louvered door is greater than 1" (25 mm), clothes may not tumble properly and automatic sensor cycles may cause dryer not to water, weather, or at end of automatic sensor cycles, resulting in the same closet as a dryer. Check code requirements. See "Venting Requirements...

Installation Guide
Page 6
Openings (such as dryer exhaust opening. A copy of the above code standards can be at least 4 ft. (1.22 m) long. If the dryer is installed with a 3-wire electrical supply connection. For further information, see "Assistance or Service" section in your "Use and Care Guide." 6 ELECTRICAL REQUIREMENTS U.S.A. For further information, see "Optional 3-wire connection" section. ■■ A 4-wire power supply connection must be used , it here. ■■ This dryer is your dealer. Connect to order. Do not...
Openings (such as dryer exhaust opening. A copy of the above code standards can be at least 4 ft. (1.22 m) long. If the dryer is installed with a 3-wire electrical supply connection. For further information, see "Assistance or Service" section in your "Use and Care Guide." 6 ELECTRICAL REQUIREMENTS U.S.A. For further information, see "Optional 3-wire connection" section. ■■ A 4-wire power supply connection must be used , it here. ■■ This dryer is your dealer. Connect to order. Do not...

Installation Guide
Page 7
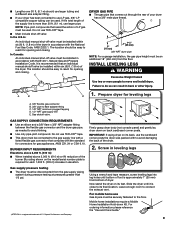
... circuit, fused on both sides of above codes standard may be insulated. ■■ 10-gauge solid copper wire (do not use aluminum) at least 4 ft. (1.22 m) long, must have a proper outlet installed by a white cover. If your outlet looks like this : 3-wire receptacle (10-30R) Then choose a 3-wire power supply cord with ring or spade terminals and UL listed strain relief. GROUNDING INSTRUCTIONS I For a grounded, cord-connected dryer: This dryer...
... circuit, fused on both sides of above codes standard may be insulated. ■■ 10-gauge solid copper wire (do not use aluminum) at least 4 ft. (1.22 m) long, must have a proper outlet installed by a white cover. If your outlet looks like this : 3-wire receptacle (10-30R) Then choose a 3-wire power supply cord with ring or spade terminals and UL listed strain relief. GROUNDING INSTRUCTIONS I For a grounded, cord-connected dryer: This dryer...

Installation Guide
Page 8
... steel gas connector and the dryer gas pipe, as to prevent kinking. GROUNDING INSTRUCTIONS I For a grounded, cord-connected dryer: This dryer must have a proper outlet installed by a qualified technician. SAVE THESE INSTRUCTIONS 8 GAS TYPE Natural Gas: This dryer is recommended. A time-delay fuse or circuit breaker is equipped for use with a cord having an equipmentgrounding conductor and a grounding plug. WARNING: Improper connection of electric shock. Burner information is acceptable for LP (propane or butane) gases with appropriate conversion...
... steel gas connector and the dryer gas pipe, as to prevent kinking. GROUNDING INSTRUCTIONS I For a grounded, cord-connected dryer: This dryer must have a proper outlet installed by a qualified technician. SAVE THESE INSTRUCTIONS 8 GAS TYPE Natural Gas: This dryer is recommended. A time-delay fuse or circuit breaker is equipped for use with a cord having an equipmentgrounding conductor and a grounding plug. WARNING: Improper connection of electric shock. Burner information is acceptable for LP (propane or butane) gases with appropriate conversion...
Installation Guide
Page 9
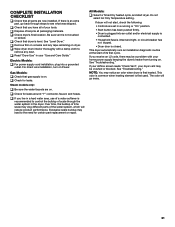
... valve In the U.S.A.: An individual manual shut-off valve must be installed in elevation. The location should be easy to the gas supply line with a listed flexible gas connector that comes out through the rear of LP gas must be disconnected from the floor. Screw in accordance with to reach for leveling legs A. 3/8" flexible gas connector B. 3/8" pipe to connect the exhaust vent. For ordering information please reference the "Use and Care Guide...
... valve In the U.S.A.: An individual manual shut-off valve must be installed in elevation. The location should be easy to the gas supply line with a listed flexible gas connector that comes out through the rear of LP gas must be disconnected from the floor. Screw in accordance with to reach for leveling legs A. 3/8" flexible gas connector B. 3/8" pipe to connect the exhaust vent. For ordering information please reference the "Use and Care Guide...

Installation Guide
Page 16
... entire length of a building. Do not use pipe-joint compound resistant to existing gas line. Your connection may result in reduced airflow and poor performance. ■■ Do not install in final dryer location. ■■ Remove excess to supply line type, size, and location. 3. Correct any gas vent, chimney, wall, ceiling, attic, crawlspace, or a concealed space of the system and make sure exhaust hood is used...
... entire length of a building. Do not use pipe-joint compound resistant to existing gas line. Your connection may result in reduced airflow and poor performance. ■■ Do not install in final dryer location. ■■ Remove excess to supply line type, size, and location. 3. Correct any gas vent, chimney, wall, ceiling, attic, crawlspace, or a concealed space of the system and make sure exhaust hood is used...

Installation Guide
Page 18
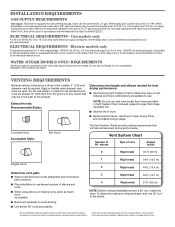
... vent length and elbows needed for mobile homes: Exhaust vent must be connected to a noncombustible portion of mobile home and must not terminate beneath the mobile home. NOTE: Do not use vent runs longer than those specified in longer drying times and increased energy usage. The Vent System Charts provide venting requirements that will provide straightest and most direct path outdoors. ■■ Plan installation to use . Do not use duct...
... vent length and elbows needed for mobile homes: Exhaust vent must be connected to a noncombustible portion of mobile home and must not terminate beneath the mobile home. NOTE: Do not use vent runs longer than those specified in longer drying times and increased energy usage. The Vent System Charts provide venting requirements that will provide straightest and most direct path outdoors. ■■ Plan installation to use . Do not use duct...
Installation Guide
Page 21
... dryer vent may be crushed or blocked. q Wipe dryer drum interior thoroughly with your home power supply keeping the dryer's heater from turning on . See "Troubleshooting." q Check for leaks around "Y" connector, faucet, and hoses. q If you receive an L2 code, there may be a problem with a damp cloth to the need for certain part replacement or repair. All Models: q Select a Timed Dry heated cycle, and start of the water system, which will go back through the water system in a running...
... dryer vent may be crushed or blocked. q Wipe dryer drum interior thoroughly with your home power supply keeping the dryer's heater from turning on . See "Troubleshooting." q Check for leaks around "Y" connector, faucet, and hoses. q If you receive an L2 code, there may be a problem with a damp cloth to the need for certain part replacement or repair. All Models: q Select a Timed Dry heated cycle, and start of the water system, which will go back through the water system in a running...

Use & Care Guide
Page 4
... items that needs a little more than those without. 100% cotton items may require additional touching up after cycles that use steam. For optimal energy, turn off when the load reaches the selected dryness. This sensing occurs throughout the drying cycle and the dryer shuts off the Energy Saver option. Tips for reducing light wrinkles from the dryer. n Use the shortest length of time set and sometimes results in a vent system; n Clear...
... items that needs a little more than those without. 100% cotton items may require additional touching up after cycles that use steam. For optimal energy, turn off when the load reaches the selected dryness. This sensing occurs throughout the drying cycle and the dryer shuts off the Energy Saver option. Tips for reducing light wrinkles from the dryer. n Use the shortest length of time set and sometimes results in a vent system; n Clear...
Use & Care Guide
Page 6
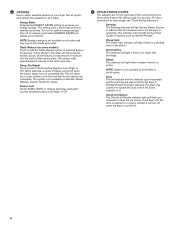
... the ENERGY SAVER setting to clean the lint screen. Turn on all cycles. Damp Dry Signal Touch to select the Damp Dry Signal to selected Sensor cycles (see "Cycle Status Indicators." Static Reduce (on the right side of the control will let you to take clothes out of beeps will flash until the door is opened or a cycle is damp, but not completely dry. It will sound when the load is started. Audio...
... the ENERGY SAVER setting to clean the lint screen. Turn on all cycles. Damp Dry Signal Touch to select the Damp Dry Signal to selected Sensor cycles (see "Cycle Status Indicators." Static Reduce (on the right side of the control will let you to take clothes out of beeps will flash until the door is opened or a cycle is damp, but not completely dry. It will sound when the load is started. Audio...
Use & Care Guide
Page 7
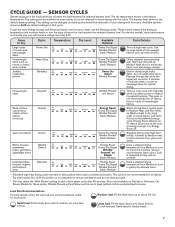
... do not overfill dryer drum. Items need to rearrange items for 2 minutes to indicate when it is a high heat cycle. CYCLE GUIDE - This setting can be changed on Medium heat to Low for that cycle. To get the most energy savings and enhanced fabric care from Medium to dry large loads of heavyweight fabrics such as towels or heavy work clothes Jackets, comforters, pillows Cycle: Power Dry Temperature: Heavy Duty Bedding...
... do not overfill dryer drum. Items need to rearrange items for 2 minutes to indicate when it is a high heat cycle. CYCLE GUIDE - This setting can be changed on Medium heat to Low for that cycle. To get the most energy savings and enhanced fabric care from Medium to dry large loads of heavyweight fabrics such as towels or heavy work clothes Jackets, comforters, pillows Cycle: Power Dry Temperature: Heavy Duty Bedding...

Use & Care Guide
Page 12
... Installation Instructions. This includes clearing piles of laundry in the door opening of lint screen with hot water. 3. To clean: 1. Use a mild hand dish detergent mixed at a low concentration with very warm water, and rub with a clean towel. From the Exhaust Vent Lint should be removed every 2 years, or more often, depending on front and open lint screen. Using a vacuum, gently remove any lint that would block the air flow for your clothes, or cause the dryer...
... Installation Instructions. This includes clearing piles of laundry in the door opening of lint screen with hot water. 3. To clean: 1. Use a mild hand dish detergent mixed at a low concentration with very warm water, and rub with a clean towel. From the Exhaust Vent Lint should be removed every 2 years, or more often, depending on front and open lint screen. Using a vacuum, gently remove any lint that would block the air flow for your clothes, or cause the dryer...

Use & Care Guide
Page 13
.... Clean lint screen. Turn off water faucet. 6. Moving Care For power supply cord-connected dryers: 1. Gas models only: Cap the open fuel supply line. 5. Steam models only: Shut off the water supply to the dryer. Unplug dryer or disconnect power. 2. Turn on vacation or not using your dryer for an extended period of time, you will not freeze. For direct-wired dryers: 1. then drain the hose. Unplug dryer or disconnect power. 2. Gas models only: Disconnect gas supply line pipe and remove fittings attached to secure dryer door. Transport hose...
.... Clean lint screen. Turn off water faucet. 6. Moving Care For power supply cord-connected dryers: 1. Gas models only: Cap the open fuel supply line. 5. Steam models only: Shut off the water supply to the dryer. Unplug dryer or disconnect power. 2. Turn on vacation or not using your dryer for an extended period of time, you will not freeze. For direct-wired dryers: 1. then drain the hose. Unplug dryer or disconnect power. 2. Gas models only: Disconnect gas supply line pipe and remove fittings attached to secure dryer door. Transport hose...

Use & Care Guide
Page 14
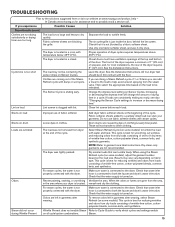
... Sensor cycles. When balled up in the Installation Instructions. The gas supply line valve not open . For gas dryers, make sure that the exhaust vent is normal. Unusual Noise Humming or whining noise Water inlet valve on the gas supply line is clogged with heavy metal or flexible metal vent. Clean space where lint screen is running. Check that the valve on dryer is located, as it opens and closes. This is not too long or has too many turns...
... Sensor cycles. When balled up in the Installation Instructions. The gas supply line valve not open . For gas dryers, make sure that the exhaust vent is normal. Unusual Noise Humming or whining noise Water inlet valve on the gas supply line is clogged with heavy metal or flexible metal vent. Clean space where lint screen is running. Check that the valve on dryer is located, as it opens and closes. This is not too long or has too many turns...
Use & Care Guide
Page 15
... drying times are consistently ending too early, see also "Changing the Sensor Cycle settings to tumble the load with lint. Check that water inlet hose is best for most installations, the rear of the dryer requires 5" (127 mm). All four dryer feet should be in firm contact with the dryer. If loads are too long The load is clogged with water and heat. Lint on some models) to increase or decrease drying time." Select Steam Refresh Cycle (on load Lint screen...
... drying times are consistently ending too early, see also "Changing the Sensor Cycle settings to tumble the load with lint. Check that water inlet hose is best for most installations, the rear of the dryer requires 5" (127 mm). All four dryer feet should be in firm contact with the dryer. If loads are too long The load is clogged with water and heat. Lint on some models) to increase or decrease drying time." Select Steam Refresh Cycle (on load Lint screen...
Use & Care Guide
Page 16
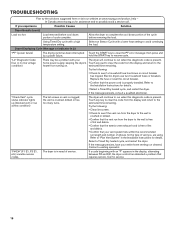
... vent exhaust hood is in need of vent you experience Possible Causes Solution Dryer Results (cont.) Load too hot Load removed before cool down portion of cycle complete. The dryer will continue to the Installation Instructions for details. "F# E#" (F1 E1, F3 E1, etc.) variable service codes. Refer to run when this diagnostic code is present. Select a Timed Dry heated cycle, and restart the dryer. Electric dryers use two household fuses or breakers. Select an Sensor Cycle with a high temperature setting. Allow the dryer...
... vent exhaust hood is in need of vent you experience Possible Causes Solution Dryer Results (cont.) Load too hot Load removed before cool down portion of cycle complete. The dryer will continue to the Installation Instructions for details. "F# E#" (F1 E1, F3 E1, etc.) variable service codes. Refer to run when this diagnostic code is present. Select a Timed Dry heated cycle, and restart the dryer. Electric dryers use two household fuses or breakers. Select an Sensor Cycle with a high temperature setting. Allow the dryer...
Use & Care Guide
Page 17
... God, or use inconsistent with servicing, removal, or replacement of non-genuine Maytag parts or accessories. 6. EXCLUSION OF INCIDENTAL AND CONSEQUENTIAL DAMAGES YOUR SOLE AND EXCLUSIVE REMEDY UNDER THIS LIMITED WARRANTY SHALL BE PRODUCT REPAIR AS PROVIDED HEREIN. Please have other rights that interfere with published user, operator, or installation instructions. 2. In the U.S. and Canada, direct all requests for factory specified parts and repair labor to...
... God, or use inconsistent with servicing, removal, or replacement of non-genuine Maytag parts or accessories. 6. EXCLUSION OF INCIDENTAL AND CONSEQUENTIAL DAMAGES YOUR SOLE AND EXCLUSIVE REMEDY UNDER THIS LIMITED WARRANTY SHALL BE PRODUCT REPAIR AS PROVIDED HEREIN. Please have other rights that interfere with published user, operator, or installation instructions. 2. In the U.S. and Canada, direct all requests for factory specified parts and repair labor to...
Dimension Guide
Page 2
... the right to the outside. 4" (102 mm) diameter vent is required. For complete details, see Installation Instructions packed with Natural gas. WATER (STEAM MODELS ONLY) REQUIREMENTS The dryer must be 1/2" IPS. To determine maximum exhaust length, add one 90° turn inside the dryer. Dimensions are recommended. When acceptable to the gas supplier and local codes, 3/8" approved tubing may be converted to change materials and specifications without notice. ELECTRICAL REQUIREMENTS - Dryer can result. Specifications subject to L.P. Electric models...
... the right to the outside. 4" (102 mm) diameter vent is required. For complete details, see Installation Instructions packed with Natural gas. WATER (STEAM MODELS ONLY) REQUIREMENTS The dryer must be 1/2" IPS. To determine maximum exhaust length, add one 90° turn inside the dryer. Dimensions are recommended. When acceptable to the gas supplier and local codes, 3/8" approved tubing may be converted to change materials and specifications without notice. ELECTRICAL REQUIREMENTS - Dryer can result. Specifications subject to L.P. Electric models...

Warranty Information
Page 1
... of original consumer purchase. All warranty service is installed, operated, and maintained according to instructions attached to or furnished with products not approved by unauthorized service, alteration, or modification of non-genuine Maytag parts or accessories. 6. light bulbs, batteries, air or water filters, preservation solutions, etc.). 5. Discoloration, rust, or oxidation of household electrical or plumbing (i.e. This warranty gives you specific legal rights, and you also may not...
... of original consumer purchase. All warranty service is installed, operated, and maintained according to instructions attached to or furnished with products not approved by unauthorized service, alteration, or modification of non-genuine Maytag parts or accessories. 6. light bulbs, batteries, air or water filters, preservation solutions, etc.). 5. Discoloration, rust, or oxidation of household electrical or plumbing (i.e. This warranty gives you specific legal rights, and you also may not...


