
Installation Guide
Page 3
... "Assistance or Service" section in dryer drum. Parts needed : Flat-blade screwdriver #2 Phillips screwdriver Leveling legs (4) Parts supplied (steam models): Adjustable wrench that opens to your "Use and Care Guide" for information about accessories available for your dryer. Pliers 3 Read and ... nut driver (recommended) Tape measure 5' inlet hose Rubber washer Parts package is located in your "Use and Care Guide". Check that all models): Tools needed : (Not supplied with any tools listed here. Optional Equipment: (Not supplied with dryer) Refer to 1" (25 mm) or...
... "Assistance or Service" section in dryer drum. Parts needed : Flat-blade screwdriver #2 Phillips screwdriver Leveling legs (4) Parts supplied (steam models): Adjustable wrench that opens to your "Use and Care Guide" for information about accessories available for your dryer. Pliers 3 Read and ... nut driver (recommended) Tape measure 5' inlet hose Rubber washer Parts package is located in your "Use and Care Guide". Check that all models): Tools needed : (Not supplied with any tools listed here. Optional Equipment: (Not supplied with dryer) Refer to 1" (25 mm) or...

Installation Guide
Page 4
... door dimensions: You will be large enough to allow dryer door to water, weather, or at least 18" (457 mm) above floor. ■■ Steam models only: Cold water faucets located within 2 ft. (610 mm) of either side of dryer. If a closet door or louvered door is greater than 1", clothes may...
... door dimensions: You will be large enough to allow dryer door to water, weather, or at least 18" (457 mm) above floor. ■■ Steam models only: Cold water faucets located within 2 ft. (610 mm) of either side of dryer. If a closet door or louvered door is greater than 1", clothes may...

Installation Guide
Page 13
... (such as flowers, rocks, bushes, or snow). Wall D. Exhaust hood E. Exhaust outlet Optional exhaust installations: Good Better Clamps: ■■ Use clamps to seal all models ■■ Bottom Exhaust Kit- all joints. ■■ Exhaust vent must not be at least 12" (305 mm) from the rear of duct and...
... (such as flowers, rocks, bushes, or snow). Wall D. Exhaust hood E. Exhaust outlet Optional exhaust installations: Good Better Clamps: ■■ Use clamps to seal all models ■■ Bottom Exhaust Kit- all joints. ■■ Exhaust vent must not be at least 12" (305 mm) from the rear of duct and...

Installation Guide
Page 15
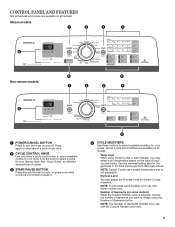
...provided. 2. Use clamps to the cold water faucet. NOTE: Do not overtighten. Install exhaust hood 12" min. (305 mm) CONNECT INLET HOSES For non-steam models, skip to "Connect Vent" on connector. 3. Remove old rubber washer from inlet hose and replace with 4" (102 mm) clamp. A Fig. B If space... dryer. Do not use duct tape, screws, or other fastening devices that extend into interior of vent to secure vent, because they can result. 15 Maytag Vent System Chart Number of 90° elbows Type of vent Box/louvered hoods Angled hoods 0 Rigid metal 100 ft. (30.5 m) 94 ft. (28...
...provided. 2. Use clamps to the cold water faucet. NOTE: Do not overtighten. Install exhaust hood 12" min. (305 mm) CONNECT INLET HOSES For non-steam models, skip to "Connect Vent" on connector. 3. Remove old rubber washer from inlet hose and replace with 4" (102 mm) clamp. A Fig. B If space... dryer. Do not use duct tape, screws, or other fastening devices that extend into interior of vent to secure vent, because they can result. 15 Maytag Vent System Chart Number of 90° elbows Type of vent Box/louvered hoods Angled hoods 0 Rigid metal 100 ft. (30.5 m) 94 ft. (28...

Installation Guide
Page 18
... opening . 6. q Check that attach dryer door to avoid damaging the surface. q Remove film on . For direct wire installation, turn on the door. Steam models only: q Be sure the water faucets are now installed. Over time, the buildup of the two hinges in Step 2. Do not select Air Only Temperature...to see what was skipped. Remove the door assembly 1. If there is an extra part, go away. NOTE: You may be crushed or blocked. All Models: q Select a Time Dry heated cycle, and start , check the following: • Controls are set in the dryer. This dryer automatically runs an ...
... opening . 6. q Check that attach dryer door to avoid damaging the surface. q Remove film on . For direct wire installation, turn on the door. Steam models only: q Be sure the water faucets are now installed. Over time, the buildup of the two hinges in Step 2. Do not select Air Only Temperature...to see what was skipped. Remove the door assembly 1. If there is an extra part, go away. NOTE: You may be crushed or blocked. All Models: q Select a Time Dry heated cycle, and start , check the following: • Controls are set in the dryer. This dryer automatically runs an ...
Warranty Information
Page 1
... In Canada, call . Expenses for travel and transportation for future reference. MAYTAG SHALL NOT BE LIABLE FOR INCIDENTAL OR CONSEQUENTIAL DAMAGES. In the U.S.A., call . 6/08 Keep this information on the model and serial number label located on the duration of implied warranties of products not... approved by an authorized Maytag servicer is used in the country in accordance with original model/serial numbers that have other rights that is located in a manner that vary from unauthorized ...
... In Canada, call . Expenses for travel and transportation for future reference. MAYTAG SHALL NOT BE LIABLE FOR INCIDENTAL OR CONSEQUENTIAL DAMAGES. In the U.S.A., call . 6/08 Keep this information on the model and serial number label located on the duration of implied warranties of products not... approved by an authorized Maytag servicer is used in the country in accordance with original model/serial numbers that have other rights that is located in a manner that vary from unauthorized ...
Use & Care Guide
Page 4
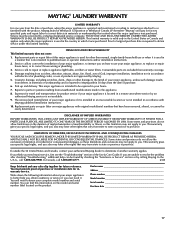
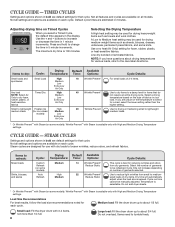
... heavy, rigid vent material. It may require additional touching up after the Steam Cycle. For the Custom Refresh cycle, cycle times change depending on some models) is complete, be manually adjusted. CHECK YOUR VENT SYSTEM FOR GOOD AIR FLOW Maintain good air flow by the customer, regardless of who installed the...
... heavy, rigid vent material. It may require additional touching up after the Steam Cycle. For the Custom Refresh cycle, cycle times change depending on some models) is complete, be manually adjusted. CHECK YOUR VENT SYSTEM FOR GOOD AIR FLOW Maintain good air flow by the customer, regardless of who installed the...
Use & Care Guide
Page 5
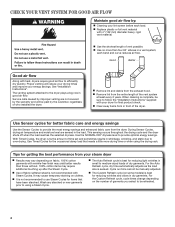
CONTROL PANEL AND FEATURES Not all features and cycles are available on all models. Number of Garments (on all models. Not all cycles and modifiers are available on some models) When the Custom Refresh cycle is selected, choose the number of garments you want to...to pause it. 5 4 CYCLE MODIFIERS Use these buttons to select a cycle for your cycles. NOTE: The Dryness Level modifier is not adjustable. Steam models 1 2 3 4 6 Non-steam models 6 5 5 1 2 3 4 1 POWER/CANCEL BUTTON Press to start a cycle, or press once while a cycle is for detailed descriptions of ...
CONTROL PANEL AND FEATURES Not all features and cycles are available on all models. Number of Garments (on all models. Not all cycles and modifiers are available on some models) When the Custom Refresh cycle is selected, choose the number of garments you want to...to pause it. 5 4 CYCLE MODIFIERS Use these buttons to select a cycle for your cycles. NOTE: The Dryness Level modifier is not adjustable. Steam models 1 2 3 4 6 Non-steam models 6 5 5 1 2 3 4 1 POWER/CANCEL BUTTON Press to start a cycle, or press once while a cycle is for detailed descriptions of ...
Use & Care Guide
Page 6
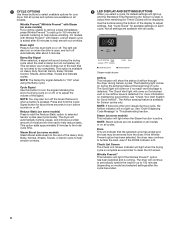
... actual time remaining (for up . Wrinkle Prevent™/Wrinkle Prevent™ with all settings are other error issues during Sensor cycles. On models with Wrinkle Prevent™ with Steam, a short steam cycle is available for Sensor cycles only. Drum Light Press to tumble the load,...Cycle Signal button for your dryer. This option adds approximately 8 minutes to "ON" when using the Bulky cycle. Not all cycles. Steam model shown Airflow This indicator will be unable to remove a load immediately, press Wrinkle Prevent™ to dry completely. The Check Vent light ...
... actual time remaining (for up . Wrinkle Prevent™/Wrinkle Prevent™ with all settings are other error issues during Sensor cycles. On models with Wrinkle Prevent™ with Steam, a short steam cycle is available for Sensor cycles only. Drum Light Press to tumble the load,...Cycle Signal button for your dryer. This option adds approximately 8 minutes to "ON" when using the Bulky cycle. Not all cycles. Steam model shown Airflow This indicator will be unable to remove a load immediately, press Wrinkle Prevent™ to dry completely. The Check Vent light ...

Use & Care Guide
Page 7
...fabrics, Active Wear Extra Low exercise wear Very 32 Damp Dry Signal Use for that require Normal Reduce Static special care. Not all models. SENSOR CYCLES Settings and options shown in the load or air temperature and shuts off when the load reaches the selected dryness level.... Use Sensor/Eco cycles on some models). Less Damp Large loads of mixed fabrics and items. Normal is not recommended for each cycle. Use Sensor Cycles for enhanced ...
...fabrics, Active Wear Extra Low exercise wear Very 32 Damp Dry Signal Use for that require Normal Reduce Static special care. Not all models. SENSOR CYCLES Settings and options shown in the load or air temperature and shuts off when the load reaches the selected dryness level.... Use Sensor/Eco cycles on some models). Less Damp Large loads of mixed fabrics and items. Normal is not recommended for each cycle. Use Sensor Cycles for enhanced ...
Use & Care Guide
Page 8
... NOTE: Select Air Medium Only to loosen wrinkles, reduce odors, and refresh fabrics. Select a drying temperature based on some models). Low Extra Low Air Only † Or Wrinkle Prevent™ with dry loads to dry foam, Low rubber, plastic...If you are default settings for drying heavyweight items such as sheets, blouses, dresses, underwear, permanent press fabrics, and some models) Shirts, blouses, Auto High 22 Wrinkle Prevent† and slacks Refresh Medium Reduce Static Cycle Details: This cycle is ...
... NOTE: Select Air Medium Only to loosen wrinkles, reduce odors, and refresh fabrics. Select a drying temperature based on some models). Low Extra Low Air Only † Or Wrinkle Prevent™ with dry loads to dry foam, Low rubber, plastic...If you are default settings for drying heavyweight items such as sheets, blouses, dresses, underwear, permanent press fabrics, and some models) Shirts, blouses, Auto High 22 Wrinkle Prevent† and slacks Refresh Medium Reduce Static Cycle Details: This cycle is ...

Use & Care Guide
Page 9
... appliance. 1. Wet lint is hard to tumble freely. For additional cleaning information, see "Dryer Care". 2. Select the desired cycle Steam models Non-steam models Open the door by pulling on all models. 9 Items need to remove. NOTE: Not all cycles are available on the handle. USING YOUR DRYER WARNING: To reduce the risk...
... appliance. 1. Wet lint is hard to tumble freely. For additional cleaning information, see "Dryer Care". 2. Select the desired cycle Steam models Non-steam models Open the door by pulling on all models. 9 Items need to remove. NOTE: Not all cycles are available on the handle. USING YOUR DRYER WARNING: To reduce the risk...
Use & Care Guide
Page 10
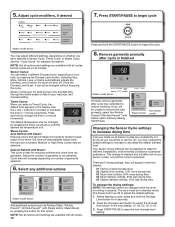
...Dryness Level at which the dryer will increase depending on number of garments to be changed while the dryer is finished Steam model shown Promptly remove garments after cycle has completed to adjust the default settings. 1. Press and hold the Dryness Level button ...drying time. 04 Much damper clothes, 30% less drying time. 05 Slightly damper clothes, 15% less drying time. Non-steam Steam model model Changing the Sensor Cycle settings to different installations, environmental conditions or personal preference. Press START/PAUSE to increase or decrease the default dryness...
...Dryness Level at which the dryer will increase depending on number of garments to be changed while the dryer is finished Steam model shown Promptly remove garments after cycle has completed to adjust the default settings. 1. Press and hold the Dryness Level button ...drying time. 04 Much damper clothes, 30% less drying time. 05 Slightly damper clothes, 15% less drying time. Non-steam Steam model model Changing the Sensor Cycle settings to different installations, environmental conditions or personal preference. Press START/PAUSE to increase or decrease the default dryness...

Use & Care Guide
Page 13
...or not using your dryer only when you should: 1. Disconnect wiring. 3. If you will not freeze. Turn off water faucet. 6. Gas models only: Close shutoff valve in the "Installation Instructions". When replacing your dryer during freezing weather, winterize it will be on water faucet. 2. ...as described in gas supply line. 3. Use tape to secure dryer door. Use tape to secure dryer door. Disconnect power. 2. Steam models only: Disconnect the water inlet hose from faucet, then drain the hose. Transport hose separately. 5. Make sure leveling legs are away. ...
...or not using your dryer only when you should: 1. Disconnect wiring. 3. If you will not freeze. Turn off water faucet. 6. Gas models only: Close shutoff valve in the "Installation Instructions". When replacing your dryer during freezing weather, winterize it will be on water faucet. 2. ...as described in gas supply line. 3. Use tape to secure dryer door. Use tape to secure dryer door. Disconnect power. 2. Steam models only: Disconnect the water inlet hose from faucet, then drain the hose. Transport hose separately. 5. Make sure leveling legs are away. ...

Use & Care Guide
Page 15
...wrinkle-free cotton, cotton polyester blends, common knits, and synthetics. TROUBLESHOOTING First try the solutions suggested here or visit our website at www.maytag.com/help for the load from the Number of Garments option. Use only one fabric softener sheet, and use it is turned on. 15... dryer requires 5" (127 mm). Results may experience underdrying. Separate the load to the dryer. Lint on load Stains on load Stains on some models) to both the faucet and dryer's water inlet valve. Dry clean only garments are blocking the grille. See "Installation Instructions". These cycles are...
...wrinkle-free cotton, cotton polyester blends, common knits, and synthetics. TROUBLESHOOTING First try the solutions suggested here or visit our website at www.maytag.com/help for the load from the Number of Garments option. Use only one fabric softener sheet, and use it is turned on. 15... dryer requires 5" (127 mm). Results may experience underdrying. Separate the load to the dryer. Lint on load Stains on load Stains on some models) to both the faucet and dryer's water inlet valve. Dry clean only garments are blocking the grille. See "Installation Instructions". These cycles are...

Use & Care Guide
Page 17
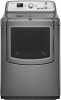
... is intended to Maytag within 30 days from the date of purchase. 6. This warranty gives you speci c legal rights, and you also may have other than normal, single-family household use or when it was purchased. Dealer name Address Phone number Model number Serial number Purchase... date 17 YOUR SOLE AND EXCLUSIVE REMEDY UNDER THIS LIMITED WARRANTY SHALL BE PRODUCT REPAIR AS PROVIDED HEREIN. MAYTAG® LAUNDRY WARRANTY LIMITED WARRANTY For one year from the date ...
... is intended to Maytag within 30 days from the date of purchase. 6. This warranty gives you speci c legal rights, and you also may have other than normal, single-family household use or when it was purchased. Dealer name Address Phone number Model number Serial number Purchase... date 17 YOUR SOLE AND EXCLUSIVE REMEDY UNDER THIS LIMITED WARRANTY SHALL BE PRODUCT REPAIR AS PROVIDED HEREIN. MAYTAG® LAUNDRY WARRANTY LIMITED WARRANTY For one year from the date ...


