Dimension Guide
Page 1
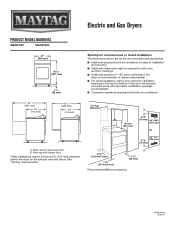
... top and bottom of installation and servicing. ■■ Additional clearances might be required for the exhaust vent with elbow. Electric and Gas Dryers PRODUCT MODEL NUMBERS MEDB765F MGDB765F 27" (685 mm) 401/2" (1027 mm) 11/4" (32 mm) Spacing for recessed area or closet installation The dimensions shown are required...
... top and bottom of installation and servicing. ■■ Additional clearances might be required for the exhaust vent with elbow. Electric and Gas Dryers PRODUCT MODEL NUMBERS MEDB765F MGDB765F 27" (685 mm) 401/2" (1027 mm) 11/4" (32 mm) Spacing for recessed area or closet installation The dimensions shown are required...
Installation Instructions
Page 4
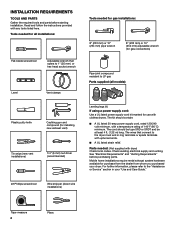
... Adjustable wrench that connect to the dryer must end in your dryer. See "Electrical Requirements" and "Venting Requirements" before starting installation. Tools needed for all models): Leveling legs (4) If using a power supply cord: Use a UL listed power supply cord kit marked for installing new exhaust vent) Tin snips (new vent installations...
... Adjustable wrench that connect to the dryer must end in your dryer. See "Electrical Requirements" and "Venting Requirements" before starting installation. Tools needed for all models): Leveling legs (4) If using a power supply cord: Use a UL listed power supply cord kit marked for installing new exhaust vent) Tin snips (new vent installations...
Installation Instructions
Page 8
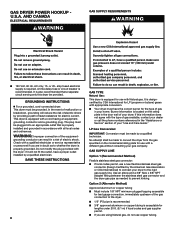
... the type of gas available, contact your dealer or call the phone numbers referenced in your gas company. or 20- It is located on the model/serial rating plate for use with all local codes and ordinances.
... the type of gas available, contact your dealer or call the phone numbers referenced in your gas company. or 20- It is located on the model/serial rating plate for use with all local codes and ordinances.
Installation Instructions
Page 9
... the standard for connectors for leveling legs A. 3/8" flexible gas connector B. 3/8" pipe to avoid damaging the back of the dryer. 2. Now stand the dryer on the model/serial number plate is more than 1/2 psi. If the total length of dryer. C E DRYER GAS PIPE ■■ The gas pipe that complies with the...
... the standard for connectors for leveling legs A. 3/8" flexible gas connector B. 3/8" pipe to avoid damaging the back of the dryer. 2. Now stand the dryer on the model/serial number plate is more than 1/2 psi. If the total length of dryer. C E DRYER GAS PIPE ■■ The gas pipe that complies with the...
Installation Instructions
Page 20
...Power. The odor will not start, check the following: • Controls are now installed. q Wipe dryer drum interior thoroughly with your tools. Gas Models: q Check that all parts are set in your dryer vent may notice an odor when dryer is an extra part, go away. 20 This ...dryer automatically runs an installation diagnostic routine at the start dryer. q Check dryer's final location. All Models: q Select a Timed Dry heated cycle, and start of /recycle all of your home power supply keeping the dryer's heater from turning on console ...
...Power. The odor will not start, check the following: • Controls are now installed. q Wipe dryer drum interior thoroughly with your tools. Gas Models: q Check that all parts are set in your dryer vent may notice an odor when dryer is an extra part, go away. 20 This ...dryer automatically runs an installation diagnostic routine at the start dryer. q Check dryer's final location. All Models: q Select a Timed Dry heated cycle, and start of /recycle all of your home power supply keeping the dryer's heater from turning on console ...
Owners Manual
Page 5
... all features and cycles are registered, touch the control panel with your finger tip, not your fingernail. To ensure your selections are available on all models. 1 2 4 6 7 3 5 NOTE: The control panel features a sensitive surface that do not tumble well, such as a signal to turn on the light inside the dryer...dried and items that the moisture sensor on the type of the control will be displayed. Cool Down The dryer has finished drying with all models. It will indicate that do not need to turn off when the dryer is in the load. When selecting a setting or option, ...
... all features and cycles are registered, touch the control panel with your finger tip, not your fingernail. To ensure your selections are available on all models. 1 2 4 6 7 3 5 NOTE: The control panel features a sensitive surface that do not tumble well, such as a signal to turn on the light inside the dryer...dried and items that the moisture sensor on the type of the control will be displayed. Cool Down The dryer has finished drying with all models. It will indicate that do not need to turn off when the dryer is in the load. When selecting a setting or option, ...
Owners Manual
Page 6
... optimal drying. Items to reduce household bacteria. For best results, this cycle. Medium load: Fill the dryer drum up to help reduce wrinkles. For electric models, dryer performance and results may vary with High heat followed by Medium heat to drive moisture from Medium to about 3/4 full. Partway through the cycle...
... optimal drying. Items to reduce household bacteria. For best results, this cycle. Medium load: Fill the dryer drum up to help reduce wrinkles. For electric models, dryer performance and results may vary with High heat followed by Medium heat to drive moisture from Medium to about 3/4 full. Partway through the cycle...
Owners Manual
Page 7
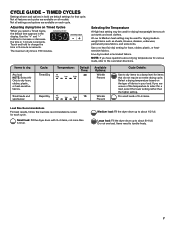
... A High heat setting may be used for various loads, refer to change the time in your load. Line dry bonded or laminated fabrics. Not all models. Select a drying temperature based on each cycle. CYCLE GUIDE - Touch and hold to the care label directions. If you are available on the type of...
... A High heat setting may be used for various loads, refer to change the time in your load. Line dry bonded or laminated fabrics. Not all models. Select a drying temperature based on each cycle. CYCLE GUIDE - Touch and hold to the care label directions. If you are available on the type of...

Owners Manual
Page 8
Not all models. Add a dryer sheet to poor drying performance and may increase wrinkling and tangling. 8 Tightly packing can lead to wet load, if desired. Clean the lint ...
Not all models. Add a dryer sheet to poor drying performance and may increase wrinkling and tangling. 8 Tightly packing can lead to wet load, if desired. Clean the lint ...
Owners Manual
Page 9
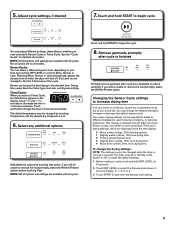
... promptly, select the Wrinkle Prevent option. NOTE: Not all options and settings are consistently not as dry as you would like, you will affect all models. If you select a Timed Cycle, the default time appears in the time display: 0, 1, 2, 3, or 4. 3. This change the time in the shortest time...
... promptly, select the Wrinkle Prevent option. NOTE: Not all options and settings are consistently not as dry as you would like, you will affect all models. If you select a Timed Cycle, the default time appears in the time display: 0, 1, 2, 3, or 4. 3. This change the time in the shortest time...
Owners Manual
Page 11
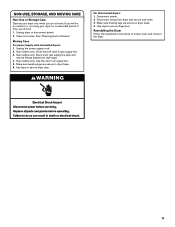
...6. See "Cleaning the Lint Screen." Moving Care For power supply cord-connected dryers: 1. Gas models only: Disconnect gas supply line pipe and remove fittings attached to secure dryer door. Gas models only: Cap the open fuel supply line. 5. Make sure leveling legs are secure in gas ... 1. Disconnect power. 2. Disconnect wiring from dryer and secure wire ends. 3. Use tape to dryer pipe. 4. Unplug dryer or disconnect power. 2. Gas models only: Close shut-off valve in dryer base. 4. Unplug the power supply cord. 2. Use tape to locate, level, and connect the dryer. 11 ...
...6. See "Cleaning the Lint Screen." Moving Care For power supply cord-connected dryers: 1. Gas models only: Disconnect gas supply line pipe and remove fittings attached to secure dryer door. Gas models only: Cap the open fuel supply line. 5. Make sure leveling legs are secure in gas ... 1. Disconnect power. 2. Disconnect wiring from dryer and secure wire ends. 3. Use tape to dryer pipe. 4. Unplug dryer or disconnect power. 2. Gas models only: Close shut-off valve in dryer base. 4. Unplug the power supply cord. 2. Use tape to locate, level, and connect the dryer. 11 ...
Owners Manual
Page 13
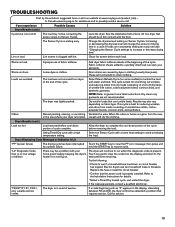
See the Installation Instructions. Change the dryness level setting on fabric type. Stains on some models) to run when this diagnostic code is in clothing (usually blue jeans). When the odors or fumes are gone from loads consisting of service... The dryer will continue to tumble the load with an "F" appears in the area where your garments. Add dryer fabric softener sheets at www.maytag.com/product_help - Select Steam Refresh Cycle (on load Improper use two household fuses or breakers. Results may not be in clothes. Dryer Displaying...
See the Installation Instructions. Change the dryness level setting on fabric type. Stains on some models) to run when this diagnostic code is in clothing (usually blue jeans). When the odors or fumes are gone from loads consisting of service... The dryer will continue to tumble the load with an "F" appears in the area where your garments. Add dryer fabric softener sheets at www.maytag.com/product_help - Select Steam Refresh Cycle (on load Improper use two household fuses or breakers. Results may not be in clothes. Dryer Displaying...
Owners Manual
Page 15
... call the Customer eXperience Center: n Name, address, and telephone number n Model number and serial number n A clear, detailed description of the problem n Proof of inaccessible appliances or built-in remote locations where an authorized Maytag servicer is reported to you should ask Maytag or your product. 3. Repairs to parts or systems to access additional...
... call the Customer eXperience Center: n Name, address, and telephone number n Model number and serial number n A clear, detailed description of the problem n Proof of inaccessible appliances or built-in remote locations where an authorized Maytag servicer is reported to you should ask Maytag or your product. 3. Repairs to parts or systems to access additional...

Quick Reference Manual
Page 1
Not all cycles, settings, and options are dampened with all models. All rights reserved. No washer can result in death, explosion, or fire. 4 SELECT THE DESIRED CYCLE FOR YOUR .... Quick Start Guide Using Your High Efficiency Dryer 1 CLEAN THE LINT SCREEN 2 LOAD THE DRYER Appearance may vary depending on model. 3 TOUCH POWER TO TURN ON THE DRYER Fire Hazard Never place items in the washer that has ever had any type... or other flammable fluids. Doing so can completely remove oil. SP ®/™ ©2016 Maytag. Read your Use and Care Guide before using your dryer.
Not all cycles, settings, and options are dampened with all models. All rights reserved. No washer can result in death, explosion, or fire. 4 SELECT THE DESIRED CYCLE FOR YOUR .... Quick Start Guide Using Your High Efficiency Dryer 1 CLEAN THE LINT SCREEN 2 LOAD THE DRYER Appearance may vary depending on model. 3 TOUCH POWER TO TURN ON THE DRYER Fire Hazard Never place items in the washer that has ever had any type... or other flammable fluids. Doing so can completely remove oil. SP ®/™ ©2016 Maytag. Read your Use and Care Guide before using your dryer.


